 07-13-2016, 03:47 PM
|
#21
|
|
Registered User
Join Date: Jun 2016
Location: Detroit
Posts: 211
|
Quote:
Originally Posted by LEJ

Disaster, I just ordered the 7200 model from Jet.com After their "triple discount" First 3 orders you get 15% off each order. it came to $808.63 Also ordered the fascia/mount from Suncoast.
|
Looks like the two differences from the 6200 to 7200 are the CF slot and Android CarPlay. I might have spent the additional $120 bucks for CarPlay if I could have found a deal on the 7200.
|

|

|
|
07-13-2016, 03:51 PM
|
#22
|
|
Registered User
Join Date: Jun 2016
Location: Detroit
Posts: 211
|
After living with this head unit a few weeks I have to say I'm very impressed. The only thing I miss on the GPS is the actual street names or exit #'s being spoken. It has been a few years since I had a GPS that didn't do that. It takes some time to get used to the weird language it uses...obviously not programmed by a U.S. English speaker. For example, it says "leave the highway" instead of "exit on the right."
I like the way it shows you the house numbers on each side of you as you drive down a road. I can remember on many occasions looking for house numbers to find an exact address. The traffic radio is nice too. It guided me around a jam on my last road trip.
Last edited by Disaster; 07-13-2016 at 05:00 PM.
|
|
|
|
|
07-13-2016, 04:16 PM
|
#23
|
|
Registered User
Join Date: Jun 2016
Location: Ontario, California
Posts: 105
|
CD is short for Carbon Dioxide. Needs to be changed on a regular basis, preferably when you change oil and filter 
|
|
|
|
|
07-13-2016, 05:05 PM
|
#24
|
|
Registered User
Join Date: Jun 2016
Location: Detroit
Posts: 211
|
Quote:
Originally Posted by LEJ
CD is short for Carbon Dioxide. Needs to be changed on a regular basis, preferably when you change oil and filter |
Have you decided how you are going to handle cable management? I used to just have them coming out on the passenger side (2 USB and the aux) but that was a mess. I decided to order the Porsche 996.552.253.01 cubby to replace the carbon dioxide holder and route them through there.

|
|
|
|
|
07-13-2016, 08:16 PM
|
#25
|
|
Registered User
Join Date: Jun 2016
Location: Ontario, California
Posts: 105
|
I already had that cubby hole. I started to have problems and decided to remove the radio. The crimps provided by Pioneer are total CRAP. The ground wire came loose from the crimp as well as the 12V constant source wire. Threw away all the crimps and used unshielded butt connectors with heat shrink tube over each connection. I have an extension cord plugged into the brown rear view camera RCA slot as well as a wire that I guess will eventually go to the reverse lights on the car all in anticipation of buying a rear view camera as you did. Those wires including the USB cable are tucked behind the cubby hole piece and when needed, I don't have to remove the radio just pull out the cubby hole and route wires.
My car originally had the Porsche radio, Remote trunk mounted CD changer and the amplifier piece in the stack where the radio now goes. The former owner removed the Porsche Radio and installed a 1 din Pioneer radio that worked OK but the only feature was bluetooth. For my fitment, I Moved the A/C unit to the bottom where the amplifier piece was and then tucked the amplifier behind the A/C unit as suggested by Suncoast Porsche.
The 'cubby' hole is between the A/C unit and the radio. All in all, it looks great.
By the way, I was able to get the Porsche logo to show up as a "Background" once the wiring issue was solved.
Last edited by LEJ; 07-13-2016 at 08:19 PM.
|
|
|
|
|
07-13-2016, 10:41 PM
|
#26
|
|
Registered User
Join Date: Jun 2016
Location: Detroit
Posts: 211
|
Quote:
Originally Posted by LEJ
I already had that cubby hole. I started to have problems and decided to remove the radio. The crimps provided by Pioneer are total CRAP. The ground wire came loose from the crimp as well as the 12V constant source wire. Threw away all the crimps and used unshielded butt connectors with heat shrink tube over each connection. I have an extension cord plugged into the brown rear view camera RCA slot as well as a wire that I guess will eventually go to the reverse lights on the car all in anticipation of buying a rear view camera as you did. Those wires including the USB cable are tucked behind the cubby hole piece and when needed, I don't have to remove the radio just pull out the cubby hole and route wires.
My car originally had the Porsche radio, Remote trunk mounted CD changer and the amplifier piece in the stack where the radio now goes. The former owner removed the Porsche Radio and installed a 1 din Pioneer radio that worked OK but the only feature was bluetooth. For my fitment, I Moved the A/C unit to the bottom where the amplifier piece was and then tucked the amplifier behind the A/C unit as suggested by Suncoast Porsche.
The 'cubby' hole is between the A/C unit and the radio. All in all, it looks great.
|
It cost me $45 bucks to buy a used cubby. Gotta love Porsche prices. On the other hand, I was able to sell the old radio and manual for $400 which lowered the upgrade cost.
If you want the reverse camera to operate automatically you'll need to wire that reverse wire to the radio reverse pickup line. I found the easiest routing to the back alongside the center console, then tucked under the base of the carpet behind the seat and up behind the seat belt cover. From there I went over the inside of the roll bar and just under the foam engine bay trim. At the back edge of the engine it comes out and goes into the trunk right around where there is an electrical cable by the convertible top transmission cable.
Couldn't figure out how to even use those stupid connectors from Pioneer. Threw them in the trash and used twist on connectors. In all the pushing and sliding I managed to strip a speaker wire. I only found it when I went back in to install the camera. It is tight back there behind the radio with all those wires.
I use the USB cables all the time to charge phone's and for Apple CarPlay.
Can you post pics of your install?
Last edited by Disaster; 07-13-2016 at 10:44 PM.
|
|
|
|
|
07-14-2016, 02:34 AM
|
#27
|
|
Registered User
Join Date: Jun 2016
Location: Ontario, California
Posts: 105
|
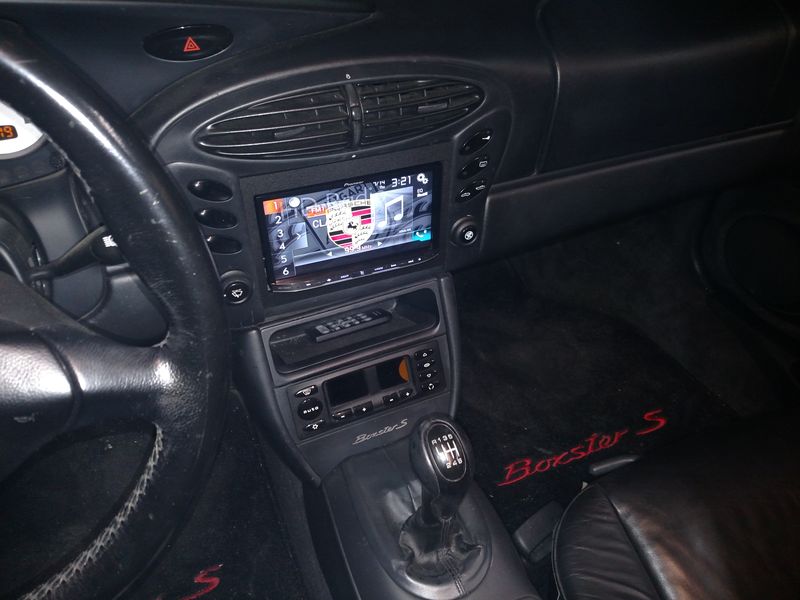
Not really much to see, very similar to your installation. The previous Pioneer radio had a hand held remote control which interestingly works with the 7200. You can see it stuffed in the cubby hole.

|
|
|
|
|
07-14-2016, 03:34 AM
|
#28
|
|
Registered User
Join Date: Jun 2016
Location: Detroit
Posts: 211
|
Quote:
Originally Posted by LEJ
Not really much to see, very similar to your installation. The previous Pioneer radio had a hand held remote control which interestingly works with the 7200. You can see it stuffed in the cubby hole.
|
Nice looking car. Wheels standard or coated? Now I understand how the higher level radios advertise a bigger screen...move the controls to the bottom and widen it.
BTW, you can get replacement LCD screens for that climate control and they aren't difficult to fix. Kit comes with instructions. First job I cut my teeth on when I bought my car.
 97 98 99 00 01 02 03 04 Porsche Climate Control New LCD Repair Kit | eBay 97 98 99 00 01 02 03 04 Porsche Climate Control New LCD Repair Kit | eBay
Last edited by Disaster; 07-14-2016 at 03:37 AM.
|
|
|
|
|
07-14-2016, 03:37 AM
|
#29
|
|
Registered User
Join Date: Jun 2016
Location: Ontario, California
Posts: 105
|
The wheels seem to be powder coated. What's wrong with my climate control?
|
|
|
|
|
07-14-2016, 04:50 AM
|
#30
|
|
Registered User
Join Date: May 2015
Location: Sydney, Australia
Posts: 335
|
"What's wrong with my climate control?" ... The big orange blob on the right, looks like the lcd's leaked, you can replace it with the kit @Disaster linked to.
Last edited by oldskool73; 07-14-2016 at 04:50 AM.
Reason: typos
|
|
|
|
|
07-14-2016, 04:55 AM
|
#31
|
|
Registered User
Join Date: Sep 2013
Location: Montreal, QC. (currently expat to Shanghai)
Posts: 3,249
|
Way! absolutely stunning roaster man, special color... lucky u
love the Din radio also
And like yourself possibly, couldn't care less about the CC. They are so ugly broken or not. Just spray paint it lolll
__________________
______________________________
'97 Boxster base model 2.5L, Guards Red/Tan leather, with a new but old Alpine am/fm radio.
|
|
|
|
|
07-14-2016, 05:00 AM
|
#32
|
|
Registered User
Join Date: Jun 2016
Location: Ontario, California
Posts: 105
|
Well, I did just order the replacement LCD screens for the Climate Control. The car's paint is factory Orient Red. (at least that's what the tag says)
|
|
|
|
|
07-14-2016, 05:20 AM
|
#33
|
|
Registered User
Join Date: Sep 2013
Location: Montreal, QC. (currently expat to Shanghai)
Posts: 3,249
|
You need to load a dark theme to this unit. E.g. dark 10% gray background/wallpaper with a platinum color porsche shield (Orient Red red horse in the very center). Too many colors in the dash imo.
That'd fit your car style great I think! Should help during night driving also
__________________
______________________________
'97 Boxster base model 2.5L, Guards Red/Tan leather, with a new but old Alpine am/fm radio.
|
|
|
|
|
07-14-2016, 08:33 AM
|
#34
|
|
Registered User
Join Date: Jun 2016
Location: Ontario, California
Posts: 105
|
I'm still experimenting with theme colors etc. Can't change the Porsche logo but if I find another it can be loaded into the radio's memory
|
|
|
|
|
07-14-2016, 09:08 AM
|
#35
|
|
Registered User
Join Date: Sep 2013
Location: Montreal, QC. (currently expat to Shanghai)
Posts: 3,249
|
interesting, was sure we could upload whatever wallpaper to these 2Dins units. Just this one or they are all the same? Presets? (admit, never owned such great multimedia in any of my cars).
Was thinking in the line of below, sthing like that anyway (porsche plastic color loll)

__________________
______________________________
'97 Boxster base model 2.5L, Guards Red/Tan leather, with a new but old Alpine am/fm radio.
|
|
|
|
|
07-14-2016, 12:31 PM
|
#36
|
|
Registered User
Join Date: Jun 2016
Location: Detroit
Posts: 211
|
Quote:
Originally Posted by Nine8Six
interesting, was sure we could upload whatever wallpaper to these 2Dins units. Just this one or they are all the same? Presets? (admit, never owned such great multimedia in any of my cars).
Was thinking in the line of below, sthing like that anyway (porsche plastic color loll)
|
You can upload whatever you want. Need to get the aspect ratio right. I agree the factory color schemes are too busy with too many colors. Not sure if one can tone all the colors or not. Maybe there is a monotone grey scheme that allows it.
|
|
|
|
|
07-15-2016, 04:05 AM
|
#37
|
|
Registered User
Join Date: Sep 2013
Location: Montreal, QC. (currently expat to Shanghai)
Posts: 3,249
|
Thx for the info.
Always wanted to upgrade to 2din myself... need nav assist and always wanted to revamp the console anyway. Just undecided who will be changing my 4x speakers as I want to do this first.
I like your setup a lot
__________________
______________________________
'97 Boxster base model 2.5L, Guards Red/Tan leather, with a new but old Alpine am/fm radio.
|
|
|
|
|
07-15-2016, 04:50 AM
|
#38
|
|
Registered User
Join Date: Jun 2016
Location: Ontario, California
Posts: 105
|
As Disaster said, you can upload wallpaper and I just found a setting that allows you to vary the tones on the theme, kind of like an equalizer scale. I haven't played around with yet as I'm busy installing a rear view camera similar to the one Disaster installed. Fortunately I thought ahead and the wires for the rear view camera are tucked away behind the dash mounted cubby hole. That just pops out for easy access to those wires. The hard part (not really hard, just time consuming) is running the wires from the dash to the rear of the cars trunk.
I hold Disaster personally responsible for me spending money on my car. If he hadn't posted photo's of his radio, I'd be $1050.00 richer (radio, 2din installation kit, camera)
|
|
|
|
|
07-15-2016, 04:28 PM
|
#39
|
|
Registered User
Join Date: Jun 2016
Location: Ontario, California
Posts: 105
|
Got the rear camera hooked up today. It's a barrel of monkeys trying to fish wires from the trunk to the radio but I got it done and nothing visible. It actually works great.
|
|
|
|
|
07-15-2016, 06:40 PM
|
#40
|
|
Registered User
Join Date: Jun 2016
Location: Detroit
Posts: 211
|
Quote:
Originally Posted by LEJ
Got the rear camera hooked up today. It's a barrel of monkeys trying to fish wires from the trunk to the radio but I got it done and nothing visible. It actually works great.
|
Yes it is. It was a bit easier in my case because I was removing the rear bumper cover anyway. That exposed everything so it was easy to thread the cable through the license plate light wiring grommet. It was lucky to find an unused hole, from the trunk, to the engine compartment. I added a grommet to that one so the cable wouldn't abrade on the metal edge.
It was a bit of a PITA to route the cable along the side of the seat because I didn't have the proper Torx socket to remove the seat and I had to squeeze my fingers down beside it.
Loving having the backup camera installed. I don't mind the extra set of marks, the ones built into the camera, and the ones for the Pioneer. The camera ones are thicker and easier to see. The pioneer ones can be adjusted for perfect placement.
|
|
|
|
 Posting Rules
|
You may not post new threads
You may not post replies
You may not post attachments
You may not edit your posts
HTML code is On
|
|
|
All times are GMT -8. The time now is 07:59 PM.
| |


 Linear Mode


