 06-22-2016, 03:36 PM
|
#1
|
|
Registered User
Join Date: Apr 2016
Location: Tannersville PA
Posts: 471
|
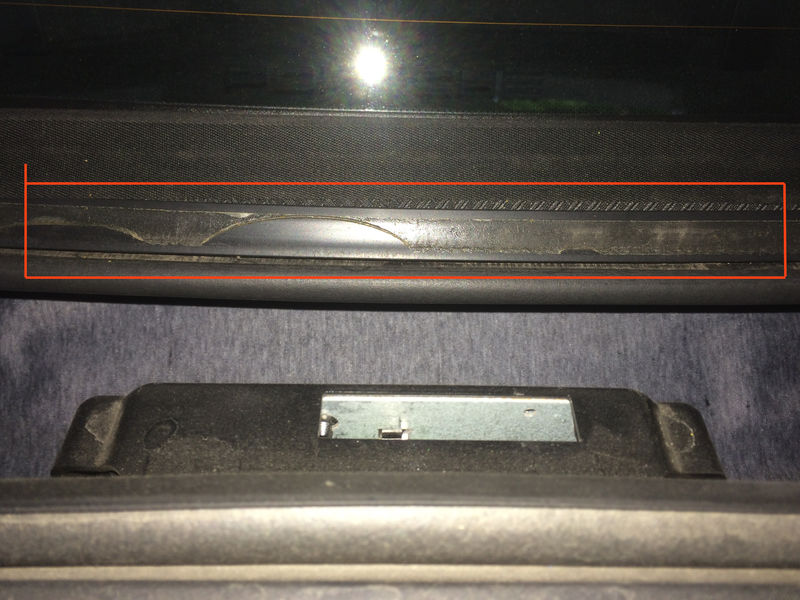
Convertible Top Ungluing?
My top started to look loose when upo so I found this........this is below the rear glass and runs the length of the top.
Can this be reglued? Can I do it? What type of glue? Should a Auto Upholstery shop do it? Thanks in advance
|

|

|
|
06-22-2016, 04:26 PM
|
#2
|
|
Registered User
Join Date: Dec 2014
Location: Pacific Grove, CA
Posts: 494
|
Mine did the same and I just used a general heavy duty contact cement. It's been a couple of years and it hasn't come unglued again. It's just a PITA to get to. 
|
|
|
|
|
10-17-2017, 04:28 PM
|
#3
|
|
Registered User
Join Date: Apr 2017
Location: Indiana
Posts: 1,512
|
Quote:
Originally Posted by Luv2Box

Mine did the same and I just used a general heavy duty contact cement. It's been a couple of years and it hasn't come unglued again. It's just a PITA to get to. |
Did you have to dismantle It or just pull It out apply the glue and tuck it back in the slot?
|
|
|
|
|
10-18-2017, 05:26 PM
|
#4
|
|
Need For Speed
Join Date: Feb 2013
Location: Funville
Posts: 2,114
|
Quote:
Originally Posted by JBauer
Did you have to dismantle It or just pull It out apply the glue and tuck it back in the slot?
|
Mine came loose at the same spot. I used the following glue.
https://www.amazon.com/Q-Bond-QB2-Q-Bond-Repair/dp/B00HX704NG/ref=sr_1_1?s=automotive&ie=UTF8&qid=1508372282&sr=1-1&keywords=Q-Bond+QB2+Repair+Kit
Just pulled the top back in place as good and tight as I could in the center and laid down some of this glue in the center area to tack it in spot. It dries quick and holds very strong. Then I followed along the rest of the loose area applying the glue while stretching the top into place. It only takes this glue about 20 seconds or less of you holding the top in place and it's done. Has not came loose since.
__________________
2003 Boxster S
| 987 Air Box | K&N Air Filter | 76mm Intake Pipe| 996 76mm TB | 997 Distribution T | Secondary Cat Delete Pipes | Borla Muffler | NHP 200 Cell Exhaust Headers |
|
|
|
|
|
06-22-2016, 06:50 PM
|
#5
|
|
Registered User
Join Date: Apr 2016
Location: Tannersville PA
Posts: 471
|
Great thanks
|
|
|
|
|
06-22-2016, 07:16 PM
|
#6
|
|
Multi-Boxer Driver
Join Date: Nov 2010
Location: Orange Park, FL
Posts: 1,434
|
There's a specific 3M double-side tape to be used here. I did this repair on mine a few years ago and it's held perfectly. It's the same type as used in the factory. I'll try to find the product ID for you.
__________________
-Chris
2004 Porsche Boxster 2.7 (gone  )
2004 Porsche 911 C4S Cab
1991 Porsche 911 C2 Targa 3.6
2017 Subaru Outback 3.6R
|

|
|
|
10-17-2017, 04:32 PM
|
#7
|
|
Registered User
Join Date: Apr 2017
Location: Indiana
Posts: 1,512
|
Quote:
Originally Posted by Deserion
There's a specific 3M double-side tape to be used here. I did this repair on mine a few years ago and it's held perfectly. It's the same type as used in the factory. I'll try to find the product ID for you.
|
Did you have to take it apart, remove the rubber, to apply the tape?
|
|
|
|
|
10-18-2017, 04:48 AM
|
#8
|
|
Multi-Boxer Driver
Join Date: Nov 2010
Location: Orange Park, FL
Posts: 1,434
|
Quote:
Originally Posted by JBauer
Did you have to take it apart, remove the rubber, to apply the tape?
|
I believe that I did, yes. Used a plastic trim tool to aid reinsertion of the seals.
__________________
-Chris
2004 Porsche Boxster 2.7 (gone )
2004 Porsche 911 C4S Cab
1991 Porsche 911 C2 Targa 3.6
2017 Subaru Outback 3.6R
|
|
|
|
|
10-18-2017, 05:59 AM
|
#9
|
|
Registered User
Join Date: Apr 2013
Location: Lincolnshire, IL
Posts: 575
|
In my case, I decided to replace the entire top, since it was 20 years old and was showing overall general signs of "old age". That rear glue seam along with a couple of areas indicated it was just wearing out. $1,700 later all is great.
|
|
|
|
|
10-20-2017, 05:48 AM
|
#10
|
|
Registered User
Join Date: Apr 2009
Location: MD
Posts: 268
|
Quote:
Originally Posted by Deserion
I believe that I did, yes. Used a plastic trim tool to aid reinsertion of the seals.
|
Can you describe this tool for me and maybe provide a picture?
|
|
|
|
|
06-29-2016, 08:39 AM
|
#11
|
|
Registered User
Join Date: Oct 2015
Location: Rockland Ontario
Posts: 208
|
The product is 3M 06384 adhesive tape.
__________________
Frank
|
|
|
|
|
06-29-2016, 09:09 AM
|
#12
|
|
Registered User
Join Date: Apr 2016
Location: Tannersville PA
Posts: 471
|
That is what I used and it is all fixed....thanks very much.
Bob
|
|
|
|
|
10-17-2017, 04:30 PM
|
#13
|
|
Registered User
Join Date: Apr 2017
Location: Indiana
Posts: 1,512
|
Quote:
Originally Posted by achillies
That is what I used and it is all fixed....thanks very much.
Bob
|
Could you go through the process? I've got the same problem.
|
|
|
|
|
10-18-2017, 02:39 PM
|
#14
|
|
Registered User
Join Date: Apr 2016
Location: Tannersville PA
Posts: 471
|
I had it come loose again with the contact cement so I switched to the 3M tape. Honestly, I just put on the tape...peel the top and just yank the top over it as far as I can get it to go. I assume that eventually it will pull back off but for the cost of the tape I can do it yearly or so.
There are some YouTube videos that show the correct process and how to clip the moulding into the retainer etc.
|
|
|
|
|
10-18-2017, 04:50 PM
|
#15
|
|
Registered User
Join Date: Apr 2017
Location: Indiana
Posts: 1,512
|
Quote:
Originally Posted by achillies
I had it come loose again with the contact cement so I switched to the 3M tape. Honestly, I just put on the tape...peel the top and just yank the top over it as far as I can get it to go. I assume that eventually it will pull back off but for the cost of the tape I can do it yearly or so.
There are some YouTube videos that show the correct process and how to clip the moulding into the retainer etc.
|
Thanks everyone. This is a really good video on the subject.
https://www.youtube.com/watch?v=40BXEt07fGU
|
|
|
|
 Posting Rules
|
You may not post new threads
You may not post replies
You may not post attachments
You may not edit your posts
HTML code is On
|
|
|
All times are GMT -8. The time now is 09:48 AM.
| |


 Mena
Mena My car
 Boxster
 2003 Boxster S
 Hybrid Mode


