Quote:
Originally Posted by Gelbster

Stelan,
Your custom design is very interesting because the AOS failure is a frequent issue here.
Can you share your design idea with us?
One other member used some BMW parts, some have modified 'catch cans' with or w/o the AOS. I have a project to replace the Buna diaphragm with a Viton piece. But nobody(yet) has an effective improvement for the AOS.
Yes, the "Motorsports" version is better but it is larger and more difficult/impossible to fit for the average DIY guy.
So tell us about your creation please?
|
I travel almost half of the year supervising companies overseas so I will describe it with words until I get back to take some pictures as I'm about 3k miles from my car at the moment.
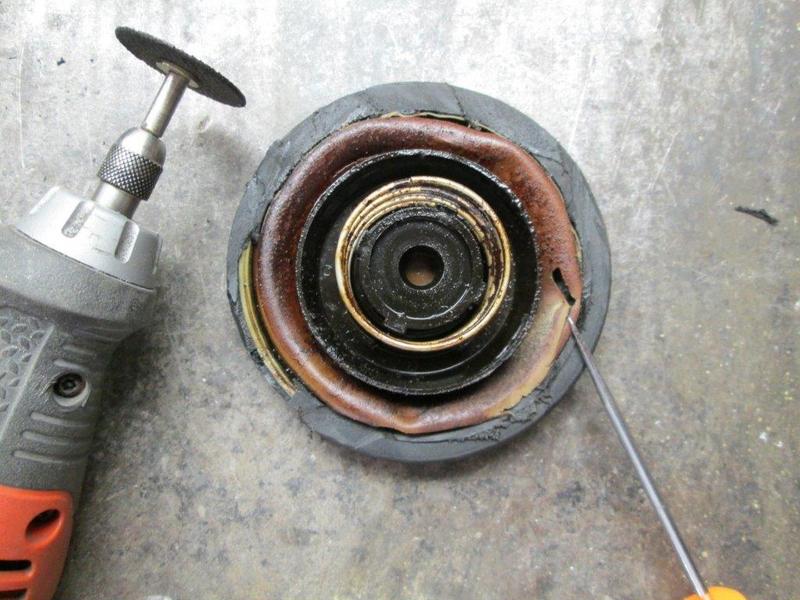
First I removed and dissected the original AOS which was not bad but it was getting my intake and idle control valve oily, this is what I found to be wrong in my opinion:
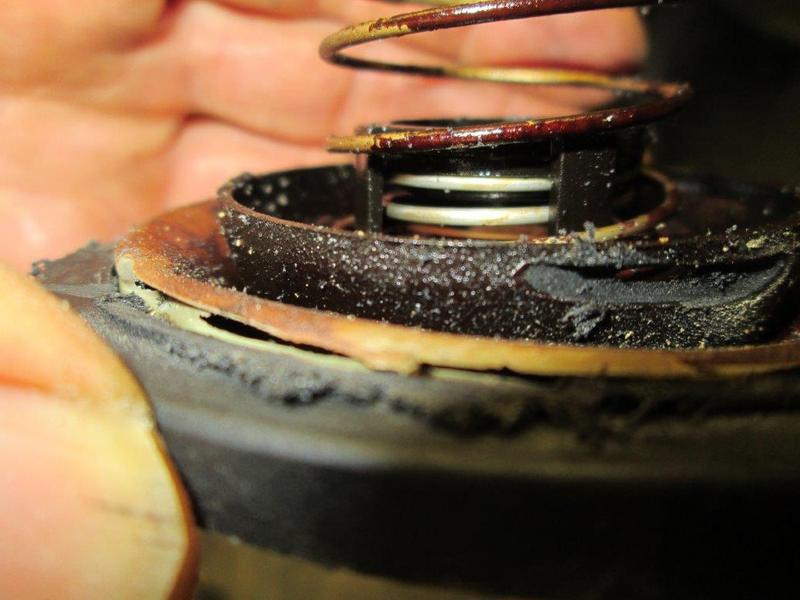
a) The actual bottom of the AOS is just an empty half a swirl cavity, this is the part that separates the oil, not the diaphragm. and it does it halfway as it is just a half a swirl.
b) there are 2 openings at the bottom of the AOS, one is the inlet in which the accordion large hose attaches to and small oil return to drain oil back into the block
notice that the small one is too small to actually drain oil at a good rate once the diaphragm starts to fail or other circumstances make the oil to start overwhelming the AOS capacity (oil quality, viscosity, humidity, etc).
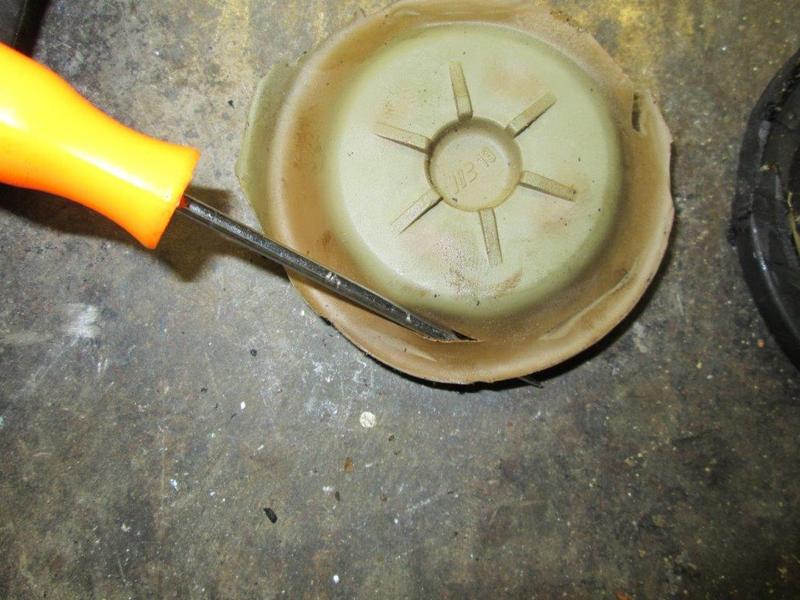
c) the diaphragm is sideways (vertical) this creates a problem as oil sticks to it and makes it degrade faster
d) the plastic tubes, and I mean all of them including the j-tube to the throttle body, the one from the drivers side block vent to the AOS are brittle and crap, as they crack just by looking at them. (specially in an old 986 like mine), not to mention the plastic tubes for the dipstick and remote oil fill. (I got rid of those too but that is another story)
e) there is a little check valve in the tip of the driver's side block vent that also starts blowing oil when the system fails and it gets oil all over your drivers side part of the engine.
Here is how I fixed, like I said I will post pics eventually but I hope this does for now
I purchased a 1 quart stainless steel (aluminum will work too) cylindrical container with a screw on cap, the cap is the size of the entire opening, I welded 3 bungs at the bottom, at the same level, meaning at the bottom, two were 1" and one was 1/4 npt
Then I took a long 1" rubber hose and ran it from one bung of the container to the vent fitting on the drivers side of the engine and clamped, I also capped the check valve opening on this fitting.
Then a very short section of the hose from the second bung from the container and installed right over the original AOS location tube coming straight up from the block (where the accordion rubber boot connected originally).
Then a small 1/4" hose to a piece of tubing that I machined a couple of slots and installed orings and inserted into the small block opening where the small fitting used to be.
placed a stainless steel mesh on the inside bottom of the container, then filled with washed and rinsed stainless steel wool, (use the heavy duty one not the fine one that may break and get pieces of ss into the block) I tested the one I use by pulling and compressing and basically distressing it and it did not flake or break).
then another stainless steel mesh disk on top of the ss wool.
Then I drilled the cap and installed a grommet to accept a standard vw PCV valve (which is exactly a diaphragm like the one we are replacing) one from a vr6 I believe is the one I purchased for about 16 or 20 bucks but you can use from a volvo or a vw1.8t. and connected another section of 1" rubber hose from the pcv valve to the throttle body to replace the j-tube and clamps
After 3k mile trip the inside of the intake, throttle body, etc are dry as dry can be.
This are the benefits I see.
- Next time the diaphragm fails it will cost me a few bucks and it takes 2 minutes to change.
- the thousands of swirls that the steel wool provides to condensate and separate the oil from the vapor are way more efficient than a single empty swirl cavity in the OEM AOS
-I can open the can anytime to see what's going on inside every oil change, last time I checked after that long trip only the bottom part of the ss wool was a little oily.
-I actually got rid of the remote oil fill in the trunk and long dipstick at the same time as they were bad as well, I installed a freeze plug on the top and now I fill my oil thru this new AOS can. and I fabricated a new short dipstick that is marked every quart exactly. I got rid of many potential vacuum and oil leaks all at the same time.
(one disavantage of this is that I have to open the engine cover if I want to chek my oil level but the good thing is that my dash gauge is calibrated accurately)
- My new redneck AOS actually pulls vapor thru all 3 openings in the engine and it drains oil thru ALL 3 of them too so the container will never fill up. (versus the OEM AOS with it's small drain).
- By replacing all plastic tubes with rubber hoses the crack-prone and vacuum leaks are virtually eliminated (and by instaling clamps and not o-ring clips as OEM too)
-The main function of the diaphragm (glorified PCV) is to let vapor go from the inside of the engine block back into the intake where it will be burned. but has to do this at a certain pace and under certain conditions:
1 - when idle (high intake vacuum) the diaphragm closes so the engine does not sees this a vacuum leak. (that's why many bad AOS's give you a CEL and rough idle.)
2- under load (medium intake vacuum) open and closing to let most of the vapors go thru and burn.
3 - Cruising (no intake vacuum) completely open so all fumes get burned.
Another way of doing this is to take the hose from the top of the container (without pcv valve) and instead of running to the throttle body, run it to your air filter box, then you are completely bypassing the problem and you will never need a new diaphragm anymore (you will need to plug shut the throttle body opening)
Regardless you need tu pull fumes from the engine block to keep your oil healty and to avoid pressure build up tha causes oil leaks at the IMS, MBS, spark plug tubes, etc.
So that's it
Steve


 Growly Grannis/Sex stallion

 Name my car - no
 "
"
 Linear Mode


