 03-04-2015, 09:31 PM
|
#1
|
|
Registered User
Join Date: May 2013
Location: Orange County, California
Posts: 266
|
Water Pump, Thermostat, Engine Mount DIY Remarks
Hi guys,
I just finished replacing the water pump, low temp thermostat, and front engine mount on my 2001 today. There are a few articles on these replacements, but there were still things that I did not expect. I just want to share my thoughts and observations that could be helpful for those planning to do this.
A little background information: 2001 Base, 138k miles, no repair record before 80k miles (2009), has been daily driven since then. The cooling system was working fine. The only thing is the vibration at ~3000 RPM and a loud noise during rapid acceleration. I decided to do all three because of the engine mount, and the pump is at least ~60k miles.
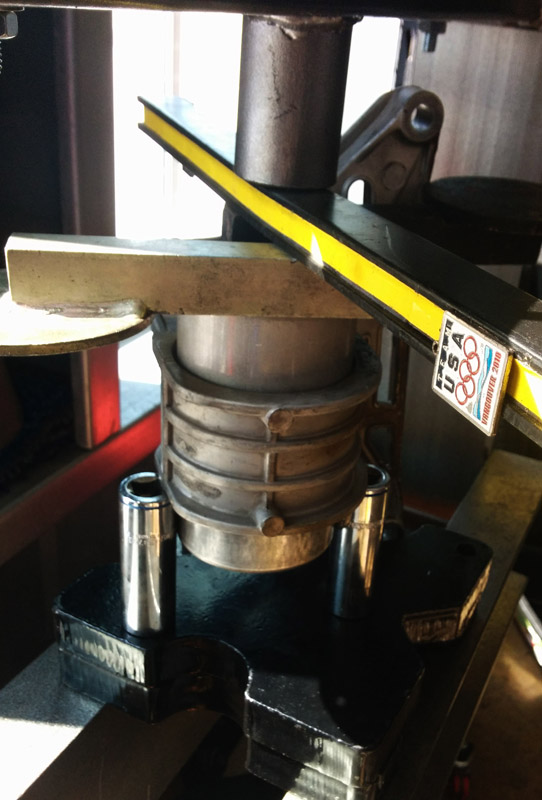
- I bought just the mount bushing, assuming I could get it pressed in for cheap. Took it to a couple places (Sears, Pepboys), they couldn't do it. Then took it to a European shop, paid $95  to get it done. Not much saving there!
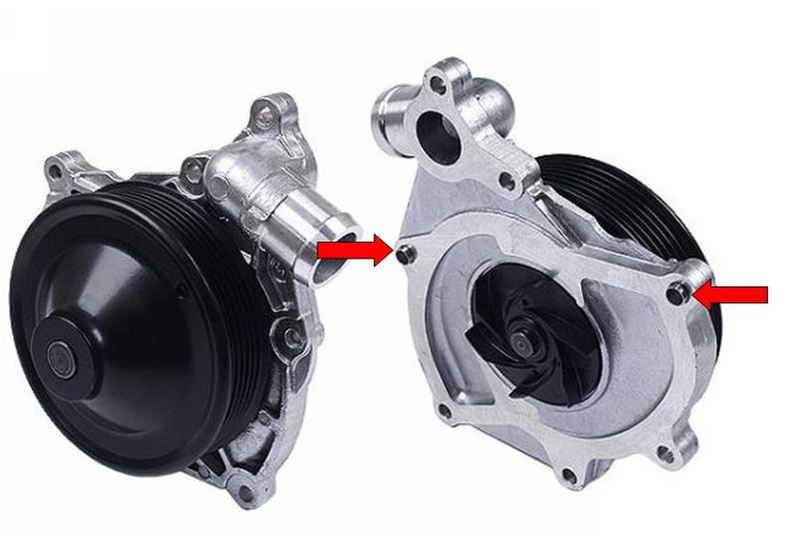
- I got the Pierburg pump, it looks good. The old one was also Pierburg, and the gasket had been cut, so I assume the pump has been replaced before 80k.
- On the pump, there were 2 longer bolts. I didn't make note where they went, and in the end I had 1 bolt sticking out, and had to undo most of them to find the right bolt.
- I followed the bleeding process in the Bentley manual. There was one part where it says to open/relieve the coolant cap and top off when the car is hot and idling. I couldn't open it because coolant was very hot and ready to shoot out, so I'm not sure how that would affect the bleeding.
- The articles say the car takes about 5 gallons. I could only drain and put back in a little more than 3 gallons.
- Many articles say you can do the engine mount without undoing the hoses, but I think it's really hard to wiggle it out for someone doing this with the car on jack stands instead of a lift.
Results: The car feels younger. I have more confidence in the car not breaking down on me (even though it has never done it). Vibration at 3000 RPM and the loud noise from acceleration are gone.
I hope this might be useful to you in some way 
|

|

|
|
03-04-2015, 10:36 PM
|
#2
|
|
Registered User
Join Date: Apr 2014
Posts: 27
|
That's good info, thank you for sharing.
Water pump is on my "to do" list
|
|
|
|
|
03-04-2015, 10:39 PM
|
#3
|
|
Registered User
Join Date: May 2013
Location: North Alabama
Posts: 2,079
|
I did my engine mount in my 01 S recently and you are right about the hoses, with them off it would have been a lot easier. A couple of the bolts I found impossible to torque because I saw no way to get a torque wrench in there...but the rest are by the book.
|
|
|
|
|
03-05-2015, 03:32 PM
|
#4
|
|
1999 base
Join Date: Dec 2011
Location: Coral Springs FL
Posts: 1,617
|
some tips for followers.
1. the 2 two longer bolts will go on the center sides of the pump, where the hols on the pump have a metal sleeve (i'm sure there is a proper name for that).
2. save yourself the time, and disconnect the water hoses when replacing engine mount. its a good opportunity to flash the coolant, and will take you less time and frustration to remove and install the mount.
3. when installing the new mount, lower the engine. it will give you a good access to torque at least 3 out of 4 bolts with a conventional torque wrench. the last one (top left) will require the use of a torque wrench with a 15mm craw foot
|
|
|
|
|
03-05-2015, 04:23 PM
|
#5
|
|
Registered User
Join Date: Jan 2013
Location: Houston
Posts: 370
|
Shoulda just bought your own press for less than $200! Luckily I found a friend with one....gave him a $20 and did it myself. Otherwise I probably would have bought the press. I disagree about needing to disconnect water hoses - just lower the engine a tad while it's off the mount. Still have to press into the hoses a fair amount but it's do-able.
__________________
DD summer/winter: 2000 Boxster S
DD spring/fall: 914-6 w/ 3.0L SC Dual Webers
http://imgur.com/a/k0Wtl - My 914-6 Build/Project Story
|
|
|
|
|
03-05-2015, 04:35 PM
|
#6
|
|
Registered User
Join Date: Jul 2013
Location: Bastrop, Tx
Posts: 2,644
|
Maybe it's the redneck in me.?. I used two 2x4 pieces of wood, a floor jack and a heavy truck to press a friends mount in. Of course he spent about an hour getting the old one out using a drill and a reciprocating saw.
__________________
Woody
|
|
|
|
|
03-05-2015, 05:49 PM
|
#7
|
|
1999 base
Join Date: Dec 2011
Location: Coral Springs FL
Posts: 1,617
|
Quote:
Originally Posted by itsnotanova

Maybe it's the redneck in me.?.
|
Maybe?
LOL you have to be very creative (or very drunk) just to think about something like that.

|
|
|
|
|
03-05-2015, 07:47 PM
|
#8
|
|
Registered User
Join Date: Jul 2013
Location: Bastrop, Tx
Posts: 2,644
|
Quote:
Originally Posted by Meir
Maybe?
LOL you have to be very creative (or very drunk) just to think about something like that.
|
He was paying me in beer so I guess he got what he paid for.
__________________
Woody
|
|
|
|
|
03-05-2015, 08:01 PM
|
#9
|
|
Custom User Title Here
Join Date: Mar 2012
Location: Ft. Leonard Wood
Posts: 6,169
|
Quote:
Originally Posted by itsnotanova
Maybe it's the redneck in me.?. I used two 2x4 pieces of wood, a floor jack and a heavy truck to press a friends mount in. Of course he spent about an hour getting the old one out using a drill and a reciprocating saw.
|
I've taken tires off of wheels with a 2 x 4 and donor car in my younger days(more than I care to remember). You lay the tire flat and set the 2 x 4 on the rubber, right up to the rim/bead, then drive the donor car up the 2 x 4 to press down and break the bead. Fun stuff. 
__________________
https://youtube.com/@UnwindTimeVintageWatchMuseum
|
|
|
|
|
03-05-2015, 09:37 PM
|
#10
|
|
Registered User
Join Date: May 2013
Location: Orange County, California
Posts: 266
|
Quote:
Originally Posted by patssle
Shoulda just bought your own press for less than $200! Luckily I found a friend with one....gave him a $20 and did it myself. Otherwise I probably would have bought the press. I disagree about needing to disconnect water hoses - just lower the engine a tad while it's off the mount. Still have to press into the hoses a fair amount but it's do-able.
|
I was thinking about getting the HF 20 ton press, but there's no more room in my garage. The guy at Sears said they could do it when I asked them, but when I took it to them, they played with it for 15 minutes and said they didn't have the right adapter to press the thing out.
|
|
|
|
|
03-05-2015, 04:29 PM
|
#11
|
|
Registered User
Join Date: Jun 2014
Location: LB, Germany
Posts: 1,526
|
A simple trick concerning fluid changes. Allways measure the amount of fluids you drain off the car and fill in that amount at a minimum.
|
|
|
|
|
03-05-2015, 09:41 PM
|
#12
|
|
Registered User
Join Date: May 2013
Location: Orange County, California
Posts: 266
|
Quote:
Originally Posted by Smallblock454
A simple trick concerning fluid changes. Allways measure the amount of fluids you drain off the car and fill in that amount at a minimum. |
I got out more than 3 gallons. And I was able to put back in more than 3 as well. However, the articles mention 5 gallons, so I think I probably didn't get much coolant out of the radiators. I did undo the radiator supply and return hoses, and let drain for an hour, but my car might not have been level.
|
|
|
|
|
03-05-2015, 06:30 PM
|
#13
|
|
Registered User
Join Date: Sep 2008
Location: Florida
Posts: 2,497
|
I've done these jobs...motor mounts about 4 or 5 times on different cars.
I've also bought just the mount. After freezing the mount, I was able to press it in the carrier with my vice without issue.
I've also never had to remove the coolant hoses but it is very tight.
Couldn't believe how easy it was to change out the WP on this car!
|
|
|
|
|
03-05-2015, 10:28 PM
|
#14
|
|
Registered User
Join Date: Dec 2008
Location: Queensland, Australia
Posts: 1,522
|
To get all (most) of the coolant out of the radiators, the car needs to be elevated at the front, not level.
Unfortunately, you have now got a large portion of old coolant diluting the new......
__________________
2001 Boxster S (triple black). Sleeping easier with LN Engineering/Flat 6 IMS upgrade, low temp thermostat & underspeed pulley.
2001 MV Agusta F4.
|
|
|
|
|
03-17-2015, 09:55 PM
|
#15
|
|
Registered User
Join Date: May 2013
Location: Orange County, California
Posts: 266
|
A quick update: So last time when I did my pump and coolant, I didn't get most of the coolant out. Also, I followed the bleeding procedure in the Bentley book. which was fine up until the point when I had to open the cap to relieve pressure and check coolant, but I couldn't because of excessive pressure.
I don't want to risk having air pockets and such, so I got the Uview Airlift tool, and replace the coolant again. This time I got most of the coolant out, and using the tool was so much easier than doing the procedure, plus the tool can check for leak right away. For the cost, it might not make sense to buy the tool for a one time thing, but I do work on other cars, so the tool is really worth the investment, ease of use, and good result.
|
|
|
|
 Posting Rules
|
You may not post new threads
You may not post replies
You may not post attachments
You may not edit your posts
HTML code is On
|
|
|
All times are GMT -8. The time now is 04:40 AM.
| |


 boxster S

 Hybrid Mode


