 09-10-2012, 12:58 AM
|
#1
|
|
Registered User
Join Date: Mar 2005
Location: utah
Posts: 96
|
Black HIDs
Just got done with another set of HID retrofits this set is all mine! 
No more blinding glare with just those "swap out the bulb" HID kits, I don't know why I haven't gotten around to this on my own car before now.
Before
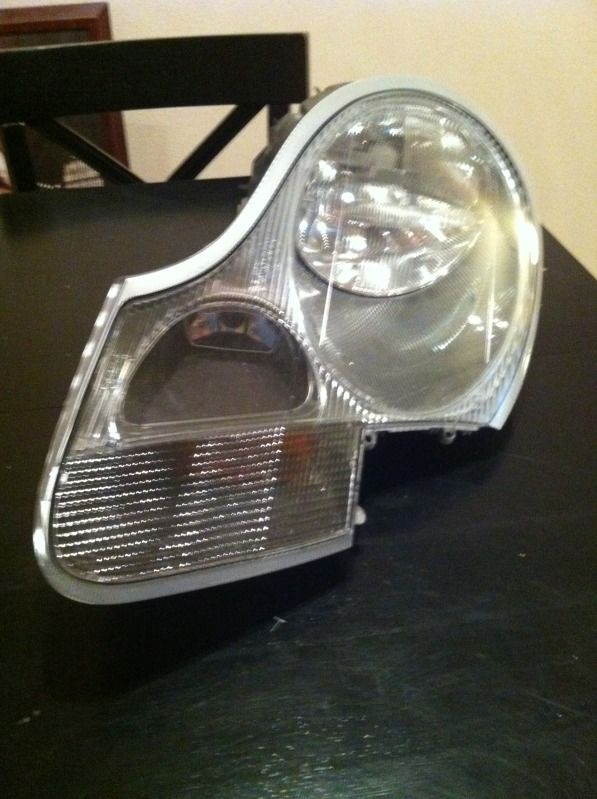
After
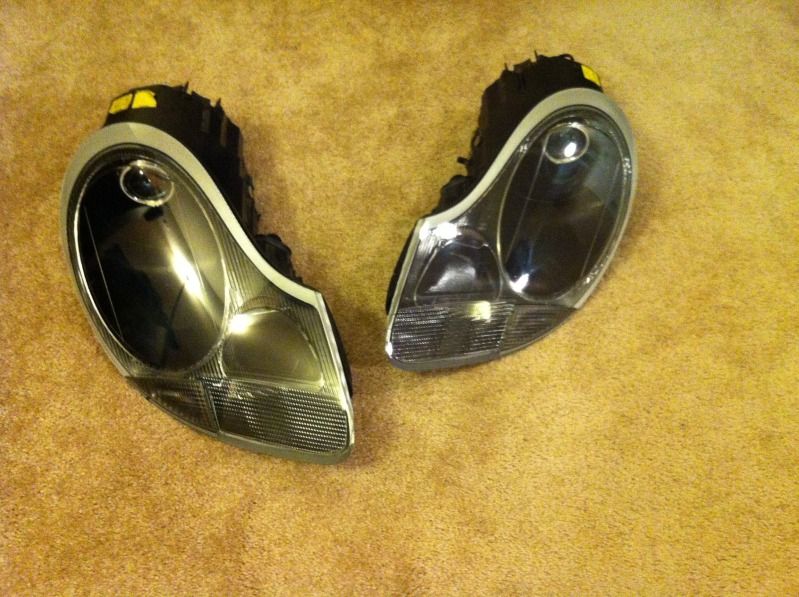
It's kind of hard to see in these pics but they do have CCFL angel eyes
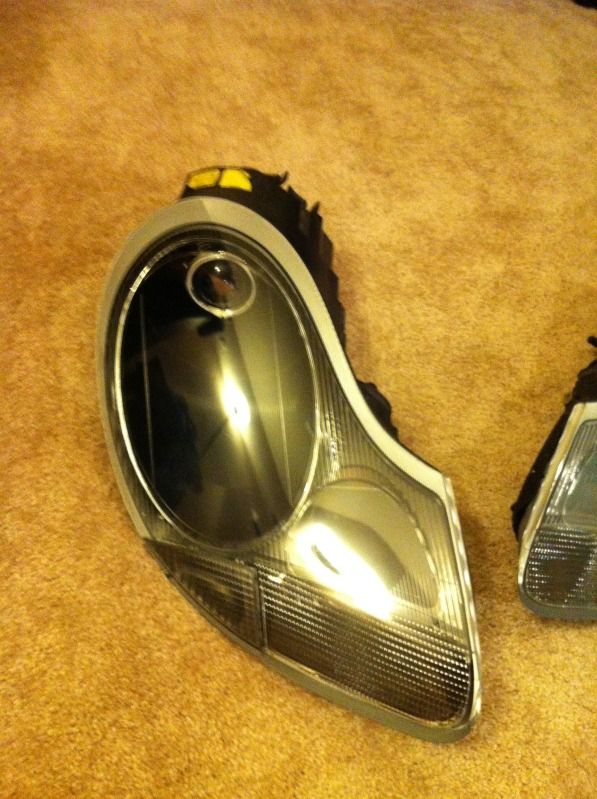
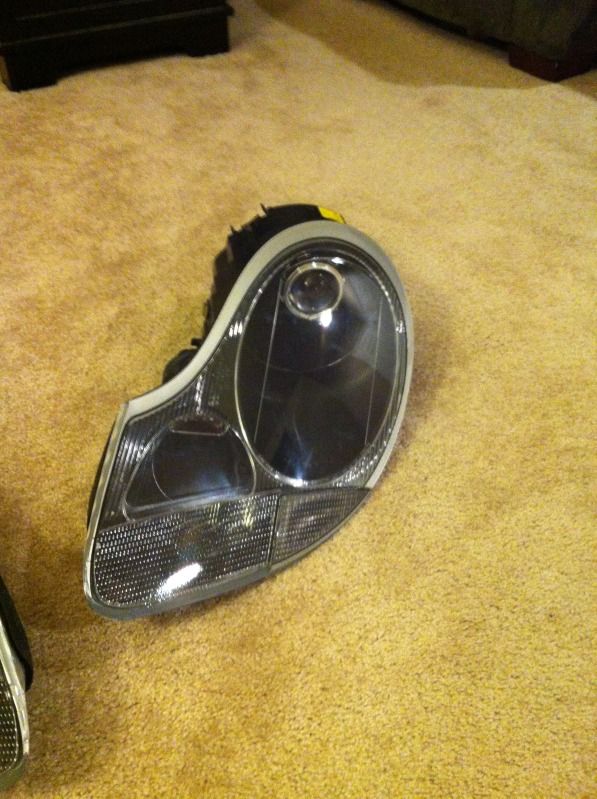
I toyed around with leaving the chrome reflector but I liked the solid black better
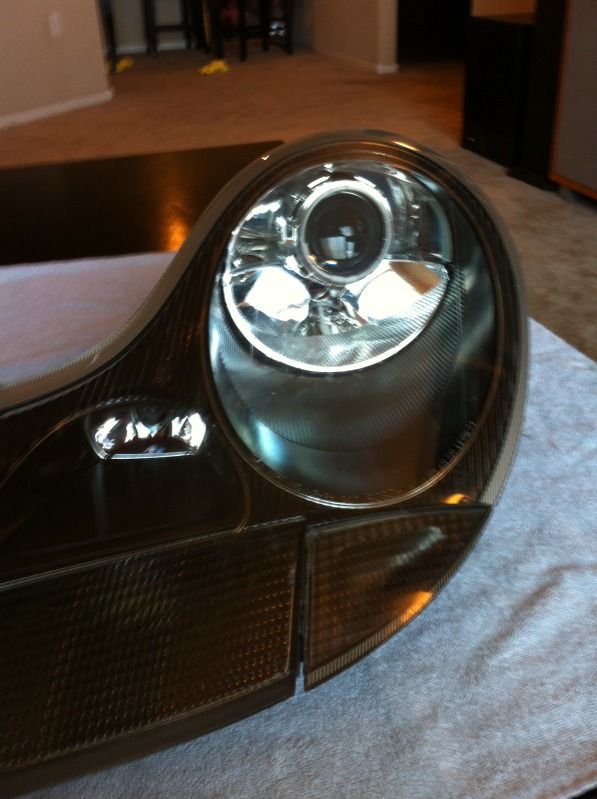
If anyone cares or follows HID retrofits: this setup I used the Morimoto Bi-xenon mini H1 projectors and angle eyes. I designed a custom side specific foreground and cut-off shields that I have fine tuned, along with a custom hinge pin to eliminate any sticking problems the mini H1 suffered from. The ballasts are mounted to the back of the headlight housing just like the original Litronic set up. This means a clean factory look install with no messy wiring kit to play with every time you have to remove the light, its just plug and play. As far as people telling you need a relay/wiring kit to run HIDs, this may be true with some vehicles wiring but our cars already support wiring for the HID/Litronic lights from the factory. The only difference was a control box and suspension sensor used for the auto leveling feature in the Litronics. The aftermarket ballasts also draw less current than the OEM ones, thus the relay wiring kits are really just overkill. But if you like sales "scare tactics" by all mean feel free to run a wiring kit they don't hurt anything, the're just messy, more complicated and not needed.
So I don't know if this is breaking any rules on here cause I'm not a vendor. I'm just trying to help my fellow Porsche buddies out. I'm seeing these cheesy aftermarket LED headlights selling on Ebay. I just wanted to let you guys know what is possible customizing the original Porsche lights and retaining OEM quality while retrofitting a projector that is designed for HID (not a halogen projector like the Ebay ones) with a clean cut off and a brilliant color output that rivals the stock Litronics. This can be done for a fraction of the cost. I don't want to break any rules on here so I won't list any prices. So feel free to use this as guide for inspiration on your own DIY retrofit, but for those of you who feel this type of project is a little over your head PM me and we can work something out. Obviously if we get a group of people together I can get a better deal on parts buying in bulk and save some $$.
Last edited by boxster7614; 09-10-2012 at 01:03 AM.
|

|

|
|
09-10-2012, 06:49 AM
|
#2
|
|
Registered User
Join Date: Nov 2008
Location: MA
Posts: 255
|
I like it! pics of on the car!
|
|
|
|
|
09-10-2012, 07:25 AM
|
#3
|
|
Multi-Boxer Driver
Join Date: Nov 2010
Location: Orange Park, FL
Posts: 1,434
|
I'd also like to see more steps on how you added the projectors, if you had photos of the process handy. It looks good!
__________________
-Chris
2004 Porsche Boxster 2.7 (gone  )
2004 Porsche 911 C4S Cab
1991 Porsche 911 C2 Targa 3.6
2017 Subaru Outback 3.6R
|

|
|
|
09-10-2012, 10:00 AM
|
#4
|
|
Registered User
Join Date: Jul 2007
Location: atlanta, ga
Posts: 91
|
Beautiful! It would be great to get some detailed step-by-step directions on these. I'd love to do this but don't want to screw up the only lights I have. Very intimidated by fitting projector/reflector in housing.
__________________
Richard Griffin
Atlanta GA
2001 blk/tan Boxster 18" turbo twist wheels
2003 gray/tan Navigator
|
|
|
|
|
09-10-2012, 10:46 AM
|
#5
|
|
Registered User
Join Date: Jul 2012
Location: Bay Area California
Posts: 415
|
That looks great! I
Like that better than the Depo setup.
|
|
|
|
|
09-15-2012, 04:07 PM
|
#6
|
|
Registered User
Join Date: Mar 2005
Location: utah
Posts: 96
|
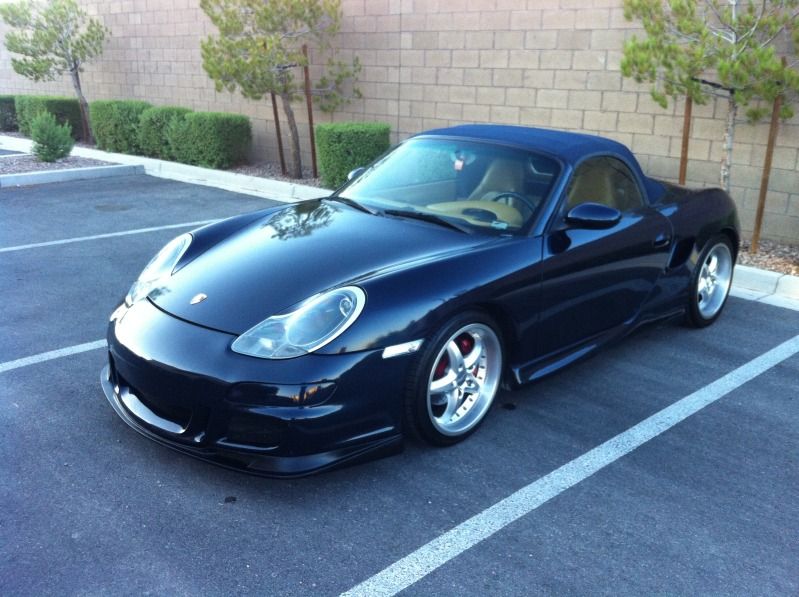
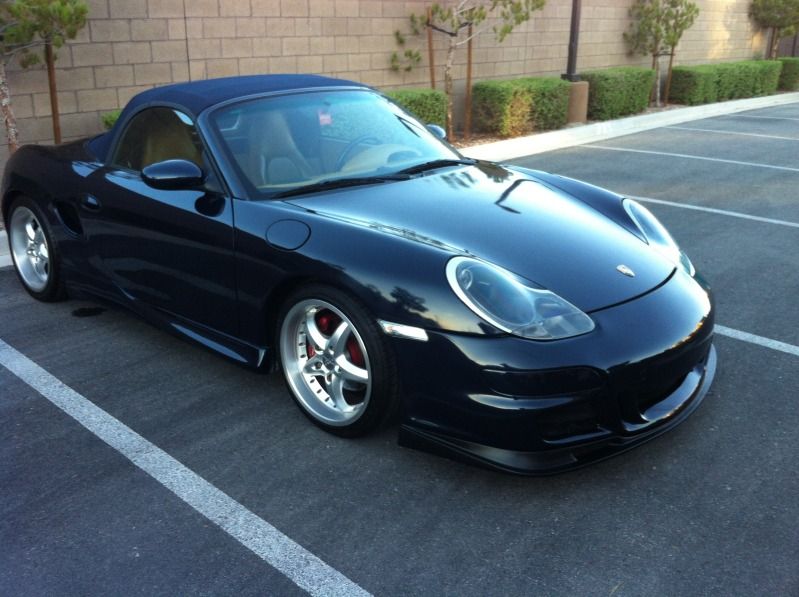
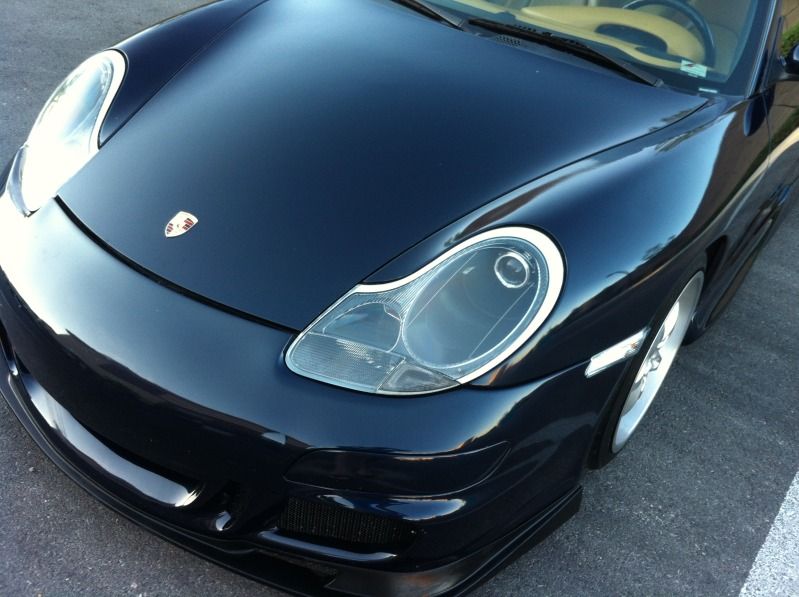
I finally got the car washed and was able to take some pics. I didn't realize how hard it is to get good pics without getting glare off the lenses, I did the best I could with my iphone LOL.
I don't have step by step pictures for this as I didn't really mean this to be a how to thread. There are already tons of guides out there showing how to retrofit HID if you do your homework.
I wanted to show a before pic so I searched through some old pics and found one when I first put my bumper on, I have since painted my grills black. It's not the best pic but hopefully you get the idea. (and no that's not my motor home in the background)
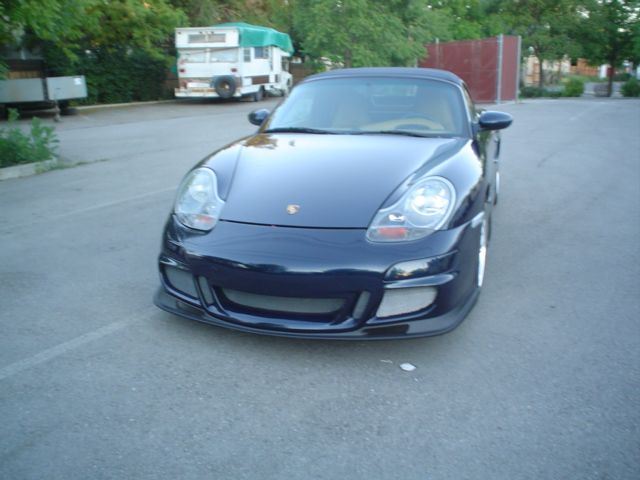
As you can see I also de-ambered the lights and installed silver bulbs
Please ignore my paint chips lol my car is a daily driver with 117,000 miles

|
|
|
|
|
09-15-2012, 06:22 PM
|
#7
|
|
Registered User
Join Date: Nov 2008
Location: MA
Posts: 255
|
WOW
That makes your car look both more modern (ALA 981) and more mean!
GreAT WORK!
|
|
|
|
|
09-16-2012, 04:53 PM
|
#8
|
|
Registered User
Join Date: Dec 2011
Posts: 32
|
That looks amazing!
|
|
|
|
|
09-16-2012, 05:13 PM
|
#9
|
|
Registered User
Join Date: Feb 2011
Location: St Paul, MN
Posts: 59
|
The car looks awesome! Please share some more details...
|
|
|
|
|
09-16-2012, 06:31 PM
|
#10
|
|
Registered User
Join Date: Oct 2010
Location: NKY
Posts: 211
|
What guide did you use? Looks awesome
__________________
2001 Seal Gray 5-Speed - 2007 Yamaha R6 - 2003 Honda Civic EX - 1999 Nissan Frontier XE - 2003 Coleman Utah
|
|
|
|
|
02-13-2013, 03:08 PM
|
#11
|
|
Registered User
Join Date: Nov 2004
Location: New Jersey
Posts: 8,709
|
Quote:
Originally Posted by boxster7614

|
I want this mod!! (painting the inside black of course...I already have the HID bulbs). best mod I've seen in 10 years.
resemblance...
__________________
GT3 Recaro Seats - Boxster Red
GT3 Aero / Carrera 18" 5 spoke / Potenza RE-11
Fabspeed Headers & Noise Maker
BORN: March 2000 - FINLAND
IMS#1 REPLACED: April 2010 - NEW JERSEY -- LNE DUAL ROW
Last edited by Perfectlap; 02-13-2013 at 04:23 PM.
|
|
|
|
|
09-16-2012, 09:54 PM
|
#12
|
|
Registered User
Join Date: Mar 2011
Location: Orange County, CA
Posts: 316
|
That looks great!
Want to sell them to me?
|
|
|
|
|
09-17-2012, 04:42 AM
|
#13
|
|
Registered User
Join Date: Jul 2012
Location: Ontario Canada
Posts: 16
|
That really looks nice! What kind of wheels are those? They look fantastic on your car.
|
|
|
|
|
09-17-2012, 07:24 AM
|
#14
|
|
Registered User
Join Date: Aug 2012
Location: mexico
Posts: 173
|
Beautiful looking car. What type of front bumber is that on your car?
|
|
|
|
|
09-17-2012, 08:03 AM
|
#15
|
|
Registered User
Join Date: Nov 2008
Location: MA
Posts: 255
|
You fit a projector now over where the fog lights are. I just dont know what projectors come in that size and will fit over that area. But I think it will look awesome if its doable!
|
|
|
|
|
09-17-2012, 08:35 AM
|
#16
|
|
Registered User
Join Date: Oct 2010
Location: NKY
Posts: 211
|
I'd have you do a set for me if I had the clear headlights already, mine are amber...
__________________
2001 Seal Gray 5-Speed - 2007 Yamaha R6 - 2003 Honda Civic EX - 1999 Nissan Frontier XE - 2003 Coleman Utah
|
|
|
|
|
09-18-2012, 04:20 PM
|
#17
|
|
Registered User
Join Date: Jan 2010
Location: Redmond, Wa
Posts: 369
|
I looove these, it looks amazing!
Boxster7614 you need to put a step by step how to guide.. I'm willing to pay for it..
Couple of questions:
What did you do to plastic inside the headlight? cut it off?
Projector has 3 bulbs, I see only one in your deadlight.. where did the other 2 go?
Did you put some kind of black film inside? or it's just our headlight look like that on the inside?
How did you mount new projectors? Where did you buy them from?
I have a pair of clear lights with broken lens which will be perfect for it..
Please "How to" us!
|
|
|
|
|
09-18-2012, 05:23 PM
|
#18
|
|
Registered User
Join Date: May 2008
Location: Toronto
Posts: 2,656
|
This is how it should be done... not the other clown looking headlights with LED from ebay...
|
|
|
|
|
09-19-2012, 05:29 PM
|
#19
|
|
Registered User
Join Date: Mar 2005
Location: utah
Posts: 96
|
As I said I don't have a how to. Yes the inside of your light looks like that after you break off the front lens. But it's chrome not black, see first post there is a pic before I painted it with a semi gloss black paint for plastic. As for the 3 bulbs, the original setup used 1.high beam 2.low beam 3. A very small back light. On this set up the projector uses a movable cutoff shield so blubs 1 & 2 are combined into one light, thus the name bi-xenon. When you turn the high beams on it acts as a relay to activate a selinoid that moves the shield and allows the light to function as a high beam. This is how many OEM hid lights are setup. The 3rd light I connected to the angel eye which is hard to see in the pics but it's a bright white ring that lights up around the projector like BMW uses.
I agree with the remark about the led lights, i think they look a little cheesy and look like a cheap aftermarket light. But I kinda like their led tail lights.
As for the car, front bumper is a polyurethane GT3 look bumper, with TA style side skirts, splitters on rear bumper, robins top with back glass w defroster, 18" ruff racing wheels. Painted calipers red with Porsche logos & high temp cleared over.
Last edited by boxster7614; 09-19-2012 at 05:32 PM.
|
|
|
|
|
09-23-2012, 07:25 PM
|
#20
|
|
Registered User
Join Date: Jan 2008
Location: atl
Posts: 363
|
I didn't notice the angel eye remark at first. do you have another pic of it? like you said, it's hard to see or even notice in the other pics you posted.
nothing you can do about the "amber" that is painted on the lens huh? (except paint over them, like i see people posting). but i want mine to be clear like yours.
Quote:
Originally Posted by boxster7614
As I said I don't have a how to. Yes the inside of your light looks like that after you break off the front lens. But it's chrome not black, see first post there is a pic before I painted it with a semi gloss black paint for plastic. As for the 3 bulbs, the original setup used 1.high beam 2.low beam 3. A very small back light. On this set up the projector uses a movable cutoff shield so blubs 1 & 2 are combined into one light, thus the name bi-xenon. When you turn the high beams on it acts as a relay to activate a selinoid that moves the shield and allows the light to function as a high beam. This is how many OEM hid lights are setup. The 3rd light I connected to the angel eye which is hard to see in the pics but it's a bright white ring that lights up around the projector like BMW uses.
I agree with the remark about the led lights, i think they look a little cheesy and look like a cheap aftermarket light. But I kinda like their led tail lights.
As for the car, front bumper is a polyurethane GT3 look bumper, with TA style side skirts, splitters on rear bumper, robins top with back glass w defroster, 18" ruff racing wheels. Painted calipers red with Porsche logos & high temp cleared over.
|
__________________
-Tuan
tuanle16@juno.com

|
|
|
|
 Posting Rules
|
You may not post new threads
You may not post replies
You may not post attachments
You may not edit your posts
HTML code is On
|
|
|
All times are GMT -8. The time now is 07:01 PM.
| |


 Boxster

 Hybrid Mode


