Go Back   986 Forum - The Community for Porsche Boxster & Cayman Owners > Porsche Boxster & Cayman Forums > Boxster General Discussions

Post Reply
 
LinkBack Thread Tools Display Modes
Old 07-30-2012, 12:54 PM   #121
Registered User
 
The Radium King's Avatar
 
Join Date: Apr 2010
Location: Canada
Posts: 3,121
i'll try and post a photo tonite.

The Radium King is offline   Reply With Quote
Old 07-30-2012, 03:52 PM   #122
Registered User
 
The Radium King's Avatar
 
Join Date: Apr 2010
Location: Canada
Posts: 3,121
here you go ...

The Radium King is offline   Reply With Quote
Old 07-30-2012, 04:23 PM   #123
Carnut
 
AndyA6's Avatar
 
Join Date: May 2010
Location: Utah
Posts: 775
Awesome! Thanks for posting! I hope I can do my install sooner than later.
__________________
'14 Boxster
AndyA6 is offline   Reply With Quote
Old 07-31-2012, 08:43 AM   #124
Registered User
 
The Radium King's Avatar
 
Join Date: Apr 2010
Location: Canada
Posts: 3,121
hey andy - do you have a multi-meter? if so, i might ask a favour from you when you have the plenum off ...
The Radium King is offline   Reply With Quote
Old 07-31-2012, 01:31 PM   #125
Carnut
 
AndyA6's Avatar
 
Join Date: May 2010
Location: Utah
Posts: 775
Maybe..... if I can get my hands on one, what is it you need?
__________________
'14 Boxster
AndyA6 is offline   Reply With Quote
Old 07-31-2012, 01:46 PM   #126
Registered User
 
The Radium King's Avatar
 
Join Date: Apr 2010
Location: Canada
Posts: 3,121
well, when you have the old plenum off you should have easy access to the oil level/temperature sender (shown in the third image down in this article):

Pelican Technical Article: Boxster Engine Sensor Replacement - 986 / 987

i'd love to know the resistance to ground of the contact that the green/red wire connects to. if it is around 10 ohms when the engine is cold then the sender follows the VDO 10-180 ohm standard and i should be able to splice into it and connect a standard VDO temperature gauge.

so, if it's easy for you to check when you're doing your plenum then cool, otherwise it's all good anyway; i can get to it eventually. cheers.
The Radium King is offline   Reply With Quote
Old 07-31-2012, 08:52 PM   #127
Registered User
 
Join Date: Apr 2009
Location: Australia
Posts: 328
Hi Guys,

subscribed so I can keep track of your progress with this and also to post up my carbon intake. I have helped a couple on here put one the same together, so if your interested in where to get the parts - send me a PM and I'll help out.


Cheers,
Sam
__________________
Australian Carbon Fiber nut
sparker is offline   Reply With Quote
Old 08-16-2012, 12:17 PM   #128
Carnut
 
AndyA6's Avatar
 
Join Date: May 2010
Location: Utah
Posts: 775
OK folks, job done!

What a pain, knees, legs, back hurt, cuts in fingers and hands, the price one pays if DIY! And a wrench day without cuts and bruises and blood does not count, right????


Still proud to have done it, though! Total time 2.5 hours, no breaks, from start to finish.

Some observations:-

-I used 2 silicone reducers from Siliconeintakes.com, bought online
-Also from them 2 larger clamps
-997 "T"
-997 TB
-Related parts as mentioned elsewhere in this thread
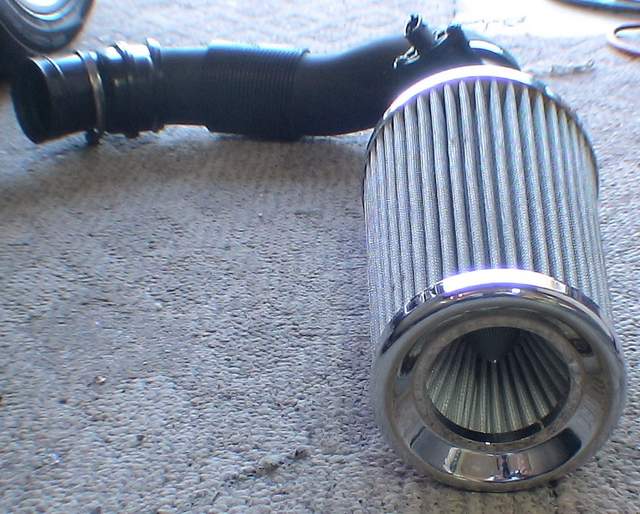
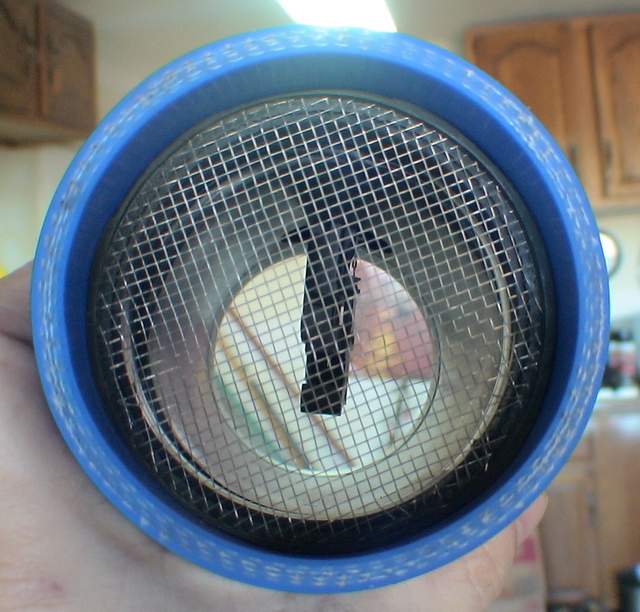
-Spectre hose to connect AF to TB

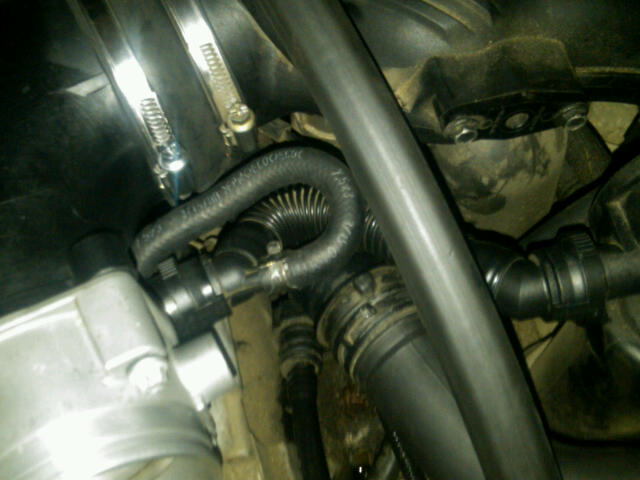
-The 997 T is the same width as the original but much larger in diameter. I had to trim the reducers a lot to make them fit in terms of getting the dang T in! That took 1 hour alone. Tip: Cut to the same length as the original couplers!

-RK, I still don't get how you used the original rubber couplers, I tried but no way they slip onto the 997 T....??????

-Once the T was in I connected the TB, easy 2 minutes. Connected the AOS line, no problem as was the plug into the TB.
-There is one hole to make into the right reducer for some vacuum line (forgot the name, who cares!).
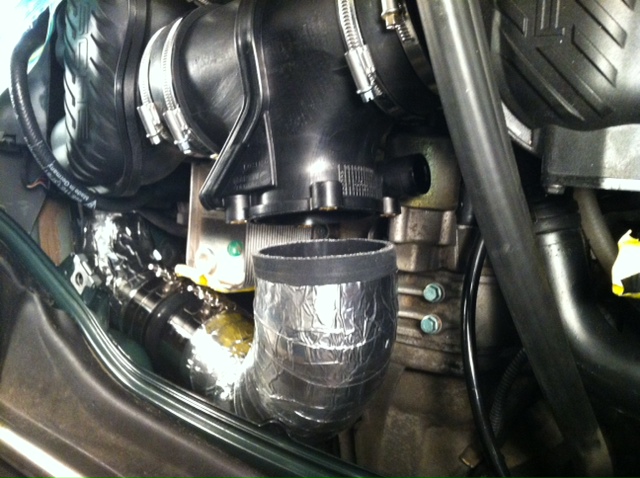
-Now, the Spectre intake hose looks nice and all but I will def. change that part. It does not connect well to the MAF housing, painful to slip over....Tip: I actually tricked a bit by cutting on opposite sides to make it slip over and clamped down. That side is fine but...
-TB to Spectre hose is super fine but there is so little space between the TB and the rear upper engine "wall" that the hose is kinked a lot. I do not trust this connection at all! I will def look for an alternative, probably reverting to my original plan to do everthing in silicone as well.
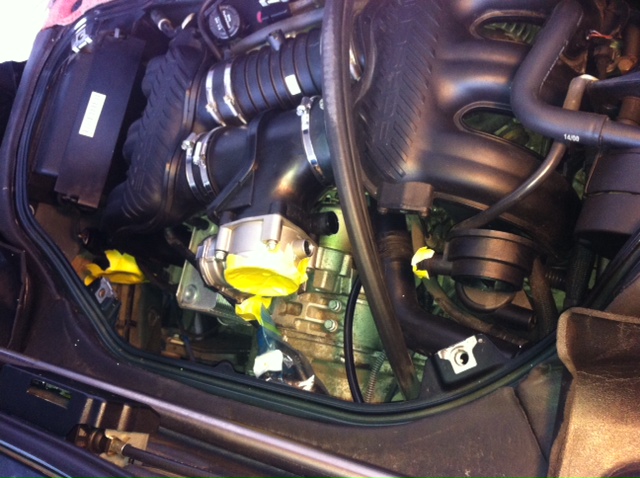
-Not sure if the engine cover is touching the TB! It really is a tight fit there!
-The original TB is held in place with a bracket, did not use that part, it won't fit anyways.

What else?

Engine started right up. I only drove 3 miles since the installation so I cannot comment much on gains and all that.

One thing changed for sure, intake sound. With the original intake hose/tube it sounded "darker", more "roar" (excuse my description...), with the new hose the engine sounds "lighter" in tone, not bad at all! Actually more old school Porsche which I like. Maybe the elimination of the "Heimholtz" chamber has to do with this?

Throttle response seems a bit more pronounced, driveability is spot on.

I report later with more feedback.

Thanks everybody who has contributed, educated, investigated, written, wrenched!

Andy
__________________
'14 Boxster
AndyA6 is offline   Reply With Quote
Old 08-16-2012, 12:54 PM   #129
Registered User
 
The Radium King's Avatar
 
Join Date: Apr 2010
Location: Canada
Posts: 3,121
awsome. i'm not a fan anymore of the spectre part either. it's 3" outside diameter, so smaller inside. good enough to get the car running until you can source the right combination of elbows, straights, reducers, etc.

one thing that worked for me is a 3.25" to 3" reducing elbow - 3.25" where it connects to the tb but narrows to 3" as it turns 90" - this buys clearance from the chassis. that and a took a hacksaw to that small protrusion on the chassis lip to make more room (not required, but does improve things).
The Radium King is offline   Reply With Quote
Old 10-09-2012, 09:11 PM   #130
Registered User
 
jaykay's Avatar
 
Join Date: Sep 2009
Location: toronto
Posts: 2,668
Finally mine is in. I took a lot of time to try and kit it up for all but the intake tube was too much cutting and stretching to be viable...I would have to pull it apart to duplicate it. I don't have my own garage. I went with 3.25" tubing all the way. The larger duct size was a b___ to work with things are very tight near the TB. I used some serious force to move it and shape it with a heat gun. Just thought I would go big or go home! I wanted to minimize losses as much as possible. Be warned that 3.25" is an odd size and if you that route you should make silicon intakes your friend!

Just running it now...yes its one in the morning. The intake roar/rush from the 3,25 duct is scary/strong from idle to 3000 rpm.....have not rolled it out yet. Throttle response is crisp everytime I stab it.....from idle....this is not what I expected but very welcome. Testing starts tomorrow.

Some negatives: my duct is touching (jammed) on my transmission top bolt and engine bay (the price you pay for a bigger diameter; TB plug receptacle is very close to my trans/engine case; made a mess of the AOS tube with the heat gun but it works....it was dark and I was rushing;

Some cautions: I had my inspection mirror under and around the Carrera tee and nearly sent the car jumping...the starter solenoid is right there so don't forget to disconnect the battery!

So far the engine is running ferociously! It took me by surprise when I blipped it...
__________________
986 00S

Last edited by jaykay; 10-09-2012 at 09:17 PM.
jaykay is offline   Reply With Quote
Old 10-10-2012, 10:49 AM   #131
Carnut
 
AndyA6's Avatar
 
Join Date: May 2010
Location: Utah
Posts: 775
Looks good! Any pics of the finished plumbing?
__________________
'14 Boxster
AndyA6 is offline   Reply With Quote
Old 10-10-2012, 08:00 PM   #132
Registered User
 
jaykay's Avatar
 
Join Date: Sep 2009
Location: toronto
Posts: 2,668
Thanks
__________________
986 00S

Last edited by jaykay; 10-10-2012 at 08:04 PM.
jaykay is offline   Reply With Quote
Old 10-10-2012, 08:01 PM   #133
Registered User
 
jaykay's Avatar
 
Join Date: Sep 2009
Location: toronto
Posts: 2,668
I will try and snap some next time I pop the lid. I eventually plan to Cayman airbox the thing and every thing will change.

After the first 50kms I cant say that I feel a big difference in power but I guess I will have to wait for the computer to adjust. A couple of times between 4 and 5k I got some nice thrust but not that much different than before. I was a motorcycle rider way back so I may just be spoiled.

I did get a couple pops/back fire while downshifting which is not usual..but this was early on in the session...hope all is okay. I do have an open by pass exhaust

The intake roar is loud! I am running with my engine lid insulation off for now though....yeah but at 4 to 4.5k the sound is like a dozen angry lions!
__________________
986 00S

Last edited by jaykay; 10-11-2012 at 09:21 AM.
jaykay is offline   Reply With Quote
Old 10-11-2012, 04:57 PM   #134
Registered User
 
jaykay's Avatar
 
Join Date: Sep 2009
Location: toronto
Posts: 2,668
Okay here is an early foil wrapped attempt....enjoy
__________________
986 00S
jaykay is offline   Reply With Quote
Old 10-22-2012, 06:12 AM   #135
Registered User
 
jaykay's Avatar
 
Join Date: Sep 2009
Location: toronto
Posts: 2,668
Okay after 250 kms of testing:

I am assuming that the DME has had time to learn

The most notable difference in power (or feeling) is at around 4200rpm. The engine seems to really light up when squeezing the throttle in conjunction with the cams phasing. More forward thrust is my impression.

There seems to be a flat spot at 2500 to 2900 rpm; I am not sure whether this was there before or it is just apparent as I was rolling on the throttle at different places in the rev range.

With the 3.25 duct intake roar is quite loud especially when get past 4K.

Really getting some snap and pop with down shifts

Overall the engine is running very nicely
__________________
986 00S
jaykay is offline   Reply With Quote
Old 12-07-2012, 11:24 PM   #136
2K9ATE6
 
Join Date: Jan 2012
Location: Tuscaloosa Alabama
Posts: 4
Garage
What a thread! I wish I found this sooner!

I must say this is quite a thread. I only wish I had come across it sooner! I have been playing with intake modifications since June, trying various tweaks etc. I have been wanting to do a plenum upgrade, but after recently installing (in my garage) a Spec 3+ clutch, LWFW, IMS replacement, & semi solid trans mounts, I couldn't justify spending another $900 on the aftermarket plenum options right now. I first came across this thread a couple of weeks ago and immediately ordered the required parts from dealer and a used throttle body from Oklahoma Foreign. Came out to less than $275 for shipping and all.

Post installation, I love the upgrade. After disconnecting battery and completeing the circuit between the disconnected cables (reset fuel trims/maps etc), I drove vehicle 50 miles without "hard" acceleration (hard enough to map pedal positions etc though) so the computer could make its adaptations. It was a long 50miles, but I wanted to observe the "butt dyno" without the computer inefficiencies blurring my perception of increases. But then I let her rip. The car seems significantly faster in the 3,500-5,500 RPM range. The speedometer often jumps 4-5 miles per hr at a time in 2nd and 3rd. The rest of the range feels improved as well, but at 3,500-5500 it rockets off. Lower end power had dropped before this mod due to an aftermarket intake, but feels improved now. Stock intake still provides for a torquier low rpm range but I am rarely below 3300 or so rpm so it doesn't bother me at all. LWFW makes up for it on uphill starts.

As I mentioned earlier I have been playing with intake mods for several months trying different things. It's surprising how the smallest change can make a drastic difference. The new TB obviously requires a 50% intake redesign. I have tested everything from modifying the OE tube to ABS pieces routed in all ways possible. I still haven't settled on a final setup but am close. I looked at all the aftermarket intakes out there and saw inefficiencies or some sort in each. I still have to make it pretty but it is pointless until I settle on a final design. I wanted the following things out of the intake:
-no hard 90 degree bends
-smooth airflow surface
-no diameter restrictions less that of throttle body
-100% outside air consumption

Currently, I am still working to meet all of these criteria at the same time. My setup as of now from throttle body to vent in fender:
-Like others I put a specter hose in order to fit new TB (only temporary; I tried the ABS tubing first but took it off after 100 miles because I didn't trust it to hold due to tight areas and "making it fit")
-factory MAF housing removed from air box
-KN Apollo filter with inlet tube extending almost out to vent cover

I Know, I know. You aren't supposed to use oiled filters etc. I have researched this until blue in the face and decided to use one. KN has done extensive research on this and if anyone has the incentive to disprove this and the funds required to perform scientific tests, it is KN. They say it doesn't hurt them and if you think that the oil ruined yours to send it in and let them break it down and diagnose it. I've read plenty of posts from people who used them without any issues. It's a fragile part indeed however I think people are too quick to blame their filter oil. I've got 12k miles on an oiled filter without any MAF issues.

I've come to decide that silicone tubing in as few pieces as possible is the way to go. I put the Spectre piece on while I figure out the best way to proceed with tubing. Any recs on where to find long pieces of 3.25 ID with built in gradually curved ends? Two pieces of silicone tubing between tb and MAF is the best thing I can think of other than having a 1 peice tube custom made (which takes months I think). ABS has good sound but gets too hot with little room for insulation. Spectr flexible tube is too narrow plus it seems the wire ribbing would cause all sorts of turbulence.

I initially used a KN Dryflow filter but replaced it with Apollo for better heat shield fitment. The Apollo has got to go though because its outlet is my greatest restriction at about 2.5". The Dryflow was a little larger outlet but a much larger filter surface area. In retrospect I miss the Dryflow because the idle sounds it produced were intoxicating. It had that low rumble/gurgle of a rich A/F mixture. I have never gotten so many compliments on anything in my life. The Apollo killed that sound. I'm still deciding on the best option for an air filter/box. Any recommendations? I'm hoping to make my 3rd filter purchase the charm haha. I would love to hear input on intake ideas and experiences. I've learned a lot over the past several months and I'm sure others have too. Maybe with our combined inputs we can come up with an ideal intake setup to compliment the throttle body and plenum? Thanks for the great info guys. The tb upgrade is definitely worth it. Almost ready for a tune to make it all work together

Let me know if anything needs clarification. It's late and I have been trying to cover everything on my mind. Hopefully it's coherent and I am not delusional . gdnite
2K9ATE6 is offline   Reply With Quote
Old 12-08-2012, 05:14 AM   #137
Registered User
 
Johnny Danger's Avatar
 
Join Date: Nov 2008
Location: Massachusetts
Posts: 4,810
Garage
In the end, who is using what for TB diameter ?
__________________
Don't worry … I've got the microfilm.
Johnny Danger is offline   Reply With Quote
Old 12-08-2012, 05:29 AM   #138
Homeboy981
 
Homeboy981's Avatar
 
Join Date: Jan 2012
Location: Sherman, TX
Posts: 663
Garage
Here's my version of the Cold Air Intake system.

This is Stage1 - using factory air tubing with MAF in factory location and HUGE air filter!


Large Conical Air Filter - it is 6"X11"...


MI Stage1 uses the mesh "screen" from Factory airbox...


You can see the Air Filter peeking through the Factory Side Intake...


This picture is hard to see but a lot has changed from the Stage1 configuration….

1). The MAF housing has been moved to 1" before the Throttle Body
2). Using a Honeycomb Filter to straighten airflow.
3). Using larger diameter silicone tubing - 4" to 3.25".
4). Although it looks rough on the outside, the inside diameter is SMOOTH.
5). Computer has adapted and I am getting SAME GAS mileage as i did BEFORE change, i.e., 22 city and 26 highway - under not-so-gentle acceleration. Average is 350 miles out of a tank.

LOVE the extra power, especially over 4200 RPM. It flies over to the redline now, instead of loping along to the redline.

Getting a Cat Back exhaust system today so we'll let you know how much she feels after "setting the engine FREE"! Love the car now with more power!

Would highly recommend. It DOES take time to get the intake right. If you need designing yours….PM me for details.

Thanks to everyone who helped!

The Downside: I need new tires now!
__________________
2002 Porsche Boxtser S - Silver & Chrome - Died from IMS failure AFTER IMS was replaced!
Homeboy981 is offline   Reply With Quote
Old 12-08-2012, 06:11 PM   #139
Registered User
 
Join Date: Jun 2012
Location: Frederick MD
Posts: 658
Quote:
Originally Posted by Homeboy981 View Post
Computer has adapted and I am getting SAME GAS mileage as i did BEFORE change, i.e., 22 city and 26 highway - under not-so-gentle acceleration. Average is 350 miles out of a tank.
Wow, I've never gotten mileage like that... Granted, I have a heavy foot...but the best I've done on a tank is 19.5mpg.
shadrach74 is offline   Reply With Quote
Old 03-02-2013, 01:23 PM   #140
Registered User
 
Speedster986's Avatar
 
Join Date: Feb 2013
Location: So. Cal
Posts: 24
Plenum Upgrade Yields More HP & MPG!!!

See my current thread "Typical MPG for a Boxster" under "Performance and Technical Chat".

The strange part of it all... I conducted the upgrade to satisfy by thirst for more HP and ultimately ended up with a "win win" situation!

Since the upgrade in November 2012, increase in performance (NO CEL) has truly been remarkable. My stock 2003 2.7L pulls extremely hard to red-line, improved throttle response & Porsche note enhanced.

Next on my list of modifications for my STOCK 03 2.7L will be to increase the size of the stock 'T' shaped plenum, TB (68mm to 74mm), air tube from the MAF, which will further UNCORK this engine.

Trust me... where I live 91 Octane fuel can average over $4.65 per gallon (soon to be $5.00), so any improvement in engine performance & efficiency is a huge plus in my book.

Typical mileage: 20 to 23 City 35 to 37 HWY (results from 3 months of monitoring via Porsche's on board computer).

Comments Welcomed!


Speedster986 is offline   Reply With Quote
Post Reply


Posting Rules
You may not post new threads
You may not post replies
You may not post attachments
You may not edit your posts

BB code is On
Smilies are On
[IMG] code is On
HTML code is On
Trackbacks are On
Pingbacks are On
Refbacks are On


All times are GMT -8. The time now is 08:02 PM.


Powered by vBulletin® Version 3.8.7
Copyright ©2000 - 2024, vBulletin Solutions, Inc.
Content Relevant URLs by vBSEO 3.6.0
Copyright 2024 Pelican Parts, LLC - Posts may be archived for display on the Pelican Parts Website -    DMCA Registered Agent Contact Page