 04-02-2011, 11:03 PM
|
#1
|
|
Registered User
Join Date: Apr 2007
Location: san fran
Posts: 241
|
If your canvas top is good don't change it!
Hey guys helped a buddy of mine do a window replacement on his boxster canvas top with the vinyl window. It was not hard at all and would highly recommend it for those who have a damaged window from the elements or just cracking. It took us about an hour and a half to remove the top. Once removed we brought it to an upholstery place who sewed in a new plastic window for a FRACTION of a price to have them do the whole process themselves or to buy a new top with a new plastic window or the one with the upgraded glass top. We got the ideal from one of the members who had just down a sew in himself (Landrovered)... Convertible top window replacement experience He used a 40 gauge window which everyone thought was too thick but was DOT approved to use as a window but I believe that the stock window is all a 40 gauge window because it is thick when feeling it after we took it off. We ended up using the 30 gauge slightly smoked tint vinyl that Jake D had suggested. Not as thick as the 40 but pretty good. It was ordered from the company Jake D had posted and before buying it I had called the place and they said it was used for boat windows and was treated with uv protection and was built to withstand weather and sea conditions. We got the top back yesterday from the shop and got it installed. Took us about 3 1/2 hours after trying to figure out how we took it apart and to put back as it had been a few days since we took it off. Came out great! Will post pictures. If we were to do this again, I have confidence that we could do this in 3 hours with removal and replacement. At first it seemed like a daunting task but after it was said and done it was not bad at all. I wish I would've done this on my boxster but all the post here on people who have done it always made it feel like it was horrible... 
|

|

|
|
04-03-2011, 08:41 AM
|
#2
|
|
Registered User
Join Date: Nov 2009
Location: Dayton Ohio
Posts: 225
|
Awesome.. Can't wait to see the pics. Did you remove the whole top assembly or the canvas? I'm still hunting around for a shop who can sew in a new window if I bring them the assembly. So far everyone wants me to remove the canvas which is what I was trying to avoid.
How much total in repairs do you have in it, and is it harder to see out the back with it tinted?
|
|
|
|
|
04-03-2011, 06:17 PM
|
#3
|
|
Registered User
Join Date: Nov 2009
Location: Dayton Ohio
Posts: 225
|
MAN..... hurry up with those pics! I've been bored all day and keep checking back to see how it turned out cause I know it's gonna probably look awesome and make me go search a little harder tomorrow to find someone to sew one in for me.
BTW thanks for the shameless plug. Haha. I
|
|
|
|
|
04-03-2011, 06:37 PM
|
#4
|
|
Registered User
Join Date: Oct 2010
Location: MI
Posts: 144
|
Quote:
|
Originally Posted by Jake D
Awesome.. Can't wait to see the pics. Did you remove the whole top assembly or the canvas? I'm still hunting around for a shop who can sew in a new window if I bring them the assembly. So far everyone wants me to remove the canvas which is what I was trying to avoid.
How much total in repairs do you have in it, and is it harder to see out the back with it tinted?
|
Like in your other thread, EV's in Toledo will put a new window for you for $300 labor and $40 for 40 gauge plastic.
They told me to leave the canvas in the car and the $340 total covers all the work (we just have to drive the car to their facility).
|
|
|
|
|
04-03-2011, 06:51 PM
|
#5
|
|
Registered User
Join Date: Nov 2009
Location: Dayton Ohio
Posts: 225
|
Quote:
|
Originally Posted by laphan
Like in your other thread, EV's in Toledo will put a new window for you for $300 labor and $40 for 40 gauge plastic.
They told me to leave the canvas in the car and the $340 total covers all the work (we just have to drive the car to their facility).
|
Thanks.. thats about 2 hours away. If I cant find someone more local then I might make the trip
|
|
|
|
|
04-04-2011, 12:26 AM
|
#6
|
|
Registered User
Join Date: Apr 2007
Location: san fran
Posts: 241
|
Quote:
|
Originally Posted by Jake D
Awesome.. Can't wait to see the pics. Did you remove the whole top assembly or the canvas? I'm still hunting around for a shop who can sew in a new window if I bring them the assembly. So far everyone wants me to remove the canvas which is what I was trying to avoid.
How much total in repairs do you have in it, and is it harder to see out the back with it tinted?
|
Sorry Jake, will put pictures up in the morning. In regards to the procedure we took the canvas off the frame and I'm telling you that it was not as hard as people seem to make it and its the first time I've done it. I have done a frame and canvas swap in the past and that by far is just easy to do because its only a few bolts and can be done in about an hour or even less if there is two sets of hands. Total in repair was cheap--$220... If you lived in san francisco I'd do it for $320 including the install and glass replacement...lol
|
|
|
|
|
04-04-2011, 06:48 AM
|
#7
|
|
Registered User
Join Date: Nov 2009
Location: Madison, Georgia
Posts: 1,012
|
Good to hear that everything went well for you. It is really nice to have a top that looks like it should instead of having a yellow cracked rear window that you cannot see out of. I got mine done just in time, we have had some serious spring rains this season and it does not appear to be letting up any time soon.
__________________
2001 Boxster S 3.6L, Zeintop
"Calling upon my years of experience, I froze at the controls." - Stirling Moss
|
|
|
|
|
04-04-2011, 09:30 AM
|
#8
|
|
Registered User
Join Date: Nov 2009
Location: Dayton Ohio
Posts: 225
|
You said it didn't take you very long to remove the canvas, so why have I seen anywhere from 9hrs to 16hrs(101 Boxster Projects) to replace the top? I mean I understand that the original top will have all the holes and everything should line back up.
I was wondering about removing the whole assembly and taking it to a shop. I was wondering if I removed the assembly if the rear part of the canvas could be unfastened and then the window sewn in. That way the whole canvas wouldn't have to come off. I'm just trying to find the easiest/laziest way to get a new window sewn in.
Called another shop today that I was referred to and they said they wont sew one in because it wont hold up and will most likely leak.. anyone agree/disagree with that statement?
|
|
|
|
|
04-04-2011, 12:06 PM
|
#9
|
|
Registered User
Join Date: Apr 2007
Location: san fran
Posts: 241
|
Jake, Here are a few pictures of the top with the new window. You can hardly tell from the pictures that it is tinted as the tint is not too dark at all. Its just slightly tinted and can tell in the sun but in the garage it looks pretty clear. It took me literally 1.5 hours to remove the top. You just have to have a step by step guide to do it and follow the instructions. Its basically all screws and a few fasteners. The shop I did it was a shop that does the repairs for a local p-car dealership and they specialize in car tops and interior the stitching was sealed so no leaks.
|
|
|
|
|
04-04-2011, 12:19 PM
|
#10
|
|
Registered User
Join Date: Jan 2010
Location: Redmond, Wa
Posts: 369
|
Mikes_box .. just to make sure.. it took you 1.5hr to remove the canvas from the frame or the frame from the car?
As Jake mentioned I read it takes a full day to remove the canvas from frame and it takes little time to remove frame from the car..
Also how long did it take to put the canvas back on frame?
If it's that easy.. I might do it myself!
Thanks
Sasha
|
|
|
|
|
04-04-2011, 12:32 PM
|
#11
|
|
Registered User
Join Date: Apr 2007
Location: san fran
Posts: 241
|
Sasha, It took 1.5 hours. I timed it as I was curious as to how long it would take. It was the removal of the canvas top off the frame. Most if not all shops will not sew a window on with the top still on the frame.
|
|
|
|
|
04-04-2011, 12:42 PM
|
#12
|
|
Registered User
Join Date: Nov 2009
Location: Dayton Ohio
Posts: 225
|
Looks good, but like you said, its hard to tell that its tinted. I found one shop that said if I bring him the canvas he can sew one in for $155 factory green vinyl and $180 for smoked or charcoal. Going to run by his shop to see some samples in the next couple of days. Probably going to be the route I go. He said he had not had problems with leaks and I have heard good things about his work.
I love my car and have no idea what I would do if I were to sell it, but I don't have the $ to do some of the upgrades I want to reduce the chances of a major problem (ims, water pump, etc.) so I can seriously been considering selling it off. I know that having a new top might help me sell it, but I don't really want to spend $650 to replace it just to turn around and sell the thing.
I have the 101 Boxster Projects book. Is that what you used to take the canvas off or did you find something better on here?
I just bought a beater truck the other week so I can now park my car and not drive it daily. I see a new window being sewn in very soon.
Thanks Mike.
|
|
|
|
|
04-04-2011, 01:10 PM
|
#13
|
|
Registered User
Join Date: Apr 2007
Location: san fran
Posts: 241
|
Jake, I haven't seen the instructions in that book. If it has step by step instructions with photos you should be fine.
|
|
|
|
|
04-04-2011, 01:29 PM
|
#14
|
|
Registered User
Join Date: Apr 2009
Location: Orlando
Posts: 1,266
|
If the top is about 10 years old, then the canvas and stitching has reached it's life span and will start to deteriorate which means you will need a new top eventually. It's a good temporary fix for now, so start putting funds away for a new GAAH top.
__________________
http://i768.photobucket.com/albums/x...6/PC120055.jpg
Old Hippie Young Heart
2000 S/3.2 Liter/Tiptronic/Boxster S Sport Package/Cruise Control/Slate Grey Metallic
Red Special Leather Interior/Red Floor Mats/Red Hand Painted Instrument Dials/Roll Bar/Windstop
Small Carbon Package/Leather Wrap Carbon Wheel/Center Console Exterior Color/Alum Carbon Shift Knob
AM/FM Radio w/CD Player & Changer/Digital Sound Package/18" Turbo Wheels/Wheel Caps w/Colored Crest
|
|
|
|
|
04-08-2011, 10:50 AM
|
#15
|
|
Registered User
Join Date: Apr 2007
Location: san fran
Posts: 241
|
Jake, here is a picture of the car in sunlight... Here you can see the tint...
|
|
|
|
|
04-08-2011, 11:22 AM
|
#16
|
|
Registered User
Join Date: Jun 2007
Location: Freeport, New York
Posts: 472
|
Quote:
|
Originally Posted by Jake D
.....
I have the 101 Boxster Projects book. Is that what you used to take the canvas off or did you find something better on here?
....
|
Here's another DIY for replacing the top: http://sites.google.com/site/mikefocke2/replacingthetop-adiy
Regards, Maurice.
|
|
|
|
|
04-11-2011, 05:35 PM
|
#17
|
|
Registered User
Join Date: Feb 2009
Location: Ann Arbor, MI
Posts: 287
|
Marine vinyl
a note on the marine vinyl (strataglass) - looks great in the smoked tint. That is what I used but they recommend a special cleaning and treatment compound. I picked up a small sample from a marine / sailboat shop.
It is thinner - but may be less prone to cracking because it is not as stiff.
(Although, I wouldn't test this.)
|
|
|
|
|
04-11-2011, 06:13 PM
|
#18
|
|
Autobahn Glanz
Join Date: Dec 2010
Location: Charlotte, NC
Posts: 1,282
|
Mike, that looks nice smoked...can you show us some close up pics of the stitching? The reason I ask is I have seen some that didn't look so good but it sounds like you might have got some really nice stitching done.
|
|
|
|
|
04-12-2011, 10:27 AM
|
#19
|
|
Registered User
Join Date: Nov 2009
Location: Dayton Ohio
Posts: 225
|
Thats looks real nice. I actually just took mine off Sunday and dropped my top off at a shop to have tinted sewn in yesterday.. I had to stop myself from getting the charcoal vinyl as I thought it might be too dark. Any idea on what % his windows are?
I know I posted the other day about being broke and was gonna sell my beater truck for some maintenance parts, but I figured with a cracked rear window my chances of selling the car would be slim to none, plus it was slightly leaking even after silicone.
I dropped off my bumperettes to a buddy whos gonna spray them for free and then we're gonna go through and buff the whole car out.. Might even rip the exhaust off and powdercoat it black while I'm at it (own all the stuff to do it for free).
Thanks Mike for the pics. Funny how similar mine looks to that one and it's gonna look even more close to that once I get my top back on.
|
|
|
|
|
04-12-2011, 10:46 PM
|
#20
|
|
Registered User
Join Date: Apr 2007
Location: san fran
Posts: 241
|
Jake-I'm sure it wasn't too bad when you took the top of right. Not too bad to due as long as you take your time and follow the instructions. When putting the top back on my suggestion to you is to put the top back on in same order all the way to fastening it all up in front. The last thing you want to do is to lock the back window and canvas in to the frame. What we did was do everything in reverse and finish it up then when we put the top back on we noticed that the rear window was totally off--there were waves on the window and we thought that it was sewn on incorrectly. After a few minutes of thinking we took the back part apart--the rubber and locking piece of plastic with the top all the way closed then we started at the far end and pulled on the canvas to make it nice and tight and make sure that the window was really stretched then we pushed in the looking piece of plastic. We did that in steps making sure there was no waves. Jake you could always sell your boxster S and buy my buddies as he is thinking of selling his car and moving into a 996. Same year and color as yours but it is highly optioned with a new clutch, ln bearing, h20 pump and everything else already fixed which was on your wish list...
Whip-- I'll get some close up of the stitching. It was done nice and tight. The guy he went to does tops and interiors all the time. Which I was brave in the past with my other boxster to have had the window replaced rather than just putting clear tape over it during the rain. The top plastic is thinner than the OEM. I believe the OEM plastic is 40 gauge and the smoked one is 30 gauge.
|
|
|
|
 Posting Rules
|
You may not post new threads
You may not post replies
You may not post attachments
You may not edit your posts
HTML code is On
|
|
|
All times are GMT -8. The time now is 08:08 AM.
| |


 Buttercup
 Brodie - The blue car of awesome!
 Whip986S - SOLD but will live the good life!
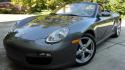 Peter Jr - SOLD but not forgotten!
 The Silver Surfer (SOLD)
 The Black Widow
 Nite
Nite Linear Mode


