 05-03-2007, 02:33 PM
|
#21
|
|
Registered User
Join Date: Sep 2004
Location: Atlanta
Posts: 1,820
|
Quote:
|
Originally Posted by Topless
Nice work Insite,
You patiently seek out leading edge performance upgrades, act as test pilot, verify your impressions with instrumentation and lap times and share your findings with all of us. Bravo! 
This is not bolt on fluff, but tested and verified with results. 2.5 sec on a track you already have wired is pretty good stuff. Just for kicks, if you had not made these improvements to your suspension and braking and focused only on the motor, how much HP increase would you need to get the same lap times? 50? 80? Interesting question don't you think? I suspect you are already outrunning most of the 987's in your area with a stock 2.5 motor. |
thanks for the kind words. for those reading this, i'd say that maybe .75 seconds was from the stress bar. another .75 was shocks. the final second was all brakes. either way, measurable gains.
to put the lap times in perspective, this was faster than the other boxsters, 996, a 928 race car (2700lb / 400HP), a 928 twin-screw (550HP), etc. i have a buddy with a tricked out '99 box that has a 3.2 in it. on street tires, he ran a 1:14.5. on race tires, he ran a 1:11.7. with my stock motor, i ran a 1:12.7 on street tires. not bad!
this chassis is really getting well developed. it's retarded, stupid fast in corners now. with the brakes, it's just patently absurd. now i need just a LITTLE power......
|

|

|
|
05-03-2007, 02:39 PM
|
#22
|
|
Track rat
Join Date: Nov 2006
Location: Southern ID
Posts: 3,701
|
Time to go shopping for that shiny new 3.8L. 
__________________
2009 Cayman 2.9L PDK (with a few tweaks)
PCA-GPX Chief Driving Instructor-Ret.
|
|
|
|
|
05-03-2007, 02:45 PM
|
#23
|
|
Registered User
Join Date: Sep 2004
Location: Atlanta
Posts: 1,820
|
Quote:
|
Originally Posted by Topless
Time to go shopping for that shiny new 3.8L. |
no joke. i may do a 3.6L in a year or two. i'll probably spend some more time developing the chassis and taking the car as far as it can go with stock power. then we'll step its game up with another one or two hundred ponies.
only problem is that THEN everyone will be like, "well you have that 400HP motor; THAT'S why you beat me!" it's fun now stomping them down with 201HP. no excuses. :-)
|
|
|
|
|
05-03-2007, 03:05 PM
|
#24
|
|
Track rat
Join Date: Nov 2006
Location: Southern ID
Posts: 3,701
|
Quote:
|
Originally Posted by insite
no joke. i may do a 3.6L in a year or two. i'll probably spend some more time developing the chassis and taking the car as far as it can go with stock power. then we'll step its game up with another one or two hundred ponies.
only problem is that THEN everyone will be like, "well you have that 400HP motor; THAT'S why you beat me!" it's fun now stomping them down with 201HP. no excuses. :-)
|
Just keep putting away $$ for a rainy day. When your 2.5 breaks...it's time.
I too enjoy being that guy in the old, underpowered 2.5 that knows how to drive. I am committed to S/S class for another year. After that, who knows.
__________________
2009 Cayman 2.9L PDK (with a few tweaks)
PCA-GPX Chief Driving Instructor-Ret.
|
|
|
|
|
05-03-2007, 04:07 PM
|
#25
|
|
Registered User
Join Date: Sep 2004
Location: Atlanta
Posts: 1,820
|
it really is a blast. i especially enjoy giving hot lap rides to porsche folks who have never been in a boxster. without a doubt they are absolutely FLOORED after the ride, usually with a comment like, "man, maybe i'll reconsider those cars!" most people, especially die hard 911 fanatics, are totally unaware of what these little monsters are capable of with a little bit of work.
|
|
|
|
|
05-03-2007, 04:53 PM
|
#26
|
|
Registered User
Join Date: Mar 2007
Location: Huntington, NY
Posts: 409
|
 Great stuff
Thanks Insite. This is great info. I appreciate the pictures too.
|
|
|
|
|
05-15-2007, 05:01 PM
|
#27
|
|
Registered User
Join Date: Sep 2006
Location: Montreal
Posts: 502
|
Hi Insite Nice post, I'm thinking of fabricating a brace myself and I'd want to know what diameter the bar and screws are.
Thanks
Franco
__________________
1997 Porsche Boxster manual
2018 Subaru WRX Sport Tech
2014 Honda CRV
2014 Mercedes Benz 350 ML
2015 Chevrolet Corvette Stingray manual
|
|
|
|
|
05-15-2007, 05:12 PM
|
#28
|
|
Registered User
Join Date: Sep 2004
Location: Atlanta
Posts: 1,820
|
Quote:
|
Originally Posted by Franco
Hi Insite Nice post, I'm thinking of fabricating a brace myself and I'd want to know what diameter the bar and screws are.
|
the bar's about an inch in diameter and is pretty much solid. not sure about the bolts; maybe 7mm?
|
|
|
|
|
05-18-2007, 03:49 PM
|
#29
|
|
Registered User
Join Date: Sep 2006
Location: Montreal
Posts: 502
|
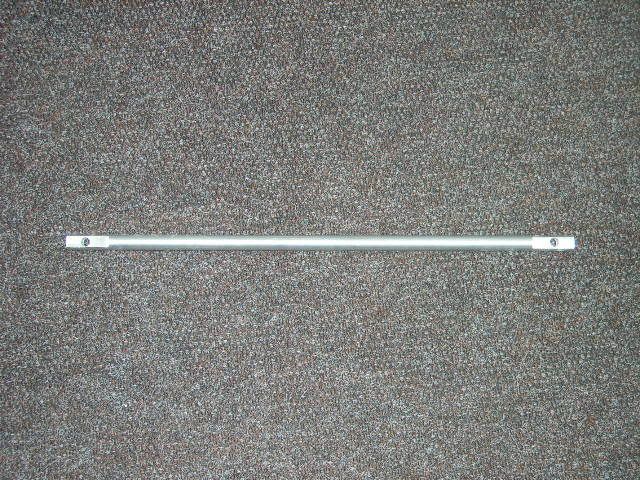
Hi, Had some time today so i made a rear lower brace, thought I'd share it if anyone is interested. 
Installed it in 10 minutes
__________________
1997 Porsche Boxster manual
2018 Subaru WRX Sport Tech
2014 Honda CRV
2014 Mercedes Benz 350 ML
2015 Chevrolet Corvette Stingray manual
|
|
|
|
|
05-19-2007, 08:39 AM
|
#30
|
|
Registered User
Join Date: Sep 2006
Location: Montreal
Posts: 502
|
Hi, Went for a ride last night and again this morning on some more twisty roads and let me just say that the rear end feels more precise and tight less twisty, worth the $10.00 . 
This is a must do for any Boxster,
Thanks Insite, this mod does way more than you lead us to believe.
__________________
1997 Porsche Boxster manual
2018 Subaru WRX Sport Tech
2014 Honda CRV
2014 Mercedes Benz 350 ML
2015 Chevrolet Corvette Stingray manual
|
|
|
|
|
05-19-2007, 09:28 AM
|
#31
|
|
Registered User
Join Date: Mar 2007
Location: Huntington, NY
Posts: 409
|
That's incredible! How did you make your own lower stress bar?
|
|
|
|
|
05-21-2007, 09:04 PM
|
#32
|
|
Registered User
Join Date: Sep 2006
Location: Montreal
Posts: 502
|
Quote:
|
Originally Posted by 2000SoCalBoxsterS
That's incredible! How did you make your own lower stress bar?
|
HI, I used a 3/4 x 24 inches long diameter aluminum bar, made 2 flats at each end about 2 inches in length, giving a total thickness of 9/16, then i measured the distance between the 2 bolts, drilled the bar at each end to clear a 3/8 bolt and that is all.
OH, the distance between the 2 existing bolt on my car was 22 1/4 center to center.
__________________
1997 Porsche Boxster manual
2018 Subaru WRX Sport Tech
2014 Honda CRV
2014 Mercedes Benz 350 ML
2015 Chevrolet Corvette Stingray manual
Last edited by Franco; 05-21-2007 at 09:07 PM.
|
|
|
|
|
05-22-2007, 08:21 AM
|
#33
|
|
Registered User
Join Date: Mar 2007
Location: Huntington, NY
Posts: 409
|
Easy for you to say & do. What kind of tools or power equipment is needed to take a 3/4 piece of aluminum and flatten the ends and drill the holes, and finish it off so nicely. Do you have the tools at home or did you do this at work?
__________________
http://i25.tinypic.com/20aq3wn.jpg http://i26.tinypic.com/2zguetx.jpg http://i28.tinypic.com/2jdi1ok.jpg
2000 Boxster S: 18" Turbo wheels w/color crests, Litronics, Onboard Computer, Traction control, Cruise, Painted rollbar, Leather interior, Aluminum package, headlight washers, Porsche GT3 seats, windstop, Hi Fi six speaker amp package, DSP, CDR 220, Limited Slip, side airbags, BK Rollbar extender.
|
|
|
|
|
08-06-2007, 04:46 PM
|
#34
|
|
Registered User
Join Date: Sep 2006
Location: Montreal
Posts: 502
|
Quote:
|
Originally Posted by 2000SoCalBoxsterS
Easy for you to say & do. What kind of tools or power equipment is needed to take a 3/4 piece of aluminum and flatten the ends and drill the holes, and finish it off so nicely. Do you have the tools at home or did you do this at work?
|
SORRY never came back to check this thread, never too late 
To fabricate the bar is a joke, i used a 3/4 diameter aluminum bar, used a file to make 2 flats at each end to facilitate drilling 7/16 holes and so that the 3/8 X 2 inch screws and lock washers sit on a flat surface, then i removed the existing metric screws on the triangular plate and installed the bar over it.
With all materials on hand this is a 45 minute job max.
If you have any other questions I'd be glad to help.
Franco
__________________
__________________
1997 Porsche Boxster manual
2018 Subaru WRX Sport Tech
2014 Honda CRV
2014 Mercedes Benz 350 ML
2015 Chevrolet Corvette Stingray manual
|
|
|
|
|
09-01-2007, 11:54 PM
|
#35
|
|
Registered User
Join Date: Jul 2007
Location: Texarkana, Texas
Posts: 959
|
Modification to the Lower Stress Bar
Franco, thanks for the good feedback on how to DIY this mod. I followed your lead and made one of these bars. Just a couple notes on the basic mod:
1. I was able to fit in a 1" bar. Look for solid aluminum round stock. I had to go to a specialty metal supplier to get this as hardware stores and Home Depot won't have it.
2. I had to remove the metal plate and one anti-sway bar mount to get the 1" bar up in there.
3. I polished the aluminum first and then clear coated it. Sure you'll never see it, but at least I know it looks pretty...
After I got the basic lower stress bar in place I decided to take it the next step. I call these the Bristol Bars... :-P Basically I made two more bars out of 3/4" solid aluminum bar stock. At one end I threaded in some custom modified eye bolts to mount to the SAME bolt as the main lower stress bar. These eye bolts allowed for some adjustment when installing and also allowed me to slide into the slot in the support so that no permanent modifications were required. I then attached the Bristol bars at the rear-most mounting points of the metal plate. This further ties in the rear suspension to another support piece at the rear of the car. I think this kind of "triangulation" of the rear suspension will really help to stiffen it up. Basically it totally reinforces that flimsy metal plate that is otherwise supposed to tie everything together. Plus, with everything made out of aluminum there is a minimal weight penalty.
Here's a photo of my "assistant" showing off the pieces of the system, the Ernie Bar and two Bristol Bars, making up a complete lower stress bar system:
|
|
|
|
|
09-01-2007, 11:58 PM
|
#36
|
|
Registered User
Join Date: Jul 2007
Location: Texarkana, Texas
Posts: 959
|
Here are some more pictures to give you a better idea of how it all fits together.
Kirk Bristol
|
|
|
|
|
09-02-2007, 12:17 AM
|
#37
|
|
Registered User
Join Date: Jul 2007
Location: Texarkana, Texas
Posts: 959
|
Just two more photos to try to clarify things here. You should be able to see the Ernie Bar mounted up high, kind of behind the anti-sway bar. The eye bolt portion of the smaller, lower bars are mounted just below the Ernie Bar at the same mounting bolts that are used for the Ernie Bar.
BTW, these eye bolts make it MUCH easier to mount the bars as there is some adjustment then allowed. I know Franco didn't have much trouble with making his Ernie Bar, but I followed my classic rule of measure three times and still cut (or in this case, drill the holes) WRONG. It was a bit of a PITA to make this stuff. The Mantis Sport bar should be a LOT easier to mount, or I guess you could just drill the damn holes in the right spot to start with.... Either way, a big thanks to Mantis and especially insite for bringing this mod to everyone's attention!
Kirk B.
|
|
|
|
|
09-02-2007, 01:02 AM
|
#38
|
|
Registered User
Join Date: Sep 2006
Location: California
Posts: 713
|
hey Kirk, great work!! Can you post your driving impressions?
__________________
http://farm4.static.flickr.com/3420/...90927559_o.jpg
Some stuff for sale: M030 S 24mm front sway bar, M030 base 19.6mm rear sway bar, 996 GT3 OEM Porsche Motorsport front strut mounts monoball "camber plates"
WTB: looking for some 5-7mm spacers with extended bolts
|
|
|
|
|
09-02-2007, 01:15 AM
|
#39
|
|
Registered User
Join Date: Jul 2005
Location: Preston, CT
Posts: 102
|
More pics of the "helper"!!!
|
|
|
|
|
09-02-2007, 06:16 PM
|
#40
|
|
Registered User
Join Date: Sep 2006
Location: Montreal
Posts: 502
|
Hi Kirk, lets begin with your hot assistant, please I've been married for 21 years and that's just painful  for me.
Next, I didn't use the eye bolts because IMHO they would reduce the overall stiffness of the 3/4 bar, so I measured 6 times , scrapped a couple of bars and then Voila but I could be wrong (NOT) .
I understand your idea for the 2 extra bars , but after much reflection wouldn't it be a much more solid setup if we would just replace the OEM triangular plate with a 1/2 plate instead and get equivalent or better results, I'm sure some local machine shop with a water jet cutting machine can cut one out for about $60.00.
Looking forward to your thoughts on this and more pics of your hot assistant .
Thanks
Franco
__________________
1997 Porsche Boxster manual
2018 Subaru WRX Sport Tech
2014 Honda CRV
2014 Mercedes Benz 350 ML
2015 Chevrolet Corvette Stingray manual
|
|
|
|
 Posting Rules
|
You may not post new threads
You may not post replies
You may not post attachments
You may not edit your posts
HTML code is On
|
|
|
All times are GMT -8. The time now is 03:38 AM.
| |


 Lil Red
 2009 Porsche Cayman 2.9L
 Linear Mode


