 03-26-2015, 06:43 AM
|
#181
|
|
Registered User
Join Date: Jan 2015
Location: Illinois
Posts: 104
|
Are you saying I have to get a GM starter too?  lol dammit. :ah:
|

|

|
|
03-26-2015, 08:25 AM
|
#182
|
|
Registered User
Join Date: Oct 2014
Location: Georgia
Posts: 391
|
Quote:
Originally Posted by Lcrivers816

Are you saying I have to get a GM starter too? lol dammit. :ah: |
Well if your plan was to use the Porsche starter then yep, sorry. You can find good used or rebuild units out there which will cost less then going straight to GM but I think they will still run you around $180-$200 so for a bit more I just got the IMI.
|
|
|
|
|
03-28-2015, 06:17 PM
|
#183
|
|
Registered User
Join Date: Oct 2014
Location: Georgia
Posts: 391
|
Good evening everyone,
Been a bit under the weather the last few days so haven't got as much done as I wanted but tomorrow is a new day so we will see 
Decent video update today and answered some of the questions I've been getting. If you have any others just let me know and i'll do my best to answer them.
Thanks!
J
Video update 3.28.2015 - https://youtu.be/zYu6f_g-rSE
|
|
|
|
|
03-29-2015, 01:42 PM
|
#184
|
|
Registered User
Join Date: Oct 2014
Location: Georgia
Posts: 391
|
Greetings all,
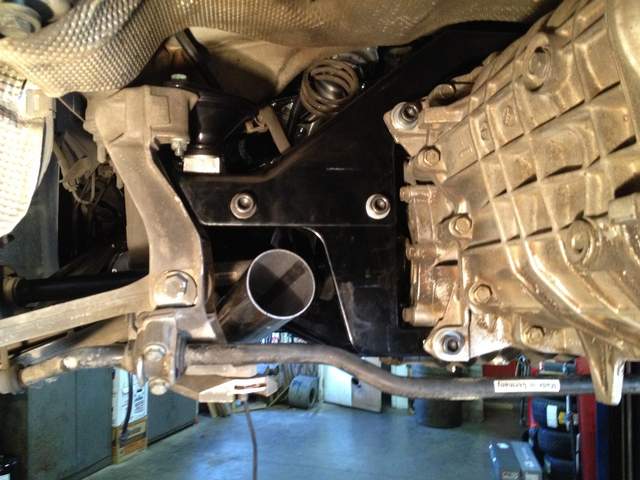
Dragged myself back to the shop today and worked for a few more hours. Trying to get all the little thing in place to make sure my exhaust clears everything... A few things to note~
Well the starter is really being a pain in the "enter edited expletive here".  The oil sender just simply unscrews from the oil pan as suspected, but even with that out of the way there does not seem to be enough clearance for the starter. I've loosened up every cradle bolt and tried to move the bars around to clear it but so far, this ain't gonna work. I didn't want to frustrate myself to badly on a Sunday so I just walked away.
Also tried to bolt up the A/C bracket and so far it looks like the damn holes don't quite line up... The top two line up but the bottom is no-go, not off by much but enough to not fit. I'll triple verify it before re-drilling the mount when I have the motor out again but this is starting to get ridiculous...
So I decided to go ahead and start playing with the exhaust and hope that everything turns out OK in the end! I got the down pipes and fitment through the axle area taken care of today. The exhaust is pretty close to the axles but that is as close as it is gonna get, I don't plan any Dukes of Hazzard style jumps but if I do it should still clear I may make a small heat shield for the exhaust there or possibly some header wrap to keep the CV boot from cooking, well see how it looks once it's on the ground.
Thanks~
J
Video Update 3.29.2015 - Exhaust - http://youtu.be/7Bh4i0-o6Ws


|
|
|
|
|
03-29-2015, 01:51 PM
|
#185
|
|
Registered User
Join Date: Oct 2014
Location: Georgia
Posts: 391
|
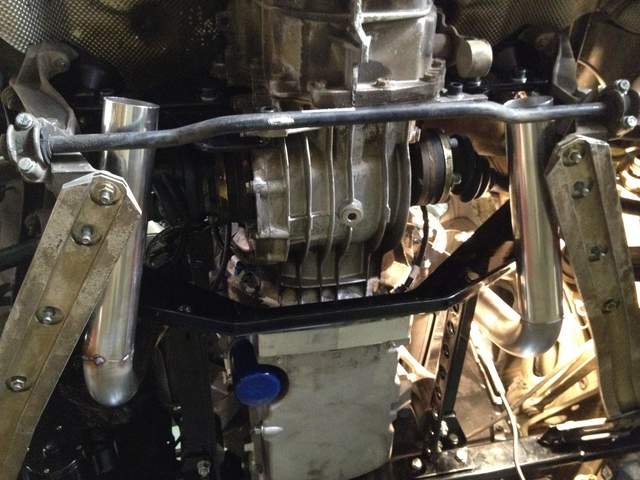
One more exhaust pic to show why I think an x-pipe may be the best solution. This is all just mock-up resting in place and will not look this way in the end... just brain-storming really.
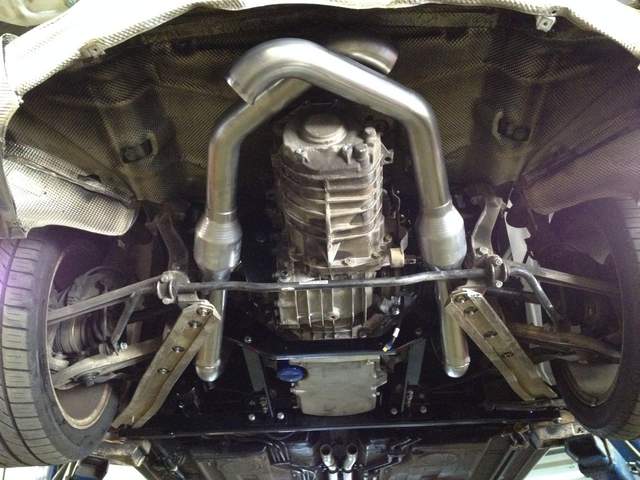
It's gonna be tight but hey what's new!!
Oh and don't be afraid to chime in and join the conversation... it's starting to feel like I'm talking to myself in here ")
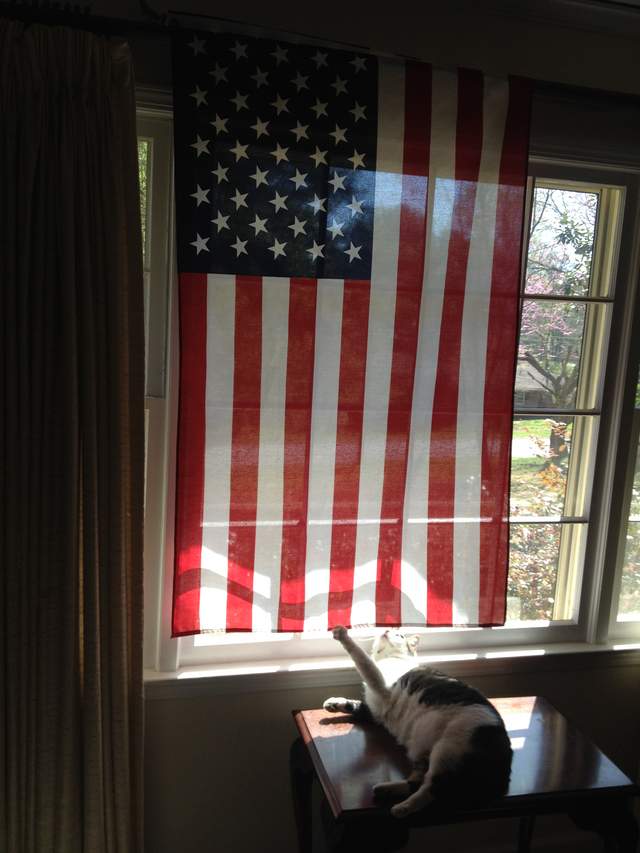
Here is a picture of one of my awesome cats - she loves America too 
|
|
|
|
|
03-29-2015, 02:42 PM
|
#186
|
|
Registered User
Join Date: Oct 2014
Location: Georgia
Posts: 53
|
Hard for me to comment - I'm just blown away by your craftsmanship - tenacity - and great attitude. I may have set the beast on fire by now.
One thing I've been thinking about is using the crate motor set up for a carburetor but use a 4 bore EFI unit. But until I see how the intake would work as a down draft and if it would interfere with the top when it's down I'll just keep thinking.
Seems like that would get the intake out of the heat - simplify installation - eliminate a lot of pipe fabrication - eliminate the oil pressure relocation - eliminate the cutting of the trunk floor - and the cost are not over the top. The system should also be smog compliant and pretty much self tuning. Just a thought.
I had intended to drop by but picked up the worst case of flu on earth when I went down to Amelia for the Concourse - figured you wouldn't want me within 1,000 yards of the shop. Maybe next week.
Randy
|
|
|
|
|
03-29-2015, 09:24 PM
|
#187
|
|
Registered User
Join Date: Jul 2013
Location: Bastrop, Tx
Posts: 2,644
|
Quote:
Originally Posted by BoxsterLS376
Oh and don't be afraid to chime in and join the conversation... it's starting to feel like I'm talking to myself in here |
Just sitting here enjoying the show. Keep up the good work! I have a 97 that you're almost inspiring me to go with a V8.
__________________
Woody
|
|
|
|
|
03-30-2015, 07:50 AM
|
#188
|
|
Registered User
Join Date: Jun 2012
Location: Bedford, TX
Posts: 2,755
|
Quote:
Originally Posted by BoxsterLS376
Oh and don't be afraid to chime in and join the conversation... it's starting to feel like I'm talking to myself in here |
We are here  Take a look at the views on your thread, over 17,000! I don't have anything to contribute and why clutter up the thread? Great information, and I love the pictures and videos. Keep up the great work 
__________________
______________________________________________
2001 Boxster S Lapis Blue
TS Cat Bypass Pipes and exhaust
iPad Mini Dash Install
DEPO Tail Lights
|
|
|
|
|
03-30-2015, 08:53 AM
|
#189
|
|
Registered User
Join Date: Oct 2014
Location: Georgia
Posts: 391
|
Quote:
Originally Posted by JRL
Hard for me to comment - I'm just blown away by your craftsmanship - tenacity - and great attitude. I may have set the beast on fire by now.
One thing I've been thinking about is using the crate motor set up for a carburetor but use a 4 bore EFI unit. But until I see how the intake would work as a down draft and if it would interfere with the top when it's down I'll just keep thinking.
Seems like that would get the intake out of the heat - simplify installation - eliminate a lot of pipe fabrication - eliminate the oil pressure relocation - eliminate the cutting of the trunk floor - and the cost are not over the top. The system should also be smog compliant and pretty much self tuning. Just a thought.
I had intended to drop by but picked up the worst case of flu on earth when I went down to Amelia for the Concourse - figured you wouldn't want me within 1,000 yards of the shop. Maybe next week.
Randy
|
Hey Randy,
Sorry to hear you're not feeling well, hope you get better soon. I definitely appreciate the compliments! Yeah I think the biggest problem with a carb/EFI unit would be the intake, top up or down because you would essentially have to expose the air clearer outside of the engine compartment. It is possible to set up a cold air type system using the intake on the side of the car but would take some kind of custom intake to route the air up there.
Feel free to drop by when you are feeling better and i'll show you what I've gotten done~
Thanks!
J
Quote:
Originally Posted by itsnotanova
Just sitting here enjoying the show. Keep up the good work! I have a 97 that you're almost inspiring me to go with a V8.
|
Excellent! Glad it is still keeping everyone's attention Some of these little things are tedious and not very exciting so just making sure no one is asleep! 
I hope this does inspire you! Just keep in mind though if you start with a 97 it is going to take even more work then this project I've got going... it is much better to start off with an "S" model if you can. Better transmission, brakes, cooling, suspension etc. so many things you will want to change after a V8 is in there so keep it in mind!
Quote:
Originally Posted by BruceH
We are here Take a look at the views on your thread, over 17,000! I don't have anything to contribute and why clutter up the thread? Great information, and I love the pictures and videos. Keep up the great work |
Haha thanks Bruce, I appreciate it!! Hopefully soon enough we will get to fire this bad boy up and make things more exciting
|
|
|
|
|
04-10-2015, 12:14 PM
|
#190
|
|
Registered User
Join Date: Dec 2014
Location: SF Bay Area
Posts: 246
|
Hey,
Have you drilled new holes for the hand brake cables yet? I'm just wondering how renegade runs it to the handle.
Vlad
|
|
|
|
|
04-12-2015, 05:09 AM
|
#191
|
|
Registered User
Join Date: Oct 2014
Location: Georgia
Posts: 391
|
Quote:
Originally Posted by martsink
Hey,
Have you drilled new holes for the hand brake cables yet? I'm just wondering how renegade runs it to the handle.
Vlad
|
Hey Vlad,
I have not and actually haven't bothered to ask Renegade how they did it~ Doesn't seem to complicated but just more stuff that needs to be done. I am actually getting pretty close to that now so hopefully I'll give you an update on that soon.
Greetings everyone else,
Sorry for the lack of updates - I've been a bit under the weather the past few weeks and progress pretty much came to a halt, but we are back to rocking and rolling again so I wanted to pick up where I left off with a quick video.
I was just about wrapped up with the cooling system last update so I wanted to point out a few things to be aware of regarding the new radiators and some rub points.
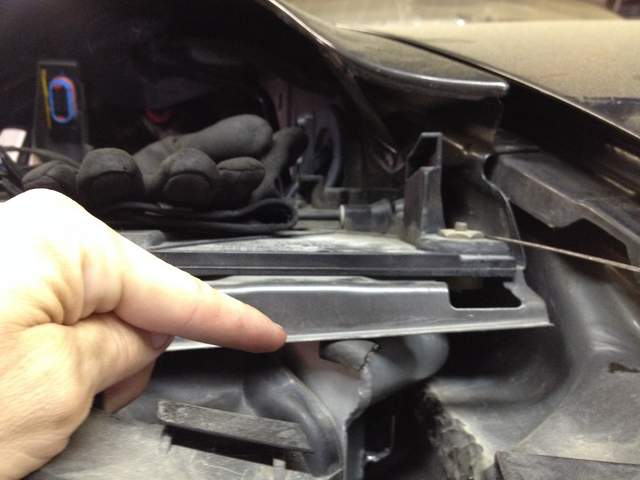
All the front end cooling system is back together now, 3 new CSF all aluminum radiators, new Heater core and all new cooling hoses front to back! Got the bumper and headlights back on yesterday and it is starting to look like a car again.
Posted a few pics below of the problem areas you need to look out for on the upgraded radiators~
I'm also about to start working on this project a bit more during the week so I truly hope to have this bad boy running within a month now!
On a side note it looks like I may have a customer interested in converting his 2000 911 C4 which sadly just appears to have popped a cylinder head, or it may be available to purchase for a conversion but either way I've talked to a few of you guys and will keep you posted if it becomes available!~
Short and sweet video update finished up the cooling system will be available shortly~
http://youtu.be/4H0r_KcBG1Y
Thank you all for your support!
J


|
|
|
|
|
04-12-2015, 05:21 AM
|
#192
|
|
Registered User
Join Date: Oct 2014
Location: Georgia
Posts: 391
|
About those transmission spacers~ I was wrong.
Oh yeah... 
Sooo before I forget I have been trying to get some other things done including getting the accessories on like the alternator, starter etc...
Looks like I was wrong about the spacers for the transmission - not a big deal but so far I have found 2 definite problems with it. Just wish I hadn't wasted so much time with it now, but now I am back to clearance issues again as well so is a bigger pain in the rear for that reason.
So while the motor sits nice and level with the spacers so far I have found that the shifter counterbalance thingy hits the Renegade transmission cross mount if the rear of the tranny is sitting to low. I took about 1/4" of my spacing out and it now clears, but now the front crank bolt is hitting the damn e-brake mount again
The spacers are very likely the problem for why I was having problems getting the starter bolted up too although I haven't messed with it much I think that may sort itself out.
Sorry if I screwed any of you guys up
J
Last edited by BoxsterLS376; 04-12-2015 at 05:35 AM.
|
|
|
|
|
04-12-2015, 05:28 AM
|
#193
|
|
Registered User
Join Date: Oct 2014
Location: Georgia
Posts: 53
|
JJ the video link doesn't work - at least for me.
|
|
|
|
|
04-12-2015, 05:38 AM
|
#194
|
|
Registered User
Join Date: Oct 2014
Location: Georgia
Posts: 391
|
Quote:
Originally Posted by JRL
JJ the video link doesn't work - at least for me.
|
Hey Randy,
Give it just a few more minutes less then 5 I think - YouTube is still processing it.
OK working now~
Thanks!
J
Last edited by BoxsterLS376; 04-12-2015 at 05:40 AM.
|
|
|
|
|
04-12-2015, 06:14 AM
|
#195
|
|
Registered User
Join Date: Oct 2014
Location: Georgia
Posts: 53
|
It's working now - thanks - more good stuff.
|
|
|
|
|
04-12-2015, 12:20 PM
|
#196
|
|
Registered User
Join Date: Oct 2014
Location: Georgia
Posts: 391
|
Quote:
Originally Posted by JRL
It's working now - thanks - more good stuff.
|
Thanks Randy,
Not a whole lot of excitement in this video but the next few should really see things rolling again!
J
|
|
|
|
|
04-14-2015, 06:20 AM
|
#197
|
|
Registered User
Join Date: Apr 2015
Location: Atlanta
Posts: 1
|
Very cool
This is a great project. Enough in fact to get me to register just so I can subscribe!
-QB
|
|
|
|
|
04-14-2015, 07:06 AM
|
#198
|
|
Registered User
Join Date: Sep 2012
Location: S. New Jersey
Posts: 1,239
|
The more posts I read the more I think this would not be the direction I would go. Sounds like it would be an awesome car when done but as a Kit, I'm trying to figure out where the Kit part is.
You are a glutted for punishment but no question have to be admired for you persistence and passion.
When that thing is done, I hope it is the beast it seems it could be
I will keep following. Keep posting your progress as this is akin to watching a climb of Mt Everest

__________________
2002 S - old school third pedal
Seal Grey
|
|
|
|
|
04-14-2015, 08:49 AM
|
#199
|
|
Registered User
Join Date: Oct 2013
Location: San Jose, CA
Posts: 583
|
Quote:
Originally Posted by kk2002s
The more posts I read the more I think this would not be the direction I would go. Sounds like it would be an awesome car when done but as a Kit, I'm trying to figure out where the Kit part is.
You are a glutted for punishment but no question have to be admired for you persistence and passion.
When that thing is done, I hope it is the beast it seems it could be
I will keep following. Keep posting your progress as this is akin to watching a climb of Mt Everest
|
Yes, aint that the truth! I admire the gumption it takes to do this project. Talking to Renegade, it's virtually "plug and play". not so...
Having ridden in a V8 powered Boxster, however, i can attest that when it is done, it will have been worth it :-)
__________________
2000 S - Borla Exhaust, TS Cat Deletes, RSS UDP, B&M Short Shift, T96 Steering Wheel, Potenza RE-71R's,
Mantis 2.0L Deep Sump, de-snorkeled, Bilstein PSS9 Coil-Overs, Rennline lug studs, and auto crossed regularly.
|
|
|
|
|
04-15-2015, 03:06 AM
|
#200
|
|
Registered User
Join Date: Oct 2014
Location: Georgia
Posts: 391
|
Thanks everyone for the kind words!
Yeah this has been challenge for sure but I know it will all be worth it in the end!!
|
|
|
|
| Thread Tools |
|
|
| Display Modes |
 Linear Mode Linear Mode
|
 Posting Rules
|
You may not post new threads
You may not post replies
You may not post attachments
You may not edit your posts
HTML code is Off
|
|
|
All times are GMT -8. The time now is 10:48 AM.
| |


 2001 Boxster S
 Name my car - no


