 05-13-2026, 04:57 AM
|
#1
|
|
Registered User
Join Date: Sep 2018
Location: Laval QC
Posts: 891
|
Black foam from heater - some notes from my experience
Both my Boxsters have this problem, the one I am selling is the worst. I decided to fix them both starting with my 2000S, that I am keeping, to gain experience before doing the one that is for sale.
The video from Help Me DIY is my inspiration:
https://www.youtube.com/watch?v=42IZ0lb33C8
Some things that I did differently.
1) Instead of cutting the sides of the snorkel-like duct and folding it down I cut the bottom as well and removed the cutout completely to simplify the operation and have more room.
2) I worked with the first door partially or fully open rather than fully closed as shown in the video. This gives more room to get a hand in to remove the old foam and the access to the door is just as good.
3) Instead of using tape or foam I used a piece of thin aluminium that I JB welded to the door. The advantages of are that the aluminum is easier to control than tape when maneuvering it into place and before the JB weld hardens the patch can be slid around to place it accurately. With the door fully open it is easy to feel how the patch is placed at the bottom and on the sides.
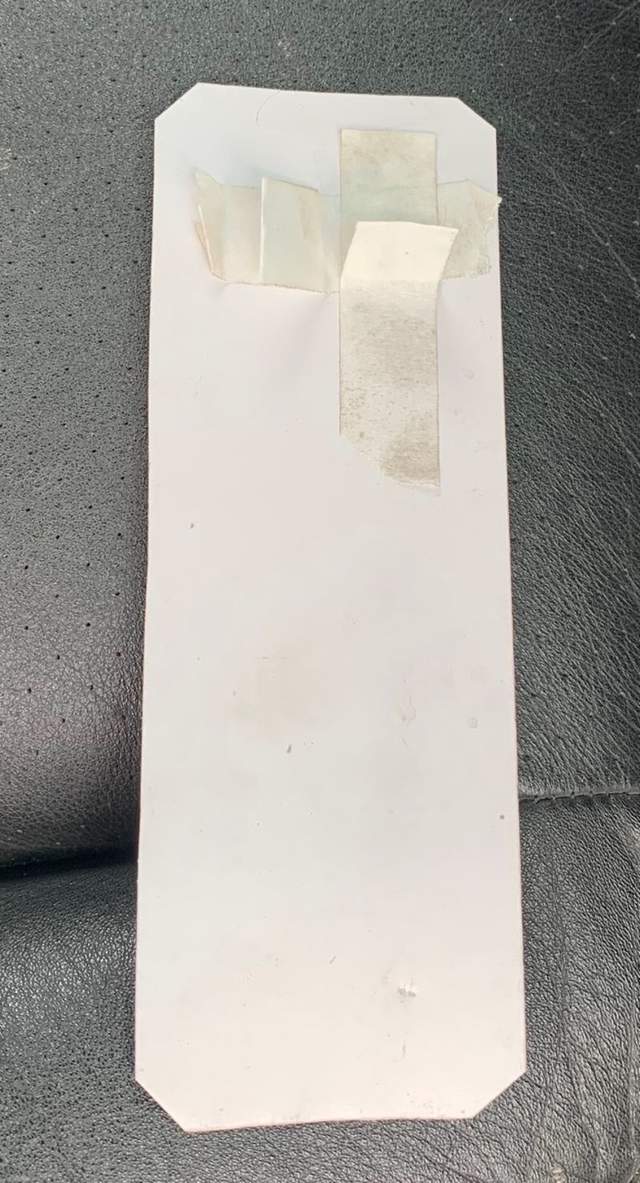
I stuck a couple of pieces of masking tape with a fold in the middle onto the patch to act as a handle during installation.
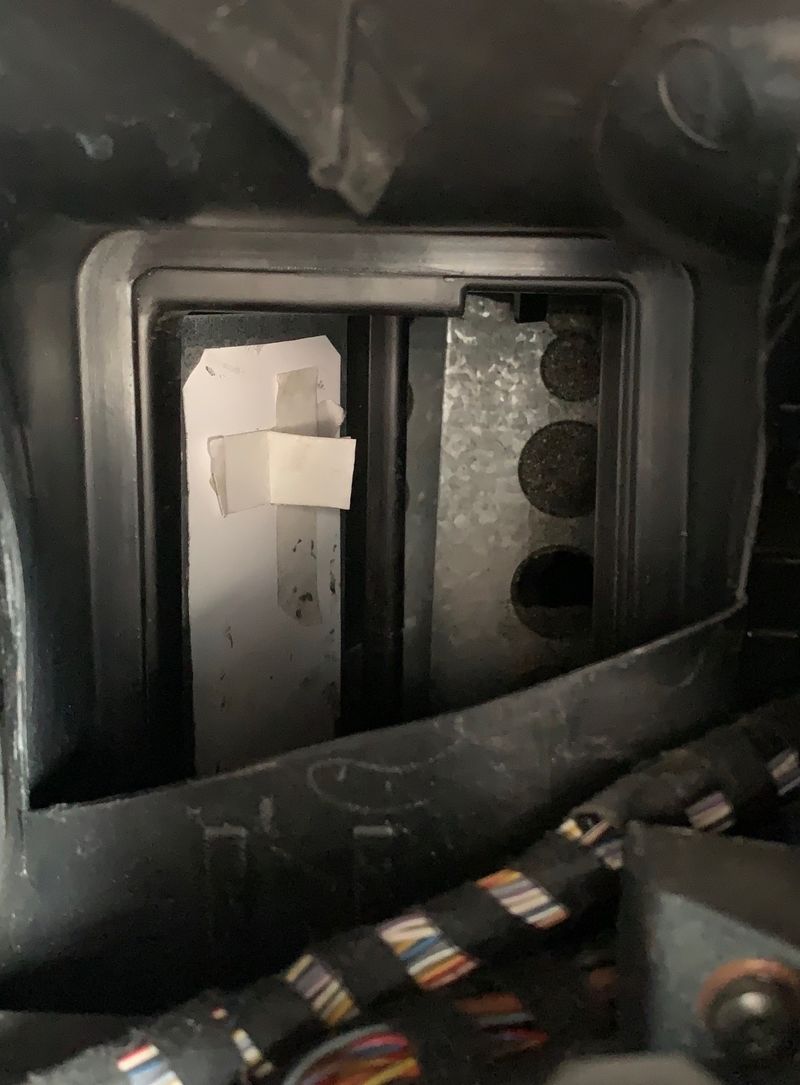
The second door will not be so easy. The foam on it is starting to degrade but is almost intact and very resistant to being removed. I am considering the alternative of going in through the heater core which gives better access to this door. I can wait to do this later, so will button up the parts that I removed and come back to it some other time.
__________________
Grant
Arctic Silver 2000 Boxster S - bought with a broken engine, back on the road with the engine replaced
Green 2000 Boxster 5-speed and 1978 928 auto
1987 924S 5-speed (Sold) - Blue 2000 Boxster 5 spd (Sold)
|

|

|
|
05-13-2026, 06:19 AM
|
#2
|
|
Registered User
Join Date: Jan 2023
Location: Ontario, Canada
Posts: 255
|
I believe there are 3D printable plugs out there, worst case I could design some. I assumed my car would have the same problem but when I opened it up the foam was pristine.
|
|
|
|
|
05-14-2026, 04:05 AM
|
#3
|
|
Registered User
Join Date: Sep 2018
Location: Laval QC
Posts: 891
|
Quote:
Originally Posted by redpepperracing

I believe there are 3D printable plugs out there, worst case I could design some. I assumed my car would have the same problem but when I opened it up the foam was pristine.
|
I saw the plugs but I think installing one aluminum plate is easier than installing the the plugs, especially the lower ones that you can't see.
I found this video, it is very detailed, both going in from the front and from behind the radio.
https://www.youtube.com/watch?v=ncCc-ZbdaFI
I don't understand why he didn't cut the duct behind the radio all the way up. Access is improved by cutting all the way up.
__________________
Grant
Arctic Silver 2000 Boxster S - bought with a broken engine, back on the road with the engine replaced
Green 2000 Boxster 5-speed and 1978 928 auto
1987 924S 5-speed (Sold) - Blue 2000 Boxster 5 spd (Sold)
|
|
|
|
|
05-14-2026, 05:21 AM
|
#4
|
|
Registered User
Join Date: Jan 2023
Location: Ontario, Canada
Posts: 255
|
Quote:
Originally Posted by elgyqc
I saw the plugs but I think installing one aluminum plate is easier than installing the the plugs, especially the lower ones that you can't see.
|
Fair enough, I didn't actually get that far in the process.
|
|
|
|
|
05-14-2026, 06:13 PM
|
#5
|
|
Registered User
Join Date: May 2025
Location: Midwest
Posts: 75
|
I did this "repair" a year ago with silver ducting tape (not actual duct tape but the more rigid metal tape). It has failed. It rattles :|
I think it may be where I taped the vent back up mostly, but I'll be adhering in the plugs, probably going to print them out of PA6-GF.
|
|
|
|
|
05-15-2026, 05:01 AM
|
#6
|
|
Registered User
Join Date: Sep 2018
Location: Laval QC
Posts: 891
|
Quote:
Originally Posted by maxbottomtime
I did this "repair" a year ago with silver ducting tape (not actual duct tape but the more rigid metal tape). It has failed. It rattles :|
I think it may be where I taped the vent back up mostly, but I'll be adhering in the plugs, probably going to print them out of PA6-GF.
|
I'd be interested to know what you find when you go back in there. I too used the aluminum tape to close up the duct. In Help Me DIY he used Hi-heat aluminum tape, rather than brand X like I did, maybe the difference is important.
__________________
Grant
Arctic Silver 2000 Boxster S - bought with a broken engine, back on the road with the engine replaced
Green 2000 Boxster 5-speed and 1978 928 auto
1987 924S 5-speed (Sold) - Blue 2000 Boxster 5 spd (Sold)
|
|
|
|
|
05-15-2026, 10:48 AM
|
#7
|
|
Registered User
Join Date: Jan 2023
Location: Ontario, Canada
Posts: 255
|
Quote:
Originally Posted by maxbottomtime
I did this "repair" a year ago with silver ducting tape (not actual duct tape but the more rigid metal tape). It has failed. It rattles :|
I think it may be where I taped the vent back up mostly, but I'll be adhering in the plugs, probably going to print them out of PA6-GF.
|
I would instead go softer and use TPU, easier to get in, presumably, and they shouldn't rattle. If they have the right profile they shouldn't even need adhesive.
|
|
|
|
|
05-15-2026, 01:32 PM
|
#8
|
|
Registered User
Join Date: Sep 2018
Location: Laval QC
Posts: 891
|
Going in from the frunck I got the front blend door out... it was still almost fully clothed in foam, that was falling off. The foam was on both sides, as others have indicated and I think even folded over the edges. So, doing the repair with tape or an aluminum patch as I am doing means that there will be leakage around the door where the foam should seal it. I am debating whether to add foam around the edges to get a factory like seal. Probably not...
__________________
Grant
Arctic Silver 2000 Boxster S - bought with a broken engine, back on the road with the engine replaced
Green 2000 Boxster 5-speed and 1978 928 auto
1987 924S 5-speed (Sold) - Blue 2000 Boxster 5 spd (Sold)
|
|
|
|
|
05-17-2026, 05:24 AM
|
#9
|
|
Registered User
Join Date: Jul 2016
Location: Wauseon, OH
Posts: 96
|
I also accessed the blend doors from the frunk when I did this repair as that seemed to be far less invasive that cutting the ductwork behind the head unit. It is possible to recover both blend doors this way although I'll readily admit that getting to the inner door was a PITA. I covered the doors with craft store self-adhesive EVA foam sheets. This has worked well for me.
You can see how I did it here - https://rx19jones.wixsite.com/projectboxster/projectboxster7

__________________
2002 Boxster S Orient Red Metallic / Graphite Gray
https://rx19jones.wixsite.com/a-986-s
|
|
|
|
|
05-22-2026, 10:21 PM
|
#10
|
|
Registered User
Join Date: Oct 2018
Location: North Cali
Posts: 862
|
My 2002 Boxster also started to throw some debris through the vents and probably it's not very good to inhale that dust, so I might have to do something to it, too. And all this at 26000 miles. I know it's the age and not the mileage, but it's still very disappointing.
Cutting through the duct behind the radio and then stitching it back up with duct tape seems a bit kinda barbarian to me. I like A 986 S's approach more, but from that point removing the whole entire dash and then fixing it properly without messing up my hands seems like a reasonable approach.
|

|
|
|
05-23-2026, 04:01 AM
|
#11
|
|
Registered User
Join Date: Sep 2018
Location: Laval QC
Posts: 891
|
Quote:
Originally Posted by Homeoboxter
... Cutting through the duct behind the radio and then stitching it back up with duct tape seems a bit kinda barbarian to me. I like A 986 S's approach more, but from that point removing the whole entire dash and then fixing it properly without messing up my hands seems like a reasonable approach.
|
I agree it's a bit barbarian, but for me, a 2 day repair operation vs a months long project (for me) that opens up the possibility or messing up all sorts of things is a no brainer. 
__________________
Grant
Arctic Silver 2000 Boxster S - bought with a broken engine, back on the road with the engine replaced
Green 2000 Boxster 5-speed and 1978 928 auto
1987 924S 5-speed (Sold) - Blue 2000 Boxster 5 spd (Sold)
|
|
|
|
|
05-23-2026, 03:56 AM
|
#12
|
|
Registered User
Join Date: Sep 2018
Location: Laval QC
Posts: 891
|
I finished my Boxster S without major problems. The whole operation is less complicated than it seems before starting, even if there are a lot of things to remove in the frunk.
Yesterday I started on my Boxster base. When I got eyes on the front blend door I thought I was wasting my time because the foam looked like it had been replaced already, then I touched it and it turned into powder.
So this is where that long piece of foam I found in the driver's side window vent on the other car is supposed to go.

When rempving this door I had a problem separating the door from the bottom clip (that is accessed from the passenger footwell), I was able to release it using a long screwdriver from inside the frunk.
Other than that the repair was the same as previously outlined for the S.
Dimensions for the aluminum patches that I used are 2 3/4" X 6 1/2" (rear door), 3 1/4" X 6 3/4" and 1 3/8" X 8 1/4".
__________________
Grant
Arctic Silver 2000 Boxster S - bought with a broken engine, back on the road with the engine replaced
Green 2000 Boxster 5-speed and 1978 928 auto
1987 924S 5-speed (Sold) - Blue 2000 Boxster 5 spd (Sold)
|
|
|
|
|
05-23-2026, 04:38 AM
|
#13
|
|
Registered User
Join Date: Sep 2015
Location: SW Ohio
Posts: 30
|
Grant,
Are you able to provide any detail on the raised grey section of foam on the right hand side of your photo? I have never seen this addressed before in blend door repair discussions. Possible function and dimensions?
Thanks,
Rick
|
|
|
|
|
05-23-2026, 12:04 PM
|
#14
|
|
Registered User
Join Date: Sep 2018
Location: Laval QC
Posts: 891
|
Quote:
Originally Posted by gdotcvg
Grant,
Are you able to provide any detail on the raised grey section of foam on the right hand side of your photo? I have never seen this addressed before in blend door repair discussions. Possible function and dimensions?
Thanks,
Rick
|
I think most people don't find that piece because it is gone somewhere in the ducting. The second video that I linked to above, by Yogi, shows him recovering it from his driver side window duct... like me. Since I now know where it goes I stuck it on my repaired door.
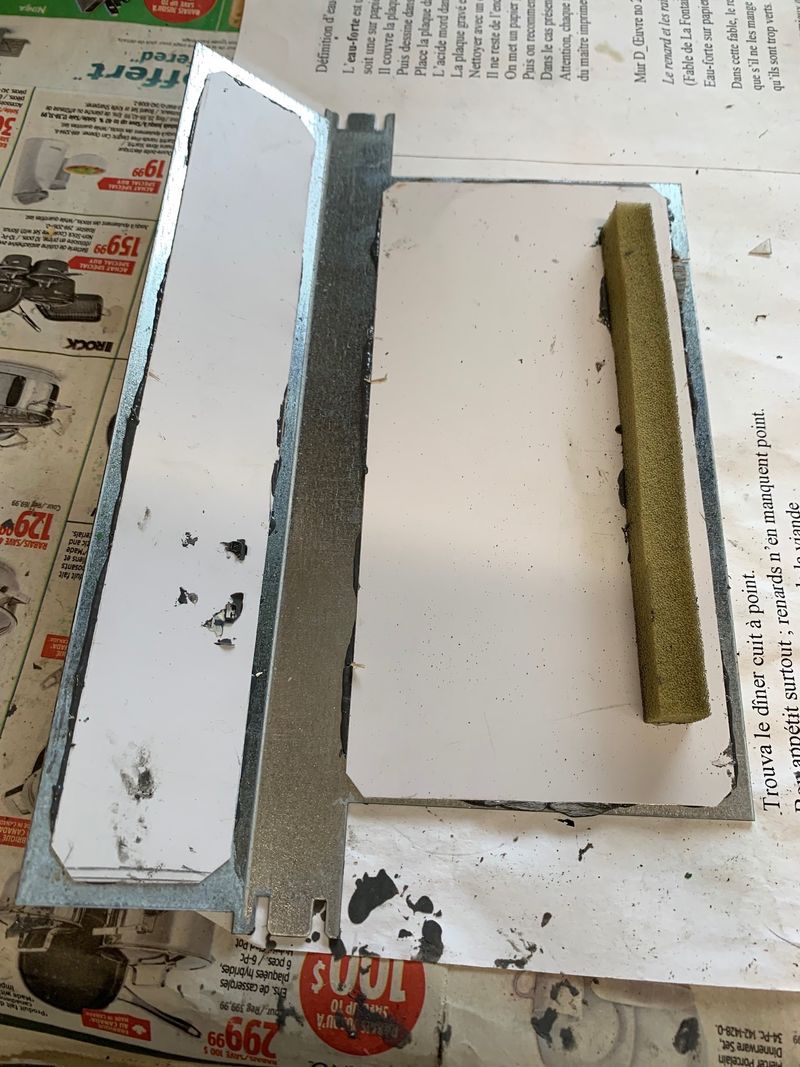
I didn't think to measure its position, so just estimated based on the picture.
__________________
Grant
Arctic Silver 2000 Boxster S - bought with a broken engine, back on the road with the engine replaced
Green 2000 Boxster 5-speed and 1978 928 auto
1987 924S 5-speed (Sold) - Blue 2000 Boxster 5 spd (Sold)
|
|
|
|
|
05-24-2026, 06:22 PM
|
#15
|
|
Registered User
Join Date: May 2014
Location: Atlanta, GA
Posts: 111
|
Did this on my Civic years ago, I replaced the thinner and cheaper "open celled foam" with "closed cell foam", has worked well for me the last 12+ years.
|
|
|
|
 Posting Rules
|
You may not post new threads
You may not post replies
You may not post attachments
You may not edit your posts
HTML code is On
|
|
|
All times are GMT -8. The time now is 01:56 PM.
| |


 Boxster
 Boxster
 Hybrid Mode


