 03-29-2020, 05:46 PM
|
#1
|
|
Registered User
Join Date: Sep 2009
Location: toronto
Posts: 2,668
|
Tachometer Signal
Gents,
Where is the best place to connect to the tachometer signal. I ask as I a have the cluster apart and have access to the plugs at the back.
From the wiring diagrams (1998) I have and posts it appear that it is plug II (white), gr/vi (I think this is green/violet; I hope I can actually discern the colours). I could solder a pin and insert into to the connector. This will be a bit messy.
Which OBDII wire is the tachometer signal? Would it be better wiring practice to use a wire tap (if so which type) and just grab switched 12v there as well? The wires I am trying to connect up are a very fine gauge.
A present it would be easier to order wire taps online rather that grabbing soldering equipment.
j
__________________
986 00S
|

|

|
|
04-03-2020, 08:15 AM
|
#2
|
|
Registered User
Join Date: Sep 2009
Location: toronto
Posts: 2,668
|
Crickets.........no one?
__________________
986 00S
|
|
|
|
|
04-03-2020, 10:30 AM
|
#3
|
|
Registered User
Join Date: Aug 2009
Posts: 1,466
|
Check the ODB2 plug pin 9 Purple Green
__________________
2003 Black 986. modified for Advanced level HPDE and open track days.
* 3.6L LN block, 06 heads, Carrillo H rods, IDP with 987 intake, Oil mods, LN IMS. * Spec II Clutch, 3.2L S Spec P-P FW. * D2 shocks, GT3 arms & and links, Spacers front and rear * Weight reduced, No carpet, AC deleted, Remote PS pump, PS pump deleted. Recaro Pole position seats, Brey crouse ext. 5 point harness, NHP sport exhaust
|
|
|
|
|
04-04-2020, 06:21 AM
|
#4
|
|
Registered User
Join Date: Aug 2019
Location: Spokane, WA
Posts: 61
|
tach connections
I have a question about doing just the opposite.
My engine swap is using a stand alone ECU that has a 5V tach driver output. As I'm not using the factory ECU to make the engine run, can I back feed the 5 volt signal into the same OBD wire to make the tach in the dash work?
I'm aware of the Tach Adapt product but I still need to find out what wire or wires feed the tach itself. 01 Boxster S 6 speed. I have the Bentley manual and wiring diagram but my eyesight is just not that good anymore.....
Thanks for any thoughts!
|
|
|
|
|
04-04-2020, 05:46 PM
|
#5
|
|
Registered User
Join Date: Sep 2009
Location: toronto
Posts: 2,668
|
Quote:
Originally Posted by jsceash

Check the ODB2 plug pin 9 Purple Green
|
Thanks man. This matches with the cluster wire colour which is good news. There was nothing I could find wiring diagram-wise. By any chance can are you aware of which OB2 pin/wire colour is switched 12V???
__________________
986 00S
|
|
|
|
|
04-05-2020, 06:10 PM
|
#6
|
|
Registered User
Join Date: Jul 2019
Location: Charleston
Posts: 569
|
Quote:
Originally Posted by outsidetheboxster
I have a question about doing just the opposite.
My engine swap is using a stand alone ECU that has a 5V tach driver output. As I'm not using the factory ECU to make the engine run, can I back feed the 5 volt signal into the same OBD wire to make the tach in the dash work?
I'm aware of the Tach Adapt product but I still need to find out what wire or wires feed the tach itself. 01 Boxster S 6 speed. I have the Bentley manual and wiring diagram but my eyesight is just not that good anymore.....
Thanks for any thoughts!
|
I am leaving the factory ECU in tack so I can run all these little things like coolant temp yada yada. Might not be the "cleanest" solution but I think it should work.
If leaving the ECU in place doesn't work; I'm gonna follow this thread for a solution.
__________________
'99 supercharged 4.3 chevy Boxsterado
'98 PP13B powered "RX986"
This hairdresser only cuts mullets
|
|
|
|
|
04-06-2020, 06:15 AM
|
#8
|
|
Registered User
Join Date: Aug 2009
Posts: 1,466
|
Quote:
Originally Posted by jaykay
Thanks man. This matches with the cluster wire colour which is good news. There was nothing I could find wiring diagram-wise. By any chance can are you aware of which OB2 pin/wire colour is switched 12V???
|
I used the wire in the center console under the radio Its a 4 pin plug that also has a ground. Green/Black switched 12, Red/Green 12vdc always, Brown GND.
ODB2 pin 16 Red/Black
__________________
2003 Black 986. modified for Advanced level HPDE and open track days.
* 3.6L LN block, 06 heads, Carrillo H rods, IDP with 987 intake, Oil mods, LN IMS. * Spec II Clutch, 3.2L S Spec P-P FW. * D2 shocks, GT3 arms & and links, Spacers front and rear * Weight reduced, No carpet, AC deleted, Remote PS pump, PS pump deleted. Recaro Pole position seats, Brey crouse ext. 5 point harness, NHP sport exhaust
Last edited by jsceash; 04-06-2020 at 06:24 AM.
|
|
|
|
|
04-06-2020, 06:37 AM
|
#9
|
|
Registered User
Join Date: Aug 2009
Posts: 1,466
|
I used this for my Traqmate system, until I started to have compatibility problems with GoPro. I switched to AIM with ODB2 bluetooth which was easier mating video to data and direct connect sensor.
__________________
2003 Black 986. modified for Advanced level HPDE and open track days.
* 3.6L LN block, 06 heads, Carrillo H rods, IDP with 987 intake, Oil mods, LN IMS. * Spec II Clutch, 3.2L S Spec P-P FW. * D2 shocks, GT3 arms & and links, Spacers front and rear * Weight reduced, No carpet, AC deleted, Remote PS pump, PS pump deleted. Recaro Pole position seats, Brey crouse ext. 5 point harness, NHP sport exhaust
|
|
|
|
|
04-06-2020, 07:39 AM
|
#10
|
|
Registered User
Join Date: Dec 2012
Location: FL
Posts: 4,146
|
If you do end up using a tap, search for posi-tap connectors, they are way better than the blade style ones that pinch onto the wire. When I wired my trailer hitch, the blade connectors that came with my harness were junk and worked intermittently, so I replaced them all (except passenger side turn signal) with the posi-tap connectors. Guess which one doesn't work reliably these days 
Disclaimer: Maybe the blade taps that came with my harness were junk and other brands are better, but I really like the posi-tap connectors.
|

|
|
|
04-07-2020, 12:28 PM
|
#11
|
|
Registered User
Join Date: Sep 2009
Location: toronto
Posts: 2,668
|
Quote:
Originally Posted by steved0x
If you do end up using a tap, search for posi-tap connectors, they are way better than the blade style ones that pinch onto the wire. When I wired my trailer hitch, the blade connectors that came with my harness were junk and worked intermittently, so I replaced them all (except passenger side turn signal) with the posi-tap connectors. Guess which one doesn't work reliably these days
Disclaimer: Maybe the blade taps that came with my harness were junk and other brands are better, but I really like the posi-tap connectors. |
Thanks Steve! I was doing some surfing (not the kind I want to be doing on Coco Beach) and came to this conclusion. Thanks for confirming my arm chair thoughts with practical experience. Here is a link for everyone's benefit:
https://www.posi-products.com/
These things still use a spike going in the stands but my feeling is that they would yield way less damage while having less potential for an intermittent condition
__________________
986 00S
|
|
|
|
|
04-07-2020, 12:42 PM
|
#12
|
|
Registered User
Join Date: Sep 2009
Location: toronto
Posts: 2,668
|
Quote:
Originally Posted by Quadcammer
|
Thanks Quad, yes this is exactly where I am going with this....If I can secure all the materials required for the install during these times, fI will post up the results.
Currently looking for a remote 3D printer for small stuff and then have them mail back the hardware.
__________________
986 00S
|
|
|
|
|
04-07-2020, 12:51 PM
|
#13
|
|
Registered User
Join Date: Sep 2009
Location: toronto
Posts: 2,668
|
Quote:
Originally Posted by jsceash
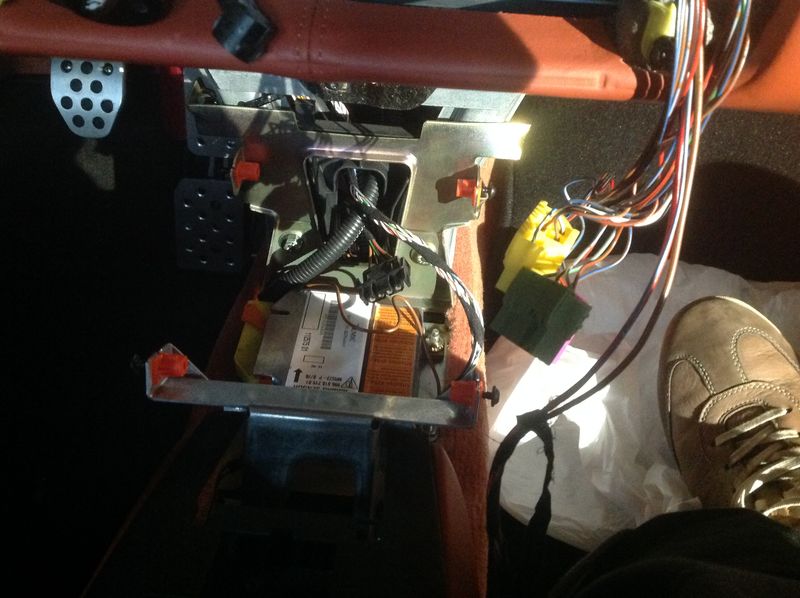
I used the wire in the center console under the radio Its a 4 pin plug that also has a ground. Green/Black switched 12, Red/Green 12vdc always, Brown GND.
ODB2 pin 16 Red/Black
|
Beautiful yes, I think you are referring to the black connector pictured here in mid-frame. I would dearly love to find a connector that goes in and slice into those leads for all the add ons I am putting in. Any mistakes would not harm the stock harness.
Did you find pins that fit in there?
__________________
986 00S
|
|
|
|
 Posting Rules
|
You may not post new threads
You may not post replies
You may not post attachments
You may not edit your posts
HTML code is On
|
|
|
All times are GMT -8. The time now is 02:07 AM.
| |


 Linear Mode


