 08-17-2015, 06:59 PM
|
#1
|
|
There Is No Substitute.
Join Date: May 2007
Location: West Coast
Posts: 3,253
|
Changed Motor Mount @ 95k
As some of you may know I am currently performing a kind of mega service on my 986. Today I buttoned up the water pump, new low temperature thermostat, and motor mount. I had to get a second water pump gasket after I bent mine trying to install it from the top. I highly recommend installing the pump from the bottom with the motor mount out, which is what I ended up doing, it provides a lot more room to work. All three of these replacements are easily doable in day.
Getting the mount out was a pain, because even with a 15mm box wrench, spanner, deep socket, and crowfoot, I could only reach the two upper bolts with the spanner, which wasn't long enough to provide a lot of leverage. I finally got them to break, and after that getting the mount out was pretty easy, and having the thermostat hose disconnected definitely made removing and installing the mount much easier.
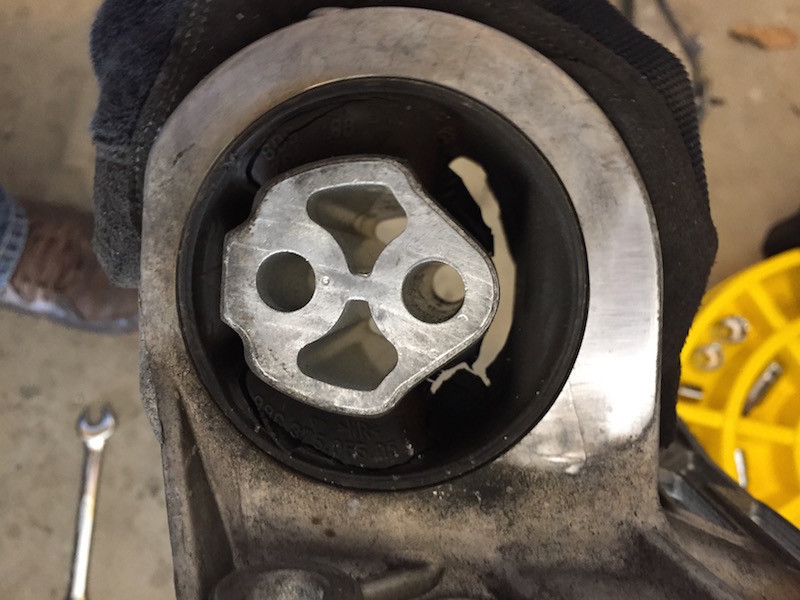
Here is what my 16 year old, 95k motor mount looked like:
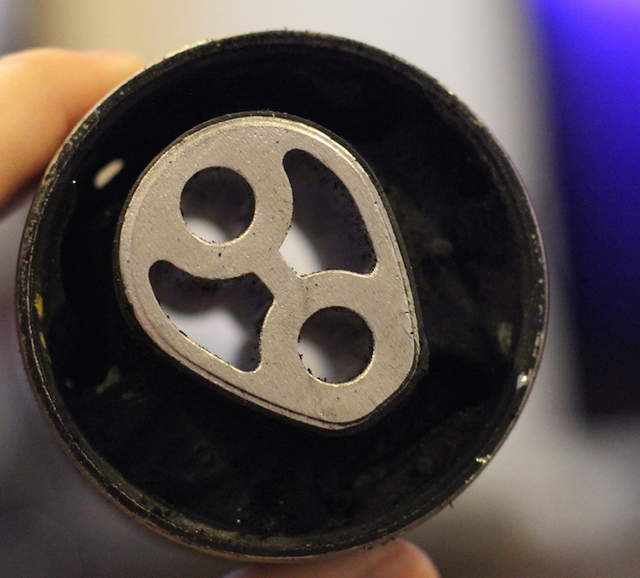
Here is the new 987 mount (the 987 one supersedes the old 986 style):
As you can seen the rubber on the top of the old mount was completely gone, and if you look closely you can see that there is a long crack all the way around the remaining rubber. It was better than I expected, but it needed to be replaced. I removed it from the holder with a combination hacksaw, and sledgehammer/awl. Not the best way but it worked. I had the new insert frozen, and I got it have way in before I declared defeat and called around to find a hydraulic press. A friend of my dad's pressed the new mount in within a few seconds. I definitely recommend using a press over the sledge hammer/DIY route.
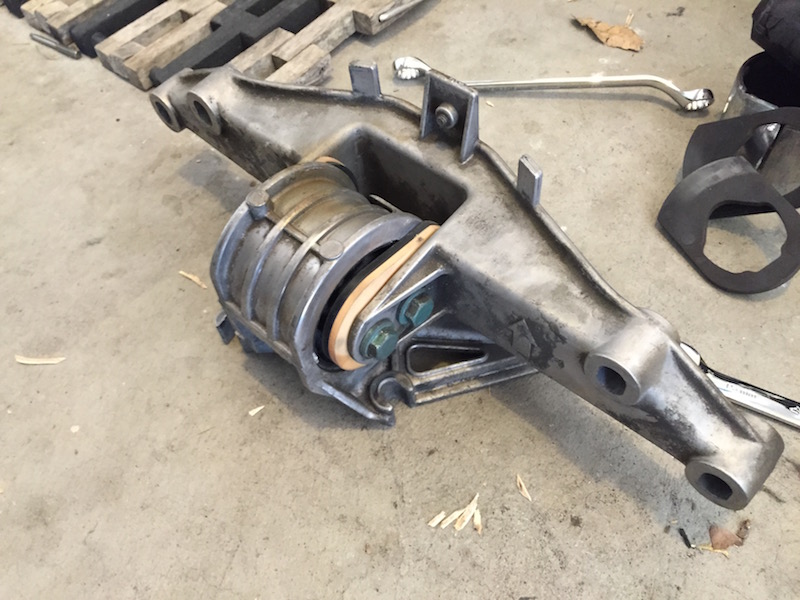
I then mounted the new mount into the yoke. I put a little blue locktite on the two bolts, and torqued to 48ft/lbs. I installed the rubber bumpers with the rubber facing in, because I could not find any instructions on the direction for the new rubber/foam stoppers, and because I figured the inner mount section would experience more friction, than the outer foam side.
The yoke and mount with new 987 insert, and rubber/foam stops:
I got the mount back in, and fastened all of the bolts, lifting and lowering the engine as needed with a large scissor jack I had placed under the oil sump with a 2x4 on top to distribute the weight more evenly. I torqued the lower two engine bolts to spec (34ft/lbs), but couldn't reach the two upper bolts with the torque wrench, so I torqued then as much as I could by hand. I then installed the four studs, and 4 nuts. None of the instructions I saw mentioned torquing the studs separately from the nuts. I attempted to torque the studs, but was afraid of stripping the 7mm stud hex heads, so I settled for getting them as tight as I could by hand, then torqued the nuts to spec (48ft/lbs). I raised and lowered the engine a bit and rechecked the torque, then called it a day.
The best tip I have for anyone replacing their motor mount is to not loosen the upper two engine bolts too much. Loosen them just enough to remove the mount. The two U-shaped bolt holes allow you to not remove the bolts all the way, and tightening them back in with the little space available is a pain.
I'm curious what people's thoughts are on using locktite, torquing the studs, and the direction of the rubber/foam stops?
Best,
-Rick 
__________________
1999 Ocean Blue Metallic Boxster - blueboxster.com
|

|

|
|
08-18-2015, 08:11 AM
|
#2
|
|
Registered User
Join Date: May 2013
Location: Orange County, California
Posts: 266
|
Nice work! I just did this combo (water pump, thermostat, engine mount) recently too. Mine had 140,000 miles on it, and the center piece was completely separated from the rubber. I had to pay a shop ($95) to press it in for me. These double flex ratcheting wrenches came in really handy for me when removing the mount bolts thanks to the extremely long reach and flex head.
Did you have the insert pressed in in a particular orientation? I see that the insert is not symmetric all around. I tried to tell the shop to orient mine just like how a 987 complete mount is, but they did it up side down. Still don't feel any different, don't know if there will be any damage in the long run.
I'm sure you will enjoy the new ride quality just like I do with mine. Didn't know the 986 can be so comfortable (after replacing the engine mount and the rear track arms, of course  )
|
|
|
|
|
08-18-2015, 12:42 PM
|
#3
|
|
There Is No Substitute.
Join Date: May 2007
Location: West Coast
Posts: 3,253
|
Those extra long ratchets look fantastic for getting at the two upper bolts. I did have the new mount pressed in a certain way, the same orientation as this.
__________________
1999 Ocean Blue Metallic Boxster - blueboxster.com
|
|
|
|
|
08-18-2015, 01:36 PM
|
#4
|
|
Registered User
Join Date: Sep 2009
Location: toronto
Posts: 2,668
|
Just wondering why all are not using the whole 987 mount housing assembly....IIRC it's a direct fit. I will have to get to this shortly and did not anticipate pressing anything.
...dreading this job on jack stands
__________________
986 00S
|
|
|
|
|
08-18-2015, 03:19 PM
|
#5
|
|
Registered User
Join Date: Feb 2015
Location: QC
Posts: 415
|
Quote:
Originally Posted by jaykay

Just wondering why all are not using the whole 987 mount housing assembly....IIRC it's a direct fit. I will have to get to this shortly and did not anticipate pressing anything.
...dreading this job on jack stands
|
AutoPartsWAY.ca Canada 2001 Porsche Boxster Engine Mount Bushing in Canada
Vs 180US+
Hit center of bushing with hammer and it will probably fly out. Saw a section of the old bushing out and then the rest comes out easily by hand.. I used an arbor press on the frozen new bushing. Went in easy peasy..
No problem doing it with jack stands if you have a decent bed to roll around on under there
Last edited by WillH; 08-18-2015 at 03:22 PM.
|
|
|
|
|
08-18-2015, 04:17 PM
|
#6
|
|
There Is No Substitute.
Join Date: May 2007
Location: West Coast
Posts: 3,253
|
The creeper has been my number one best tool for this service, and I almost didn't buy one. I thought cardboard would be fine, but my dad said I would regret not having one. He was right, it has made everything that much easier. Also, there is no reason to worry about using jack stands. I purchased some Esco's, and they have given me way more confidence than my old HF stands. The car hasn't moved a millimeter, even when I was battling the engine carrier bolts.
I hit the center of the old mount out in two hits, then I got a small hacksaw in there. Hammering the old mount out, wasn't what I was expecting when servicing my precision german car.
Also, Pelican Parts sells the insert only for $34. However, make sure you have someone who can press it in/out first, because if they charge you like they did to hancock1701, maybe buying the entire assembly makes more sense.
Hoping my original Q's didn't get lost in my original lengthy post:
Quote:
|
I'm curious what people's thoughts are on using locktite, torquing the studs, and the direction of the rubber/foam stops?
|
__________________
1999 Ocean Blue Metallic Boxster - blueboxster.com
Last edited by rick3000; 08-18-2015 at 04:20 PM.
|
|
|
|
|
08-18-2015, 10:05 PM
|
#7
|
|
Registered User
Join Date: May 2015
Location: Greater Seattle, WA
Posts: 534
|
I just used the original rubber side disc-like shaped pieces (well, after cleaning them up a bit) - they were in good shape and crammed onto the new 987 mount protrusions just fine.  So no foam pieces in on my mount install.
Immediately after I installed the front mount, and for probably a couple days, I marveled at how smooth the clutch worked and all. Before there was a shutter/shaking, especially noticeable when engine was cold. Now (seems after my wife drove it) it's come back some.
I'm wonders if perhaps the alignment of the mount isn't as good as it could be, and if it settled a bit somehow. Any thoughts on how to align the mount to the body? There was substantial adjustment where the four nuts/studs clamp the bracket to the body. I seem to remember set letting it settle he it wanted to, and tightening it up. It was nowhere close to how the bracket set on the original mount.
I did get the mount pressed in the right side up (like it is on the 987 mount assembly).
Last edited by jakeru; 08-18-2015 at 10:17 PM.
|
|
|
|
|
08-19-2015, 08:45 AM
|
#8
|
|
Registered User
Join Date: Oct 2014
Location: California Central Coast
Posts: 1,476
|
Quote:
Originally Posted by jakeru
I just used the original rubber side disc-like shaped pieces (well, after cleaning them up a bit) - they were in good shape and crammed onto the new 987 mount protrusions just fine. So no foam pieces in on my mount install.
Immediately after I installed the front mount, and for probably a couple days, I marveled at how smooth the clutch worked and all. Before there was a shutter/shaking, especially noticeable when engine was cold. Now (seems after my wife drove it) it's come back some.
I'm wonders if perhaps the alignment of the mount isn't as good as it could be, and if it settled a bit somehow. Any thoughts on how to align the mount to the body? There was substantial adjustment where the four nuts/studs clamp the bracket to the body. I seem to remember set letting it settle he it wanted to, and tightening it up. It was nowhere close to how the bracket set on the original mount.
I did get the mount pressed in the right side up (like it is on the 987 mount assembly). |
I also noticed the amount of adjustability while installing my mount, so what I thought was when the car was built maybe they used some method to align the engine to the body?? I know expecting a lot... SO I just tightened the nuts on the original score marks on the brace.
|
|
|
|
|
08-19-2015, 08:55 AM
|
#9
|
|
Registered User
Join Date: Jun 2014
Location: LB, Germany
Posts: 1,529
|
Just wondering if the 2 screws can't easily be reached from the inside of the car if the service port behind the seats is removed.
Regards
Markus
|

|
|
|
08-19-2015, 09:48 AM
|
#10
|
|
Registered User
Join Date: Aug 2013
Location: Bay Area
Posts: 700
|
A nice set of ratcheting box wrenches get those bolts nicely from the bottom of the car. I don't think they are accessible from the top as the crank cog blocks any easy access.
I probably said every bad word 2 or 3 times, but eventually the hard to reach bolts come loose. Its those damn coolant hoses that are the real ************************************s.
Last edited by epapp; 08-19-2015 at 01:30 PM.
|
|
|
|
|
08-19-2015, 10:45 AM
|
#11
|
|
Registered User
Join Date: May 2013
Location: Orange County, California
Posts: 266
|
Quote:
Originally Posted by rick3000
Also, Pelican Parts sells the insert only for $34. However, make sure you have someone who can press it in/out first, because if they charge you like they did to hancock1701, maybe buying the entire assembly makes more sense.
|
Suncoast Parts has the whole assembly for $140, and I didn't know about it. If I had, I would've gone with the whole thing too. But in my case, I went down to Sears Auto Center and asked them if they could press it in for me, they said yes, should be about $30. Great! When I got the thing out and took it down to them, they told me they didn't have any adapter big enough to press it in. Then I tried Pepboys, press wasn't woriking. Tried O'reilly, they could, but would have to send it out, takes about a day.
So yeah, the whole assembly would be a safer and less annoying approach if you don't know anyone with a press.
Oh, and to one of your questions, I couldn't get my torque wrench in there, so I got everything to snug, and then add another 1/8 to 1/4 turn. The car still hasn't fallen apart yet.
Last edited by hancock1701; 08-19-2015 at 10:47 AM.
|
|
|
|
|
08-19-2015, 07:39 PM
|
#12
|
|
Registered User
Join Date: May 2015
Location: Greater Seattle, WA
Posts: 534
|
Torquing properly without getting a torque wrench onto a fastener is not a problem if you have a similar fastener you can get a torque wrench onto. Then after using the torque wrench, use a hand wrench on the torqued fastener to get a sense of how much force you need to press with your hand on the hand wrench to make the torqued fastener move (just a little bit), and immediately duplicate that force on your difficult-to-reach fastener.
As I recall, all the fasteners for the entire motor mount job called for the same torque setting so it's very easy to apply this technique to torque everything properly.
Last edited by jakeru; 08-19-2015 at 07:43 PM.
|
|
|
|
|
08-20-2015, 07:20 AM
|
#13
|
|
Registered User
Join Date: Sep 2008
Location: Agoura Hills (LA) So.Cal.
Posts: 1,574
|
Nice write up Rick. I also just changed all three components, WP, Low Temp Thermostat and motor mount. After 14 years and 26,000 miles my motor mount was torn, but nothing like yours. I bet there are a lot of Boxsters out there with bad motor mounts and the drivers have no idea.
__________________
1995 Porsche C4 Cab
2016 BMW M2, 6 Speed LBB - ED 7/2016
1997 993 Cab - Sold; 1997 993 Turbo - Sold
2001 Boxster S - Original Owner - 30K Miles -SOLD
|
|
|
|
|
08-21-2015, 03:34 AM
|
#14
|
|
Registered User
Join Date: Nov 2014
Location: Wallace, Nova Scotia, CANADA
Posts: 182
|
Just wondering what a reasonable amount of time this job would take a competent shop, or a dealer, to perform.....water pump, thermostat and motor mount?
__________________
The name's Ian....now a former owner.....sold my 2000 Speed Yellow Base to its new owner in Nova Scotia.
|
|
|
|
|
08-21-2015, 06:47 AM
|
#15
|
|
There Is No Substitute.
Join Date: May 2007
Location: West Coast
Posts: 3,253
|
Probably about 4-5 hours. It took me the whole day, but it was my first time doing it, and the car was on jack stands not a lift.
__________________
1999 Ocean Blue Metallic Boxster - blueboxster.com
|
|
|
|
|
08-21-2015, 07:04 AM
|
#16
|
|
Registered User
Join Date: Nov 2014
Location: Wallace, Nova Scotia, CANADA
Posts: 182
|
Quote:
Originally Posted by rick3000
Probably about 4-5 hours. It took me the whole day, but it was my first time doing it, and the car was on jack stands not a lift.
|
Whew, thanks. $$$
__________________
The name's Ian....now a former owner.....sold my 2000 Speed Yellow Base to its new owner in Nova Scotia.
|
|
|
|
|
08-29-2015, 03:56 PM
|
#17
|
|
Registered User
Join Date: Jul 2014
Location: Long Island
Posts: 180
|
Quote:
Originally Posted by Wallace River
Whew, thanks. $$$
|
Just did this yesterday. The longest part of the job was lying on my back underneath the car deciding if i wanted to do it or bring it somewhere. I decided to do it and it was much easier than I expected. Took about three hours but could do it much faster next time. The scariest part was when the motor dropped a bit when I got the bottom bracket loose. Was easy to get the mount out of the car. I just moved the passenger side hose out the the way and pulled it down. I reused the rubber washers from the old mount. I have a friend who is a Porsche mechanic and he said that is fine. I had to install it with the longer side facing opposite from the way it came out. Mount went back in even easier. car shifts much smoother now. Feels new. I autocrossed it last weekend with the broken mount and it was horrible. BTW i backed the car up onto ramps and put the front on jack stands. I did use blue loctite and torques all bolts but the to one. Also my mount only had three bolts on it, not four.
|
|
|
|
|
09-01-2015, 11:51 AM
|
#18
|
|
Registered User
Join Date: Jul 2012
Location: CT, USA
Posts: 104
|
I also did this at the beginning of the season at about 120K miles. Swapped the full mount with the 987 unit. I think I paid $115 from FCP Autoparts. Came sealed in the OEM bag with all the latest part numbers. I also swapped the low temp T-Stat at the same time. Much improved over the standard one. Car only runs up to the original temp if I get stuck in traffic. As soon as you are rolling again it cools right off. Also while I was in there I swapped the fuel filter since you already have full access with the covers off.
__________________
2000 Boxster S
|
|
|
|
|
10-13-2015, 06:26 AM
|
#19
|
|
Registered User
Join Date: Jun 2014
Location: LB, Germany
Posts: 1,529
|
Hi,
i have a question concerning the two rubber dampers 98737525505 on each side of the 987 engine mount. Why are they so f…king expensive? Is that a very special material?
They are around 18 Euros (20 USD) each at Porsche stealership. Just for a peace of rubber? Or is there something i've missed?
Is there any source to get these parts at an affordable price?
Thanks and regards
Markus
|
|
|
|
|
10-13-2015, 08:00 AM
|
#20
|
|
There Is No Substitute.
Join Date: May 2007
Location: West Coast
Posts: 3,253
|
They are expensive because they are 'Porsche' parts.
Pedro mentions on his website you can fabricate your own from some heavy duty rubber, and a number of people just reuse the ones from the original mount, even though the fit isn't perfect. They are only made by Porsche, there isn't another manufacture making them at a lower price. I hated paying so much for two stupid pieces of rubber, but I didn't want to get under there and find out they needed to be replaced and not have them. They will wear out eventually, so I considered it preventative.
__________________
1999 Ocean Blue Metallic Boxster - blueboxster.com
|
|
|
|
 Posting Rules
|
You may not post new threads
You may not post replies
You may not post attachments
You may not edit your posts
HTML code is On
|
|
|
All times are GMT -8. The time now is 02:39 AM.
| |


 Porscha
 1998 Porsche Boxster
 Growly Grannis/Sex stallion
 Linear Mode


