 02-01-2013, 07:36 AM
|
#61
|
|
1999 base
Join Date: Dec 2011
Location: Coral Springs FL
Posts: 1,617
|
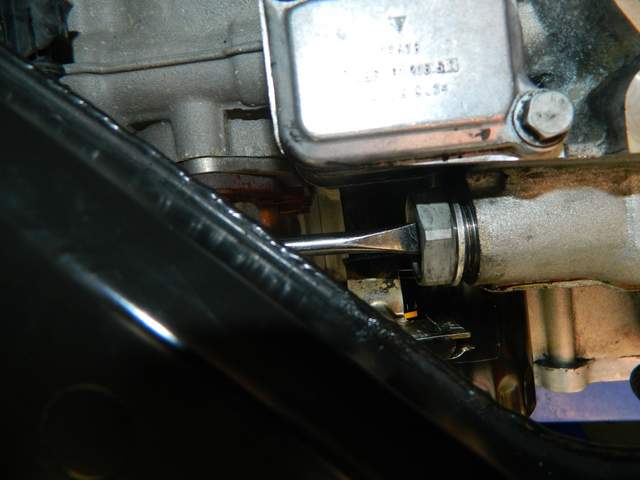
for extracting the bearing, i wanted to have the best grip and torque i can get.
so i slide a 16mm wrench on the nut, and held the center bolt with a 13 mm socket.

holding the ratchet in my left hand and turning the socket clockwise, extracted the bearing with no effort at all. in fact, i was a littel bit sorpraised how easy it came out.
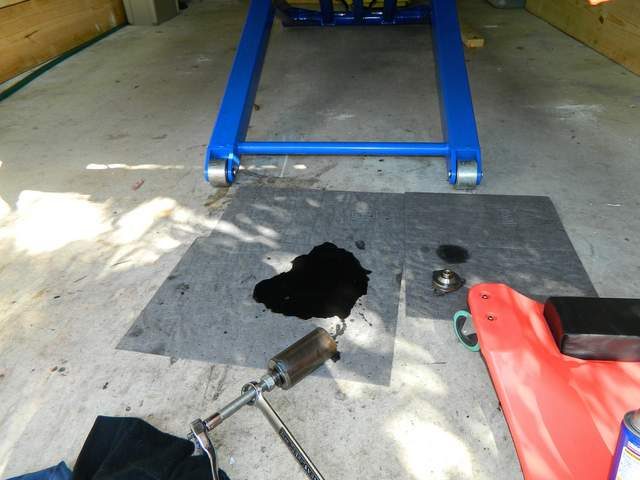
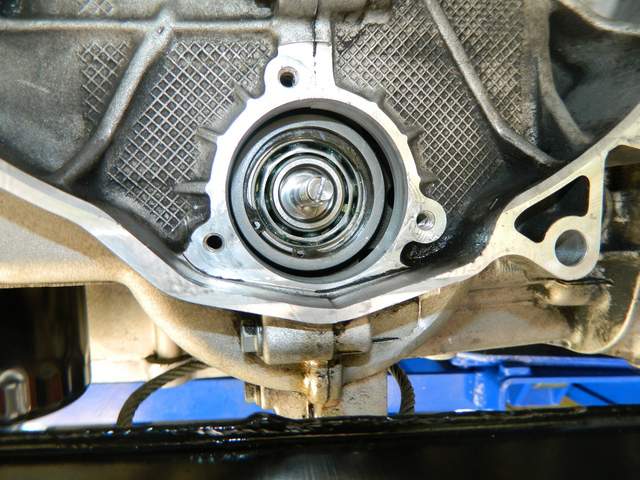
one of my fears, was to find out the IMS is not centered (based on other posts i read). i was happy to see it was perfectly centered, and i do not need to remove the third tensioner (a true PITA to remove).

Last edited by Meir; 02-01-2013 at 08:10 AM.
|

|

|
|
02-01-2013, 07:48 AM
|
#62
|
|
1999 base
Join Date: Dec 2011
Location: Coral Springs FL
Posts: 1,617
|
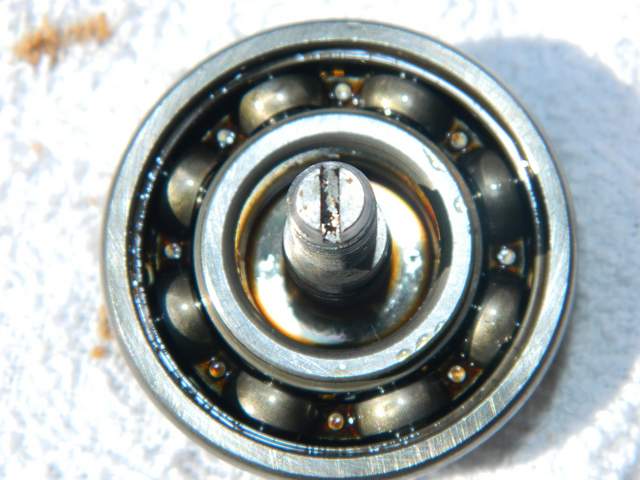
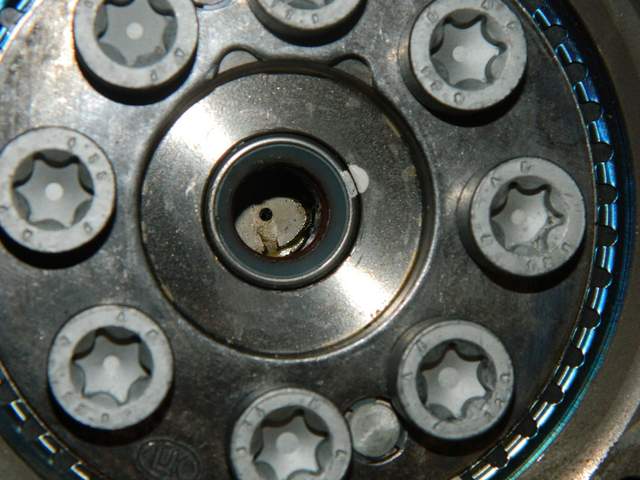
here are some pics of the bearing on and off the tool.

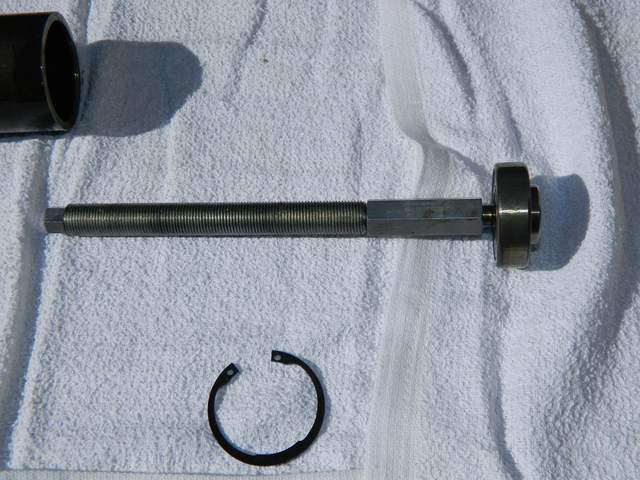
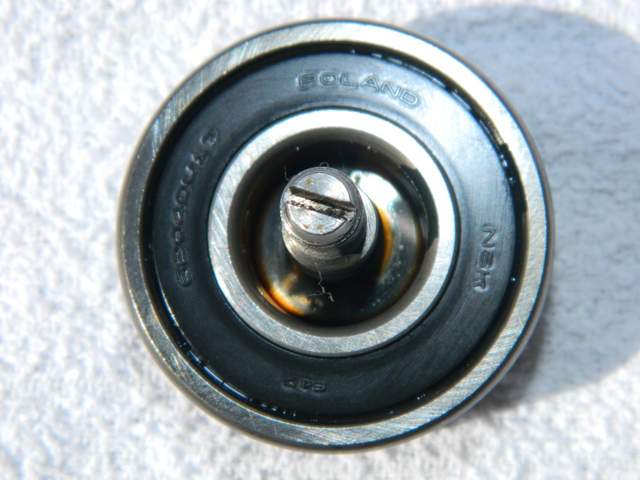
removed the plastic seal. no grease, but also no play in the bearing.
in fact, it looks brand new after 77K.
|
|
|
|
|
02-01-2013, 08:08 AM
|
#63
|
|
1999 base
Join Date: Dec 2011
Location: Coral Springs FL
Posts: 1,617
|
O.K.
so now is the big moment.
after cleaning the bearing area, with some alcohol and lint free cloth, i went to the freezer and took the bearing out.
at this point some parts of my body started shaking and as i mentioned in other posts, i'm not talking about my hands :chicken:
i took the bearing (connected to the installation tool) and placed it as square as i could in the shaft.
i decided to start with a rubber hammer and move from there.
started with light taps, and the bearing went right in. in some point (after 10 taps more or less) it didn't move no more. i removed the installation tool and inspected the bearing. i noticed that most of the bearing is in. put the tool back on, taped it twice with a metal hammer, and that's it. it was all the way in.
removed the tool and installed the new clip.(again. put your finger in center of clip to prevent falling inside the engine).
once the clip was in, i rotated it 360 degrees to confirm it is fully seated.
i think the key to complete this step in the most easy and smooth way, is to install the bearing as soon as it gets out of the freezer.
i didn't rush myself during the bearing installation, but i defiantly didn't spent time (that is why i don't have pics of the installation).
bottom line, it was way easy then i expected.
Last edited by Meir; 02-01-2013 at 12:58 PM.
|
|
|
|
|
02-01-2013, 08:16 AM
|
#64
|
|
1999 base
Join Date: Dec 2011
Location: Coral Springs FL
Posts: 1,617
|
need to go now.
more updates later 
|
|
|
|
|
02-01-2013, 01:05 PM
|
#65
|
|
1999 base
Join Date: Dec 2011
Location: Coral Springs FL
Posts: 1,617
|
installing the new IMS cover using 3 6X25mm bolts from Ace.

using the bolts will help you drive the cover gradually to its exact location.
i turned each bolt one turn at a time until the cover was flush with the case.

removed the bolts, and installed the encapsulated ones, supplied with the LN kit.

some CurilT and the center nut.

|
|
|
|
|
02-01-2013, 01:16 PM
|
#66
|
|
1999 base
Join Date: Dec 2011
Location: Coral Springs FL
Posts: 1,617
|
the tensioners got new O-Rings and washers, and re installed.

for the IMS chain tensioner, i found it more easy if you push it with a screwdriver and then tighten it by hand.
i then removed the locking tools (camshaft and pulley) and turned the engine couple of times to make sure both camshafts return to the same position at TDC.
once it was confirmed, i installed new cam plugs.
the whole process took me 40-45 minutes to complete.
not bad at all.
Last edited by Meir; 02-01-2013 at 02:30 PM.
|
|
|
|
|
02-01-2013, 02:29 PM
|
#67
|
|
1999 base
Join Date: Dec 2011
Location: Coral Springs FL
Posts: 1,617
|
so far my winter project was going great, and didn't have any special issues, except the broken bolts that was easy to remove.
but then i got to the RMS.
man, just looking back at it makes me furious again.
i thought that will be the easy part, especially after completing the IMSB under an hour.
i was wrong.
first i had hard time removing it. the technique with the screw and pliers didn't work well, i ended up filing on of my prey bars to fit and the screw head, and used a piece of wood as a pivot.
i highly recommend using one of these to make it easy on you:
SG Tool Aid 81500 Junior Slugger Slide Hammer Dent Puller : Amazon.com : Automotive
putting the new one was even worst.
i have to admit i was not mentally prepared for the job.
i was sure it will go easy, so i pounded it with a hammer using a 3" PVC tube.
the RMS went in crooked.
that was the end of the day for me. i found myself on Saturday 12PM, with nothing to do.
i was hoping the finis the car that weekend.
was so frustrated since i work on the cars during weekends, and now i wasted half of Saturday, and all of Sunday. 
Monday morning i made my firs encounter with my local dealership. paid 24$ for the RMS, and realized why they are called stillerships.
Tuesday was a day off, so i gave it another try. i messed it up again.
you really need patience with that thing.(which i don't have)
for the first time i gave up. started searching the web for the SIR RMS tool, with no success.
placed an order for new seal and some other parts i needed, and waited for the following weekend.
when i got the new seal, i meditated for half an hour, and promised myself to take the time and not to get upset. 
i started pounding on it real slow with very light taps over the seal, with a piece of flat plastic bar. every time i started loosing my patience, i walked away, smoked a sig, drank some cold water, and got back. the most difficult part is to drive the seal up to the point where is flush with the case.
then i took the PVC pipe and drove it to the correct depth.
the whole thing took me over an hour 
next time, i get the tool 
i would like to take this opportunity to thank Heiko and Hal (AKA whipE350) for the support and the good advise.
|
|
|
|
|
02-01-2013, 02:47 PM
|
#68
|
|
1999 base
Join Date: Dec 2011
Location: Coral Springs FL
Posts: 1,617
|
next step.
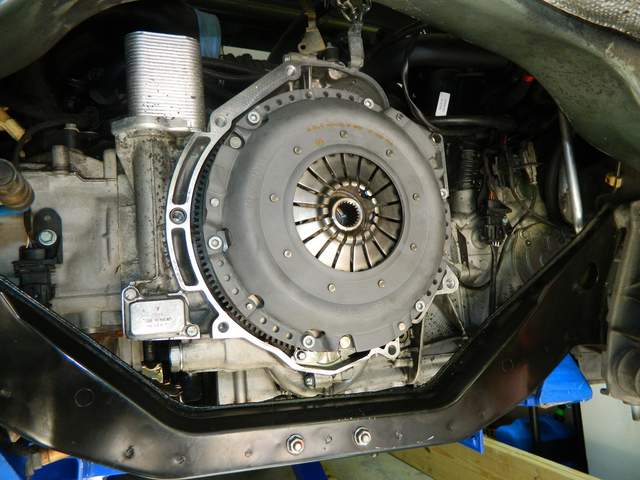
installing new flywheel and clutch kit.
used a home made tool to lock the flywheel and torque the bolts to spec.

if you are installing a new flywheel, look at the whit dot. this will help you locate the hole in the flywheel, that goes over the pin in the crankshaft.
after torquing the bolts in star pattern, and in two stages , i used the template from the pelican website to tighten the additional 90 degrees.
what i did, was marking the bolt on the top, and torquing it to the 90 degrees mark.

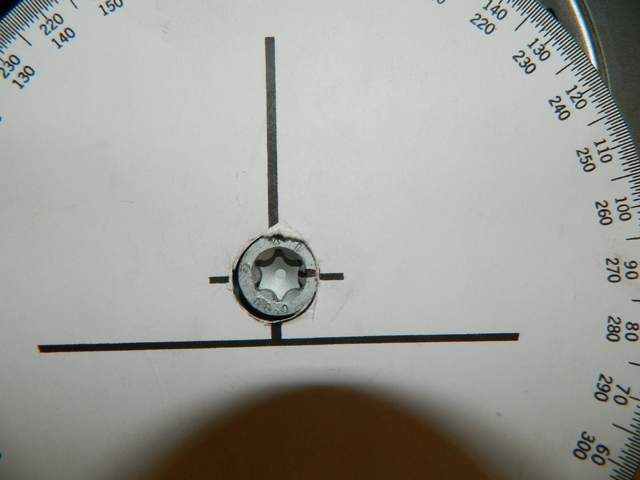
since i have a memory of a fish, that also helped me to see which bolt i already tighten.
clutch disk and pressure plat was installed. using the centering tool and the same method of star pattern and several stages of torquing .
|
|
|
|
|
02-01-2013, 02:59 PM
|
#69
|
|
1999 base
Join Date: Dec 2011
Location: Coral Springs FL
Posts: 1,617
|
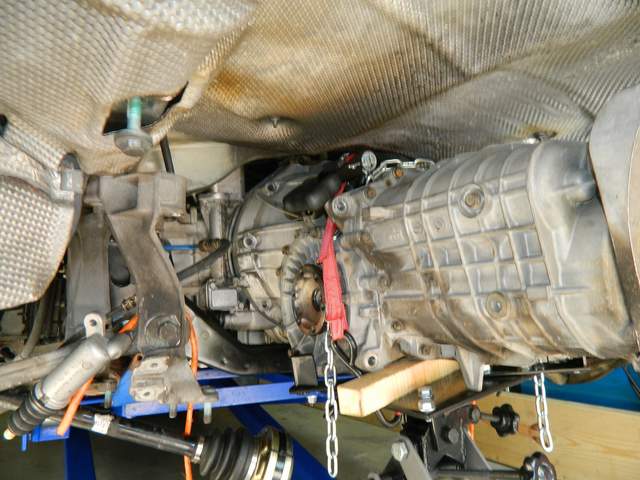
next day, i installed the transmission that got new
Clutch Release Lever
Retaining Spring Clamp for Clutch Release Lever
Ball Pin for Clutch Release Lever
Throw Out Bearing Guide Tube
and rubber o ring (for clutch guide sleeve)
greased the needed parts and installed the transmission.
the transmission jack i got from HF, helped a lot, since it can be adjusted to any direction. i had to turn the engine bit by bit to get the flywheel to align with the transmission shaft, but after all it wasn't that bad, and i was able to drive it in myself.
i installed the transmission bolts and used them to drive the transmission for the remaining 1 cm gap.
|
|
|
|
|
02-01-2013, 03:16 PM
|
#70
|
|
1999 base
Join Date: Dec 2011
Location: Coral Springs FL
Posts: 1,617
|
once transmission was in, i installed the mounts, half shafts and exhaust.
put some coolant in the reservoir, and oil in the engine.
now this is the important part.
i removed the fuel pump relay, and cranked the engine 3 times for 10 seconds at a time, to allow oil pressure to build up in the tenssioners, and to get to the other parts of the engine.
i replaced the relay, and cranked the engine.
success!
the engine started right up and no parts was flying out of it :dance:
i started bleeding the coolant system and added more oil to the engine.
at one point, i started hearing a faint squeaking noise coming from the clutch area.
the noise disappeared when i pressed the clutch, or raved the engine 
i decided to take the car for a run.
when i got back the noise was gone, and never came back since.
i put 350 mile on the car since and so far (touch woo) it looks great.
the car with the new clutch is twice the fun to drive.
the firs time i pressed it, i almost made a hole in the floor

edit: THE END.
|
|
|
|
|
02-01-2013, 05:24 PM
|
#71
|
|
1999 base
Join Date: Dec 2011
Location: Coral Springs FL
Posts: 1,617
|
Quote:
Originally Posted by Johnny Danger

Once again ! Why aren't there any good DIY'ers up here in New England ?? |
Let me know when you'r ready.
Can pack up the tools and jump on a plane.
Never been to massachusetts before
Disclaimer: ambient temperature must be at 70 degrees farenhite or above, for selected dates.
|
|
|
|
|
02-05-2013, 12:45 AM
|
#72
|
|
Theoretical propagandist
Join Date: Dec 2011
Location: Pacific Northwest
Posts: 793
|
I can't believe that I missed this entire thread! Great write up and excellent pictures. I have to say one of the funniest parts was your fact of being nervous about the install of the IMS bearing! I remember having Robin in the garage and through the whole process, I kept telling her, if this fails the whole project was a wash! Nothing more satisfying on seeing it back in place and the clean cover plate buttoned up!
A really nice write up again.
__________________
When life throws you curves, aim for the apex...
|
|
|
|
|
02-05-2013, 05:20 AM
|
#73
|
|
Homeboy981
Join Date: Jan 2012
Location: Sherman, TX
Posts: 663
|
Thanks Meir!
You have done more than inspire me to do it myself!
Great write up, excellent pictures, great timing.
I have the Bentley Manual, LN Engineering instructions, Pelican instructions, & the "Meir Manual"
do I need anything else?
Getting started this week. As soon as Pelican delivers.
Thanks again for the confidence.
__________________
2002 Porsche Boxtser S - Silver & Chrome - Died from IMS failure AFTER IMS was replaced!
|
|
|
|
|
02-05-2013, 06:20 AM
|
#74
|
|
1999 base
Join Date: Dec 2011
Location: Coral Springs FL
Posts: 1,617
|
Quote:
Originally Posted by Eric G
I can't believe that I missed this entire thread! Great write up and excellent pictures. I have to say one of the funniest parts was your fact of being nervous about the install of the IMS bearing! I remember having Robin in the garage and through the whole process, I kept telling her, if this fails the whole project was a wash! Nothing more satisfying on seeing it back in place and the clean cover plate buttoned up!
A really nice write up again.
|
thanks ERIC.
couldn't describe it better myself.
thanks for the inspiration by the way.
i remember showing your original thread to my wife. when Robin tells you she don't like to see you working under the car with the jack stands.
guess what, it got me a scissor lift
so, thank you Robin.
|
|
|
|
|
02-05-2013, 06:29 AM
|
#75
|
|
1999 base
Join Date: Dec 2011
Location: Coral Springs FL
Posts: 1,617
|
Quote:
Originally Posted by Homeboy981
Thanks Meir!
You have done more than inspire me to do it myself!
Great write up, excellent pictures, great timing.
I have the Bentley Manual, LN Engineering instructions, Pelican instructions, & the "Meir Manual"
do I need anything else?
Getting started this week. As soon as Pelican delivers.
Thanks again for the confidence. |
Hi Mark.
don't use the pelican instructions. it is more confusing then helping (in my case at least). follow the LN instructions step by step, and you will be fine.
use the Bentley manual to get the torque values, and writ it down.
it will save you a lot of time during assembly (you will not have to go to the book every minute). in fact, here is a link to the table i made.
https://www.dropbox.com/s/853n51vzy8fqnlm/Torque%20values.docx
just get a good pair of latex underwear, to keep everything is place while assembling the bearing. JD sales them for 10$ on his website, but they only come in speed yellow
|
|
|
|
|
08-17-2018, 04:32 PM
|
#76
|
|
Who's askin'?
Join Date: Mar 2018
Location: Utah
Posts: 2,448
|
Quote:
Originally Posted by Meir
so far my winter project was going great, and didn't have any special issues, except the broken bolts that was easy to remove.
but then i got to the RMS.
man, just looking back at it makes me furious again.
i thought that will be the easy part, especially after completing the IMSB under an hour.
i was wrong.
first i had hard time removing it. the technique with the screw and pliers didn't work well, i ended up filing on of my prey bars to fit and the screw head, and used a piece of wood as a pivot.
i highly recommend using one of these to make it easy on you:
SG Tool Aid 81500 Junior Slugger Slide Hammer Dent Puller : Amazon.com : Automotive
putting the new one was even worst.
i have to admit i was not mentally prepared for the job.
i was sure it will go easy, so i pounded it with a hammer using a 3" PVC tube.
the RMS went in crooked.
that was the end of the day for me. i found myself on Saturday 12PM, with nothing to do.
i was hoping the finis the car that weekend.
was so frustrated since i work on the cars during weekends, and now i wasted half of Saturday, and all of Sunday.
Monday morning i made my firs encounter with my local dealership. paid 24$ for the RMS, and realized why they are called stillerships.
Tuesday was a day off, so i gave it another try. i messed it up again.
you really need patience with that thing.(which i don't have)
for the first time i gave up. started searching the web for the SIR RMS tool, with no success.
placed an order for new seal and some other parts i needed, and waited for the following weekend.
when i got the new seal, i meditated for half an hour, and promised myself to take the time and not to get upset.
i started pounding on it real slow with very light taps over the seal, with a piece of flat plastic bar. every time i started loosing my patience, i walked away, smoked a sig, drank some cold water, and got back. the most difficult part is to drive the seal up to the point where is flush with the case.
then i took the PVC pipe and drove it to the correct depth.
the whole thing took me over an hour
next time, i get the tool
i would like to take this opportunity to thank Heiko and Hal (AKA whipE350) for the support and the good advise. |
This. So much this.
Here it is, first part of friday evening, and I'm broke down cuz I destroyed the RMS trying to install it.
So frustrated. My machinist finished my flywheel, so I'm ready..... just to be foiled by the RMS.
Do any of you have any tips for the installation? I went and bought the abs pipe to drive it, but I cannot get it to go in straight. No matter what I do. Tried it a dozen times before I finally decided the new seal was no longer useable. Then I tried it a dozen more to see if I could devise a technique for the next one.... didn't work. I'm so frustrated with this right now.
Any help is appreciated.
Sent from my SM-G930T using Tapatalk
|
|
|
|
|
08-17-2018, 07:36 PM
|
#77
|
|
1999 base
Join Date: Dec 2011
Location: Coral Springs FL
Posts: 1,617
|
Quote:
Originally Posted by maytag
This. So much this.
Here it is, first part of friday evening, and I'm broke down cuz I destroyed the RMS trying to install it.
So frustrated. My machinist finished my flywheel, so I'm ready..... just to be foiled by the RMS.
Do any of you have any tips for the installation? I went and bought the abs pipe to drive it, but I cannot get it to go in straight. No matter what I do. Tried it a dozen times before I finally decided the new seal was no longer useable. Then I tried it a dozen more to see if I could devise a technique for the next one.... didn't work. I'm so frustrated with this right now.
Any help is appreciated.
Sent from my SM-G930T using Tapatalk
|
Pm me me your phone number.
I have the Porsche tool, and I can let you borrow it.
|
|
|
|
|
08-17-2018, 07:43 PM
|
#78
|
|
Who's askin'?
Join Date: Mar 2018
Location: Utah
Posts: 2,448
|
Quote:
Originally Posted by Meir
Pm me me your phone number.
I have the Porsche tool, and I can let you borrow it.
|
Kinda my hero, haha. I'll shoot ya a PM. And thank you!
Sent from my SM-G930T using Tapatalk
|
|
|
|
 Posting Rules
|
You may not post new threads
You may not post replies
You may not post attachments
You may not edit your posts
HTML code is On
|
|
|
All times are GMT -8. The time now is 09:30 AM.
| |


 boxster S
 Esmeralda
 Gadget
 Sasha
Sasha Gertrude
 Bernice
 Mrs. T
 "Bernie" - PONZI that 'made off' with my money!
 Linear Mode


