 03-05-2010, 06:10 PM
|
#1
|
|
Registered User
Join Date: Jan 2009
Location: pa
Posts: 423
|
rear diffuser
anyone add a rear diffuser ?
any good sources ? saw some options on ebay but they are outside the country.
is it easy to install?
|

|

|
|
03-05-2010, 06:34 PM
|
#2
|
|
Registered User
Join Date: Jul 2004
Location: Houston, Texas
Posts: 7,242
|
I have them. Bought off eBay but from a US source.
They're a total pain in the butt to put on the car without taking off the bumper first. I can be done though because I did it. I just wouldn't recommend it!
They really make the back end look a LOT better if you ask me.
embryoguy... let me guess. Fertility specialist?
|
|
|
|
|
03-06-2010, 08:49 AM
|
#3
|
|
Registered User
Join Date: Jan 2009
Location: pa
Posts: 423
|
yes.  thanks for the info. i really want to add one. i thought it would just be a bolt on kind of thing. do you remember where you bought it? retail or...
does my license plate give it away? haha
im also interested in switching out my red third brake light out to a match the gray part of my tail light. anyone do this ? it looks like just a plug in thing.
Last edited by embryoguy@mac.com; 03-06-2010 at 08:54 AM.
|
|
|
|
|
03-06-2010, 01:38 PM
|
#4
|
|
Registered User
Join Date: Nov 2008
Location: Massachusetts
Posts: 4,810
|
I always found Kokeln Racing's carbon fiber rear diffuser an interesting piece. Unfortunately, there are very few photos of it. And at the time, Kokeln could only provide me with the images that were on their site. Its far from inexpensive, however, from what I've heard it seems to be a high quality piece that they fabricate in house.
Last edited by Johnny Danger; 03-06-2010 at 01:48 PM.
|
|
|
|
|
03-06-2010, 02:14 PM
|
#5
|
|
Registered User
Join Date: May 2008
Location: MN
Posts: 327
|
Like Randall, I bought a set new/already painted on Ebay, but then found the same seller had a website that was a few dollars less. I also bolted them on without taking the bumper off. Actually I never thought of taking it off. Maybe it would have been easier, but it really wasn't too bad. Here is the website in case you are interested:
http://app.vendio.com/storefront?view=ITEM_DETAIL&lid=322598520&cid=10774043&mode=1
I really think they look good on a 986!
I also just switched to the smoked LED 3rd brake light from a different Ebay seller, and it was plug and play. They said sometime you need to cut and swap the wires (polarity issue), but that it is uncommon.
Good luck. 
|
|
|
|
|
03-06-2010, 02:53 PM
|
#6
|
|
Registered User
Join Date: Jul 2004
Location: Houston, Texas
Posts: 7,242
|
embroguy... why are you piddling around with a 986?
My friend (who's also fertility specialist) makes enough to keep a brand new 911 in the garage as a weekend toy. Holy cow people are willing to shell out a lot to let you get them pregnant!
|
|
|
|
|
03-06-2010, 04:13 PM
|
#7
|
|
Registered User
Join Date: Mar 2008
Location: CA
Posts: 726
|
they sell it for $275 painted...not a bad deal at all! if these are a DIY install, I'd be up for a pair!
__________________
_____________________________
Cars:
2007 MDX - Wife's mommy mobile
2006 RL - My daily driver
2000 Boxster - Ocean Blue Base 5spd on Black Full leather. 18" wheels and M030.
Boxster mods I've added: Rear speaker kit, Painted Calipers, Painted Bumperettes, Painted Center Console, 987 Shifter Assembly, 3 Spoke Steering Wheel, Clear side markers, 03+ rear lights, de-snorkeled.
|
|
|
|
|
03-06-2010, 05:36 PM
|
#8
|
|
Registered User
Join Date: May 2008
Location: MN
Posts: 327
|
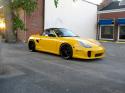
I agree that it was a good deal for painted diffusers. I haven't attached pictures before, but I'll try to include is a picture from last summer of mine installed (before the smoked 3rd brake light). I think they go well with the Aero II side skirts I found on Ebay about this time last year.
It is fun to look at these pictures because the Boxster is still 'under cover' for at least a few weeks until the roads clear. :ah:
|
|
|
|
|
03-06-2010, 08:55 PM
|
#9
|
|
Registered User
Join Date: Jan 2009
Location: pa
Posts: 423
|
three porsche s in the family. working my way up i guess
im not a car guy like most of you guys. so i find myself asking more ignorant questions.
thanks guys for the links/info.
i was worried about the potential polarity with the third brake lights. but im going to add the diffuser from MNs link. thanks! bolt on sounds alot better than taking off my bumper .
|
|
|
|
|
03-07-2010, 05:16 AM
|
#10
|
|
Registered User
Join Date: Jan 2009
Location: pa
Posts: 423
|
MN, does that diffuser you have, bolt in easily? i mean, are there holes pre drilled in the oem bumper already? if so it should take 15 minutes to put it on right?
|
|
|
|
|
03-07-2010, 06:25 AM
|
#11
|
|
Registered User
Join Date: Nov 2007
Location: Chicago suburbs
Posts: 1,675
|
I found it much easier to remove the rear bumper cover so that I could accurately drill the holes for attachment. You must be very careful to align properly so the seams line up near the exhaust. I also found it a PITA to reinstall the side bolts from the top inner bumper panel, into the diffuser threaded inserts.
BTW, I purchased mine unpainted and did the finish work myself with paint from www.paintscratch.com Several coats of base, then clear coat and buff.
__________________
JGM
2002 Boxster S
1973 911 Green FrankenMeanie
PCA DE Instructor circa '95
Last edited by jmatta; 03-07-2010 at 06:27 AM.
|
|
|
|
|
03-08-2010, 11:13 AM
|
#12
|
|
Registered User
Join Date: Jan 2009
Location: pa
Posts: 423
|
im not industrious like you are. im going to buy it painted. the website said only three bolts are needed on each side and when i looked, there are exactly three bolts to each side of the bumper so i hope these match up. than it should be pretty simple.
im not sure im mechanically inclined enough to even take off my bumper! haha
do you have a link to where you bought yours unpainted? the only one ive seen unpainted is from poland on ebay for $160
|
|
|
|
|
03-08-2010, 02:12 PM
|
#13
|
|
Registered User
Join Date: Aug 2009
Location: London, UK
Posts: 155
|
There seem to be two diffusers there - the carbon one looks awesome and I reckon it does something, the other looks a little like a stick-on with no real benefit.
Unfortunately, I have the Tequipment Sports exhaust so both are a no-go. But I do have the smoked light:

Initially it didn't work, so I had to reverse the polarity. This is easiest done by pulling the rubber grommet out that holds the power cable for the brake light, nipping the cable, adding bullet connectors and swapping them over, and then put back the rubber so nothings visible, and voila.
|
|
|
|
|
03-08-2010, 03:08 PM
|
#14
|
|
Registered User
Join Date: Aug 2009
Location: Music City U.S.A.
Posts: 166
|
Quote:
|
Originally Posted by Johnny Danger
I always found Kokeln Racing's carbon fiber rear diffuser an interesting piece. Unfortunately, there are very few photos of it. And at the time, Kokeln could only provide me with the images that were on their site. Its far from inexpensive, however, from what I've heard it seems to be a high quality piece that they fabricate in house.
|
On tap and will be ordered by this up and coming month. Stay posted!
__________________
2003 Porsche Boxster S 3.2L l AASCO Lightweight Flywheel l FVD Brombacher ECU l FVD Brombacher 100 Cell Sport Catalytics l FVD Brombacher Sport Headers l GiroDisc 340mm FR Rotors l IPD Intake Plenum l Litronics l KW Variant 3 Coilovers l Porsche 997 75mm Throttle Body l Road Sport Supply Underdrive Pulley Kit l Sachs Stage 2 Racing Clutch Kit l TechArt Short Shift Kit l TechArt Power Flow Kit l TechArt Sport Exhaust.
|
|
|
|
|
03-08-2010, 03:27 PM
|
#15
|
|
Registered User
Join Date: Nov 2007
Location: Chicago suburbs
Posts: 1,675
|
Do you have a link to where you bought yours unpainted?
It was several years ago off eBay...don't recall the seller, but kind of remember being out of Florida? Best part is it's non-permanent...everything I do to my car can be put back to stock. I actually installed these to hide the lower portion of the muffler, which does a pretty good job...sorry about the poor picture quality.
__________________
JGM
2002 Boxster S
1973 911 Green FrankenMeanie
PCA DE Instructor circa '95
Last edited by jmatta; 03-08-2010 at 03:30 PM.
|
|
|
|
|
03-08-2010, 05:52 PM
|
#16
|
|
Registered User
Join Date: May 2008
Location: MN
Posts: 327
|
Quote:
|
Originally Posted by embryoguy@mac.com
MN, does that diffuser you have, bolt in easily? i mean, are there holes pre drilled in the oem bumper already? if so it should take 15 minutes to put it on right?
|
If I remember right, 2 of the 3 holes per side were alreay there and lined up well. The 3rd hole for each side (near the exhaust) had to be drilled, at least on mine.
The part came with threaded rod to screw into the parts, then I fit the parts to the car and installed with nuts and washers. I left the bumper on, but had the car on a lift so access was good.
jmatta is right that you have to watch the alignment, especially by the exhaust tip. It took a few adjustments to get the 2 sides looking the same.
Gary H is correct that there is no real benefit, unless you count looking good! 
|
|
|
|
|
03-08-2010, 06:42 PM
|
#17
|
|
Registered User
Join Date: Mar 2008
Location: CA
Posts: 726
|
assuming you buy these painted..and assuming you do NOT remove the bumper and do it with the car on the ground.... and you have "average" ability..but ARE capable of doing the job - how long shoudl it take to line these up and bolt them on?
so let me see if I have this correct - the bumper has two holes predrilled...and those holes correspond to mounting points that the diffusers use? then you simply add in the third one? sounds kind of easy..
do the diffusers have bolts embedded in them or predrilled holes...so you haveto lineup the holes on the diffuser with the hoels on teh bumper? then drill one more hole in the bumper by the muffler / tips ?
overall - it must be pretty straightforward to see how they line up - or would it be very easy to put one on "crooked" and then have it look "wrong"....
you could probably line it up and hold it in place with painters tape or some other cheap/quick tape type item..then step back and eyeball it to see how straight they look...then drill it in once you iknow it's all lined up..
__________________
_____________________________
Cars:
2007 MDX - Wife's mommy mobile
2006 RL - My daily driver
2000 Boxster - Ocean Blue Base 5spd on Black Full leather. 18" wheels and M030.
Boxster mods I've added: Rear speaker kit, Painted Calipers, Painted Bumperettes, Painted Center Console, 987 Shifter Assembly, 3 Spoke Steering Wheel, Clear side markers, 03+ rear lights, de-snorkeled.
|
|
|
|
|
03-09-2010, 06:33 AM
|
#18
|
|
Registered User
Join Date: May 2008
Location: MN
Posts: 327
|
Quote:
|
Originally Posted by 23109VC
assuming you buy these painted..and assuming you do NOT remove the bumper and do it with the car on the ground.... and you have "average" ability..but ARE capable of doing the job - how long shoudl it take to line these up and bolt them on?
so let me see if I have this correct - the bumper has two holes predrilled...and those holes correspond to mounting points that the diffusers use? then you simply add in the third one? sounds kind of easy..
do the diffusers have bolts embedded in them or predrilled holes...so you haveto lineup the holes on the diffuser with the hoels on teh bumper? then drill one more hole in the bumper by the muffler / tips ?
overall - it must be pretty straightforward to see how they line up - or would it be very easy to put one on "crooked" and then have it look "wrong"....
you could probably line it up and hold it in place with painters tape or some other cheap/quick tape type item..then step back and eyeball it to see how straight they look...then drill it in once you iknow it's all lined up..
|
The diffusers I bought from the link in a previous post had 3 threaded holes each, and came with threaded rod to screw into the holes, and washers and nuts (I thought the threaded rod was a little short, so I went to the hardware store and got longer pieces). Install took me a 2 or 3 hours working at a leisurely pace with the bumper cover still on the car, and the car on a lift.
The 2 holes needed toward the sides of the car were already in the bumper, but I think I had to remove some hardware holding the heat shielding in place, and I had to drill them out a little larger. The 3rd hole (near the exhaust tip) had to be located and drilled.
Sorry for some uncertainty on my part, but the car is in winter storage mode and I can't get a good look at it to refresh my memory. It sounds like at least a few others have the same diffusers, so maybe they can correct me or add any details I missed.
Good luck!
|
|
|
|
|
03-09-2010, 05:20 PM
|
#19
|
|
Registered User
Join Date: Jan 2009
Location: pa
Posts: 423
|
guys thanks so much for all your thoughts and thorough write-ups. your thoughts gives me more confidence to go ahead with the project.
i want to add them also for purely aesthetic reasons.
thanks all!
|
|
|
|
|
03-10-2010, 04:12 PM
|
#20
|
|
Registered User
Join Date: Jan 2009
Location: pa
Posts: 423
|
MN,
do you have the link to where you bought your third brake light? does the smoke look match up with top part of your tail lights? plug and play right?
|
|
|
|
| Thread Tools |
|
|
| Display Modes |
 Linear Mode Linear Mode
|
 Posting Rules
|
You may not post new threads
You may not post replies
You may not post attachments
You may not edit your posts
HTML code is On
|
|
|
All times are GMT -8. The time now is 11:12 AM.
| |


 Dangermobile
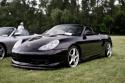 2002 Porsche Boxster


