I decided to delete my center cubby without springing for the GT3 panel, I was going to take it all apart and figure out a DIY solution (composite or 3D printed), but then I saw that these side panels were separate! A little peeling and hacking did the trick to clean up the job.
Somewhat unfinished work in progress.
You'll need:
1. Upholstery adhesive (I used some headliner adhesive I had laying around)
2. A drill (optional but helpful)
3. A hacksaw
4. Scissors
5. Carpet (or some old old black jeans if you're broke)
6. The small panel to bridge the gap in front of the shifter boot (I plan to replace the peeling vinyl boot with a full-length leather one instead)
First, uninstall the original cubby following the normal procedure, remove its bottom bracket and ditch all the little orange screw tabs along with it, as they tend to rattle.
This process will require you to remove the side panels. Keep them off, as they'll be undergoing some surgery, and that's what we'll be detailing here.
First, the problem: The edge of the panels is unfinished and ugly.

Before peeling back the carpet, mark where you'll cut the plastic.
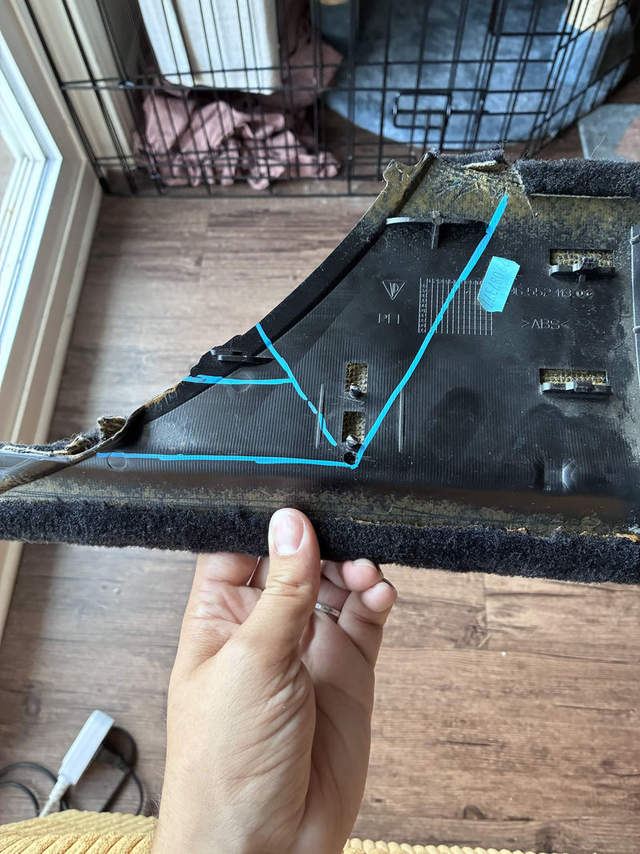
I used the mounting tabs and other lines of the panel as guides.
The horizontal line follows there the edge of the panel is level under the shifter, and the diagonal one is defined by the rectangular holes and the cross-shaped rib that formerly sat up against the cubby. I recommend drilling a hole where the two lines meet, being careful NOT to go through the carpet. The hole's job is to make the corner round and smooth where the two saw cuts meet, and it also allows us to feel that point through the soft carpet.
Mark another line bisecting the two existing lines' angles. We'll cut the carpet along that line, from the edge of the panel to the hole we drilled. This will allow us to peel the carpet back and to fold it over the edges later. The horizontal cut can be done later, its job is to make it so that the carpet doesn't overlap with the bottom on the finished product. I cut it early, and got a classic case of "measure once, cut twice".

Once you've cut the carpet, peel it back carefully all the way past the marker lines and the drilled hole. At some spots, the glue will try to pluck the roots of the shag pile, so proceed slowly and free any errant fibers by scraping along the plastic with a knife.
Then grab a hacksaw and go to town. Make sure to hold the carpet back to ensure the saw doesn't rip it up. If needed, peel it back a little more. We're still going to add glue, so there's no loss in peeling back to far.

Then fold down the carpet and trim as needed. Note that the two mounting tabs need to be unimpeded, and you'll get a better fit if the carpet on the bottom doesn't overlap.


Lay it flat again, apply your upholstery adhesive of choice and gently fold the carpet over the edge of the plastic panel. Follow all instructions and warnings on the can. Reinstall the panels into the car, and you've finished every step that involves desecrating an OEM Porsche part.

Add a filler panel, I recommend matching carpet, but I'm cheap and used some fabric scraps. Measure the gap you end up with for your filler, feel free to back it with some form of stiff material like tupperware or the flat part of a 5-quart oil bottle. You might as well, since you bought a whole can of upholstery glue.

The gap between the panels makes for a pretty handy storage space, I ended up putting a tissue box in there that had been previously sitting in the passenger footwell.

Up next I'll be getting some real carpet for the gap, making a black fabric pouch to hold a stack of un-boxed tissues in a less intrusive way, and sewing a new shifter boot that covers that gap in the front of the center console. I'll post the progress on those jobs as I buy the materials and get around to doing them.


 Threaded Mode


