 11-18-2021, 07:14 PM
|
#21
|
|
Registered User
Join Date: Feb 2016
Location: SE USA
Posts: 324
|
Youre setting a really high bar with your excellent attention to detail. Im really curious to know how you got everything so clean on your suspension rebuild. I assume everything wasnt replaced, was it? It just looks so good.
|

|

|
|
11-18-2021, 07:22 PM
|
#22
|
|
01 Seal Gray 986 S
Join Date: Sep 2019
Posts: 167
|
Great thread!
Your work looks great, I can't wait to see how this comes out!
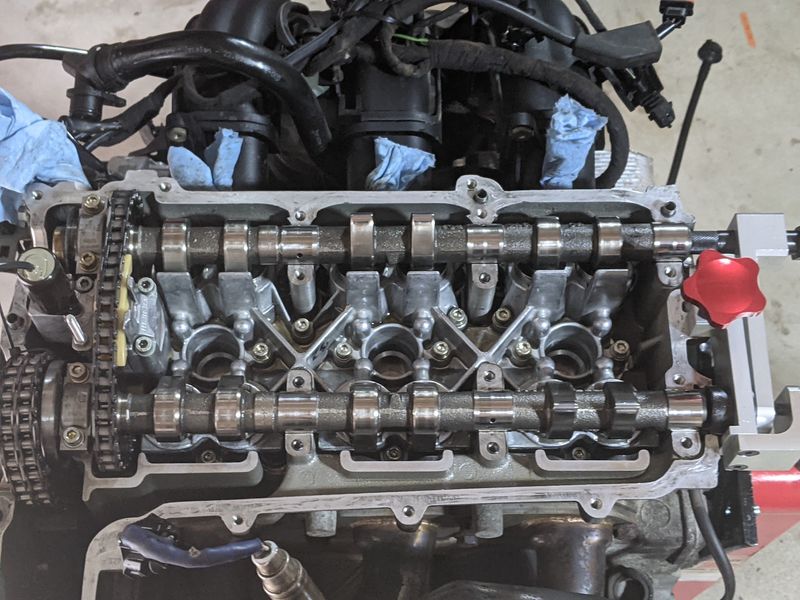
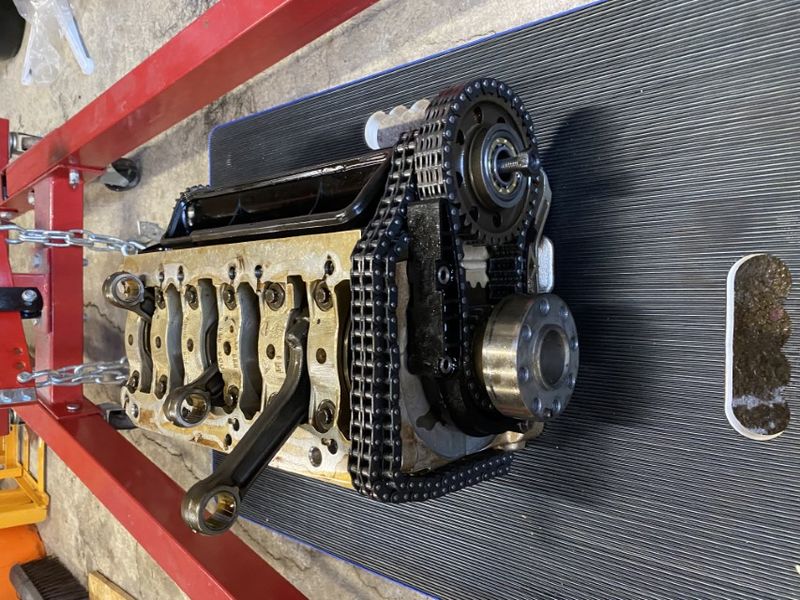
I just replaced the variocam guides / cam chains and chain tensioners (The 3 for the ims chain, and b1 and b2 ims to cam - I highly recommend changing them out if there are any signs of reduced tension on the chains (chain slap on startup, etc). While I was seeing some plastic in my oil filter it was a sudden chain noise and raspy? sound to the engine note that had me pulling everything apart. My variocam guides looked similar to yours but were still intact. I do believe the chain noise was because one of my tensioners was failing or had failed). My 01s had 50,300 mi on the clock when I took it apart earlier this year. I did not go as far as removing the heads as you are doing.
Couple of thoughts / questions reading your post.
1. you mention that you "redone all the soft touch paint" - does this mean you had the sport design option with the white / speckle finish? I used testors 1830MT on mine, came close.. but not all the way there.. I had a thread here: http://986forum.com/forums/show-tell-gallery/76906-new-headunit-usb-mic-integration.html Any-rate, I was curious if you have the same which paint you used. In addition to a smuge on the double din that is driving me nuts there are spots on the center console where the original sport design paint has been worn away.. I want to take the console out and respray, but would like to find a closer paint match.
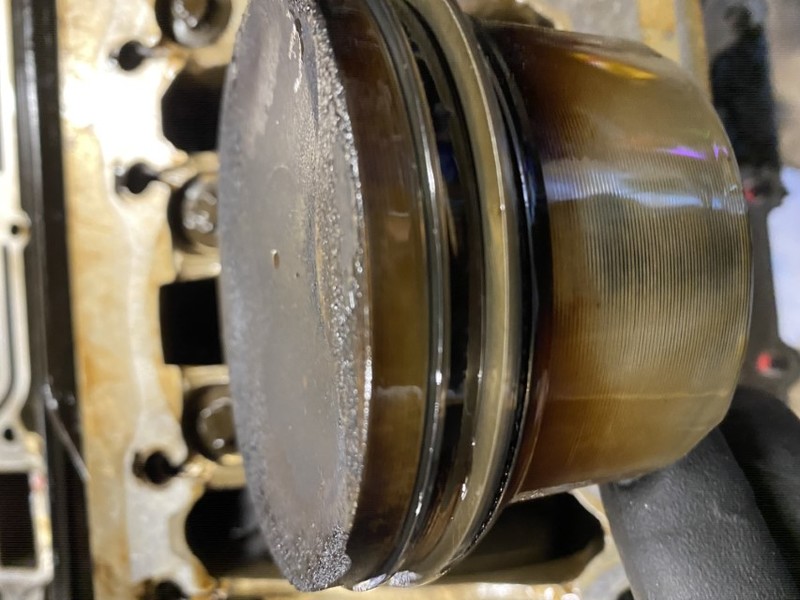
2. You mention the oil gunk in the variocam tensioner, lifters, etc.. I also noticed how "brown" your carrier and the top of the head is. Mine was not like this at all. No oil sludge at all.. I am curious what you find, do you think it is possible there might have been some intermix with coolant at point earlier in the cars life? I saw no sludge anywhere, my variocam tensioners were nice and clean (did not stop me from giving them a good cleaning anyway). And I replaced one questionable lifter.
Here is an image from my engine, 50k on the motor, but it is only 20k miles different.
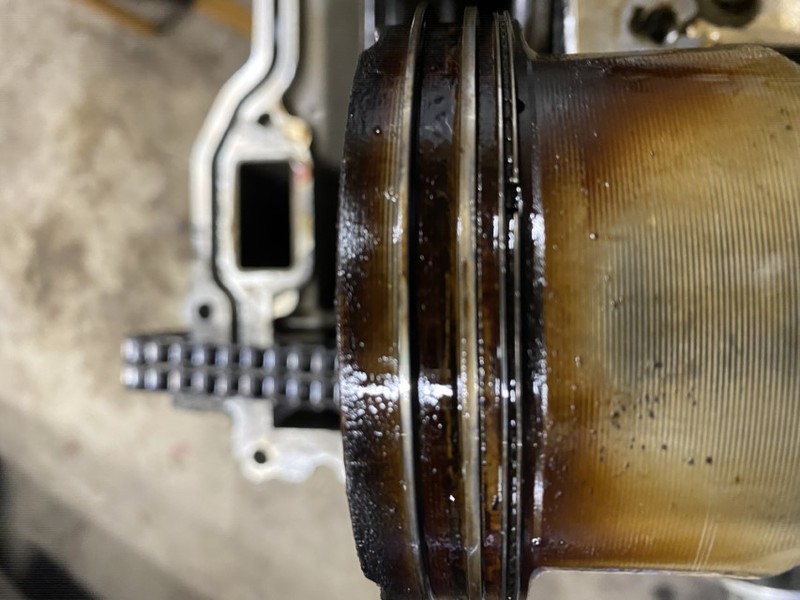
This one is with the new chain / guides:
this one was taken right after I removed the first bank cover, had not removed anything yet.

BTW, I also snagged the fuel return line dropping the engine but on the ebrake cable.. broke the seals on my injectors and fuel was dripping out. Luckily just getting new seals and re-seating the injectors took care of it.
Your son looks like he is having a blast! I tried to get mine involved (only a year older, 12).. He came down once or twice, was curious about how everything worked, but did not seem motivated to stay with it  We do get to share other hobbies though so I can't complain  .
Last edited by bg305; 11-18-2021 at 07:48 PM.
|
|
|
|
|
11-18-2021, 07:24 PM
|
#23
|
|
01 Seal Gray 986 S
Join Date: Sep 2019
Posts: 167
|
Quote:
Originally Posted by Jgkram

Youre setting a really high bar with your excellent attention to detail. Im really curious to know how you got everything so clean on your suspension rebuild. I assume everything wasnt replaced, was it? It just looks so good.
|
agreed, it looks like a new car right off the line. kudos sir!
|
|
|
|
|
11-18-2021, 07:42 PM
|
#24
|
|
01 Seal Gray 986 S
Join Date: Sep 2019
Posts: 167
|
Here is what my chain guides looked like, maybe a bit less worn then yours but in the ballpark. My deviation on b2 was -9.27, I forget B1 but it was in spec (guides were worn the same as B2 though). Now my deviations are both ~1 degree
The other side w/o the oil holes were fine, both banks were like this.
When you put it back together note that the guides with the holes (and the o-ring) are put on the right sides of the tensioner. For B1 the the guide with the holes is on the "lower" side (away from the solenoid) and on b2 it is the "upper" (same as solenoid) as I recall.
|
|
|
|
|
11-19-2021, 07:04 AM
|
#25
|
|
Registered User
Join Date: May 2021
Location: Stansted
Posts: 67
|
Quote:
Originally Posted by Jgkram
Youre setting a really high bar with your excellent attention to detail. Im really curious to know how you got everything so clean on your suspension rebuild. I assume everything wasnt replaced, was it? It just looks so good.
|
Actually, all the suspension/brakes were replaced with new, except for the callipers which I stripped and refurbed with all new parts and the wheel carrier which I bead blasted clean. So that is:
Coils, dampeners, handbrake cables, all handbrake components, discs, pads, shoes, sensors, all suspension arms, bushes, brake shields, speeds sensors, heat shield, cat converters, O2 sensors, gear shift cables, all (I think) mounting brackets (plastic and metal) and every nut, washer and bolt.
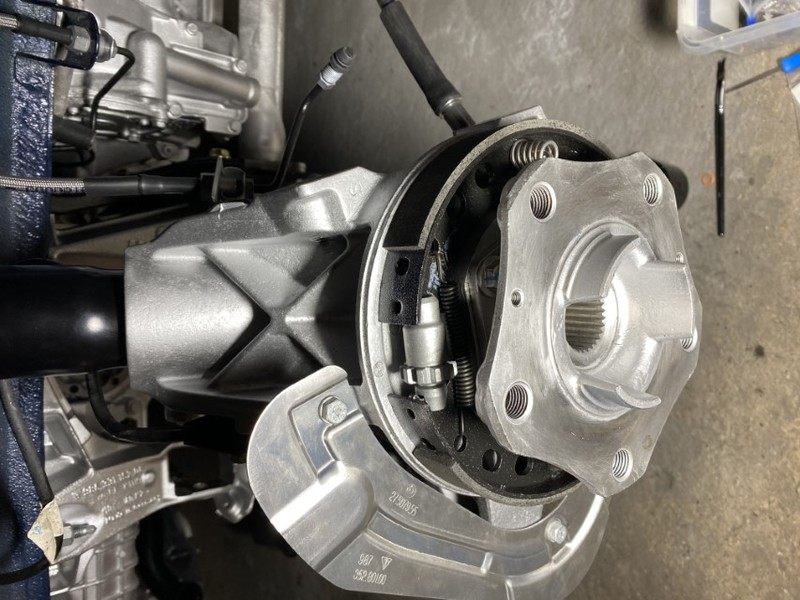
The only parts I didn't replace with new are the diagonal braces (they were in good condition and needed a clean), anti roll bar and the diamond brace. .The rear sub frame did need to be replaced as the roll bar bracket bolts snapped and they could not be tapped out (photo) but I was soooo lucky as I found two NOS items that were only £60 each instead of £800 each
|
|
|
|
|
11-19-2021, 07:20 AM
|
#26
|
|
Registered User
Join Date: May 2021
Location: Stansted
Posts: 67
|
Quote:
Originally Posted by bg305
Your work looks great, I can't wait to see how this comes out!
I just replaced the variocam guides / cam chains and chain tensioners (The 3 for the ims chain, and b1 and b2 ims to cam - I highly recommend changing them out if there are any signs of reduced tension on the chains (chain slap on startup, etc). While I was seeing some plastic in my oil filter it was a sudden chain noise and raspy? sound to the engine note that had me pulling everything apart. My variocam guides looked similar to yours but were still intact. I do believe the chain noise was because one of my tensioners was failing or had failed). My 01s had 50,300 mi on the clock when I took it apart earlier this year. I did not go as far as removing the heads as you are doing.
Couple of thoughts / questions reading your post.
1. you mention that you "redone all the soft touch paint" - does this mean you had the sport design option with the white / speckle finish? I used testors 1830MT on mine, came close.. but not all the way there.. I had a thread here: http://986forum.com/forums/show-tell-gallery/76906-new-headunit-usb-mic-integration.html Any-rate, I was curious if you have the same which paint you used. In addition to a smuge on the double din that is driving me nuts there are spots on the center console where the original sport design paint has been worn away.. I want to take the console out and respray, but would like to find a closer paint match. |
In terms of the soft touch paint, I had the rubbish finish (which was great when it was new) that turns into a gluey gooey gunk


I removed of each part, re-painted with black plastic paint then applied a new soft touch top coat that made them look an feel oooooooohhhhhhh, so nice. Can spend hours just gently stroking each plastic part and rubbing my face against it...velvet....erm....ok forget all that


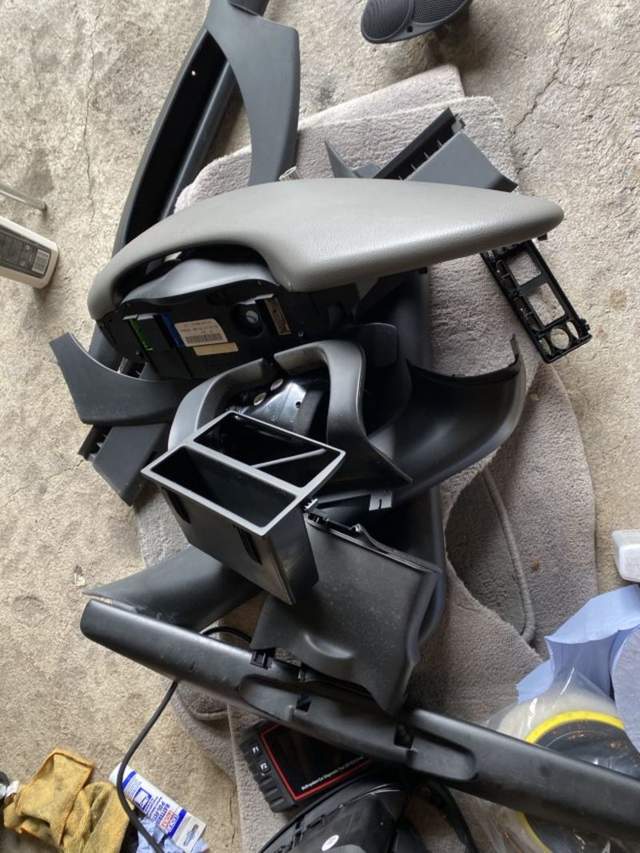
I removed all plastics on the dash, doors, etc and gave them the same treatment
The top coat I used was this one and when it cures it is super tough as I had to sand a bit back which was near impossible but at the same time it was sooooooooo sooooofffffffttttttt and like velvet
|
|
|
|
|
11-19-2021, 07:24 AM
|
#27
|
|
Registered User
Join Date: May 2021
Location: Stansted
Posts: 67
|
Quote:
Originally Posted by bg305
2. You mention the oil gunk in the variocam tensioner, lifters, etc.. I also noticed how "brown" your carrier and the top of the head is. Mine was not like this at all. No oil sludge at all.. I am curious what you find, do you think it is possible there might have been some intermix with coolant at point earlier in the cars life? I saw no sludge anywhere, my variocam tensioners were nice and clean (did not stop me from giving them a good cleaning anyway). And I replaced one questionable lifter.
|
I noticed that, mine all had this yellow almost like yellow passivate finish to everything. there was no suggestion at all of a coolant leak but the only thing I can think of is that an oil additive was added, something like a hydraulic lifter additive. In any case all that yellow came off in the degreaser with no resistance at all
|
|
|
|
|
11-19-2021, 07:26 AM
|
#28
|
|
Registered User
Join Date: May 2021
Location: Stansted
Posts: 67
|
also did similar to things like gear stick
|
|
|
|
|
11-19-2021, 07:30 AM
|
#29
|
|
Registered User
Join Date: May 2021
Location: Stansted
Posts: 67
|
Quote:
Originally Posted by bg305
Here is what my chain guides looked like, maybe a bit less worn then yours but in the ballpark. My deviation on b2 was -9.27, I forget B1 but it was in spec (guides were worn the same as B2 though). Now my deviations are both ~1 degree
The other side w/o the oil holes were fine, both banks were like this.
When you put it back together note that the guides with the holes (and the o-ring) are put on the right sides of the tensioner. For B1 the the guide with the holes is on the "lower" side (away from the solenoid) and on b2 it is the "upper" (same as solenoid) as I recall. |
Good shout about the holes, it would have been an easy (and impacting) mistake to make.
thanks for the heads up, very valuable info
|
|
|
|
|
11-19-2021, 08:11 AM
|
#30
|
|
Registered User
Join Date: May 2021
Location: Stansted
Posts: 67
|
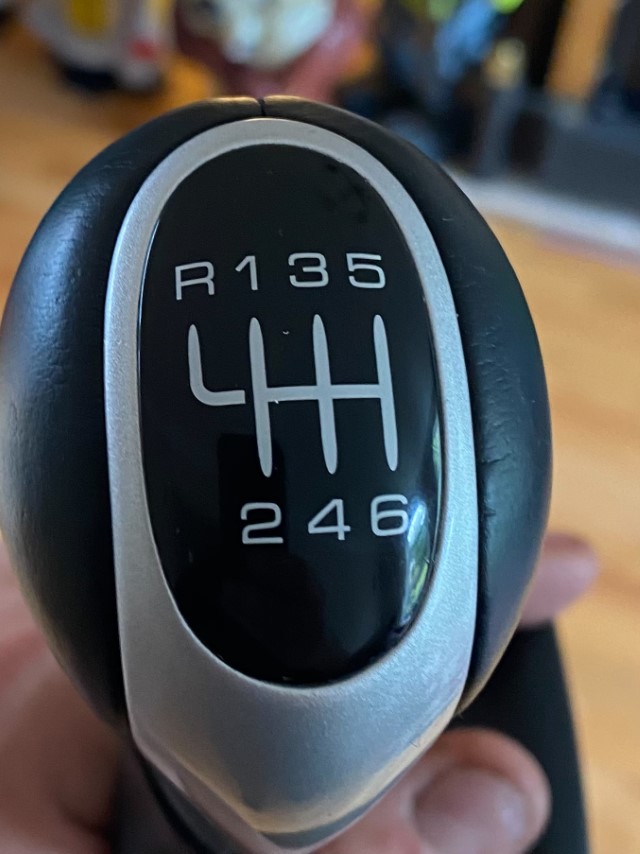
So next up is splitting the two halves of the bottom end. First remove the sump and all looks ok, yellowing at the cylinders as expected but all looked ok.
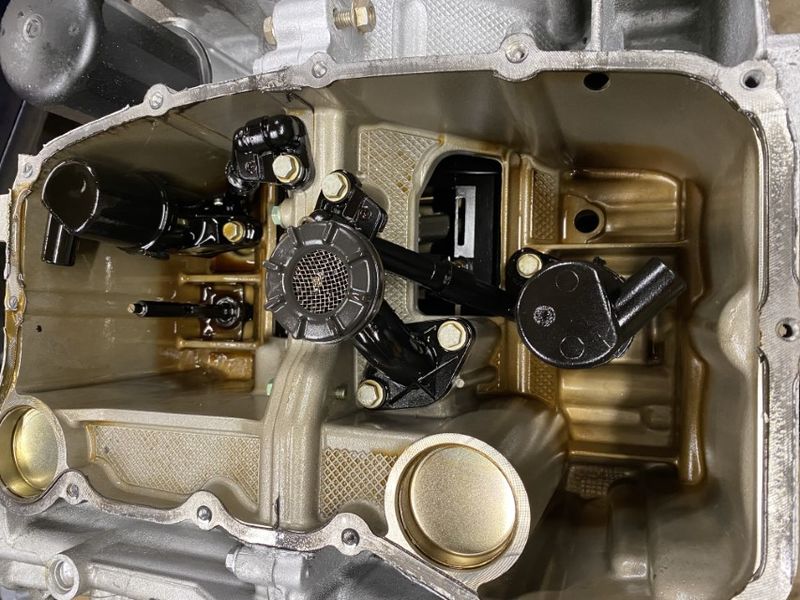
Ah, tiny piece of black plastic on the filter

the more we go into the strip down the more I believe there is an oil way blockage or restriction due to debris. Will explain in later posts
|
|
|
|
|
11-19-2021, 08:40 AM
|
#31
|
|
Registered User
Join Date: May 2021
Location: Stansted
Posts: 67
|
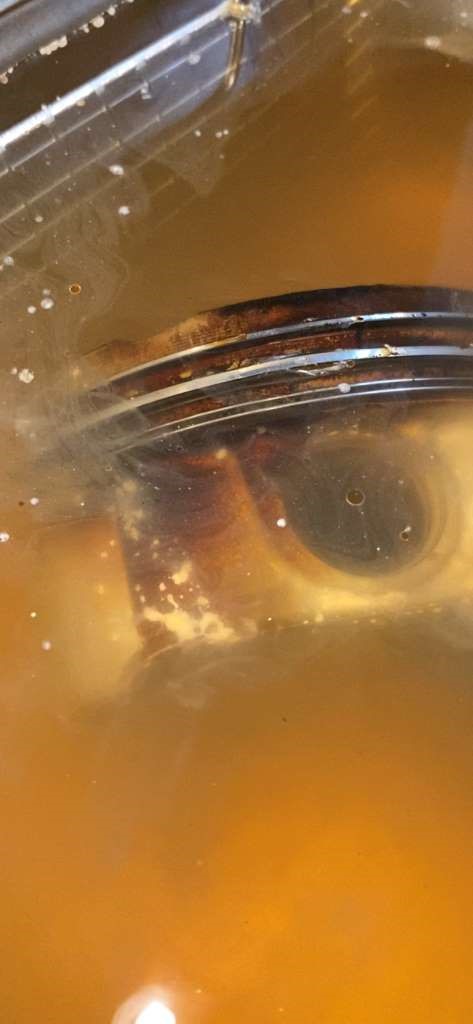
So one thing to share with anyone who is thinking of doing a rebuild, no matter how much you think you have drained the oil, you havent and loads more than you ever expected will continue to come out.
When I removed the oil level sensor over 500ml, which I was able to catch after it went over me, my son, the floor, the engine stand, basically everywhere of the darkest, smelliest, blackest oil came out
Left is the oil when I drained the engine and right is the oil that came out of the oil level sender hole and it stinks, not just of fuel, but something else I cannot figure out. Dont have smellavision unfortunately


|
|
|
|
|
11-19-2021, 08:46 AM
|
#32
|
|
Registered User
Join Date: May 2021
Location: Stansted
Posts: 67
|
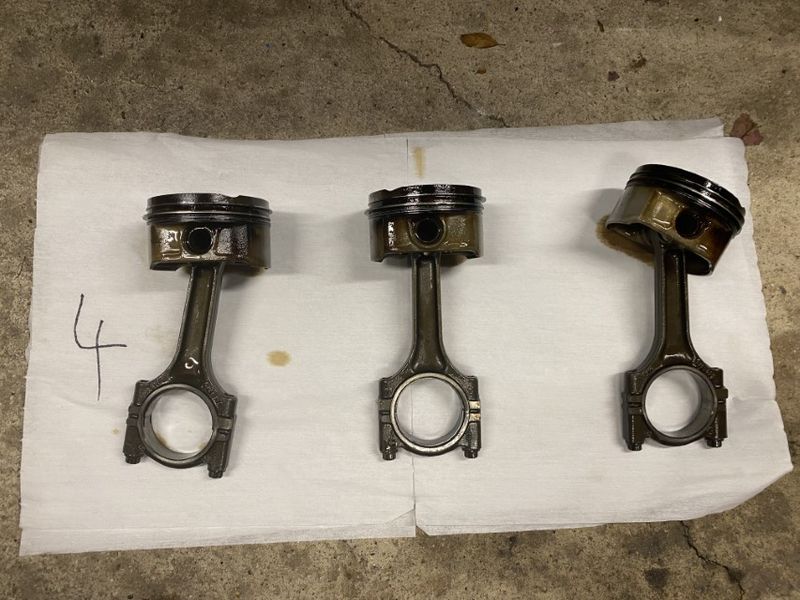
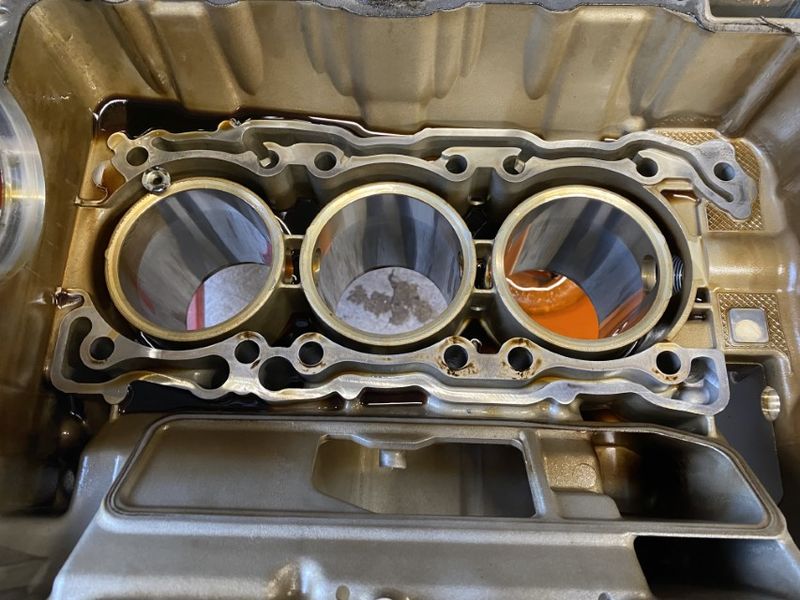
After a million screws and gentle prying I got the first half off and could see the bores totally an the pistons and wow...
Totally crud all over them. I suspect valve stems were leaking but also rings where stuck on two of three especially the bottom control ring. other rings looked far too big as the gap was huge
Luckily the pistons cleaned up nice
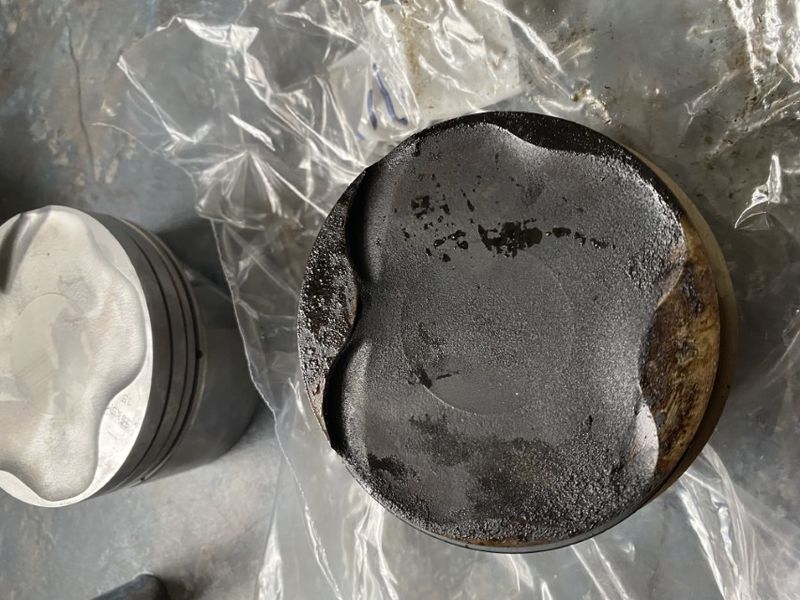
Bank 2's pistons were in no better shape
|
|
|
|
|
11-19-2021, 08:53 AM
|
#33
|
|
Registered User
Join Date: May 2021
Location: Stansted
Posts: 67
|
When I first looked into the bores, I totally bricked it as OMG, is that a crack in the walls?????!!!!!!!!

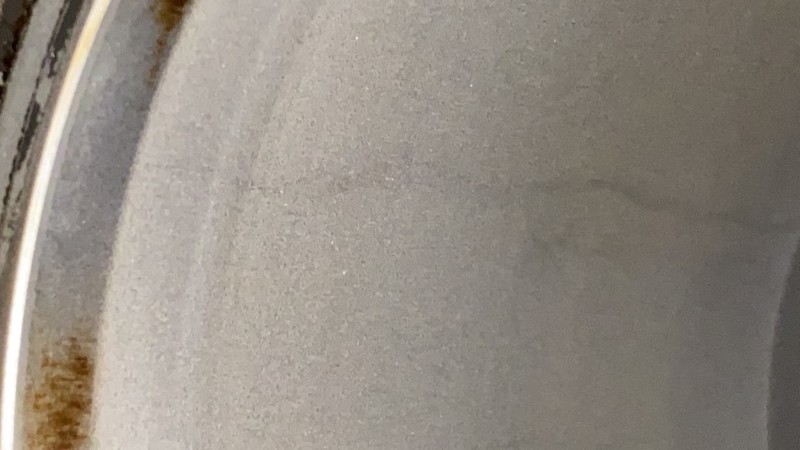
Luckily my son was not around as the amount of swearing that ensued was significant. Those observant amongst you may pick up on what I then realised, the mark is only where I had cleaned directly above is with some carb cleaner, luckily it was only a dirt mark
But it did totally throw me for a while. I will check the cylinders once parts come back from cleaning and if there are cracks or oval'ing then I will have the cylinders replaced
|
|
|
|
|
11-19-2021, 02:56 PM
|
#34
|
|
Registered User
Join Date: Jan 2014
Location: New Jersey
Posts: 1,631
|
What did you use to clean up those pistons? I've got one souvenir piston from my engine before it was rebuilt. It's still on my workbench as it looks like your pistons before you cleaned them up. If I can get my old piston that clean, it will go from my workbench to my desk!
Are you going to check the cylinder bores for roundness, i.e., no ovalization?
Everything looks great!
__________________
Current: 2022 718 Cayman GT4, PDK bone stock (the dark side).
Former: 2003 S, 3.6 LN Nickies, ARP rod bolts, under-drive pulley, Fabspeed sport headers, Softronic tune, 987 airbox 987 motor mount, Function-First Sport motor mount insert, Ben's short shifter, Nine8Six projector headlights & center caps, ROW M030, stainless flexible brake lines, B-K rollbar extension & fire extinguisher mount, hardtop
|
|
|
|
|
11-20-2021, 03:50 AM
|
#35
|
|
Registered User
Join Date: May 2021
Location: Stansted
Posts: 67
|
Quote:
Originally Posted by PaulE
What did you use to clean up those pistons? I've got one souvenir piston from my engine before it was rebuilt. It's still on my workbench as it looks like your pistons before you cleaned them up. If I can get my old piston that clean, it will go from my workbench to my desk!
Are you going to check the cylinder bores for roundness, i.e., no ovalization?
Everything looks great!
|
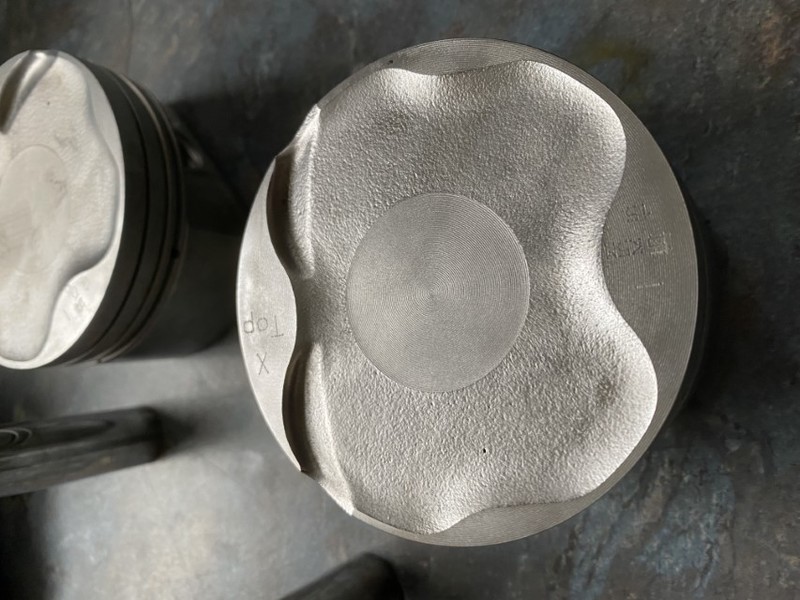
They got a blast with Carb Cleaner to get most of the oil off and soften the caked on crud. Then 10 mins in an ultrasonic bath with a degreaser at 65 deg C, then removed the piston rings, then another 10mins in the bath
Then soda blasted at 50 psi then 30 psi

They went back into the ultrasonic bath at 30 deg C wit a very mild carb ultrasonic cleaner and they came up like below.
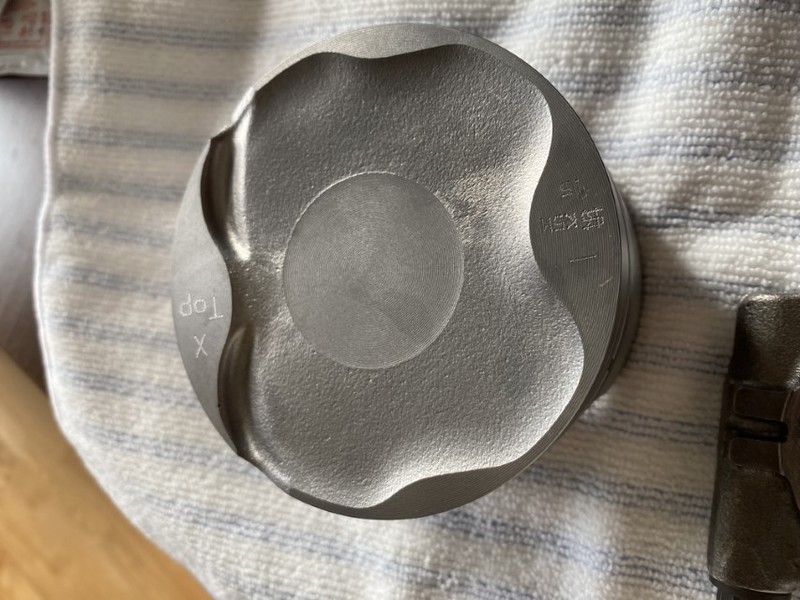
I did start polishing them up with some autosol and a rotary felt pad and then read they are coated so didnt want to polish out the coating. Got into a panic at first as though I had to buy a whole new set of pistons (and still might do mind you) but from what I read they are alloy with an iron coating, so used a weak earth magnet to test the coating is still there and it was on crown and skirts as this weak little magnet was very happy staying on the pistons
Yes, once the casing are cleaned up I will check for roundness and magnaflux test for cracks. I prefer to work with clean components

casings need a good clean first as does everything else too
Last edited by OldManMo; 11-20-2021 at 05:47 AM.
|
|
|
|
|
11-22-2021, 11:02 AM
|
#36
|
|
Registered User
Join Date: May 2021
Location: Stansted
Posts: 67
|
Ok, onto the home straight. At this point I have only the crank box and bank 2 on the engine stand.
BTW, before this point I realised I had the engine stand mounted across the two halves so I put the engine on the hoist, re-adjusted the stand so it would only be on bank 2 and then removed the bank 1 side. Forgot to mention this, so would have been far less hassle to get it right first.

So removed the end caps from pistons 4-6 and dropped them out carefully. then removed the last long bolt on the Bank 2 side, hooked up the engine hoist to four points on the crank box, lots of prayers and gentle coaxing and the crank box separated from the bank 2 half. Lifted up the crank box (with brown pants) and then set down on a trolley
Had a look into bank 2 half and looked ok, but wait...what the fanta is that in the top left corner, yep a nut, some rando nut, which looks like its been in there a while and defo not looking like its within the engine. I count everything I take off an bag it, so it is possible I dropped something while disassembly but very unlikely.
Next split the crankcase, very carefully. Its not really heavy but awkward shaped. Looking at crank journals and bearings, they were not too bad but not far off end of life.

I will need to take loads of measurements to check the crank to be sure but I was optimistic, then I reviewed my photos and my heart sank.
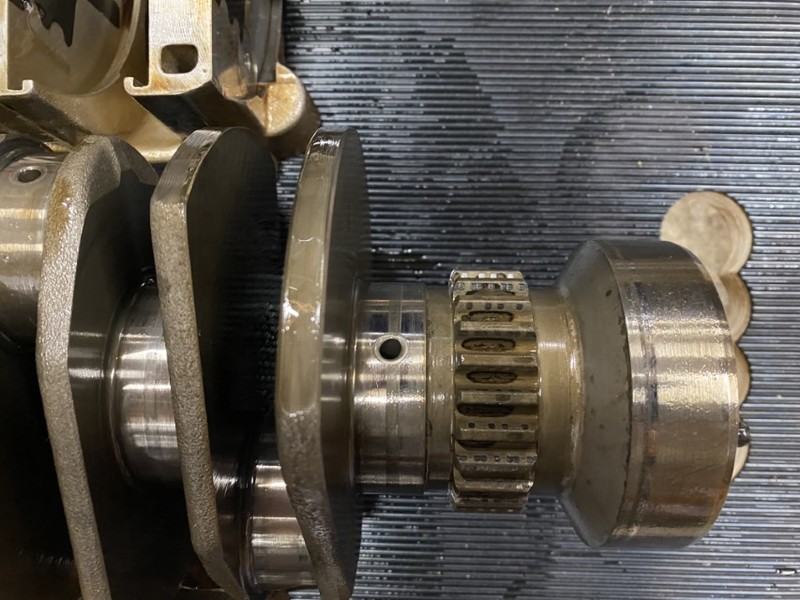
What are those marks, they looks like metal that has been stripped away!!!!! At this point it was late one night, I had just tested positive for covid and I thought sod that, if the crank is gone this car will be parted out, cannot justify an 5k cost on a new crank.
|
|
|
|
|
11-22-2021, 11:04 AM
|
#37
|
|
Registered User
Join Date: May 2021
Location: Stansted
Posts: 67
|
Fortunately the next day and in the sun, with a better photo I could see it was staining which was coming off with cleaning. The sprocket looked ok apart from some marking from the chain
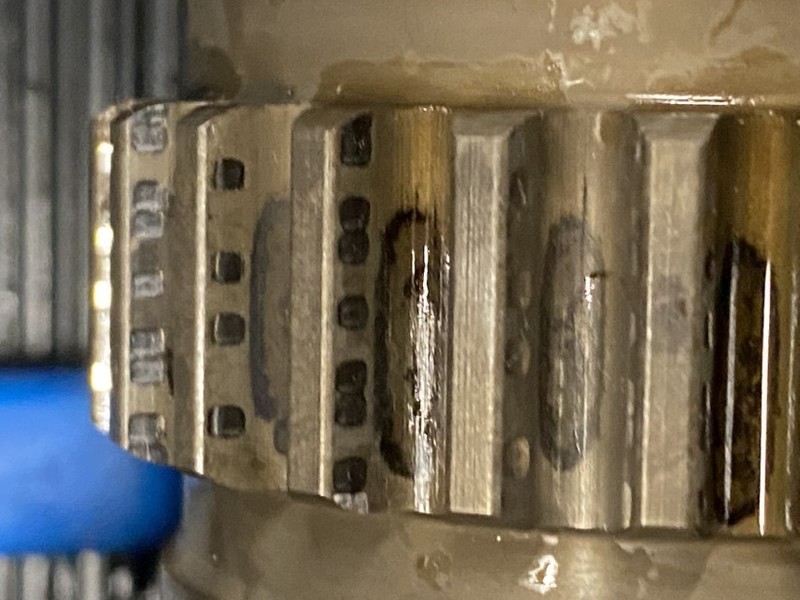
Anyone know what is and is not acceptable here? Can the sprocket be rebuilt or would the crank lose its heat treat if it was?
|
|
|
|
|
11-23-2021, 04:24 AM
|
#38
|
|
Registered User
Join Date: May 2021
Location: Stansted
Posts: 67
|
Ok, parts all stripped down and bagged or waiting for cleaning.
I am going to look to get the crank box rebuilt first once I have taken measurements and polished. Aiming to complete this by Christmas. At the same time I will send the cases, sump and some other parts from the bottom end to be cleaned
Here is what I have ordered for this part of the rebuild
Oil Separator
(99610101000)
Main Crankshaft Bearing Shell Standard. Porsche 986 Boxster / 996 >>2001
(99610120510)
2 x thrust washer
(99610112952)
6 x splash valve
(99610101851)
Tensioner Blade. Porsche 996 1998-05 / Boxster / Cayman
(99610516555)
Tensioner Blade. Porsche 996 1998-05 / Boxster / Cayman
(99610516651)
6 x pan-head screw M 6 X 16
(99921800501)
Timing Chain. Porsche 996 / 986 / 987C / 997.1
(99610517158)
2 x Timing chain. Porsche 996 / 986 Boxster
(99610517753)
roll pin 6,0 X 16
(90009503101)
straight pin A 4,0 X 10
(90030202100)
14 x screw M 9 X 127
(99610111559)
|
|
|
|
|
11-23-2021, 04:48 AM
|
#39
|
|
Registered User
Join Date: May 2021
Location: Stansted
Posts: 67
|
Recap of what I did so far.
Remove rear bumper - Lots of great posts on this forum how to do this and YouTube videos
Remove roof (easier access) - Lots of great posts on this forum how to do this and YouTube videos
Remove Exhaust - Lots of great posts on this forum how to do this and YouTube videos, 101 projects, etc
Remove gearbox - Lots of great posts on this forum how to do this and YouTube videos, 101 projects, workshop manuals, etc
Remove engine - Lots of great posts on this forum how to do this and YouTube videos, 101 projects, workshop manuals, etc
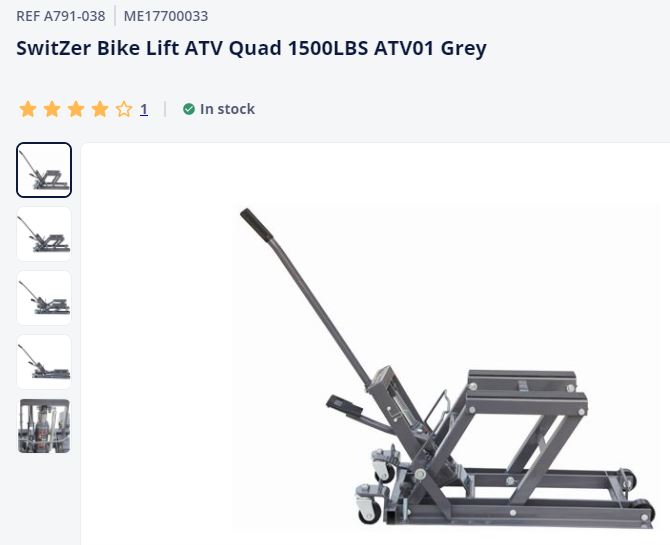
With all the resources online, dropping the engine is not as daunting as first thought with the bike lift and going slow and checking and double checking it came out with little stress. It took about 3-4 hours start to finish.
That all said, the caveat to this is that I have already taken the gearbox off so all those seized and rusted nuts, bolts etc had already snapped and I went through the stress and time previously. As an example, I was going to reuse the original cats, but the flange bolts refused to come out and I had to sacrifice the cats to get them off. With Hindsight, if you want to reuse many of the items then plan for extra time to deal with the poor quality fasteners. If you plan to replace, then do what's most time effective
If there is anything specific someone would like to know then please do ask
Here are some of the tools I used
- Bike Lift - to support and lower the engine
- Trolley Jack
- Jack Stands
- Floor transmission jack
- Various sockets
- Camshaft holder tool
- Impact Wrench
- Impact Driver
- Electric Ratchet
- Engine Stand


|
|
|
|
|
11-28-2021, 08:24 AM
|
#40
|
|
Registered User
Join Date: May 2021
Location: Stansted
Posts: 67
|
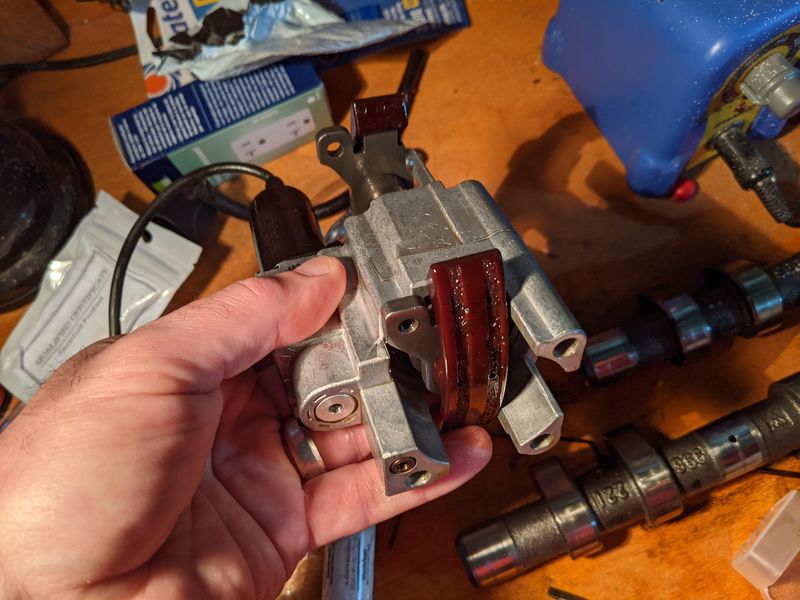
As part of the tear down, I am cleaning many components which I wont be replacing. Once of these are the Variocam adjusters. So I have searched the net looking for info on there magical devices and some does exist, but there is not much that shows some of the internals. Understandably so when we consider the cost of these. There also seems to be no way to refurbish them.
I had originally used paraffin on one of the adjusters and a ultrasonic bath to clean it and I thought it cam our well. When I went to do the bank 2 adjuster I actually saw some of the brown plastic from the guides in the same bag, which there should have not been any. On closer inspection and through some dismantling I found more fragments, some even blocking the holes on the piston visible. So I decided to take the risk and dismantle these and use a ultrasonic sensitive detergent at around 45 deg C and totally flush out the parts.
So here is a caveat, I do not recommend repeating this experiment as at this time I do not know if it will fix or damage the part. I am only sharing what I did and my observations and not recommending the following to anyone to repeat.
Each bank has differences, not only in the solenoid but also in the unit itself. Bank 2 has extra holes which oil is pushed through that bank 1 doesn't, also more importantly, there is a oilway at the top of bank 2 and this is on the bottom of bank 1
Below are some photos after the units were cleaned.


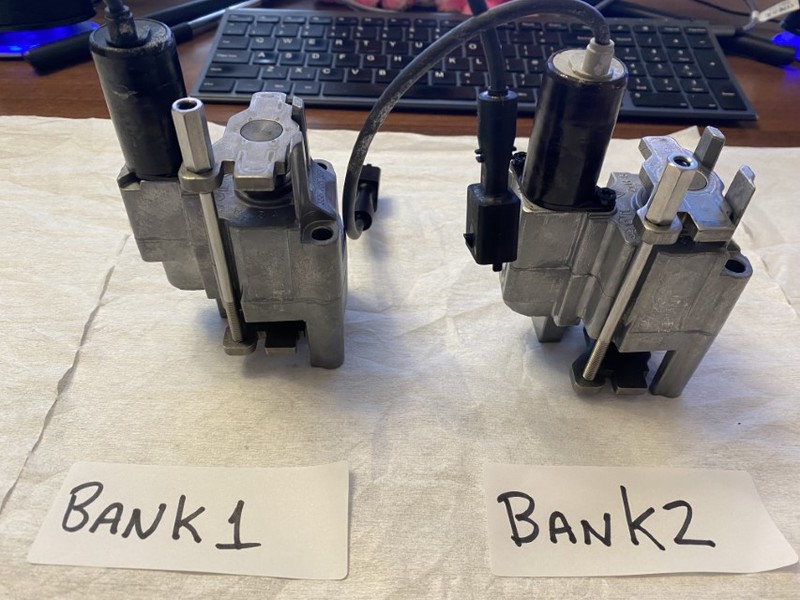
Apart from the difference in part number stamped on each unit, there is a stamp indicating which cylinder it is intended for visible on the top of each unit next to the solenoid
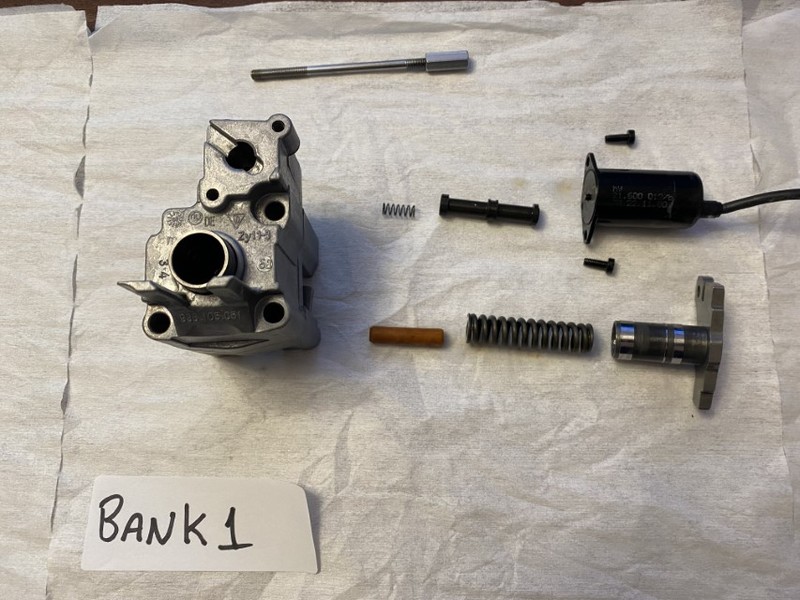
So how I cleaned the units was to dismantle each one, one by one as not not mix up the internals.
Below are the internals for Bank 1

I next put the parts, not including the solenoid into an Ultrasonic bath with a sensitive detergent (metal and rubber) at 45 deg C for 10 minutes. I then gently moved the piston in an out (and I mean gently) and wow, the crud that came out and yes some more small pieces of plastic. On bank 1, there are only 3 or 4 places where fluid goes in and out so I just watched these as I GENTLY moved the piston. I then repeated the bath for another 10 mins and repeated GENTLY moving the piston and wow, even more crud and small pieces of plastic. Dont get me wrong, it was only 1-2 very small pieces but they were still there.
Between each 10 min clean I rinsed in warm water, submerged and gently moved the piston. I repeated one more 10 min clean in the batch.
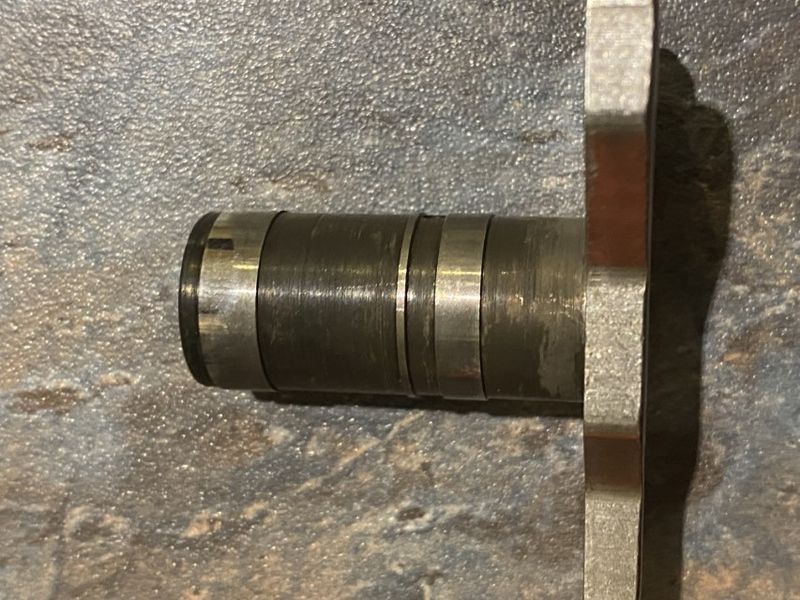
I then polished the piston in the middle (below) and using a shoelace and oil only I polished the main piston in the unit.

BTW, before cleaning the pistons did not move freely, either the one inside the main or the main. Following cleaning, I submerged the unit in fresh oil and gently moved the piston to prime it and removed as much water as possible. Yes there will be some water remaining but this will hopefully be removed when I break the engine in following the rebuild and the 2-3 oil changes I am planning post run in. The amount should be insignificant....hopefully
|
|
|
|
 Posting Rules
|
You may not post new threads
You may not post replies
You may not post attachments
You may not edit your posts
HTML code is On
|
|
|
All times are GMT -8. The time now is 06:36 PM.
| |


 Linear Mode


