Go Back   986 Forum - The Community for Porsche Boxster & Cayman Owners > Porsche Boxster & Cayman Forums > DIY Project Guides

Post Reply
 
LinkBack Thread Tools Display Modes
Old 05-02-2020, 10:51 AM   #1
Registered User
 
Join Date: Oct 2018
Location: New England
Posts: 58
Hans Gruber DIY IMS bearing replacement +other stuff

Hey gang. I'm 18 mos into owning a 99 Boxster and have started doing some mechanical work. "Hans Gruber" had ~39K miles when I purchased him and I put about 3K miles on him last year. Spent most of his life in CA and IA and was very clean inside and underneath. Also sat a lot during the past 10 years and was probably only/mostly driven for registration or inspection updates.

Anyhow, I'm not doing anything that several others haven't already done. But will document things here to give-back since many others who posted their experiences helped me. My primary objective was to inspect and replace the IMS, but am also replacing the RMS, trans seals, AOS, and a few other items while I"m in there.

Also -- completely unnecessary and impractical, but I spend more time cleaning than repairing. As long as everything is off it's a good opportunity to degrease and remove grime. ...and this vehicle is a semi garage queen which is only driven on nice non-winter non-rainy days so tends to stay clean.

So here's where I started... I use this quick jack on all my vehicles. The only challenge is the rails tend to restrict access to the bolt that holds the aluminum cross braces. So I loosened it and removed the small black fairings in front of the rear wheels before lifting (yes I'm guessin' an alignment will be required after reinstallation).

Removed the rear bumper and pulled the exhaust to get here:


After that I disconnected the axle shafts from the tranny and used a harbor freight stand to support it. Axle shaft boots were in perfect condition! I shimmed the rear portion of the transmission and took extra photos so it will hopefully be well aligned and level w/the car when I reinstall.


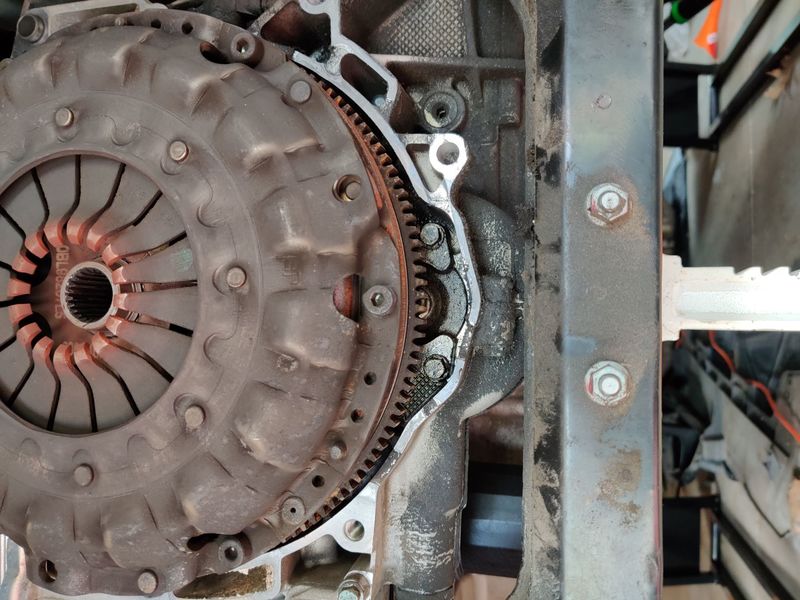
Supported the rear engine, removed the clutch slave cylinder, shift cables, and trans mounts and pulled the tranny... Pro tip from others here was to scribe the bolt pattern for the trans on a cardboard box and shove the bolts into it in the same location they were removed since all are different sizes and difficult to track. The lower driver-side bolt requires a "triple square spline" bit. You can get an entire set on Amazon for $17. I popped the bit out of the socket and put a wrench on it to remove since clearance for tools is tight.


Last edited by geekdaddy; 05-02-2020 at 11:55 AM.
geekdaddy is offline   Reply With Quote
Old 05-02-2020, 11:05 AM   #2
Registered User
 
Join Date: Oct 2018
Location: New England
Posts: 58
Found the transmission bell housing was coated with grime. Guessing an input shaft seal leak? Will have to replace it. As long as things are apart, I'll also drain the gear oil and replace the output shaft seals -- although they were not leaking, Hans is over 20 years old!


Clutch/flywheel cover was also pretty grimy but otherwise in good shape.


Removed the cover and found the clutch was well worn down to the rivets. The flywheel was in good condition but I sent it out to the local machine shop for cleaning and resurfacing. Looks like it needs it. As others have recommended, I used a spare piece of steel bar to hold the flywheel to the engine case while removing the bolts which were VERY tight. Had seen a lot of warnings about the weight of the flywheel but it really wasn't that bad. I supported it with one hand while unscrewing the last bolt and then pulled it off.


IMS and RMS seals look like they were holding up well. Doesn't look like any significant leaking from this side of the flywheel...
geekdaddy is offline   Reply With Quote
Old 05-02-2020, 11:24 AM   #3
Registered User
 
Join Date: Oct 2018
Location: New England
Posts: 58
Spent considerable time cleaning up the trans, rear of engine, and started working on the exhaust. Getting ready to pull the IMS. I ended up selecting the EPS roller bearing solution and purchased it from Vertex. I asked if they would also loan me the tools (normally $75 to rent) and they said yes!

To clean the transmission and rear of engine, I stuffed rags into the intake areas (on the engine), used the degreaser that's "plastic/rubber friendly" used a stiff plastic brush on the heavy areas, and then power washed with a lower intensity electric washer. Bell housing looks much better now!

Cleaned below and behind the engine. Actually power-washed from inside the garage and squeegeed all the crud off the floor. Wiped everything down and put a fan on it overnight. Rear of engine is much better now for working on the IMS/RMS. Here is a pic of the EPS bearing kit and removal tools I received.


I used the tool to lock the crankshaft at TDC via the aux belt pulley. Then popped the camshaft covers to inspect them and locked one set of them down. Mine is a 5 chain motor so I understand it's only necessary to lock one of the cams. This one is to the left of the flywheel.


Making progress on the midpipes. The nuts and bolts could possibly have been reused but had a fair amt of rust so I pressed out the bolts with a rented (for freeeee) tie rod press and will replace them with new HW. Have since removed the O2 sensors since (duh) it's a lot easier to work on the pipes and less likely to damage the sensors while cleaning. On the stainless exhaust parts, mine had only minor corrosion and crud so I used a magnesium wheel cleaner that has degreaser and some mild acid. Seems to be working well.
geekdaddy is offline   Reply With Quote
Old 05-02-2020, 11:45 AM   #4
Registered User
 
Join Date: Oct 2018
Location: New England
Posts: 58
Today was the big day. Pulled the IMS. Now that the cams were locked I removed the crank tensioner and the cylinder 4-6 tensioner on the right-hand side. Here's the crank tensioner coming out:


I bagged and labeled the tensioners since they are not interchangeable. Actually, I bag and EVERYTHING since it can be difficult to recall later during reassembly. I removed the three bolts and retaining nut on the flange and removed the flange. Mine had the old, single-o-ring seal on the flange but as stated earlier it had performed well with no leaking. I screwed the threaded rod onto the bearing shaft, placed the press over it, threaded the nut, and oiled the nut. You can see the tool setup here:


Several of the IMS removal instructions refer-to a C-clip that retains the bearing. But mine is a '99 with double-row bearing (expected for this vintage and verified by the shallow dish on the outside of the bearing flange seen above). A 13 mm wrench holds the end of the tool shaft, and a 24mm wrench turns the nut clockwise to pull the bearing out. It initially took a fair amount of force to turn the wrench and did my best to twist without torquing too hard in one direction. Keeping the ends of the wrenches in a similar position for the hard work (e.g. one at "4pm" and the other at "3pm") helped. Not sure that was necessary but wanted to pull things out straight. Once it started to move, it was much easier to extract. It came right out along with oil that filled over 1/3 of the inner IMS shaft! The pic below was caught after the initial flow cam out:


Removed the bearing, tapped out the shaft, and yep, it was in perfect condition. Tight, smooth, no play, no sludge or bearing particle wear around the seals. This bearing was held in place by a small wire/clip which fits into a slot on the bearing housing. When the bearing was installed, the clip expanded into a slot in the engine case -- and also gave-way during the extraction as I think it's designed to do. My vehicle was low mileage (42K) with double-row bearing but also 21+ years old and often sat unused for long periods of time. The vehicle condition was good and seemed not to be abused, but I didn't have full service records so no idea how well they changed the oil or how they drove it. Upon inspection, seems it could have likely functioned for many more miles. But glad I pulled it. The new EPS open roller bearing will have an oil feed and with no seals the IMS will drain instead of remaining filled with oil. And the clutch, flywheel, and input shaft clearly needed attention so no regrets.

Last edited by geekdaddy; 05-02-2020 at 11:50 AM.
geekdaddy is offline   Reply With Quote
Old 05-02-2020, 01:00 PM   #5
Registered User
 
Join Date: Feb 2005
Location: It's a kind of magic.....
Posts: 6,273
You might be interested in the fact that dual mass flywheels cannot be resurfaced; if they are worn, or fail the factory twist test, they need to be replaced.
__________________
Anything really new is invented only in one’s youth. Later, one becomes more experienced, more famous – and more stupid.” - Albert Einstein
JFP in PA is offline   Reply With Quote
Old 05-02-2020, 01:40 PM   #6
Racer Boy
 
Racer Boy's Avatar
 
Join Date: Sep 2015
Location: Seattle, WA
Posts: 946
Yeah, just replace the flywheel. You can get a clutch kit that includes the flywheel. Not cheap, but while you have it all apart, you may as well go ahead and do it right so you don't have to go through the same thing again soon.
Racer Boy is offline   Reply With Quote
Old 05-02-2020, 02:16 PM   #7
Registered User
 
Join Date: Oct 2018
Location: New England
Posts: 58
Aw shoot. Rookie mistake. I didn't realize that. I did the twist test and it was fine. The surface was glazed and crudded up so thought it was ok to resurface. Will replace with new LuK OEM...

Quote:
Originally Posted by JFP in PA View Post
You might be interested in the fact that dual mass flywheels cannot be resurfaced; if they are worn, or fail the factory twist test, they need to be replaced.


Last edited by geekdaddy; 05-03-2020 at 03:55 AM.
geekdaddy is offline   Reply With Quote
Post Reply


Posting Rules
You may not post new threads
You may not post replies
You may not post attachments
You may not edit your posts

BB code is On
Smilies are On
[IMG] code is On
HTML code is On
Trackbacks are On
Pingbacks are On
Refbacks are On


All times are GMT -8. The time now is 06:39 PM.


Powered by vBulletin® Version 3.8.7
Copyright ©2000 - 2024, vBulletin Solutions, Inc.
Content Relevant URLs by vBSEO 3.6.0
Copyright 2024 Pelican Parts, LLC - Posts may be archived for display on the Pelican Parts Website -    DMCA Registered Agent Contact Page