Go Back   986 Forum - The Community for Porsche Boxster & Cayman Owners > Porsche Boxster & Cayman Forums > DIY Project Guides

Post Reply
 
LinkBack Thread Tools Display Modes
Old 01-07-2016, 11:06 AM   #1
Registered User
 
steved0x's Avatar
 
Join Date: Dec 2012
Location: FL
Posts: 4,143
Rear trailing arms replacement guide DIY

I just finished replacing my rear trailing arms (well one side anyway, will update when the other side is done).

(Here is a video guide on youtube of the FRONT arms: https://www.youtube.com/watch?v=899_OjGjBMg)

Parts needed:
2 new trailing arms - part #8 on this diagram
Rear Axle Wheel Carrier Control Arm Wheel Hub

986 Boxster TRW equivalent: TRW JTC1186 Control arm:
Robot Check

987 Boxster TRW equivalent: TRW JTC1316 Control arm:
Robot Check

I used the 987 part, see this thread for discussion:
http://986forum.com/forums/performance-technical-chat/53590-rear-suspension-noise-over-tar-strips.html

And thanks to Smallblock454 for providing the TRW part numbers.

Bentley says to replace the locking nuts, part # 90038001201

Tools needed.
  • 18 MM socket for the bolt ends (or wrench/crowfoot depending on clearance)
  • 21 MM socket for the nut (or wrench/crowfoot depending on clearance)
  • Torque wrench that goes to 118 ft/lbs (the torque for both ends of this trailing arm)
  • Wobble extension and/or other extensions
  • Breaker bar

I jacked up the car and put on jack stands and removed the wheels (they were already off for a brake bleed). I ended up putting the wheels back on and lowering to ramps, when I do the other side I am going to leave the car on the ramps.

I started with the passenger side and removed the front fender liner (3 or 4 nuts, very easy, 10mm)


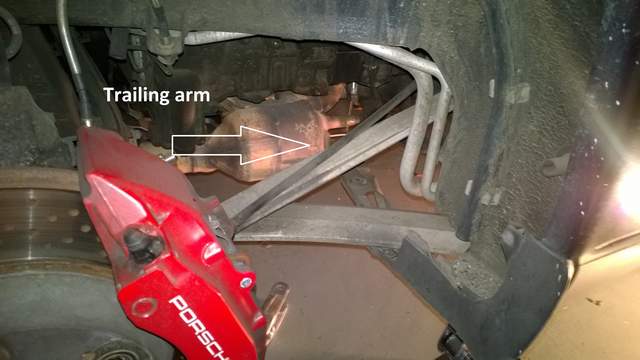
Here is me removing the bolt that goes through the LCA (rear of arm). Note the jack in the back, in addition to jack stands I always put the jack near where I am working for extra safety in case a jack stand fails.


And this is removing the bolt that attaches to the body at the front of the arm (bolt threads into body with no separate nut). This is where I needed the wobble arm because there is some tubing that is in the way.


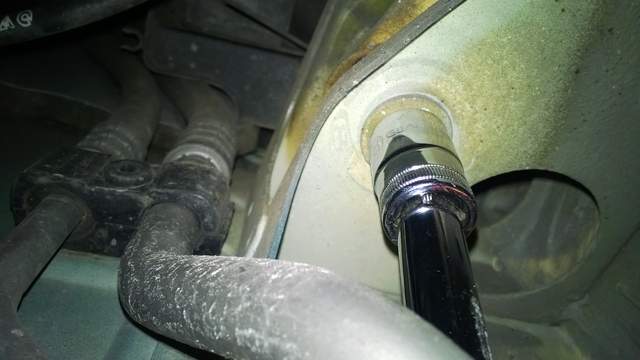
Note that I do not have the rearmost underbody panel on due to my deep sump and the fact that that panel is trashed anyway... you may need to remove it to get to the front bolt.

With the bolts removed, I removed the trailing arm. What worked for me was to take the back end of the bar and push it toward the middle of the car, sliding along the LCA, and then pop out the front end of the control arm toward the center of the car as well. Then move the whole assembly to the front of the car until the back end clears the LCA, and then it comes right out.

Note that I removed this one with the car on jack stands and the suspension unloaded. If my bushing end wasn't shot I do not believe I would have been able to remove it... [Edit: I no longer believe this is true - the monoball end of the arm is designed to pivot and so it should be able to be removed. I do believe an EPS/Vertex Urethane bushing arm would be hard to remove (and even harder to install) because that bushing would be under a lot of twisting load]

With the old arm removed, I was easily able to move around the bushing piece at the end (where with the new ones it absolutely would not budge) [Edit: now that I have taken one apart I was able to see how the monoball works - it is supposed to rotate around - that is how it accommodates the changing angles of the arm due to suspension load changes. I believe the stiffness of the new arms was due to the stiff rubber boots]


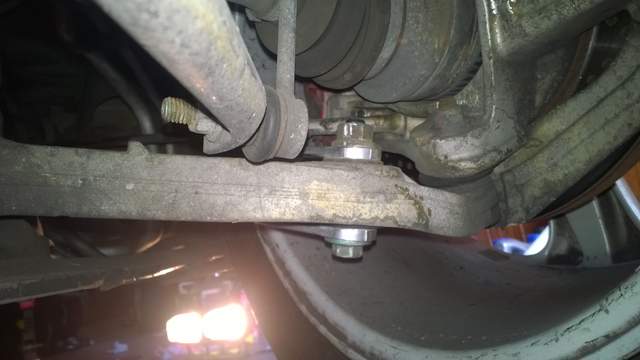
The old piece next to the new piece:


When I went to put the new piece in is when I realized there was no way unless I loaded the suspension.

[Edit: you could pivot the bushing to get it to line up to the correct angle but this is tougher to do with new arms. So I think this is easier to do but not required. With the Vertex/EPS I think it would be required because that is a traditional bushing and not a monoball and so that one would be very hard to rotate]

This is because with the suspension unloaded, the LCA is at a greater angle and when the forked end of the control arm is over it, the other end is twisted too much to slip in where it needs to go. I put the back wheels back on and lowered it down onto some ramps which flattened out the LCA. At this point I was able to get the new arm into position.

To reposition, I pushed the front of the arm toward the front of the car so I could slip the forks of the back end over the LCA. Then what worked for me was to slide the forked end up the LCA toward the center of the car until I could get the bushing end slightly rotated and slipped into where it needs to go.


I got that bolt started and then went to the back of the car. That one was a little tougher but I was able to push it on and get it lined up. Pushing from the back of the car on the top of the fork with my hand got it positioned. I thought about jacking/lowering the car to change the angle of the LCA but didn't want to stress the forks when they were not in position. Pushing the top of the fork from the back of the car was the magic combination and it slide right into place...

All buttoned back up and torqued to 118 ft/lbs. A clever eye may notice that the nut/bolt is reversed here from what is shown in the parts diagram. That is the way it was previously installed so I put it back together that way (and only noticed it was reversed as I was typing this guide... )Looks like someone has been here before... I will check to see if the other side is that way. [Edit: this is the way it is supposed to be - I don't even think there is room to thread the bolt from the top]


Now I need to take the wheel back off and reinstall the fender liner. Next side I am going to leave on the wheel and not mess with the fender liner - it is much easier to get at the fork end from the back of the car than through the side... [Edit: I subsequently did the other side with the wheel on and the back end on ramps - it was very easy and took about 20 minutes. The hardest part was applying the 118 ft/lbs of torque to the frontmost bolt - that is tough to do while laying under the car...]

FAQ:
Q: Does the car need to be on wheels and suspension loaded before installing and torqueing down the bolts of this trailing arm?
A: The Bentley doesn't say so, but in my opinion the car will be on the wheels and the suspension loaded anyway or else it will be very hard to fit the parts. So by default the suspension will be loaded anyway when you do the installation and final torque. It can be done with the suspension but I think it is easier when it is loaded. In my opinion backing the car onto 2 ramps is the quickest way if there is no access to a lift.

Q: Can I tell if the part is bad without removing it to take a look.
A: In my opinion no. It is very securely fastened at the forked end and so I don't think you will see any rotational movement at the bushing end, but maybe some lateral play (which could be a sign of it being bad). However, if you were to unbolt the forked end and slide it up the LCA toward the center of the car so the forks are somewhat clear, you could then try and rotate the bushing end along the long axis of the arm. If you can it is probably shot. [Edit: this is not true in my opinion now. I believe the bushing is designed to rotate that way. I think one way to tell if it is bad is to unbolt the forked end and then see if the ball end rattles around. Or remove the arm, put the bushing in a vise and push on it. If it moves or clicks, those may be indicators of it being bad]

Edit 11/9/2016 I found a new website the other day, a 996 Register, and it has an embedded video showing one technique on how to check the arms. The person in the video hits them with a rubber mallet, and the bad one makes a metallic pinging noise, while the good one does not. Here is the page with the video:

http://www.996revolution.com/maintenance.html

Note that I haven't tried this, I found the video long after I had completed my job.

Q: Do I need an alignment after replacing this part.
A: No [Edit: at least 1 out of 3 of my FAQs were correct when I first put them out... )


Last edited by steved0x; 11-09-2016 at 06:28 AM.
steved0x is offline   Reply With Quote
Old 01-07-2016, 12:47 PM   #2
Registered User
 
911monty's Avatar
 
Join Date: Oct 2014
Location: California Central Coast
Posts: 1,476
Garage
Excellent writeup Steve!! Well documented and Great insight even FAQs! Well done sir. After seeing your bushing stress test I do have to ask if you have compared the bushing hardness between the 9x6 and 9x7 parts?
911monty is offline   Reply With Quote
Old 01-07-2016, 01:34 PM   #3
Registered User
 
steved0x's Avatar
 
Join Date: Dec 2012
Location: FL
Posts: 4,143
Quote:
Originally Posted by 911monty View Post
Excellent writeup Steve!! Well documented and Great insight even FAQs! Well done sir. After seeing your bushing stress test I do have to ask if you have compared the bushing hardness between the 9x6 and 9x7 parts?
I have not and wouldn't know how to start. Perhaps this hardness is a key difference and is why some say the 987 part is better...?

Edit: these are monoballs and not a regular bushing. I discovered tonight that if I put a small bolt in I can get it to move. There is more resistance than my old shot ones that flopped around however. I am guessing they work in a different way and the resistance is different...

Last edited by steved0x; 01-07-2016 at 03:44 PM.
steved0x is offline   Reply With Quote
Old 01-07-2016, 05:02 PM   #4
Registered User
 
911monty's Avatar
 
Join Date: Oct 2014
Location: California Central Coast
Posts: 1,476
Garage
Quote:
Originally Posted by steved0x View Post
I have not and wouldn't know how to start. Perhaps this hardness is a key difference and is why some say the 987 part is better...?

Edit: these are monoballs and not a regular bushing. I discovered tonight that if I put a small bolt in I can get it to move. There is more resistance than my old shot ones that flopped around however. I am guessing they work in a different way and the resistance is different...
Well don't know if it's too late, but I believe you have both a 986 and a 987 arm? While it would be subjective is it possible to compare the deflection resistance between the two using a test similar to your bolt test? I'm kinda wondering if this monobail is the difference also.

Steve; Just went over your writeup again and noticed something I hadn't noticed on the original read. The bolt you identified as being upside down,IS. The reason it is installed with the nut on bottom is so that if the nut were to fall off, the bolt would still be in place. With nut on top if nut falls off bolt also falls out.

Last edited by 911monty; 01-07-2016 at 05:16 PM. Reason: 1818
911monty is offline   Reply With Quote
Old 01-07-2016, 05:13 PM   #5
Registered User
 
steved0x's Avatar
 
Join Date: Dec 2012
Location: FL
Posts: 4,143
I actually had 5 control arms to test using a bolt:
1 987 rear arm, Trw
2 986 rear trailing arms, trw
2 986 front arm, brand unknown (from Elephant, they said Asian but brand unknown)

The force to move the bushing using a bolt was the same for all 4 with the exception of the 987 trw which was easier, I could actually move it by hand (I could not with the other one i installed already)

After moving them about for a few seconds the resistance was about the same. Edit: After taking one apart, I believe the resistance I felt was the resistance of the stiff rubber boots and not from the inside parts...

The 2 old 986 arms moved very easily. I am.going to take one apart to see what is inside.

The reason I am replacing mine is the guy that installed my front GT3 LCA said they were shot. So short of the ball rattling inside, I am not sure how to tell when one is shot.

Maybe I will know more when I take it apart...

Last edited by steved0x; 01-07-2016 at 06:27 PM.
steved0x is offline   Reply With Quote
Old 01-07-2016, 05:23 PM   #6
Registered User
 
911monty's Avatar
 
Join Date: Oct 2014
Location: California Central Coast
Posts: 1,476
Garage
Steve I was editing my post when you replied. Please see my comments at bottom concerning the upside down bolt.
911monty is offline   Reply With Quote
Old 01-07-2016, 05:29 PM   #7
Registered User
 
steved0x's Avatar
 
Join Date: Dec 2012
Location: FL
Posts: 4,143
I finished the other side and it was nut on top too, so now I have them both backwards I guess what you say makes perfect sense and I was thinking the same way...

I just got out my Bentley and looking at the pictures in the Bentley they show nut on top as well, backwards from the parts diagram. Weird..
steved0x is offline   Reply With Quote
Old 01-07-2016, 05:36 PM   #8
Registered User
 
911monty's Avatar
 
Join Date: Oct 2014
Location: California Central Coast
Posts: 1,476
Garage
I think some new thought is with nut on top it protects the bolt threads from road debris somewhat better. However me being old school I think the original thought is better. I would rather the bolt remained in place.
911monty is offline   Reply With Quote
Old 01-07-2016, 05:55 PM   #9
Registered User
 
steved0x's Avatar
 
Join Date: Dec 2012
Location: FL
Posts: 4,143
Quote:
Originally Posted by 911monty View Post
I think some new thought is with nut on top it protects the bolt threads from road debris somewhat better. However me being old school I think the original thought is better. I would rather the bolt remained in place.
Looking at it some more, I'm not sure if there is even room to thread the bolt in from the top...
steved0x is offline   Reply With Quote
Old 01-07-2016, 06:24 PM   #10
Registered User
 
steved0x's Avatar
 
Join Date: Dec 2012
Location: FL
Posts: 4,143
I took the boots off of my old ones. I have to say, the grease looks good and the ball joint is smooth with no rattling or lateral play; it seems to rotate smoothly about its possible motions.


Now I am wondering why the heck I replaced them... And how to truly tell if they are bad. To me this one looks and feels pretty good... Maybe if there is a problem it only manifests under a heavy load?

The one in the vertex video for the EPS rebuilt arms is definitely bad, the whole guts falls out at one point in the video

I think i am going to unbolt the forks on my front ones and if the ball end doesn't rattle i am going to leave them on...

Steve

Last edited by steved0x; 01-07-2016 at 06:38 PM.
steved0x is offline   Reply With Quote
Old 01-08-2016, 02:06 AM   #11
Registered User
 
WillH's Avatar
 
Join Date: Feb 2015
Location: QC
Posts: 412
Place the ball in a vice and push pull on the arm, any looseness ? I had one with visible movement and an audible click when done with the mallet. The other seemed fine but was much quieter after replacement.
Also had no reason to load the suspension to install the new control arms. Bolts lined up quite well.

Last edited by WillH; 08-12-2018 at 03:59 PM. Reason: Spelling
WillH is offline   Reply With Quote
Old 01-08-2016, 04:39 AM   #12
Luckyed
 
Luckyed's Avatar
 
Join Date: Apr 2014
Location: Florida
Posts: 253
Garage
Very nice write up Steve.

Thanks.
__________________
2001 Base 2.7 - Arctic Silver - 5 speed - Comfort Top -
3-4 Stalk OBC Upgrade - Double DIN Head Unit
Luckyed is offline   Reply With Quote
Old 01-08-2016, 05:56 AM   #13
Registered User
 
steved0x's Avatar
 
Join Date: Dec 2012
Location: FL
Posts: 4,143
Quote:
Originally Posted by WillH View Post
Place the ball in a vice and push pull on the arm, any looseness ? I had one with visible movement and an audible click when done with the mallet. The other seemed fine but was much quitter after replacement.
Also had no reason to load the suspension to install the new control arms. Bolts lined up quite well.
I added these items to the write-up above, thank you! I don't have a vise but I will throw the arms in my truck and take them to a mechanic friend of mine to test next chance I get.
steved0x is offline   Reply With Quote
Old 01-10-2016, 05:31 PM   #14
Registered User
 
Join Date: Nov 2013
Posts: 52
Garage
Quote:
Originally Posted by steved0x View Post
FAQ:
Q: Does the car need to be on wheels and suspension loaded before installing and torqueing down the bolts of this trailing arm?
A: The Bentley doesn't say so, but in my opinion the car will be on the wheels and the suspension loaded anyway or else it will be very hard to fit the parts. So by default the suspension will be loaded anyway when you do the installation and final torque. It can be done with the suspension but I think it is easier when it is loaded. In my opinion backing the car onto 2 ramps is the quickest way if there is no access to a lift.

Q: Can I tell if the part is bad without removing it to take a look.
A: In my opinion no. It is very securely fastened at the forked end and so I don't think you will see any rotational movement at the bushing end, but maybe some lateral play (which could be a sign of it being bad). However, if you were to unbolt the forked end and slide it up the LCA toward the center of the car so the forks are somewhat clear, you could then try and rotate the bushing end along the long axis of the arm. If you can it is probably shot. [Edit: this is not true in my opinion now. I believe the bushing is designed to rotate that way. I think one way to tell if it is bad is to unbolt the forked end and then see if the ball end rattles around. Or remove the arm, put the bushing in a vise and push on it. If it moves or clicks, those may be indicators of it being bad]

Q: Do I need an alignment after replacing this part.
A: No [Edit: at least 1 out of 3 of my FAQs were correct when I first put them out... )
Hey Steve, thanks so much for this write up! I was on the fence for doing this project and now with your help will attempt it myself and save the labor cost for other wear and tear! One quick question is can I remove the rear trailing arm while the car is on ramps and the suspension is loaded? I know space might be tight but I'm more concerned if the trailing arm is vital to the vehicle not falling on my head hahah! Thanks again for the write up!
ttmedical is offline   Reply With Quote
Old 01-14-2016, 07:13 AM   #15
Registered User
 
steved0x's Avatar
 
Join Date: Dec 2012
Location: FL
Posts: 4,143
Quote:
Originally Posted by ttmedical View Post
Hey Steve, thanks so much for this write up! I was on the fence for doing this project and now with your help will attempt it myself and save the labor cost for other wear and tear! One quick question is can I remove the rear trailing arm while the car is on ramps and the suspension is loaded? I know space might be tight but I'm more concerned if the trailing arm is vital to the vehicle not falling on my head hahah! Thanks again for the write up!
I do not think the trailing arm is holding up anything, it looks more like it is to prevent forward/rearward caster changes for the wheel. To confirm, I did my second one with the car on ramps and nothing moved when I took off the arm.

I suppose it is possible though... You could set a jackstand or jack in a backup position just in case.
steved0x is offline   Reply With Quote
Old 01-14-2016, 07:45 AM   #16
Registered User
 
Join Date: Jul 2004
Location: Houston, Texas
Posts: 7,243
On the forked end, I was not able to get the bolt top down installed. There is simply no room. So the nut went on top with some locktite on the threads.
RandallNeighbour is offline   Reply With Quote
Old 02-02-2016, 08:35 PM   #17
Registered User
 
Join Date: May 2015
Location: Greater Seattle, WA
Posts: 534
Hey Steve - any thoughts on the trailing arm repair procedure discussed in this renntech thread?

Boxster Control Arm Repair

Do you notice a plastic bushing insert inside the ones you disassembled?
__________________
2001 Boxster

Last edited by jakeru; 02-02-2016 at 08:39 PM.
jakeru is offline   Reply With Quote
Old 02-03-2016, 06:20 AM   #18
Racer Boy
 
Racer Boy's Avatar
 
Join Date: Sep 2015
Location: Seattle, WA
Posts: 946
I replaced my trailing arms two weekends ago, and it is pretty straightforward. The first one I replaced was the driver's side, and I jacked the car up to do it. The passenger side I used ramps to get the car up. You have more room to access everything if you jack the car up, but you'll have to jack the control up to get everything to line up. The ramps method was difficult for me, because my ramps aren't high enough, and they are in the way.

The most difficult part was dealing with the splash guards and the huge plastic cover in front of the splash guards.

Now that the very bad and constant clunking is gone, it is strange to drive! It's almost like a normal car now. But without the terrible clunking, now I can hear all sorts of other suspension noises; creaking, smaller clunking, and squeaking. When my Bilstein shocks get in (the rears have been back-ordered for months), I'm completely rebuilding the suspension, including installing ROW M030 springs.
Racer Boy is offline   Reply With Quote
Old 02-03-2016, 07:15 AM   #19
Registered User
 
steved0x's Avatar
 
Join Date: Dec 2012
Location: FL
Posts: 4,143
Quote:
Originally Posted by jakeru View Post
Hey Steve - any thoughts on the trailing arm repair procedure discussed in this renntech thread?

Boxster Control Arm Repair

Do you notice a plastic bushing insert inside the ones you disassembled?
I just took off the rubber roots - the ball inside was in there without any slop, and I guess that plastic piece is captured up inside there and doesn't come out unless the ball is really flopping around in there... Mine hadn't yet degenerated to that point and so I didn't see the plastic part.

I have read that thread and if you want I can take a closeup of the arm without the rubber boot so you can get a better idea of what to do for that repair.
steved0x is offline   Reply With Quote
Old 04-13-2016, 10:27 AM   #20
Registered User
 
Join Date: Nov 2007
Location: Ontario, Canada
Posts: 42
Steve, how's it been running with the 987 part?

Sent from my LG-D852 using Tapatalk

petee_c is offline   Reply With Quote
Post Reply


Posting Rules
You may not post new threads
You may not post replies
You may not post attachments
You may not edit your posts

BB code is On
Smilies are On
[IMG] code is On
HTML code is On
Trackbacks are On
Pingbacks are On
Refbacks are On


All times are GMT -8. The time now is 11:20 PM.


Powered by vBulletin® Version 3.8.7
Copyright ©2000 - 2024, vBulletin Solutions, Inc.
Content Relevant URLs by vBSEO 3.6.0
Copyright 2024 Pelican Parts, LLC - Posts may be archived for display on the Pelican Parts Website -    DMCA Registered Agent Contact Page