 01-25-2015, 01:07 PM
|
#21
|
|
Registered User
Join Date: Nov 2014
Location: Long Island, NY
Posts: 160
|
Thanks James! I'll do just that. I'll pull the tdc lock and cam lock, throw a wrench on the crank pulley bolt and wedge that with something. I cant wait to get going on this job again! I just have a lot going on right now and now a lot of snow is expected so that doesn't help!
|

|

|
|
01-25-2015, 04:57 PM
|
#22
|
|
Registered User
Join Date: Jan 2015
Location: Melbourne, Australia
Posts: 74
|
I so admire you guys taking on this kind of stuff, I just wouldn't have the nerve to tackle something like this on my own. I would definitely participate though if someone wanted help. Besides I have no tools and getting a bit old now to start, well that's my excuse anyway. I have to say though you all must get such a satisfied feeling when you do it all yourselves plus the added bonus is you know you did it properly and not trust your babies to some non caring mechanic only interested in your money.
Wish you all the best Viper looks like you're doing a fantastic job, keep it up 
__________________
1998 Porsche Boxster
986 Arena Red, Tiptronic Base
|
|
|
|
|
01-25-2015, 05:14 PM
|
#23
|
|
Registered User
Join Date: Nov 2014
Location: Long Island, NY
Posts: 160
|
Thanks JonD! I enjoy working on cars and problem solving. I always like to get a second opinion on things in case I'm not doing something right. Being that there are written procedures, it makes it a little easier as long as you understand it and are in agreement with it. I found a few other things needing attention already and I didn't even pull off the pressure plate yet. I have a few torn CV boots and a missing mounting bolt for the transmission. One of the nuts holding the transmission to the engine was only finger tight too. Makes me annoyed and also doubtful of the mechanic that performed the clutch replacement. What else was botched? Overlooked? Short cutted? I hope I don't need to replace the flywheel or pressure plate although I will replace the pilot and throw out bearing since it is all apart and was probably not previously done. Sorry to rant, just don't like laziness when it comes to repairs! It seems like no one can do their job a lot lately.
|
|
|
|
|
01-28-2015, 04:25 PM
|
#24
|
|
Registered User
Join Date: Jun 2014
Location: Chicago
Posts: 39
|
Quote:
Originally Posted by Viper10000

Thanks JonD! I enjoy working on cars and problem solving. I always like to get a second opinion on things in case I'm not doing something right. Being that there are written procedures, it makes it a little easier as long as you understand it and are in agreement with it. I found a few other things needing attention already and I didn't even pull off the pressure plate yet. I have a few torn CV boots and a missing mounting bolt for the transmission. One of the nuts holding the transmission to the engine was only finger tight too. Makes me annoyed and also doubtful of the mechanic that performed the clutch replacement. What else was botched? Overlooked? Short cutted? I hope I don't need to replace the flywheel or pressure plate although I will replace the pilot and throw out bearing since it is all apart and was probably not previously done. Sorry to rant, just don't like laziness when it comes to repairs! It seems like no one can do their job a lot lately.
|
The "missing" trans bolt is not really missing. It was omitted by the factory for reasons unknown. There are a ton of mentions of this on the forum. I was concerned as well until I researched it. But,... When I put mine back together, I put a bolt on the empty hole, it just didn't seem right to leave it empty and I didn't think it would hurt anything.
|
|
|
|
|
01-29-2015, 05:02 AM
|
#25
|
|
Registered User
Join Date: Nov 2014
Location: Long Island, NY
Posts: 160
|
Thanks Ray, I never thought to research it since that would be a strange thing for Porsche to do. I guess that makes me feel better. But why? Why would they do that? Oh well, I'll maybe put something else in its place eventually but I need to focus on the task at hand. I still need to pull the pressure plate and flywheel off which I hope to do today. I've just been too busy to put time in on the car. Little by Little I will get there though. I just placed another order with pelican for parts so I will do what I can, when I can, in the mean time.
|
|
|
|
|
01-29-2015, 12:57 PM
|
#26
|
|
Registered User
Join Date: Nov 2014
Location: Long Island, NY
Posts: 160
|
So I had some time to remove the flywheel and pressure plate today. Looks like the RMS is not leaking but the IMS flange is. I'll try to dig further when I can.
|
|
|
|
|
02-04-2015, 09:59 AM
|
#27
|
|
Registered User
Join Date: Nov 2014
Location: Long Island, NY
Posts: 160
|
Just trying to think ahead while I don't have time to do this yet... When I remove the timing chain tensioners, do they need to be "re-primed" or can I just put them back in as is? Or can I just loosen the tensioners instead of removal? And would loosening require a "re-prime"?
|
|
|
|
|
02-05-2015, 03:38 AM
|
#28
|
|
Beginner
Join Date: Mar 2013
Location: Houston
Posts: 1,659
|
Quote:
Originally Posted by Viper10000
Just trying to think ahead while I don't have time to do this yet... When I remove the timing chain tensioners, do they need to be "re-primed" or can I just put them back in as is? Or can I just loosen the tensioners instead of removal? And would loosening require a "re-prime"?
|
When I had mine out I pumped them in clean oil to get dirt out of them and there was plenty of dirty oil in them. Others can chime in on whether or not full removal is necessary, seems like it would be.
__________________
2003 S manual
|
|
|
|
|
02-05-2015, 05:59 AM
|
#29
|
|
Reebuck1
Join Date: May 2013
Location: Georgetown, SC
Posts: 210
|
Ims
Yes, they need to be primed!! Submerge them in oil and just pump them. You also should replace the RMS even though it is not leaking. Porsche up graded the seal a couple of times so make sure you order the latest version.
|
|
|
|
|
02-05-2015, 02:05 PM
|
#30
|
|
1999 base
Join Date: Dec 2011
Location: Coral Springs FL
Posts: 1,617
|
the most impotent thing, is when you get the job done, crank the engine several times for 10 seconds or so, with the DME relay or the fuel pump fuse removed.
that will get the tensioners filled up with oil before the engine goes on high RPM
|
|
|
|
|
02-05-2015, 02:36 PM
|
#31
|
|
Registered User
Join Date: Nov 2014
Location: Long Island, NY
Posts: 160
|
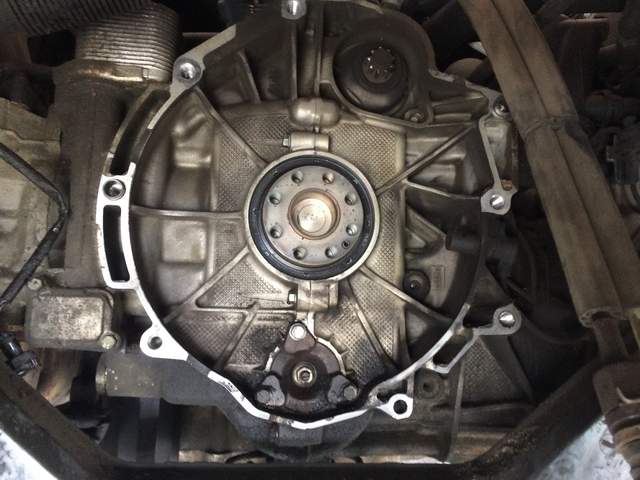
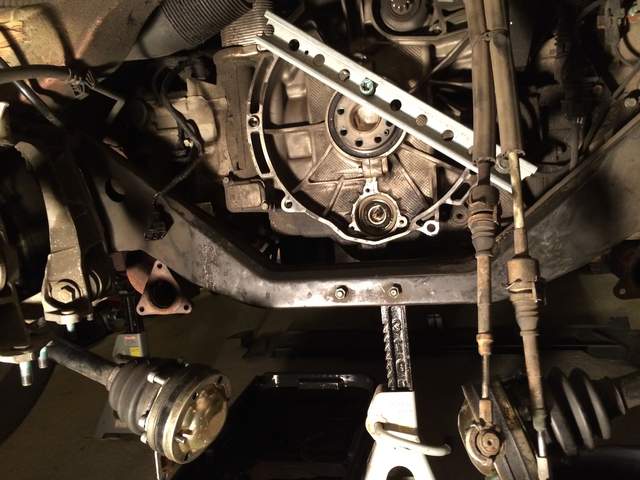
Well I got a little further today. I got the cam locked, oil drained, tensioners removed, and the IMS flange removed. So far the bearing looks great. I can not feel any play in the bolt and it spins rather nicely. I almost don't want to remove it but since it is a single row with 138,000 miles on it, I will be pulling it out. Here is where I am at...
I'll be pulling the bearing when I get more time. I'm just chipping away at this project little by little. I will flush the tensioners in fresh oil before I re-install. Thank you all who responded. I will also try cranking the engine to build oil pressure in them as well after it is all back together.
|
|
|
|
|
02-05-2015, 03:59 PM
|
#32
|
|
Beginner
Join Date: Mar 2013
Location: Houston
Posts: 1,659
|
[QUOTE= I almost don't want to remove it but since it is a single row with 138,000 miles on it, I will be pulling it out. [/QUOTE]
Good plan.
__________________
2003 S manual
|
|
|
|
|
02-06-2015, 02:57 PM
|
#33
|
|
Registered User
Join Date: Nov 2014
Location: Long Island, NY
Posts: 160
|
So, just to update where I am at...
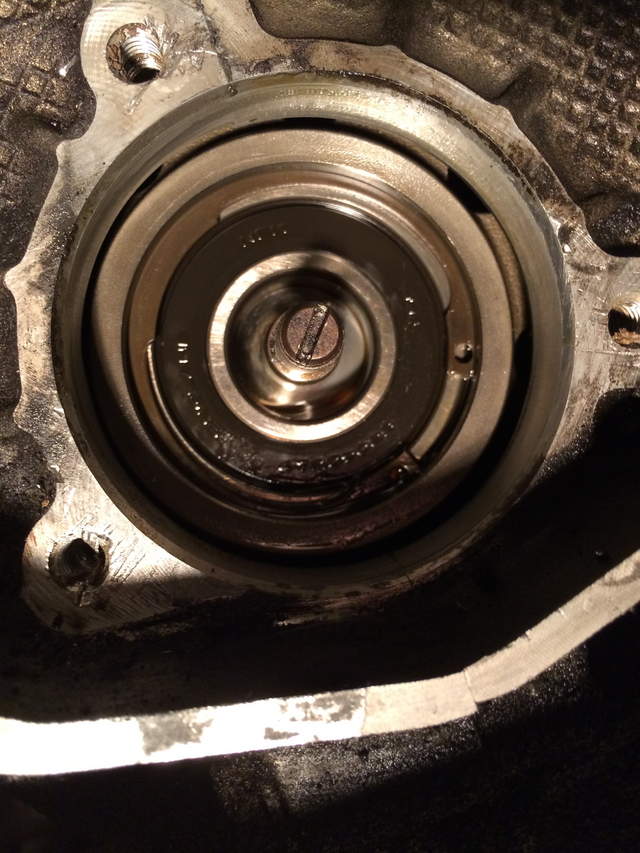
Old bearing removed and new bearing installed. The LN tool was amazing at extracting the bearing. Came out very smooth with little effort. The install was a little nerve racking but I managed to get it done and the new clip installed. I just need to put the cover on and begin re-assembly. I still need to clean up the ims cover and put a new seal on it, but after that cover is back on and the chain tensioners are re-installed, I will feel a lot better. Then the next step is the RMS. I brought the new seal with me to Home Depot and matched it up with a 3 inch pvc coupling. It fit over the seal very nicely.
As a side note, the bearing that came out of the engine felt great and no sloppiness to it. It did look like however that some grease was on the outside of the seal. There was almost no oil in the ims but I removed what was there with a shop vac.
|
|
|
|
|
02-06-2015, 04:22 PM
|
#34
|
|
Beginner
Join Date: Mar 2013
Location: Houston
Posts: 1,659
|
One of my rebuild secrets revealed. When re-installing the IMSB cover, I put a bead of sealant on the outboard side of the seal on the cover. That way when installing the cover, the sealant is pushed towards the outside of the engine, but still forms a complete seal at the IMS cover.
__________________
2003 S manual
|
|
|
|
|
02-06-2015, 04:27 PM
|
#35
|
|
Registered User
Join Date: Nov 2014
Location: Long Island, NY
Posts: 160
|
I put some Curil T on my list if things to order and I just got it recently. I'll be using that for the seal on the cover and I think also around the heads of the bolts for the ims cover. I need to read the project again in Wayne's book and the LN instructions. So far I am pleased with the project and hopefully I can keep chipping away at it and get it done before the weather gets nice!
|
|
|
|
|
02-06-2015, 10:41 PM
|
#36
|
|
Beginner
Join Date: Mar 2013
Location: Houston
Posts: 1,659
|
Thread sealer is recommended for the IMSB cover bolts. You can get it at the auto parts store. It goes on the threads, not just under the bolt heads.
__________________
2003 S manual
|
|
|
|
|
02-07-2015, 05:54 AM
|
#37
|
|
Registered User
Join Date: Nov 2014
Location: Long Island, NY
Posts: 160
|
The new micro encapsulated bolts already have the sealant on them. The LN instructions say to use a little sealant on the bottoms of the heads of the bolts. They also say to use the green loctite on the center stud after the nut is installed. I need to go pick up some of the green loctite.
As for the RMS, I've read something about setting it to 13mm. Does this sound right?
|
|
|
|
|
02-13-2015, 07:26 AM
|
#38
|
|
Registered User
Join Date: Nov 2014
Location: Long Island, NY
Posts: 160
|
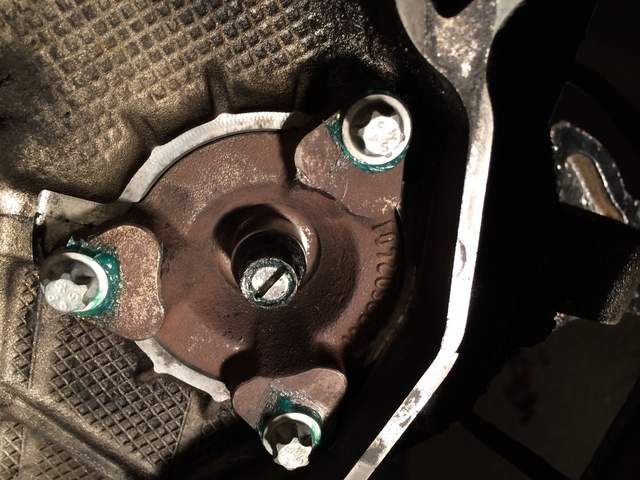
So I've made a little progress. Flange on and all torqued to spec. There was no room on the bearing stud for green loctite but I put a little Curil t at the end for some extra sealing. Next step is chain tensioners and checking the timing.
|
|
|
|
|
04-11-2015, 12:08 PM
|
#39
|
|
Registered User
Join Date: Nov 2014
Location: Long Island, NY
Posts: 160
|
Boxster is all back together finally and I started it up today. It works so I must have done something right. I did notice a lifter tapping noise for the first few minutes of warming up but eventually it went away. Any thoughts on if this is normal? My thought was since the car was sitting with no oil in it for 2 months it just needed to get re-lubricated.
|
|
|
|
|
04-11-2015, 03:50 PM
|
#40
|
|
Beginner
Join Date: Mar 2013
Location: Houston
Posts: 1,659
|
That's what mine did even after pumping up the lifters with oil before assembly. So long as it cleaned up you should be good to go. Welcome to the "I changed my own IMSB" club! Way to go!
__________________
2003 S manual
|
|
|
|
 Posting Rules
|
You may not post new threads
You may not post replies
You may not post attachments
You may not edit your posts
HTML code is On
|
|
|
All times are GMT -8. The time now is 11:44 PM.
| |


 For Sale
 boxster S
 Linear Mode


