 09-22-2014, 04:18 PM
|
#1
|
|
Registered User
Join Date: Jul 2014
Location: Tacoma
Posts: 429
|
my DIY engine rebuild
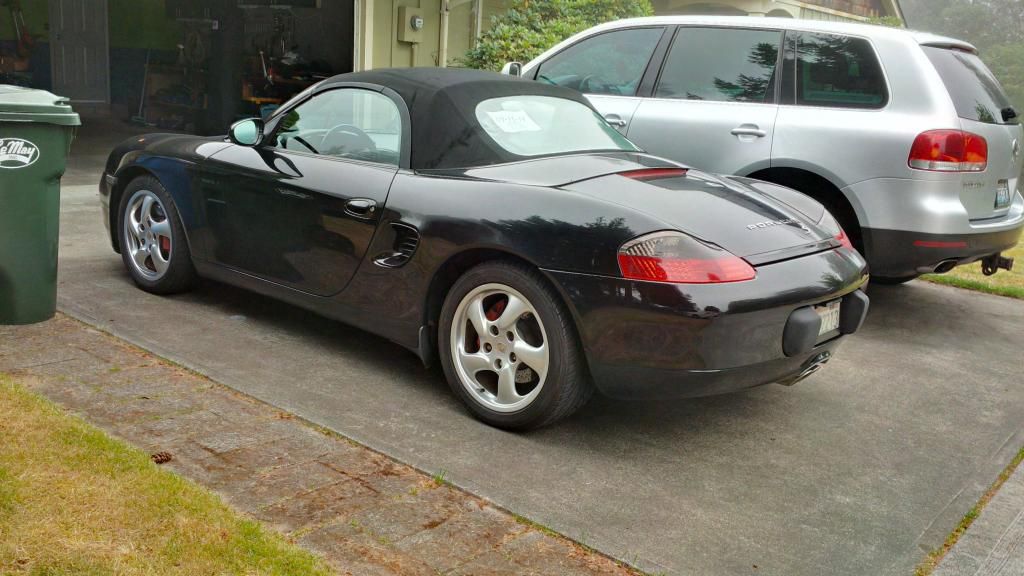
I'm not the first guy to do this of course, but I thought I'd create a thread documenting my tear down and rebuild of my '00 Boxster S.
Snapshot of the car:
I purchased the car two months ago for a very good price (relative to the going rate for similar S model Boxsters). The car is straight, runs great, has great tires, the top and interior are both in great condition, etc.
During my initial introduction to the car I read as much as possible about it and of course stumbled across the dreaded IMS failure. From what I could read it was definitely something I should be concerned about, but that paranoia was tempered with the other argument - that it would have happened already, that it was relatively low risk, etc.
My tear down decision:
Last weekend I did an oil change and found metal in the stock filter. That was a sad moment for me :ah:
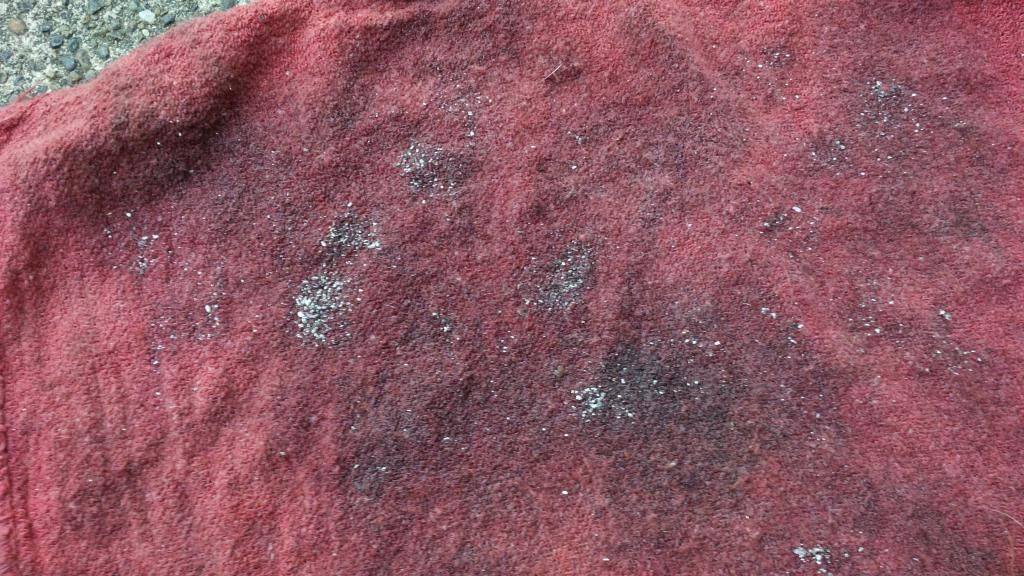
Obviously I need to stop driving the car until I've determined what the source of the metal is, what damage has been done and fix it if possible. If I were well off I would simply write a check to a well known Porsche shop. I'm not poor, but I'm also not in a position to write checks for $18K. Nor am I particularly stoked to pay $4-9K for a used engine of unknown origin, even if it does come with a 12 month "warranty".
I also bought the car as a hobby. So, I decided to take the plunge and get to know this car completely. This journey may take until early next year to complete but I'm going to drive this car again, and have a blast doing it. So come along if you'd like, and see if a mere mortal can pull it off.
I commute about 80 miles per day via motorcycle and, this will make some people laugh, I bought the car to drive in crappy weather and to make my girlfriend happy (I've had worse problems). So basically I don't need this car to be running any time soon.
Snapshot of me:
I'm 50. I've been working on my own cars my entire life. In fact my dad used to drag me outside to help work on our various busted vehicles since I was 10 years old, while all my friends watched cartoons or played games in the street. I actually resented it and it wasn't until I was in my 30s that I realized what a gift he had given me. The thought of paying someone to do work I'm quite capable of doing myself is akin to paying someone to do my laundry or grocery shop.
I've left a long trail of cars and motorcycles behind me. Mostly German cars but some Japanese and only a few US built cars. One French, one British, no Italians.
Some I loved more than others, a couple I still kick myself for selling. Some I built engines for and some I never did anything but pour gas in the hole and drive the #@*& out of. In short, outside of tire changes no one touches my car with a wrench but me (okay I did have some hop up parts installed on my Subaru after I had ruptured a disc, but otherwise it's been all me).
The only thing I've totally steered clear on is opening an automatic transmission, and I'm going to break that rule tonight when I swap the valve body in our VW Touareg (minor surgery compared to actually splitting the case). In short, I loathe automatics for their cost, complexity and well, if I have to tell you then you won't understand.
So that's it in a nut shell. Wrench turning starts in the next post.
Last edited by flaps10; 09-22-2014 at 04:56 PM.
|

|

|
 09-22-2014, 04:51 PM
|
#2
|
|
Registered User
Join Date: Jul 2014
Location: Tacoma
Posts: 429
|
Wrench turning began this past Friday. I've got a garage which my woman has agreed to leave me in charge of (guess who owns the rest of the house?). These are just going to be a couple of quick tear down pics with notes of things I learned.
My guide thus far (besides my past experience) has been Wayne's book (101 projects for your pet rock), and also a blog that was produced by another individual in the same situation I'm in. I'll have to post up the link later since I don't have it on this computer.
If Wayne's book has any defect it is only that it forces you to refer to other chapters of the book to perform the tasks. It's not actually a defect at all, as otherwise the book would be five times as thick with a bunch of repetitive tasks.
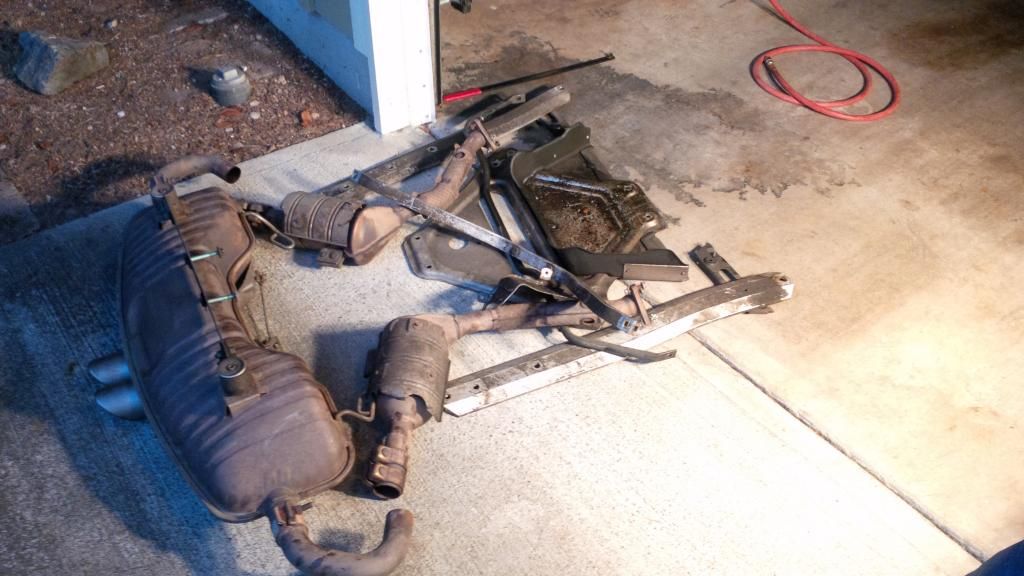
The above pile was generated at the end of a relaxing day with my car. I forget the exact name of each item but the stiffening pan, suspension supports, rear sway bar, heat shield and exhaust system all ready for clean up and storage.
As a funny aside, when my SO came to check on my progress I pointed at the exhaust system and said "that thing is not going back on this car". She laughed and said "Cute. You know I can totally read your mind". I'd swear I had a straight face. FYI, planning on the Borla exhaust when it comes time.
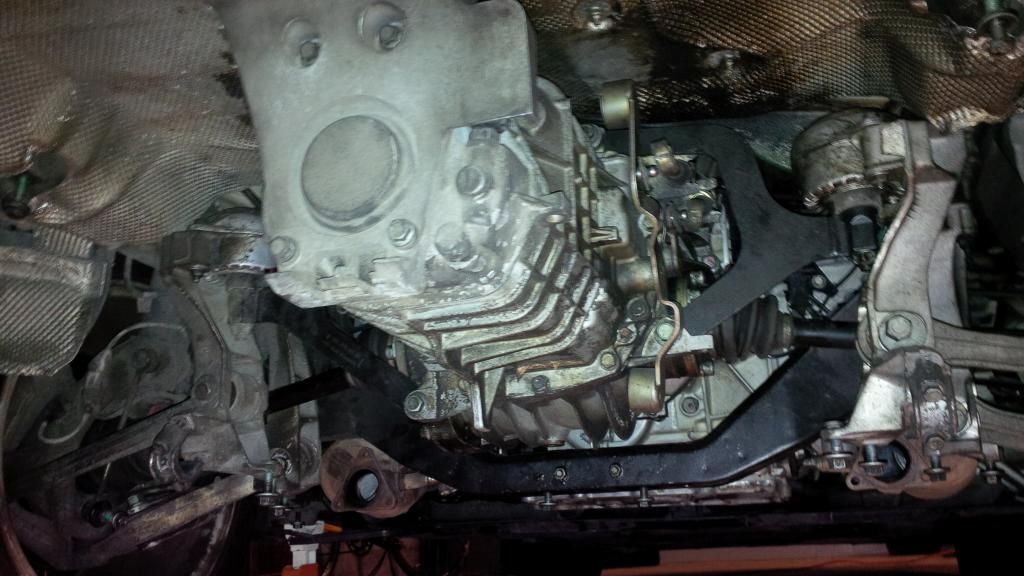
A quick view of the underside with a whole lot more space open than when I started.
In this picture the shift linkages are popped loose but the cables have not been removed from the bracket.. Since the photo was taken the large aluminum mount has been removed from the rear of the transaxle, reverse sensor switch is off and tucked away, the clutch slave cylinder has been removed (dammit, I just installed that a couple weeks ago) and the CV joints are off the transaxle.
The engine is currently supported for the pending removal of the transmission. All that remains is to slide my floor jack under it, remove the two transmission mounts (the black sheet metal Y shaped brackets and the isolators at the outboard ends), and the bolts holding the transmission to the engine.
I've already got the 10mm "triple square" drive for the odd bolts. In case anyone falls for the same thing I did, triple square =/= Torx.
One more comment on this post, and that is that you can see in this pic that my habit has always been to immediately put all hardware back where it came from. That dispenses with putting things in baggies and labeling things. It also forces me to clean up all the hardware after removal of each individual part. This method has served me well for many, many years.
|

|

|
 09-22-2014, 05:39 PM
|
#3
|
|
Registered User
Join Date: Mar 2014
Location: Eastern NC
Posts: 701
|
Good luck. I had the same experience growing up for many years, then started hanging out with a buddy that was marine mechanic and learned more than could from my dad. I have seriously considered taking one of Jakes classes to learn more about these motors.
|

|

|
 09-23-2014, 09:28 AM
|
#4
|
|
Registered User
Join Date: Aug 2013
Location: Bay Area
Posts: 700
|
Sub'd! I admire your determinism and like to think if this happened to me I would do the same.
Seems like if its just the IMS, you'll have it back on the road in no time...drop the trans, replace IMS, do about 42 oil flushes and call it a day (after some compression testing  )
Good luck!
|

|

|
 09-23-2014, 12:43 PM
|
#5
|
|
Registered User
Join Date: Jul 2014
Location: Tacoma
Posts: 429
|
I appreciate the support. I failed to mention that I have signed up for Jake's "101" class in October, and he's pointed out his four day hands on class in December as a great follow up. I'll have to shake some money out of the family budget and burn some vacation time from work to get to that one, but I'm sure it's worth every dime.
Last night was a tedious one. I got started on the car later than I planned and ran into my first road block: the 10mm triple square tool is too long to fit between the bolt head and the differential housing. I'd seen it mentioned in other places (on the Pelican Parts write up comments) but thought it wasn't going to apply to me. Duh.
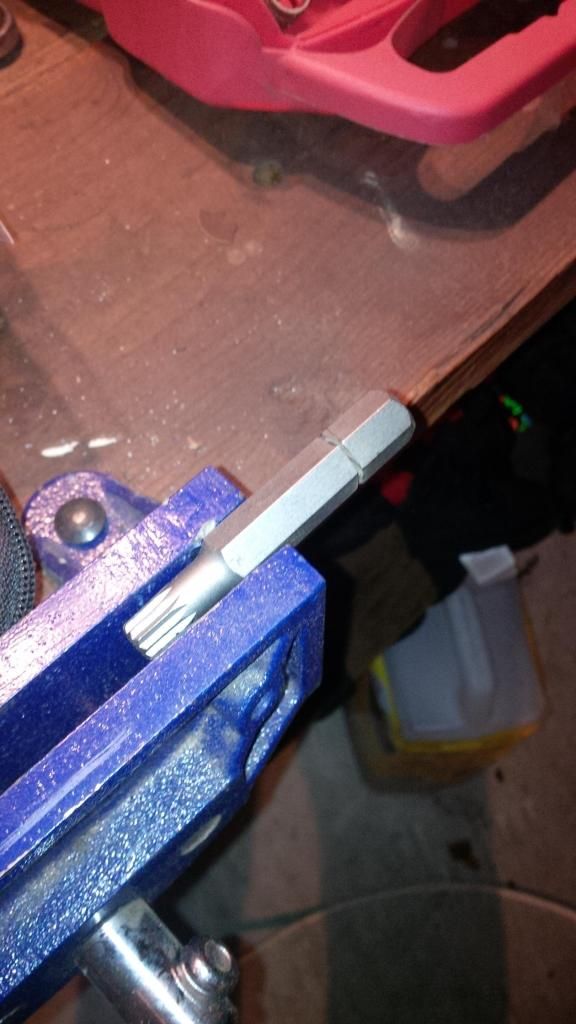
So I eye balled a good length and loaded it into one of my vises and out came the Dremel tool. It took a good 20 minutes and several of those thin grit wheels but I made it through and was able to test fit the tool into the bolt head.
A 13mm wrench just slips over the outside of the tool but of course there's nothing like enough leverage to break the bolt loose. Out came the closest cheater bar (the upper section of my floor jack handle). I could tell right away that the tool would want to climb up out of the head of the bolt and that I would only have about 1-2 tries before boogering it up completely.
I was able to use a fat screw driver to keep pressure enough to hold the tool into the bolt head while putting on a load with the cheater and it finally broke loose. I call that a win.
So far the only fastener on the car that has refused to yield was one of the nuts that holds the exhaust manifold to the secondary cat pipe. Exhaust hardware leads a difficult life, so I expect some of them to die a miserable death. I'll replace all six bolts and nuts on reassembly anyway to give myself a fighting chance.
Tonight I'm fully planning on seeing the transaxle laying on my garage floor and getting a look at my clutch. I've mentioned in other threads that I was having some clutch drag which makes shifting into first and reverse difficult. I've bled the system and replaced both the clutch master and slave cylinders. What I'm expecting to see when I get in there is a repeat of a failure posted by someone else here, and that is a crack in the clutch actuator lever. Maybe it will just be some junky bushings, the TO bearing will be coming apart or the pressure plate fingers will be mutilated. No way to tell until I get a look at it.
After that I'll remove the flywheel and find out what kind of IMS bearing they were using when my car was built.
As for the comment that maybe I'll be lucky and that's all it will be, that would be a huge relief. I'm not holding my breath. I cannot imagine that my car has gotten this old without there being wear to the cam chain tensioners and the wear pads. Those are things that seem like they'd be possible with the engine in the car, but certainly not the easiest place to work.
I'm going in with both eyes open and the expectation that I'll be holding main bearings and connecting rod bearings in my hand before long.
I joined PCA last week and I'm hoping to rub elbows with people smarter than I am soon. Hopefully someone will be able to recommend a shop that can polish my crank and check it for straightness, and maybe someone will have the cam tools to allow disassembly and reassembly.
|

|

|
 09-23-2014, 01:35 PM
|
#6
|
|
Registered User
Join Date: Jul 2008
Location: austin
Posts: 825
|
Quote:
Originally Posted by flaps10

I appreciate the support. I failed to mention that I have signed up for Jake's "101" class in October, and he's pointed out his four day hands on class in December as a great follow up. I'll have to shake some money out of the family budget and burn some vacation time from work to get to that one, but I'm sure it's worth every dime.
Last night was a tedious one. I got started on the car later than I planned and ran into my first road block: the 10mm triple square tool is too long to fit between the bolt head and the differential housing. I'd seen it mentioned in other places (on the Pelican Parts write up comments) but thought it wasn't going to apply to me. Duh.

So I eye balled a good length and loaded it into one of my vises and out came the Dremel tool. It took a good 20 minutes and several of those thin grit wheels but I made it through and was able to test fit the tool into the bolt head.
A 13mm wrench just slips over the outside of the tool but of course there's nothing like enough leverage to break the bolt loose. Out came the closest cheater bar (the upper section of my floor jack handle). I could tell right away that the tool would want to climb up out of the head of the bolt and that I would only have about 1-2 tries before boogering it up completely. |
A hammer stroke or two to set the tri-square and it usually comes out ok without stripping. Make sure the heads of the bolts are clean -- they can gunk up and
the tri-square doesn't set deep enough.
Note when you reassemble, check the torque specs -- and again
after 100 miles or so -- they can work themselves loose again.
Mike
__________________
Drivers: '15 Panamera Hybrid (wife's), ' 01 996 GT2, 00 Boxster S, '96 993 Çab/Tip (wife's)
Race Cars: '75 911 RSR Replica & '99 Spec Boxster
mike@lonestarrpm.com
|

|

|
 09-23-2014, 02:59 PM
|
#7
|
|
Registered User
Join Date: Feb 2005
Location: It's a kind of magic.....
Posts: 6,653
|
Quote:
Originally Posted by seningen

A hammer stroke or two to set the tri-square and it usually comes out ok without stripping. Make sure the heads of the bolts are clean -- they can gunk up and
the tri-square doesn't set deep enough.
Note when you reassemble, check the torque specs -- and again
after 100 miles or so -- they can work themselves loose again.
Mike
|
Or clean both the bolts and the threaded holes with brake cleaner, use a dab of Loctite, and torque to specs. Then they will stay put.
__________________
“Anything really new is invented only in one’s youth. Later, one becomes more experienced, more famous – and more stupid.” - Albert Einstein
|

|

|
 09-24-2014, 12:55 PM
|
#8
|
|
Registered User
Join Date: Jul 2014
Location: Tacoma
Posts: 429
|
Finally, a milestone.
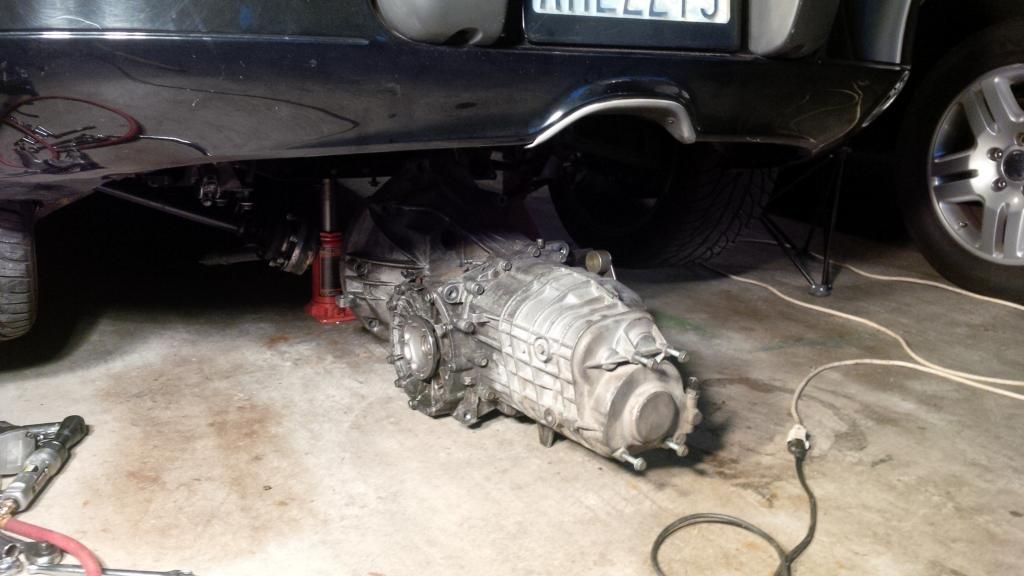
Last night at about 10:30 I was able to wash my hands and go to bed. It took me about 1.5 hours to get all of the engine to transaxle bolts broken loose and the transmission mounts too.
Funny how long I struggled with the top bolt on the engine/trans bolt when I realize I could reach it easily from the top if I just pulled the snorkel out. Duh.
Once everything was loose I supported the transaxle with my floor jack, and employed my air ratchet to pull all the hardware out and get the mounts off.
Then I grabbed my son and had him run the floor jack while I wiggled and checked everything.
I'm calling it a win.
Quickly looked over my clutch (re: the issue of not disengaging completely). Was a bit puzzled to find the date of May of 2014 on the pressure plate, so the clutch had been "done" prior to me purchasing it.
Looking at the actuator lever expecting to see a crack I didn't find one, but there was quite a deep shiny divot where the tip of the slave cylinder pushes on it. That was probably enough to keep it from getting full reach. Funny how far some people will go and not do a job correctly.
|

|

|
 09-24-2014, 01:08 PM
|
#9
|
|
Registered User
Join Date: Aug 2013
Location: Bay Area
Posts: 700
|
I have no idea what the fork looks like in this car, but it seems like a divot from the slave cylinder would not be greater than the large amount of travel you have with the pedal once the clutch is disengaged
|

|

|
 09-24-2014, 01:09 PM
|
#10
|
|
Registered User
Join Date: Aug 2013
Location: Bay Area
Posts: 700
|
How did the IMS area look? Could you see gunk on the block in the space between the flywheel and crankcase?
|

|

|
 09-24-2014, 02:16 PM
|
#11
|
|
Registered User
Join Date: Apr 2013
Location: Springfield, Oregon
Posts: 62
|
I just finished my engine swap on my 2001 S on Monday, so it's fresh in my mind. If you run into anything and want any tips, feel free to send me a PM.
|

|

|
 09-24-2014, 05:55 PM
|
#12
|
|
Registered User
Join Date: Sep 2009
Location: toronto
Posts: 2,668
|
Quote:
Originally Posted by flaps10

Finally, a milestone.

Last night at about 10:30 I was able to wash my hands and go to bed. It took me about 1.5 hours to get all of the engine to transaxle bolts broken loose and the transmission mounts too.
Funny how long I struggled with the top bolt on the engine/trans bolt when I realize I could reach it easily from the top if I just pulled the snorkel out. Duh.
Once everything was loose I supported the transaxle with my floor jack, and employed my air ratchet to pull all the hardware out and get the mounts off.
Then I grabbed my son and had him run the floor jack while I wiggled and checked everything.
I'm calling it a win.
Quickly looked over my clutch (re: the issue of not disengaging completely). Was a bit puzzled to find the date of May of 2014 on the pressure plate, so the clutch had been "done" prior to me purchasing it.
Looking at the actuator lever expecting to see a crack I didn't find one, but there was quite a deep shiny divot where the tip of the slave cylinder pushes on it. That was probably enough to keep it from getting full reach. Funny how far some people will go and not do a job correctly. |
Wow your car is pretty low for this work....good on you!
__________________
986 00S
|

|

|
 09-24-2014, 10:03 PM
|
#13
|
|
Registered User
Join Date: Nov 2013
Location: Seattle
Posts: 274
|
Enjoying this.....please keep posting. Great stuff.
__________________
Current: 981 Cayman
Former: '02 BS and '08 C
|

|

|
 09-25-2014, 10:57 AM
|
#14
|
|
Registered User
Join Date: Jul 2014
Location: Tacoma
Posts: 429
|
Jay, I think the shadows make the car look lower than it is. I had no problem working under the car or sliding the transaxle out from under it. I'm sure I'll have to remove the rear bumper in order to slide the engine out, but I'll cross that bridge when I get there.
On that note, I noticed that with the 996 you drop the engine and trans together. I thought the presence of the cross member under the bell housing would preclude that. But looking at the pics on 986fix (the DIY person I referred to in my first post - great pics btw), the cross member miraculously disappears just prior to dropping the engine without comment. Any thoughts from those of you more experience with this process?
This morning I crawled under the car in full motorcycle gear and snapped this pic, because I wanted to know what kind of IMS I have (single or double row).
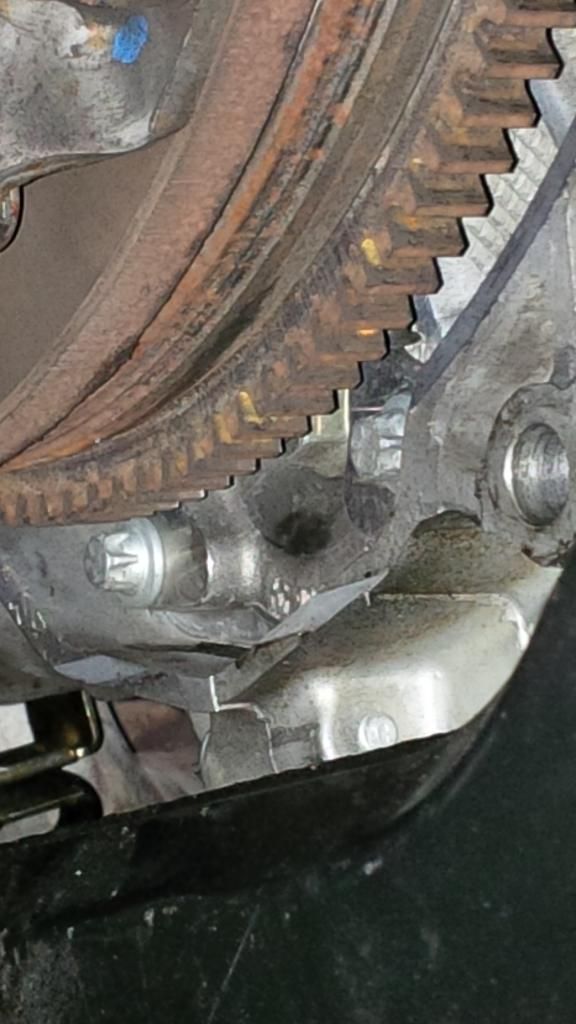
My uneducated eye, comparing to the pics on the Pelican parts tech article says this is a double row. And the cover doesn't look old and nasty.
Starting to wonder where my metal is coming from. Was it a failed bearing that someone replaced and didn't flush? Maybe my chain tensioner pads are worn through?
|

|

|
 09-25-2014, 11:12 AM
|
#15
|
|
Registered User
Join Date: Jun 2014
Location: canada eh
Posts: 94
|
neat. i am subscribed..
|

|

|
 09-25-2014, 12:52 PM
|
#16
|
|
Registered User
Join Date: Aug 2013
Location: Bay Area
Posts: 700
|
Definitely looks 'cleanly' suspicious.
The plot thickens..
|

|

|
 09-25-2014, 01:48 PM
|
#17
|
|
Engine Surgeon
Join Date: Aug 2008
Location: Cleveland GA USA
Posts: 2,425
|
Thats a single row IMSB pictured
__________________
Jake Raby/www.flat6innovations.com
IMS Solution/ Faultless Tool Inventor
US Patent 8,992,089 &
US Patent 9,416,697
Developer of The IMS Retrofit Procedure- M96/ M97 Specialist
|

|

|
 09-25-2014, 02:09 PM
|
#18
|
|
Registered User
Join Date: Aug 2013
Location: Bay Area
Posts: 700
|
On the plus side, it is now more likely than before that the metal is from your bearing
|

|

|
 09-25-2014, 06:59 PM
|
#19
|
|
Registered User
Join Date: Sep 2002
Location: Northern NJ
Posts: 633
|
I love these threads, good luck.
__________________
LB/GG/MB 02 2.7 sold
MB/GG 02 996TT
|

|

|
 09-25-2014, 07:29 PM
|
#20
|
|
Registered User
Join Date: Jul 2014
Location: Tacoma
Posts: 429
|
Quote:
|
Thats a single row IMSB pictured
|
Thanks Jake
Quote:
Originally Posted by epapp

On the plus side, it is now more likely than before that the metal is from your bearing
|
I guess if there's a plus side to a single row, that would have to be it.
|

|

|
 Posting Rules
|
You may not post new threads
You may not post replies
You may not post attachments
You may not edit your posts
HTML code is On
|
|
|
All times are GMT -8. The time now is 09:58 AM.
| |