Go Back   986 Forum - The Community for Porsche Boxster & Cayman Owners > Porsche Boxster & Cayman Forums > DIY Project Guides

Post Reply
 
LinkBack Thread Tools Display Modes
Old 09-28-2012, 04:39 PM   #1
Registered User
 
Join Date: Aug 2012
Location: Las Vegas
Posts: 78
My $40 Double Din Radio Install

In my 97 Boxster I have the stock CD/radio unit with the A/C controls right above it. I had contemplated buying the $150 dash kit from eBay, but figured I could save some money.

The replacement radio is a Kenwood Excellon DNX6990HD which is a double din DVD, Navigation unit. I of course needed the antenna adapter, and the wire harness.

I purchased both the wire harness and antenna adapter from a local Fry's electronics for a cost of $25.

Next I stopped by Lowes and bought an 12" X 12" piece of clear lexan and some black spray paint that has a textured finish when it dries. I also ordered the trim ring for the A/C controls from Pelican parts.

Here is the final result:


And another view:


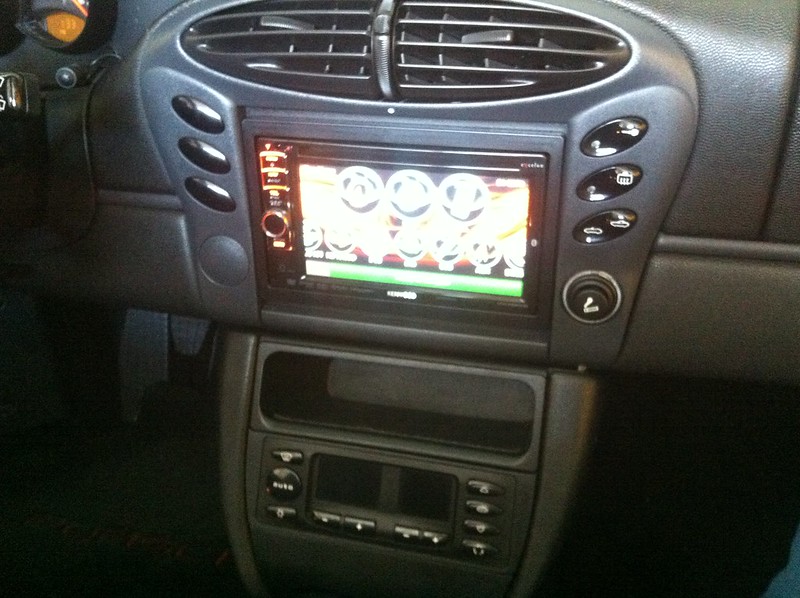
I marked out the cage for the new radio, cut the opening, then traced out the size necessary to fit in the dash and cut that. Then I painted it. I cut the necessary pieces from the dash and then mounted everything into the car.

By the way, do not ground the alarm wire thats connected to the stock radio, just cut the connector and cap it so it can't contact anything.

SolidWorks Mike is offline   Reply With Quote
Old 09-28-2012, 08:08 PM   #2
1999 base
 
Meir's Avatar
 
Join Date: Dec 2011
Location: Coral Springs FL
Posts: 1,617
Garage
Looks great.
Can you post a pic of the paint you used?
Meir is offline   Reply With Quote
Old 09-28-2012, 11:38 PM   #3
Registered User
 
Join Date: Aug 2012
Location: Las Vegas
Posts: 78
Shop Rust-Oleum 12 Oz. Black Spray Paint at Lowes.com

SolidWorks Mike is offline   Reply With Quote
Old 10-01-2012, 08:14 AM   #4
Registered User
 
Join Date: May 2011
Location: Chicago
Posts: 38
Garage
looks good! i also have a double din radio sitting in the box in the garage as I have a hard time spending the $150 on the ebay mount kit.

how did you mount the lexan to the dash? is it just screws that are hidden by other dash pieces or is it held on via compression?

any pics would be helpful too. thx!
Autobot152 is offline   Reply With Quote
Old 10-01-2012, 11:50 AM   #5
Registered User
 
Join Date: Aug 2012
Location: Las Vegas
Posts: 78
Quote:
Originally Posted by Autobot152 View Post
looks good! i also have a double din radio sitting in the box in the garage as I have a hard time spending the $150 on the ebay mount kit.

how did you mount the lexan to the dash? is it just screws that are hidden by other dash pieces or is it held on via compression?

any pics would be helpful too. thx!
The lexan gets sandwiched in between the mounting cage for the radio, and the body of the dash piece. If you look at the dash below, the lexan would simply lay in the opening:


Obviously you will have to cut out that center bar that splits up the opening.

Then when you slide the cage in the cut out of the lexan, you place it in the dash and bend back the tabs of the cage so that the cage now holds the lexan in place.

If you want to go further, imagine looking at the side of the double din radio, there will be several screw holes on it. If you are good at measuring you can measure out that screw location, and then drill a corresponding hole through the side of the dash piece, and the cage, then once the radio is locked in the cage, you can screw through the cage and the dash for a very secure mount.

When you remove the the stock radio there will be a bracket in the dash that supports the rear of the radio. You can leave it in there but you will have to bend up the sides for the larger radio to slide in it (you will see it when you remove the radio). That will give the rear of the radio some support.

My last piece of advice is to cut out the opening for the radio cage before you cut the lexan to fit in the dash. Once the outside shape is cut, the piece gets very thin and tricky to hold onto when cutting it.
SolidWorks Mike is offline   Reply With Quote
Old 10-02-2012, 11:15 AM   #6
Registered User
 
Join Date: May 2011
Location: Chicago
Posts: 38
Garage
thanks. that was very helpful! how do you recommend cutting the lexan? dremel or utility knife?
Autobot152 is offline   Reply With Quote
Old 10-02-2012, 12:46 PM   #7
Registered User
 
Join Date: Aug 2012
Location: Las Vegas
Posts: 78
Quote:
Originally Posted by Autobot152 View Post
thanks. that was very helpful! how do you recommend cutting the lexan? dremel or utility knife?
I used a jigsaw with a scroll cutting blade: (third up from bottom of picture)


It cut it real nice, no melting, and no chipping, plus it was easy to make turns in the cuts.

And definitely do not remove the protective plastic coating until you are ready to paint, that will keep the lexan from scratching, although I'm sure the paint would cover it up. I only painted the side that faces out.
SolidWorks Mike is offline   Reply With Quote
Old 10-04-2012, 12:11 PM   #8
Registered User
 
jb92563's Avatar
 
Join Date: Apr 2012
Location: Riverside, CA
Posts: 1,665
Great ingenuity Mike, looks good and easy/cheap to make and install.

I love the 2001 and under radio/vent surrounds as you mount all the radio stuff to it first with total access all around and then screw it back into the dash as a unit.

Makes for really easy fitting of non-standard stuff.

I'm thinking of doing the same for mine. I made my own radio shelf bracket out of aluminum and sprayed it black but I think raising it up a bit more by using some plexi or lexan will make it look even better.

I'll bet you could get Boxster or Porsche engraved right in the plastic too if you wanted to get fancy.

You could use edge-lit plexi to make a LED Lighted surround where the text "Boxster" shines through and hook it up to the ignition switched power. (Black paint on the back side of course)


How to edge light DIY
__________________
"It broke because it wants to be Upgraded "
2012 Porsche Performance Driving School - SanDiego region
2001 Boxster S, Top Speed muffler, (Fred's) Mini Morimotto Projectors, Tarret UDP,
Short Shifter, Touch Screen Dual Din Radio, 03 4 Bow glass Top (DD & Auto-X since May 17,2012)

Last edited by jb92563; 10-04-2012 at 02:46 PM.
jb92563 is offline   Reply With Quote
Old 10-14-2012, 07:02 PM   #9
Usercpy
 
ilikeching's Avatar
 
Join Date: Aug 2012
Posts: 205
Garage
Hi, do you have the parts number for the A/C controls trim from pelican parts?
I tried to find it, but couldn't find from their web site..

Thanks
__________________
http://www.flickr.com/photos/flickr_ching/
ilikeching is offline   Reply With Quote
Old 10-14-2012, 07:54 PM   #10
2001 Arctic Silver 2.7
 
tony_fury's Avatar
 
Join Date: Jun 2012
Location: Huntington Beach,CA
Posts: 310
Garage
Quote:
Originally Posted by ilikeching View Post
Hi, do you have the parts number for the A/C controls trim from pelican parts?
I tried to find it, but couldn't find from their web site..

Thanks
996.653.101.1
Pelican Parts - Automotive Parts and Accessories - Porsche & BMW

1997-2004 Porsche Boxster 986 996 Carrera A/C Climate Control Unit | eBay
__________________
2001 Boxster - Arctic Silver Metallic
RMS, IMS, 87.5K
tony_fury is offline   Reply With Quote
Old 10-15-2012, 07:28 PM   #11
Registered User
 
Join Date: Aug 2012
Location: Las Vegas
Posts: 78
Quote:
Originally Posted by ilikeching View Post
Hi, do you have the parts number for the A/C controls trim from pelican parts?
I tried to find it, but couldn't find from their web site..

Thanks
I could never find that part on the Pelican site, so I was ordering some stuff from Suncoast parts, so I got it from them:

Lower AC Surround Trim:Porsche Parts & Porsche Accessories - Wholesale Porsche Parts & Tequipment - Cayman Panamera Cayenn
SolidWorks Mike is offline   Reply With Quote
Old 10-15-2012, 07:29 PM   #12
Registered User
 
Join Date: Aug 2012
Location: Las Vegas
Posts: 78
I believe he is looking for the trim ring I referenced in my original post, not the actual controls.

SolidWorks Mike is offline   Reply With Quote
Post Reply


Thread Tools
Display Modes

Posting Rules
You may not post new threads
You may not post replies
You may not post attachments
You may not edit your posts

BB code is On
Smilies are On
[IMG] code is On
HTML code is On
Trackbacks are On
Pingbacks are On
Refbacks are On


All times are GMT -8. The time now is 10:59 AM.


Powered by vBulletin® Version 3.8.7
Copyright ©2000 - 2024, vBulletin Solutions, Inc.
Content Relevant URLs by vBSEO 3.6.0
Copyright 2024 Pelican Parts, LLC - Posts may be archived for display on the Pelican Parts Website -    DMCA Registered Agent Contact Page