Go Back   986 Forum - The Community for Porsche Boxster & Cayman Owners > Porsche Boxster & Cayman Forums > DIY Project Guides

Post Reply
 
LinkBack Thread Tools Display Modes
Old 03-01-2008, 09:59 PM   #1
Registered User
 
Join Date: Oct 2007
Location: Dallas, TX
Posts: 295
Send a message via Yahoo to TimAustinW
DIY-Replacing Door Carpet with Leather

Hey guys,

I finally got around to doing my passenger side door panel and promised a few that I'd do a DIY when I did it. I skipped documenting the door panel removal. Refer to this post to get that info...

To remove the door panel

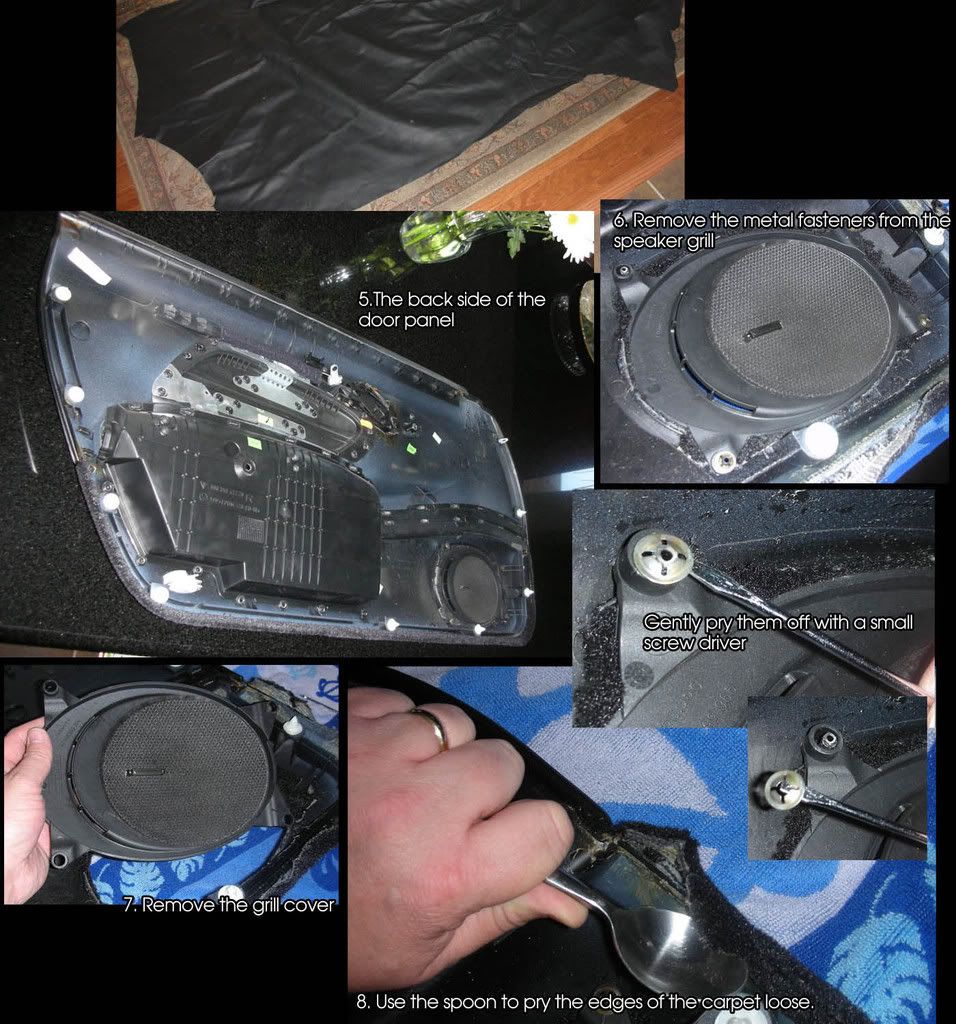
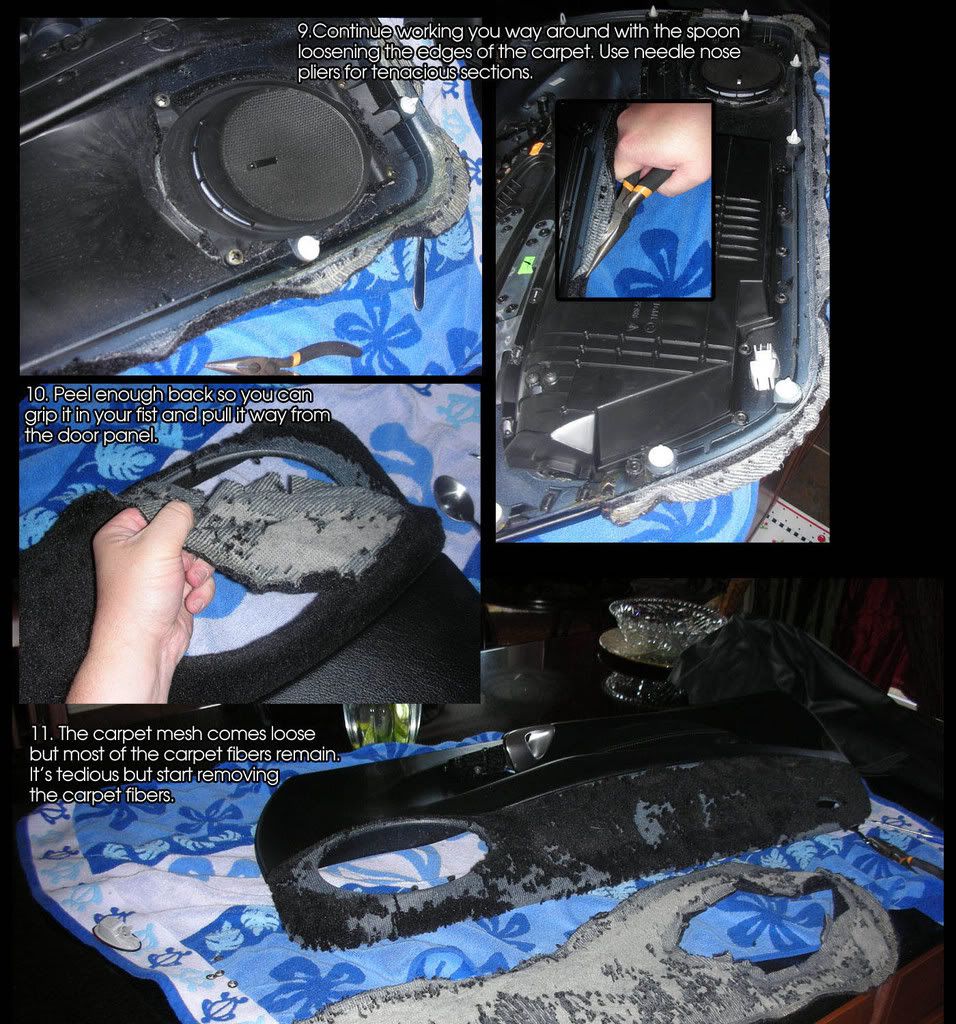
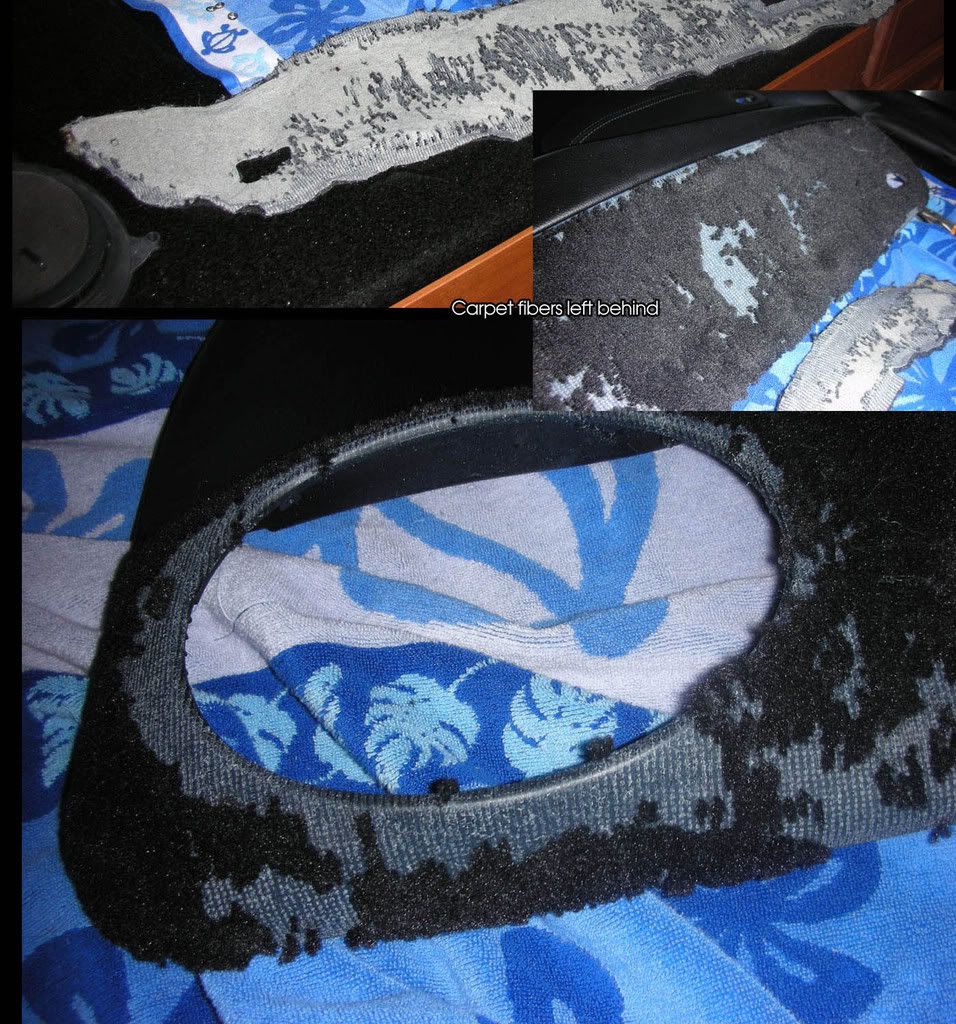
Here's the DIY once you get the door panel off...


TimAustinW is offline   Reply With Quote
Old 03-01-2008, 10:01 PM   #2
Registered User
 
Join Date: Oct 2007
Location: Dallas, TX
Posts: 295
Send a message via Yahoo to TimAustinW


TimAustinW is offline   Reply With Quote
Old 03-01-2008, 10:02 PM   #3
Registered User
 
Join Date: Oct 2007
Location: Dallas, TX
Posts: 295
Send a message via Yahoo to TimAustinW


Cheers!
__________________
TimAustinW
http://i226.photobucket.com/albums/d...ignature-1.jpg
02 Seal Grey, NHP Headers w/ Highflow Cats/2ndary Bypass Pipes, smoked side markers/3rd brake light, exterior match interior trim, 986 Lloyds Mats, 986 deck lid emblem, arctic silver intake grills, ipod link, painted calipers, Glass Window Robbins Top with defroster kit, Bose Sound System, Leather lower door panels, Console Lid w embroidered crest; Stainless door sills; Painted Bumperettes; Custom Hood Crest
TimAustinW is offline   Reply With Quote
Old 03-01-2008, 10:22 PM   #4
Registered User
 
Join Date: Oct 2007
Location: Dallas, TX
Posts: 295
Send a message via Yahoo to TimAustinW
One correction. I bought 39sq ft of the leather that was enough for both door panels , the firewall or heat sheild behind the seats and the two panels that cover the seatbelt mechanisms. In the DIY I think I said I bought 6 sq ft.


Here's a link to the seller on Ebay I got it from...

Kyson Leather
__________________
TimAustinW
http://i226.photobucket.com/albums/d...ignature-1.jpg
02 Seal Grey, NHP Headers w/ Highflow Cats/2ndary Bypass Pipes, smoked side markers/3rd brake light, exterior match interior trim, 986 Lloyds Mats, 986 deck lid emblem, arctic silver intake grills, ipod link, painted calipers, Glass Window Robbins Top with defroster kit, Bose Sound System, Leather lower door panels, Console Lid w embroidered crest; Stainless door sills; Painted Bumperettes; Custom Hood Crest
TimAustinW is offline   Reply With Quote
Old 03-02-2008, 10:44 AM   #5
Registered User
 
Join Date: Nov 2006
Location: baton rouge
Posts: 840
Thats a great looking mod, I always wondered why Porsche put carpet there.
__________________
99 TWIN TURBO Boxster 175k+ miles


Growing up the car magazines said how amazing Porsches are. Was I brainwashed? Somehow...I doubt it.

http://www.pcars.us/albums/10641_porsche_cars.jpg
Gary in BR is offline   Reply With Quote
Old 03-02-2008, 11:26 AM   #6
Registered User
 
Join Date: Sep 2005
Location: Sacramento
Posts: 3,417
Send a message via AIM to blinkwatt
Damn nice work! Looks amazing.
__________________
-99' Zenith Blue 5-spd...didn't agree with a center divider on the freeway
-01' S Orient Red Metallic 6-spd...money pit...sold to buy a house
blinkwatt is offline   Reply With Quote
Old 03-03-2008, 01:16 PM   #7
Registered User
 
Join Date: Jul 2004
Location: Houston, Texas
Posts: 7,243
Quote:
Originally Posted by Gary in BR
Thats a great looking mod, I always wondered why Porsche put carpet there.
Gary, I'm betting it was put there to make the interior feel less spartan and absorb some sound.

Tim, I bought a sheet of leather from Kyson Leather on Ebay as well this last week and will get it in this week I think. I have nasty vinyl door panels and a cigarette burn on the passenger side, so I'm planning on keeping the carpet below and doing the upper vinyl over in leather.

Do you think I can keep the vinyl on it and just spray it and put the leather over it?

PS - for other readers, I paid $144 (incl. shipping) for 39 square feet of very thin, light pebble finished black leather from Kyson on Ebay... great folks to work with. They sent me three samples to choose from. BTW, the "125" hides they have are what I bought because it was only 1 mm thick and had a grain pattern that matches the rest of my car.

I will be doing the doors, the oddments tray cover, and then I will tackle the dash... mine is old looking and it will give me a big project to do for very little money.

My interior will be swathed in black leather before I'm done
RandallNeighbour is offline   Reply With Quote
Old 03-15-2008, 02:56 PM   #8
Registered User
 
Join Date: Jul 2004
Location: Houston, Texas
Posts: 7,243
Timothy, you've inspired me to action.

Found the 3M adhesive spray at Home Depot this afternoon and did three interior pieces... the plastic and vinyl bits to the left and right of the cubby holes below the radio, and the oddments tray lid.

It was easy!

I already feel like the interior of my old boxster got an upgrade. Next, I'll tackle a door.

BTW, I didn't take pix, but I will say that I removed the vinyl so I wouldn't have "fat" pieces that didn't fit well. As one removes the vinyl, it's important to leave as much of the foam on the plastic piece so the leather has some padding on it. My vinyl was so old that it came off the foam nicely.

Last edited by RandallNeighbour; 03-15-2008 at 03:02 PM.
RandallNeighbour is offline   Reply With Quote
Old 03-17-2008, 01:36 PM   #9
Registered User
 
Join Date: Oct 2007
Location: Dallas, TX
Posts: 295
Send a message via Yahoo to TimAustinW
Quote:
Originally Posted by RandallNeighbour
Timothy, you've inspired me to action.

Found the 3M adhesive spray at Home Depot this afternoon and did three interior pieces... the plastic and vinyl bits to the left and right of the cubby holes below the radio, and the oddments tray lid.

It was easy!

I already feel like the interior of my old boxster got an upgrade. Next, I'll tackle a door.

BTW, I didn't take pix, but I will say that I removed the vinyl so I wouldn't have "fat" pieces that didn't fit well. As one removes the vinyl, it's important to leave as much of the foam on the plastic piece so the leather has some padding on it. My vinyl was so old that it came off the foam nicely.

Good deal! Yeah, I just did those pieces on the sides of the upper center console myself. I also did the triangular carpeted pieces that fit just under and behind those as well as the two vinyl oval shapes on the lower center console on each side of the shift knob. My goal is the get the carpet back to the floorboard and leather from the floor up. It'll take some time. I'm considering getting a sewing machine so I can do some strategic stitched seams.
__________________
TimAustinW
http://i226.photobucket.com/albums/d...ignature-1.jpg
02 Seal Grey, NHP Headers w/ Highflow Cats/2ndary Bypass Pipes, smoked side markers/3rd brake light, exterior match interior trim, 986 Lloyds Mats, 986 deck lid emblem, arctic silver intake grills, ipod link, painted calipers, Glass Window Robbins Top with defroster kit, Bose Sound System, Leather lower door panels, Console Lid w embroidered crest; Stainless door sills; Painted Bumperettes; Custom Hood Crest
TimAustinW is offline   Reply With Quote
Old 03-17-2008, 05:46 PM   #10
Registered User
 
Join Date: Aug 2006
Location: Vancouver, BC
Posts: 220
Very nice DIY. The project looks excellent once completed. I was worried at first that the top and bottom don't match. You have inspired me and I will tackle this tomorow. Hopefully I can find a leather supplier locally first.

Thanks for the detailed write up. I have been looking for good instructions for awhile now as I have been afraid to rip up my door panels.
__________________
97 Arctic Silver/Boxster Red

Carbon Everything
De-ambered
De-snorkled
Litronics
Eibach Pro Kit
Dansk Sport exhaust
Cheap Chinese headers
Silver console and bumperettes
AVIC D3
15mm H&R spacers in the rear
SSR GT3 19's
GT3 Carbon Replicas
Alcantera door panels
JL Aduio 5 channel powering Polks and Clif Designs

To do/complete:
Elemental Designs 10" subs in fiberglass enclosures behind seats
Carbon 3 spoke install with custom stereo control buttons (tiptronic wheel)
angman is offline   Reply With Quote
Old 07-09-2008, 07:10 AM   #11
Registered User
 
Join Date: Jul 2004
Location: Houston, Texas
Posts: 7,243
Well, last night I ruined my passenger side door panel. I cut the leather to size and it really looked like it would go down smoothly without wrinkles or bunching, but the sculpted parts of the door where it jutts out for the handle made it impossible.

I now have a door panel with dried, nasty glue all over it. I will attempt to remove the glue with goo-gone or something else, but I think I've messed up the vinyl to the point with all the solvents that I'll have to replace the panel.

So much for this DIY. The bottom part that you did, Tim, is a straight shot though and that would have been no problem. I tried to do the top part, leaving the carpet below.

Grrr.
RandallNeighbour is offline   Reply With Quote
Old 07-09-2008, 01:02 PM   #12
Registered User
 
Join Date: Aug 2006
Location: Vancouver, BC
Posts: 220
That's bad news. I take it you're not going to tackle the dash now? I have been too afraid to do the dash msyelf.
__________________
97 Arctic Silver/Boxster Red

Carbon Everything
De-ambered
De-snorkled
Litronics
Eibach Pro Kit
Dansk Sport exhaust
Cheap Chinese headers
Silver console and bumperettes
AVIC D3
15mm H&R spacers in the rear
SSR GT3 19's
GT3 Carbon Replicas
Alcantera door panels
JL Aduio 5 channel powering Polks and Clif Designs

To do/complete:
Elemental Designs 10" subs in fiberglass enclosures behind seats
Carbon 3 spoke install with custom stereo control buttons (tiptronic wheel)
angman is offline   Reply With Quote
Old 04-13-2013, 05:58 AM   #13
Registered User
 
BruceH's Avatar
 
Join Date: Jun 2012
Location: Bedford, TX
Posts: 2,744
Garage
The contrast looks great! It's on my list too, someday when I have the time!
__________________
______________________________________________
2001 Boxster S Lapis Blue
TS Cat Bypass Pipes and exhaust
iPad Mini Dash Install
DEPO Tail Lights
BruceH is online now   Reply With Quote
Old 05-19-2013, 03:20 AM   #14
1998 Boxster
 
Join Date: Aug 2012
Location: Lakewood, Ohio
Posts: 110
Great improvement! I am hoping someone can elaborate on the glueing processs. I have found the 3m glue at Home Depot. It seems that the glue can be used in a two surface process, where it is applied to both surfaces; allowed to tack; and then adhered as a contact cement application. Or, it can be applied to one surface, and applied wet.

Any advice on which approach works best would be helpful.
rah rah 986 is offline   Reply With Quote
Post Reply


Posting Rules
You may not post new threads
You may not post replies
You may not post attachments
You may not edit your posts

BB code is On
Smilies are On
[IMG] code is On
HTML code is On
Trackbacks are On
Pingbacks are On
Refbacks are On


All times are GMT -8. The time now is 04:18 PM.


Powered by vBulletin® Version 3.8.7
Copyright ©2000 - 2025, vBulletin Solutions, Inc.
Content Relevant URLs by vBSEO 3.6.0
Copyright 2025 Pelican Parts, LLC - Posts may be archived for display on the Pelican Parts Website -    DMCA Registered Agent Contact Page