 08-23-2016, 03:22 PM
|
#1
|
|
Registered User
Join Date: Jul 2016
Location: Greenfield, IN
Posts: 10
|
ARGH! Broken Air Vents
So, just bought my 98 Boxster and noticed that the airvent on the passenger side was broken (vents would not go up or down). OK, went to eBay and got a replacement and 5 minutes later it was fixed.
Driving today and noticed that the driver's side is broken now. WTF?!?!?
Is there an easy way to fix this?
Thanks!
|

|

|
|
08-23-2016, 04:35 PM
|
#2
|
|
98 Arctic silver 986
Join Date: Jul 2011
Location: Upstate, NY
Posts: 1,452
|
Go on ebay and get one for the drivers side. All kidding aside this is the first time I've heard of the side air vents breaking. My center air vent is a little loose and it drives me crazy when I hit a bump and it points down.
|
|
|
|
|
08-23-2016, 05:17 PM
|
#3
|
|
Registered User
Join Date: Jul 2016
Location: Greenfield, IN
Posts: 10
|
Quote:
Originally Posted by tommy583

Go on ebay and get one for the drivers side. All kidding aside this is the first time I've heard of the side air vents breaking. My center air vent is a little loose and it drives me crazy when I hit a bump and it points down.
|
:-) OK, I thought of that as well... but was thinking if the both have done it, maybe it was something simple to fix. Would rather not have to go replace them weekly.
Yeah, I noticed that one of my center one falls down every once and awhile as well.
|
|
|
|
|
08-23-2016, 05:50 PM
|
#5
|
|
Registered User
Join Date: Sep 2008
Location: Florida
Posts: 2,497
|
Mine both broke over time as well. I pulled one out and tried unsuccessfully to fix it. I bought a pair off ebay so far so good.
|
|
|
|
|
08-24-2016, 12:07 AM
|
#6
|
|
CEL P0306
Join Date: Jan 2014
Location: Seattle
Posts: 129
|
I had this problem (driver's side) and was able to pull it apart and fix it. Took about an hour and was a little tedious as I didn't want to break anything. On mine, the vertical slider popped loose from the fins. I was able to pull the unit out, open it up and snap the parts back together. I was impressed with the engineering of the whole thing. Pretty simple really. I have pictures and can elaborate if you decide to try it yourself.
|
|
|
|
|
08-24-2016, 01:37 AM
|
#7
|
|
Registered User
Join Date: Jul 2016
Location: Greenfield, IN
Posts: 10
|
Quote:
Originally Posted by aczyzewski
I had this problem (driver's side) and was able to pull it apart and fix it. Took about an hour and was a little tedious as I didn't want to break anything. On mine, the vertical slider popped loose from the fins. I was able to pull the unit out, open it up and snap the parts back together. I was impressed with the engineering of the whole thing. Pretty simple really. I have pictures and can elaborate if you decide to try it yourself.
|
It sounds like you had the same issue as mine. Would love to see the pics and how you did it, so I can fix this one, as well as the one I already replaced.
|
|
|
|
|
08-24-2016, 01:43 AM
|
#8
|
|
Registered User
Join Date: Jul 2012
Location: Charlotte
Posts: 70
|
Quote:
Originally Posted by dteague
It sounds like you had the same issue as mine. Would love to see the pics and how you did it, so I can fix this one, as well as the one I already replaced.
|
Love to see the pics/write-up as well.
|
|
|
|
|
08-24-2016, 04:30 AM
|
#9
|
|
Registered User
Join Date: Jul 2013
Location: Bastrop, Tx
Posts: 2,644
|
I come across a lot of them that just need to be snapped back on. Sometimes you get lucky and can fix them without taking them completely apart. As for the center vent being loose, There's a small square rubber piece that the vents rub up against and keeps tension on them. That rubber piece either shrinks or gets worn down over time. I put a shim behind it on mine and it fixed the problem of them flopping down. You'll have take the center vent apart to repair them though.
__________________
Woody
|
|
|
|
|
08-24-2016, 06:01 AM
|
#10
|
|
Registered User
Join Date: May 2016
Location: Phoenix
Posts: 14
|
@Tommy...if you're ok with the vent being set in one basic place, I just rolled the vent downwards and stuck a small piece of weatherstripping (about 1/8" thick) on the top edge and then rotated the vent back up...squeezing the weatherstripping down so the vent rolls back inside the housing.....it won't fall down anymore.....
|
|
|
|
|
08-24-2016, 08:13 AM
|
#11
|
|
98 Arctic silver 986
Join Date: Jul 2011
Location: Upstate, NY
Posts: 1,452
|
Quote:
Originally Posted by ArizonaDan
@Tommy...if you're ok with the vent being set in one basic place, I just rolled the vent downwards and stuck a small piece of weatherstripping (about 1/8" thick) on the top edge and then rotated the vent back up...squeezing the weatherstripping down so the vent rolls back inside the housing.....it won't fall down anymore.....
|
Good idea, I think i'll try that tonight. I have had that vent out of the dash many times over the years, but always forgot to try and fix it while it was out. 
|
|
|
|
|
08-25-2016, 02:34 PM
|
#12
|
|
CEL P0306
Join Date: Jan 2014
Location: Seattle
Posts: 129
|
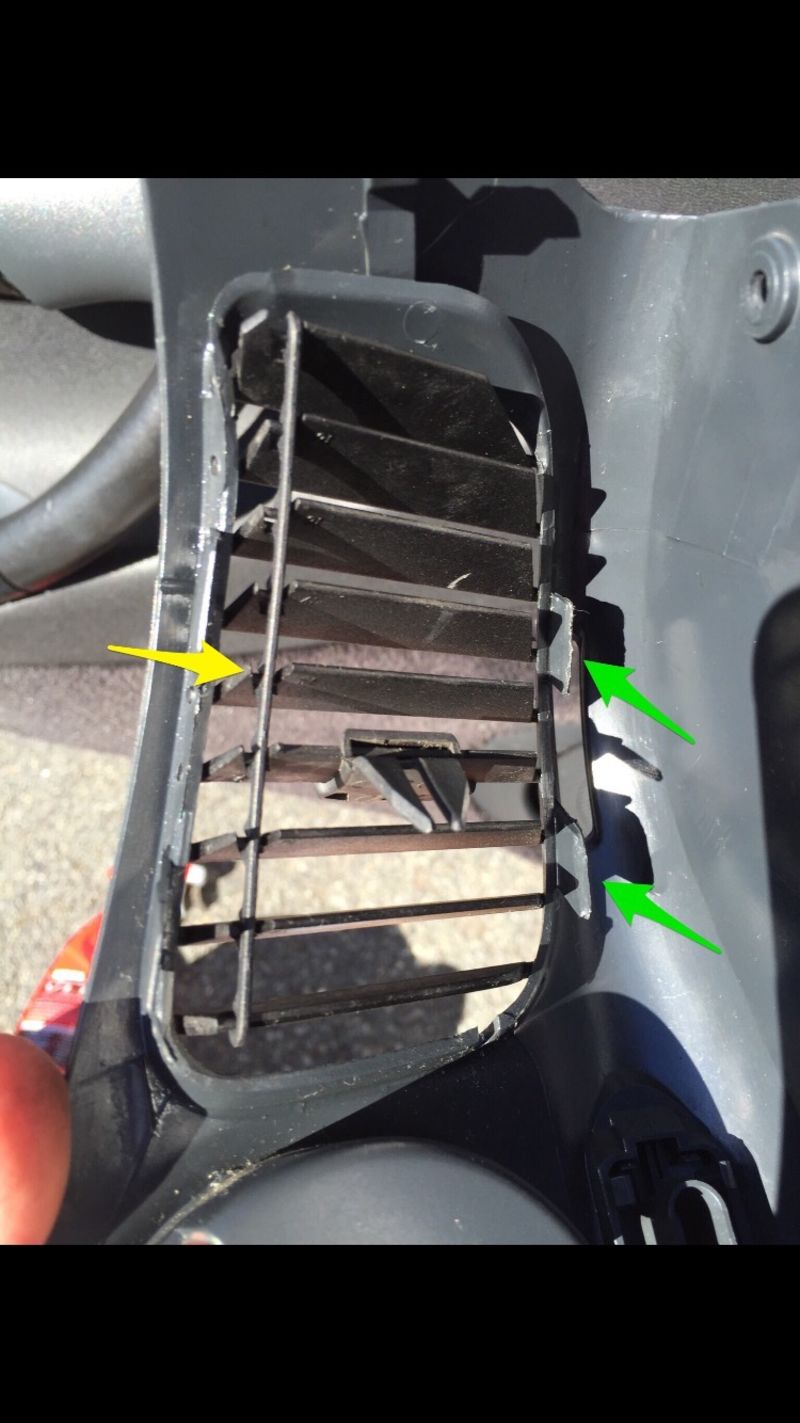
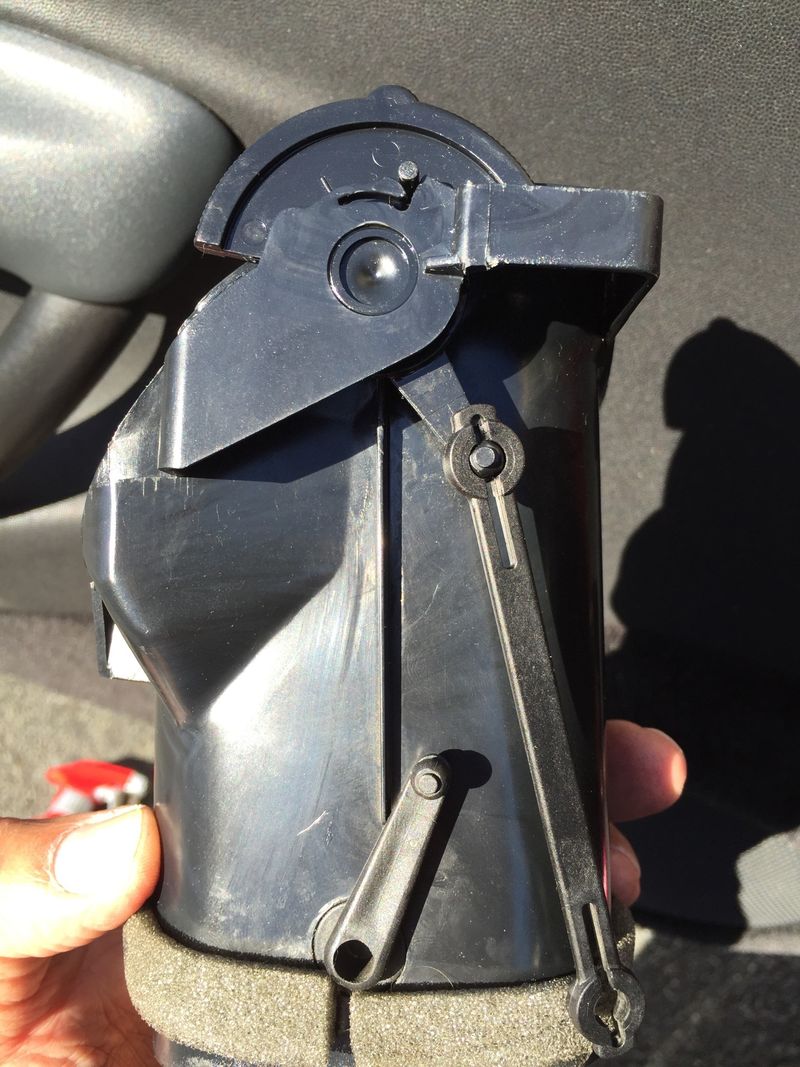
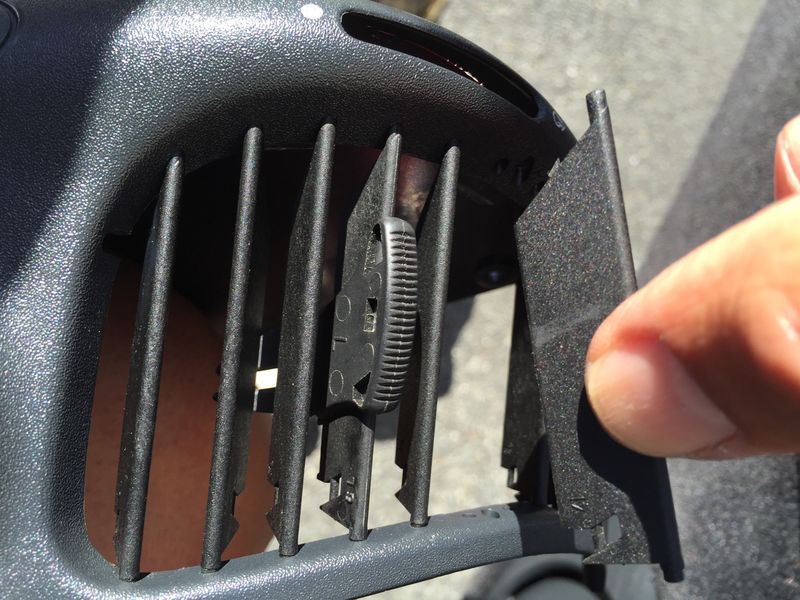
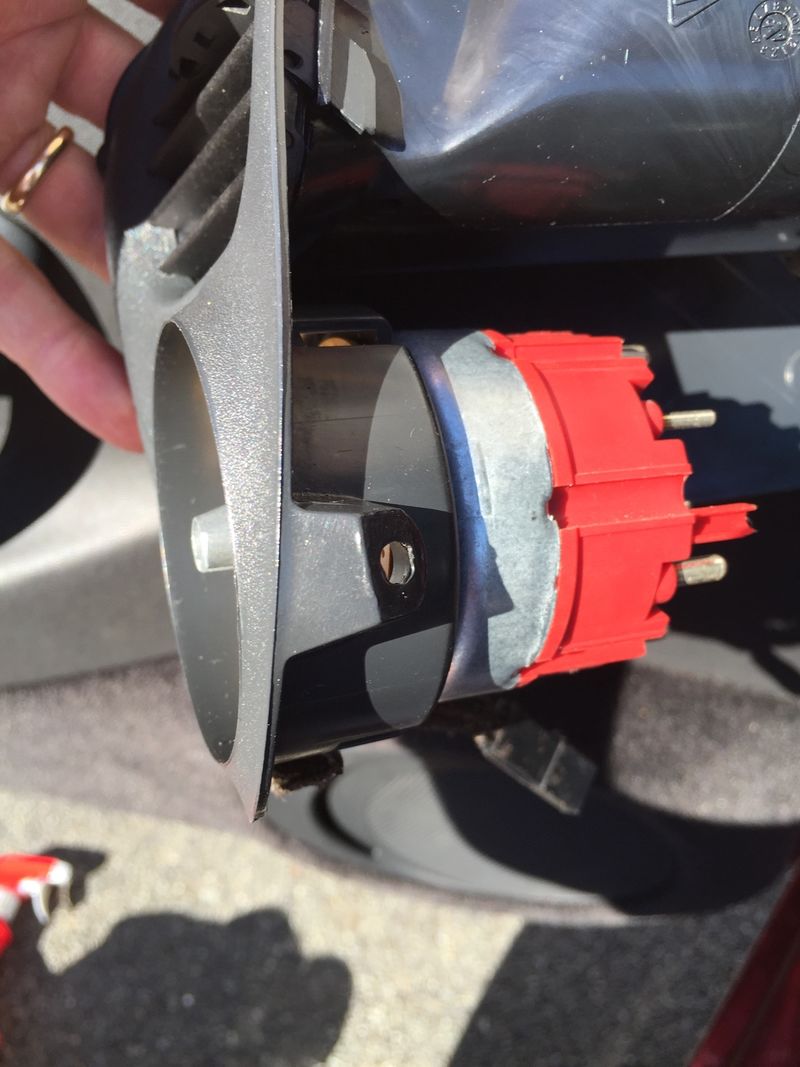
Here are my notes and photos from pulling the driver's side vent in order to pop the fins and slider back into place. Start by pulling the unit as is described elsewhere, as if you are accessing the headlamp switch. I went ahead and disconnected everything so I could wrestle with opening it up. The only difficult part is in separating the internals from the housing. There are four tabs that hold it together and mine were a real bear to get apart. One side was no problem, the other was tricky and hard to get the tabs to budge. In the end, I think it was more force than anything that got it apart. Once that's done, the rest is easy. The horizontal fins are even numbered so you know the order they sit. The vertical slider simply snaps into each fin.
Yellow arrow shows vertical slider. Green arrows show tabs.
This is what popped out of place, along with a couple of horizontal fins.

In this photo, yellow arrows show the 4 tabs.

Detail of the tabs. They are not very flexible, hence the problem popping them out.

Side view of body.
Showing the fins that had popped out.
|
|
|
|
|
03-29-2020, 03:22 PM
|
#13
|
|
Registered User
Join Date: Sep 2017
Location: California
Posts: 64
|
I have the same problem on my 98- the little connector is missing on the driver side vent and each louver moves independently. I bought what I thought was the right replacement vent assembly on Ebay, but it came with a smooth finish and my original has a sort of pebbly finish. So I have taken the little connector bar out of the Ebay vent and would like to use it to repair my original vent.
After struggling for a couple of hours to install the connector bar through the back of the assembled vent I just could not get it. Now I would like to disassemble the vent as shown in this last post so I can get direct access to the louvers. As described here it is very difficult to disassemble. I have separated the exposed outer two tabs, but the two tabs that are buried under the flap mechanism just won't budge. I am afraid to apply too much force because I have a history of breaking parts.
Has anyone else had experience with this and is there a recommendation or trick to separate the two inner tabs?
|
|
|
|
|
03-30-2020, 09:35 AM
|
#14
|
|
WALDMEISTER
Join Date: Sep 2013
Location: Germany
Posts: 1,378
|
Don't disassemble the vents, they are not meant to be!
The trick is: It all can be done from the front!
1.) Disconnect the connector carefully first.
2.) Pop the louvers carefully from the slanted side (facing towards the door) with a screwdriver, access them from above, pushing towards the middle. They will "pop" from their mounting holes.
3.) NO WORRIES...they all have a TINY number imprinted (except of the leather cover ones for obvious reasons) to keep the order for reassambly.
4.) Reassembly: pop all louvers (in order) into that connector FIRST.
5.) Carefully fiddle all pins into the mounting holes of the "INNER" side first.
6.) Carefully pop the other side one-by-one back in, on the other side (little force required, but not too much)
The side wheel...seems easy but is not...too diffucult to describe. But it is possible, once you understand and see all Little Pins and connectors. It can be done, just be patient.
__________________
Original Owner | PORSCHE Boxster 2.7L (MY01) | Seal Gray
Last edited by BRAN; 03-30-2020 at 12:41 PM.
|
|
|
|
|
04-03-2020, 08:38 AM
|
#15
|
|
Registered User
Join Date: Sep 2017
Location: California
Posts: 64
|
Just wanted to follow up. This worked perfectly and only took about 5 minutes. Thanks
|
|
|
|
|
07-22-2023, 07:16 PM
|
#16
|
|
Registered User
Join Date: Oct 2014
Location: Portland, OR
Posts: 53
|
Just did this repair. I had knocked a couple of vanes out trying "aggressively" to get foam out of the vent after doing the vent flap repair. One of the more fiddly jobs I've done on a car, but I'm amazed at the quality of these cars. In most instances, the plastic vanes would break if you looked at them wrong. These allowed multiple ham-fisted attempts without a hitch.
Thanks to aczyzewski for the instructions and pictures!
__________________
2000 Boxster S 6 speed Guards Red
|
|
|
|
 Posting Rules
|
You may not post new threads
You may not post replies
You may not post attachments
You may not edit your posts
HTML code is On
|
|
|
All times are GMT -8. The time now is 05:49 AM.
| |


 1998 Porsche 986
 1998
1998 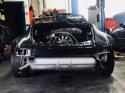 1976
1976  1966
1966  1963
1963  "GRAY"
 Linear Mode


