Go Back   986 Forum - The Community for Porsche Boxster & Cayman Owners > Porsche Boxster & Cayman Forums > Boxster General Discussions

Post Reply
 
LinkBack Thread Tools Display Modes
Old 05-04-2015, 12:59 PM   #1
Registered User
 
Join Date: May 2015
Posts: 2
removing and installing bumper cover trim panels on the front bumper of 2003 Boxster!

I am replacing the trim pieces on my 2003 Boxsters front bumper cover as they are worn. Any special trick to this or do they snap in and out and do I have to take anything else off, special tool, etc.? I am new to the boxster and appreciate any help for this simple (not for me obviously!) task! Thanks so much!

tailwinz is offline   Reply With Quote
Old 05-04-2015, 01:04 PM   #2
Registered User
 
Join Date: Nov 2014
Location: Oklahoma
Posts: 246
What trim panels are you talking about? The black grills?
antny is offline   Reply With Quote
Old 05-04-2015, 01:11 PM   #3
Registered User
 
Join Date: May 2015
Posts: 2
part no. is 996 505 526 00

I am going to replace the bumper cover trim panels (what Porsche calls them) just in front of each front wheel on the lower sides of the full bumper cover. It's the small plastic piece on the lower outside that curves with the bottom of the larger plastic bumper cover closest to each front wheel. This is just the trim piece that's in front of each rubber flap under the nose of which there are two.

Last edited by tailwinz; 05-04-2015 at 01:16 PM.
tailwinz is offline   Reply With Quote
Old 05-04-2015, 01:16 PM   #4
Registered User
 
Join Date: Nov 2014
Location: Oklahoma
Posts: 246
Ahhh, gotcha sorry never played with those. I am guessing screws and push pins like everything else on the bumper.
antny is offline   Reply With Quote
Old 05-04-2015, 02:48 PM   #5
Motorist & Coffee Drinker
 
78F350's Avatar
 
Join Date: Jul 2014
Location: Oklahoma
Posts: 3,653
Garage
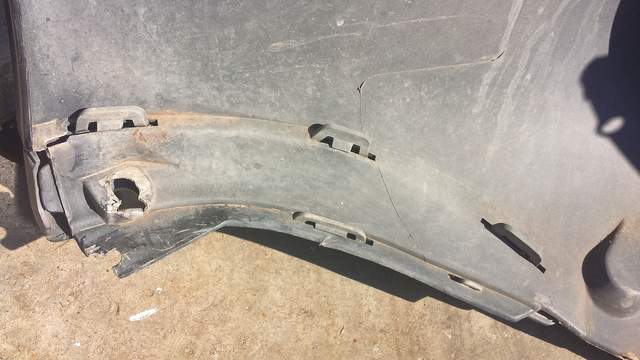
the trim piece is held in place with 5 inserts.
Three with an aft facing tab, one with a front facing tab, and one like a hook.
Start at the aft edge, insert a narrow screw driver and pry lightly to move the tab while you pull down.
Work your way forward.
Lastly pull aft to remove the hook-insert.

Install: hook the front, push the inserts in from front to back.

78F350 is offline   Reply With Quote
Post Reply


Thread Tools
Display Modes

Posting Rules
You may not post new threads
You may not post replies
You may not post attachments
You may not edit your posts

BB code is On
Smilies are On
[IMG] code is On
HTML code is On
Trackbacks are On
Pingbacks are On
Refbacks are On


All times are GMT -8. The time now is 12:41 PM.


Powered by vBulletin® Version 3.8.7
Copyright ©2000 - 2024, vBulletin Solutions, Inc.
Content Relevant URLs by vBSEO 3.6.0
Copyright 2024 Pelican Parts, LLC - Posts may be archived for display on the Pelican Parts Website -    DMCA Registered Agent Contact Page