 05-08-2014, 04:17 PM
|
#1
|
|
Registered User
Join Date: Dec 2013
Location: Cambridge. Ontario
Posts: 128
|
Headlight mount replacement
Well sometimes things don't go as planned. A simple bulb change has turned into something more. When re-installing the headlight assembly I think the connector had shifted a bit and I compensated by shoving it in harder. When I tried to tighten the locking rod I heard a crack and now I need to replace the mount. It looks like it is fastened at three points but for the life of me I cannot figure out how to loosen them to remove the mount. Anyone know the trick here? Or will have to hang my head in shame and take it to Uli the local P-car fixer?
__________________
Chris
'86 944, manual steering, a/c delete, 944Max chip
'87 951, K27, LBE, Turbo S brakes, Koni Yellows, Weltmeister sway bars / strut brace, LSD, full cage, OMP race seats
'01 Boxster - Seal Grey / Black / Black, Litronics upgrade / de-ambered
|

|

|
|
05-08-2014, 05:34 PM
|
#2
|
|
1999 base
Join Date: Dec 2011
Location: Coral Springs FL
Posts: 1,617
|
Before you do anything, I suggest you remove the fender liner.
You should be able to access the headlight from the back.
You can connect the connector and see if you can mount it using a tie rap or something Ike it.
|
|
|
|
|
05-08-2014, 05:42 PM
|
#3
|
|
Registered User
Join Date: Dec 2013
Location: Cambridge. Ontario
Posts: 128
|
Thanks - but I should clarify. The connector and its mounting bracket are fine. What broke was the plastic that holds down the retaining rod mechanism that locks in the whole light assembly.
__________________
Chris
'86 944, manual steering, a/c delete, 944Max chip
'87 951, K27, LBE, Turbo S brakes, Koni Yellows, Weltmeister sway bars / strut brace, LSD, full cage, OMP race seats
'01 Boxster - Seal Grey / Black / Black, Litronics upgrade / de-ambered
|
|
|
|
|
05-08-2014, 05:46 PM
|
#4
|
|
1999 base
Join Date: Dec 2011
Location: Coral Springs FL
Posts: 1,617
|
Quote:
Originally Posted by crooster

Thanks - but I should clarify. The connector and its mounting bracket are fine. What broke was the plastic that holds down the retaining rod mechanism that locks in the whole light assembly.
|

Got it.
I'll have a look at my manuals. Will update you if I find something.
|
|
|
|
|
05-08-2014, 05:58 PM
|
#5
|
|
Registered User
Join Date: Dec 2013
Location: Cambridge. Ontario
Posts: 128
|
I just found this article...
Pelican Technical Article: Boxster Litronic Headlamp Installation - Page 7
It suggest that I need to simply loosen the Torx #15 screws to get the mounts to loosen. I tried this but could not get them to budge but I wasn't too committed since I wasn't sure this was right. I will try again. And I also just noticed it said counter clockwise to tighten, so I was probably trying to tighten them not loosen!
__________________
Chris
'86 944, manual steering, a/c delete, 944Max chip
'87 951, K27, LBE, Turbo S brakes, Koni Yellows, Weltmeister sway bars / strut brace, LSD, full cage, OMP race seats
'01 Boxster - Seal Grey / Black / Black, Litronics upgrade / de-ambered
Last edited by crooster; 05-08-2014 at 06:00 PM.
|
|
|
|
|
05-08-2014, 08:31 PM
|
#6
|
|
98 Arctic silver 986
Join Date: Jul 2011
Location: Upstate, NY
Posts: 1,452
|
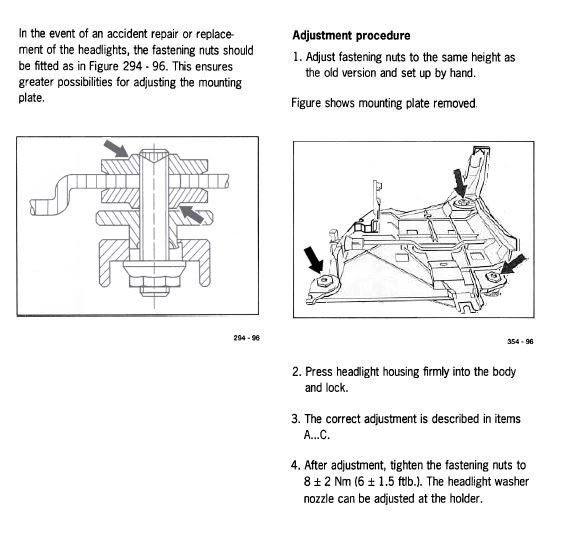
You need to loosen the Torx screw, then take off the 19mm nut around the Torx. After you do that to all three you can take the whole plate off. You may have to hold the nut thing on the underside of what you are loosening. I'm now trying to figure out how to adjust the plate. If you happen to figure that out let me know.
|
|
|
|
|
05-08-2014, 08:39 PM
|
#7
|
|
98 Arctic silver 986
Join Date: Jul 2011
Location: Upstate, NY
Posts: 1,452
|
Correction. You don't actually need to loosen the torx screws. I just had to turn them a little to break the 19mm nuts loose. I think i have an idea how to adjust the height now thanks to the link you posted. I should have read that first 
|
|
|
|
|
05-09-2014, 04:08 AM
|
#8
|
|
Registered User
Join Date: Dec 2013
Location: Cambridge. Ontario
Posts: 128
|
I tried to loosen the torx screw and broke my bit. Did you loosen in the normal direction (counter- clockwise) or opposite? I sprayed some PB blaster on them and will try again once I get a new bit.
__________________
Chris
'86 944, manual steering, a/c delete, 944Max chip
'87 951, K27, LBE, Turbo S brakes, Koni Yellows, Weltmeister sway bars / strut brace, LSD, full cage, OMP race seats
'01 Boxster - Seal Grey / Black / Black, Litronics upgrade / de-ambered
|
|
|
|
|
05-09-2014, 06:22 AM
|
#9
|
|
98 Arctic silver 986
Join Date: Jul 2011
Location: Upstate, NY
Posts: 1,452
|
Clock wise loosens the torx. It is really loosening the knurled nut underneath the mount. You really need to get the nut off the torx to remove the mount. But this nut was stuck on two of the three on my mount. If you turn the torx cw it seemed to loosen the thread in the top nut enough to get it off. The top nut is removed CCW.
|
|
|
|
|
05-09-2014, 06:25 AM
|
#10
|
|
98 Arctic silver 986
Join Date: Jul 2011
Location: Upstate, NY
Posts: 1,452
|
You need to get the top nut off the torx i mean. It is 19mm. You can see it around the torx that you are trying to turn. If you get all three off, the mount will come right off. I wish i was home so I could take a few pics for you.
|
|
|
|
|
05-09-2014, 06:28 AM
|
#11
|
|
Registered User
Join Date: Dec 2013
Location: Cambridge. Ontario
Posts: 128
|
I think I follow you now. I was turning clockwise on the torx when I broke my bit. I will get another, and also try and loosen the 19mm nut (counter-clockwise). What an over-engineered piece of crap! ;-)
__________________
Chris
'86 944, manual steering, a/c delete, 944Max chip
'87 951, K27, LBE, Turbo S brakes, Koni Yellows, Weltmeister sway bars / strut brace, LSD, full cage, OMP race seats
'01 Boxster - Seal Grey / Black / Black, Litronics upgrade / de-ambered
|
|
|
|
|
05-09-2014, 06:57 AM
|
#12
|
|
98 Arctic silver 986
Join Date: Jul 2011
Location: Upstate, NY
Posts: 1,452
|
Yes it is lol. Yeah to get the whole mount off you just need to get those 19mm gold nuts off the top. If you loosen the torx screws too much then all the stuff underneath will be able to move as well. If they move around it may be hard to get the mount back in the same exact spot as it was. That's the problem i'm having. The light sits back to far in the fender and looks like crap. It has always been like that since I bought the car. If you were to just loosen all three torx, then I think you can move the mount forward and back. Up and down is another adjustment you can make too.
|
|
|
|
|
05-09-2014, 02:36 PM
|
#13
|
|
1999 base
Join Date: Dec 2011
Location: Coral Springs FL
Posts: 1,617
|
if it helps
|
|
|
|
|
05-09-2014, 03:49 PM
|
#14
|
|
Registered User
Join Date: Dec 2013
Location: Cambridge. Ontario
Posts: 128
|
Success! I got the 19mm nuts off and the mounting plate is free! Alignment should not be an issue since the position and height of the mounts were not disturbed. New part is on the way. Thanks for all the help.
__________________
Chris
'86 944, manual steering, a/c delete, 944Max chip
'87 951, K27, LBE, Turbo S brakes, Koni Yellows, Weltmeister sway bars / strut brace, LSD, full cage, OMP race seats
'01 Boxster - Seal Grey / Black / Black, Litronics upgrade / de-ambered
|
|
|
|
|
11-30-2014, 12:35 PM
|
#15
|
|
Senior Member
Join Date: Feb 2013
Location: So Cal
Posts: 67
|
perfect advice for the project. also if you have problems getting the plug into the headlight housing a simple removal of 3 screws and a nut in the fender well liner does the trick.
Here a link that I used to help me on the Pelican boards.
Thanks for the help guys.
Pelican Technical Article: Boxster Front Bumper Removal - 986 / 987
|
|
|
|
|
03-28-2023, 05:21 AM
|
#16
|
|
Registered User
Join Date: Jul 2022
Location: Tucson, Arizona
Posts: 80
|
My Headlight Tray broke in the same way but happened when I was removing the headlight. $180 out the window. What a piece of crap!!
|
|
|
|
|
03-28-2023, 05:54 AM
|
#17
|
|
Registered User
Join Date: Jul 2022
Location: Tucson, Arizona
Posts: 80
|
Quote:
Originally Posted by crooster
I think I follow you now. I was turning clockwise on the torx when I broke my bit. I will get another, and also try and loosen the 19mm nut (counter-clockwise). What an over-engineered piece of crap! ;-)
|
I believe that this person mis spoke. CW loosens so he was turning it CCW when he broke his bit. Agree?
|
|
|
|
|
03-28-2023, 05:29 PM
|
#18
|
|
Registered User
Join Date: Nov 2012
Location: SW Okla
Posts: 1,117
|
Quote:
Originally Posted by Bush Pilot
My Headlight Tray broke in the same way but happened when I was removing the headlight. $180 out the window. What a piece of crap!!
|
One of the many joys of dealing with plastic pieces that have gone through 25 years of heat cycles, cold cycles, road vibration and fat fingers. It happens.
__________________
I think I have a Porsche problem...
|
|
|
|
|
04-05-2023, 11:20 AM
|
#19
|
|
Registered User
Join Date: Jul 2022
Location: Tucson, Arizona
Posts: 80
|
I just replaced this mount and believe that the best path is to loosen/remove (CCW) the 19 mm nuts that hold the tray down. Remove the tray. Put the new tray onto the old fasteners and tighten down the 19 mm nuts that hold the tray down. This methodology keeps the old healight alignment intact.
|
|
|
|
 Posting Rules
|
You may not post new threads
You may not post replies
You may not post attachments
You may not edit your posts
HTML code is On
|
|
|
All times are GMT -8. The time now is 03:30 AM.
| |


 boxster S
 1998 Porsche 986
 2002 Porsche Boxter S
 2001 Porsche Boxster S
 1999 Porsche Boxster
 1999 Porsche Boxster
 1999 Porsche Boxster
 1999 Porsche Boxster
 2000 Porsche Boxster
 1999 Porsche 996 C4
 1972 Porsche 914
 1984 Porsche 928S
 1984 Porsche 928S
 1985 BMW 635 Csi
 Linear Mode


