Go Back   986 Forum - The Community for Porsche Boxster & Cayman Owners > Porsche Boxster & Cayman Forums > Boxster General Discussions

Post Reply
 
LinkBack Thread Tools Display Modes
Old 05-14-2011, 10:34 PM   #1
Certified Boxster Addict
 
Join Date: Nov 2010
Location: Los Angeles
Posts: 7,669
Rennline Pedal Install Guide

I installed a set of Rennline aluminum pedals to allow me to adjust the height of the accelerator pedal to help me with my heel/toe technique on the track. Also, I thought that they looked pretty cool on a few other cars that I had seen.

Overall, the install was fairly easy and straightforward. Took me about 90 mins with no cussing (that might be a first!).

This is the set that I bought - brushed perforated aluminum 3-pedal set, red annodized accelerator extension, and adjustable accelerator lift plate.


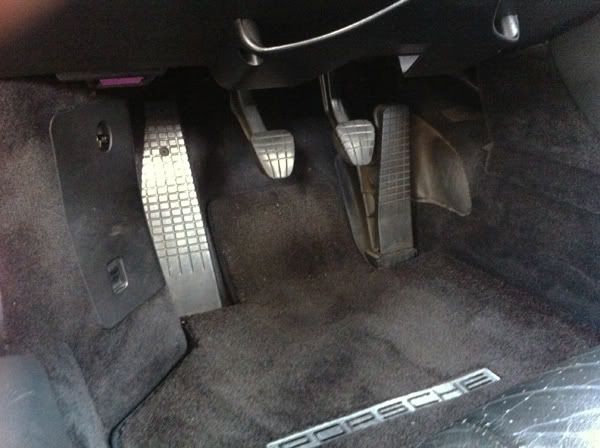
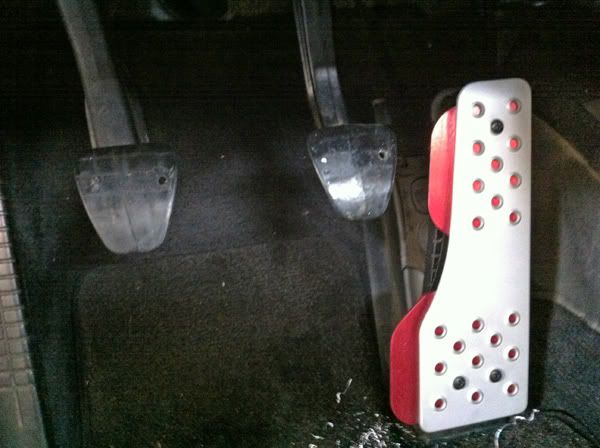
Here is the stock pedal setup. I've always had a problem reaching the accelerator while heel-and-toeing because it seems so much lower than the brake pedal. Of course, I've ridden/driven with others who have no problem at all with the stock pedal setup, but its been a struggle for me, and thus the desire for the accelerator lift plate.


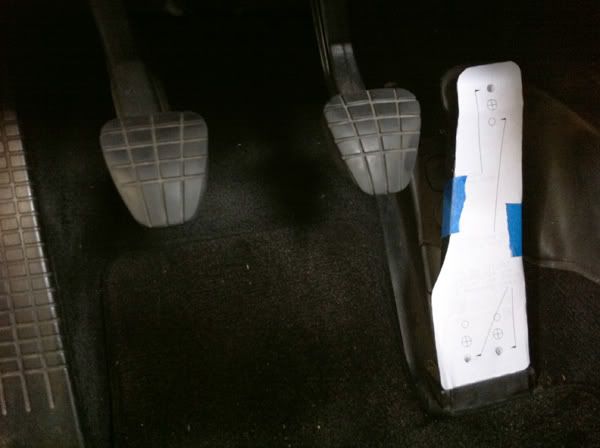
The first step is to cut out and tape the template for the accelerator lift plate onto the accelerator:


Then drill the three big holes for the cover plate nuts and three holes to mount the lifter plate. Be careful to drill at exactly the correct spot for a good fit. If the holes are off, use the drill or a Dremel to customize the fit (I had to use the Dremel a bit myself):


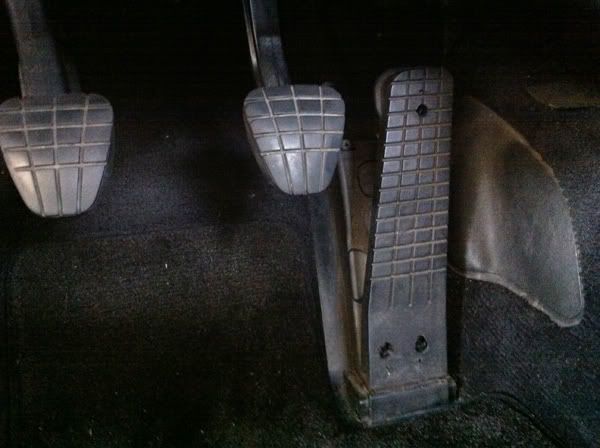
Next install the lifter plate using three screws:


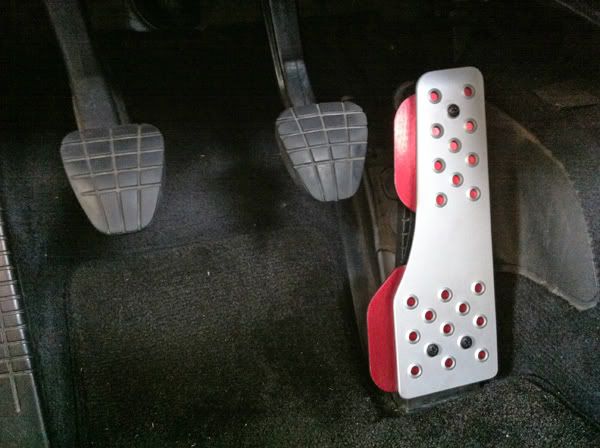
The red accelerator extension plate mounts to the rear of the accelerator cover plate with three small screws/nuts and then uses the same screws to mount to the lifter plate. The height of the cover plate is adjusted using these same screws.


With the accelerator finished, sit up and take a short break from being crunched up under the dash.

Next, the brake and clutch pedal install are identical. First, remove the existing rubber covers and line up the brake/clutch cover and mark and drill the first hole. Be sure to check for clearance for the nut behind the pedal before you drill.


Next, attach the brake/clutch cover using a screw/nut and then drill the second hole and install the second screw/nut to finish the installation:


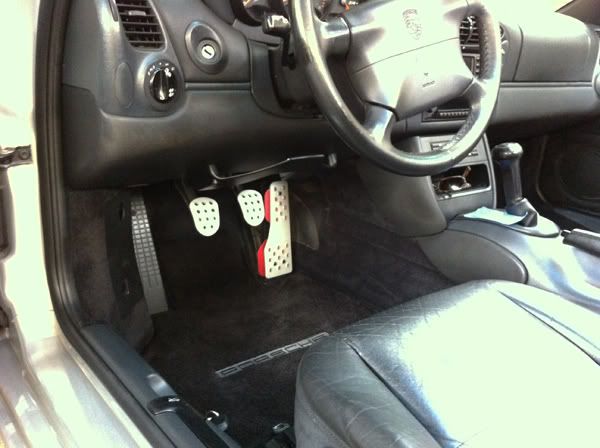
The final look is very nice and now the accelerator is up closer to the brake height which should improve my heel/toe technique (or at least I can't blame the car anymore!).


__________________
1999 996 C2 - sold - bought back - sold for more
1997 Spec Boxster BSR #254
1979 911 SC
POC Licensed DE/TT Instructor

Last edited by thstone; 05-14-2011 at 10:45 PM.
thstone is offline   Reply With Quote
Old 05-15-2011, 01:11 AM   #2
Multi-Boxer Driver
 
Deserion's Avatar
 
Join Date: Nov 2010
Location: Orange Park, FL
Posts: 1,408
Garage
Thanks for the writeup. It looks great!
__________________
-Chris
2004 Porsche Boxster 2.7
1991 Porsche 911 C2 Targa 3.6
2017 Subaru Outback 3.6R
Deserion is offline   Reply With Quote
Old 02-20-2012, 09:03 AM   #3
Registered User
 
Join Date: Jul 2005
Location: MA
Posts: 880
Long term feedback?

Would you get the perforated version again instead of the rubber grip?
Do the brake & clutch pedals offer better grip, or is it just for aesthetics?
__________________
98 Arena Red 986
Stroked & Blown is offline   Reply With Quote
Old 06-09-2012, 08:49 AM   #4
Certified Boxster Addict
 
Join Date: Nov 2010
Location: Los Angeles
Posts: 7,669
*** Long Term Update ***

The pedal upgrade greatly improved my heel-and-toe technique and I can blip off downshifts at will and with ease.

The perforated pedals work great and look cool (at least to my eye) but can be a little slippery when your shoes are wet. If you live where it rains, then the rubber grip set might be a better choice.
__________________
1999 996 C2 - sold - bought back - sold for more
1997 Spec Boxster BSR #254
1979 911 SC
POC Licensed DE/TT Instructor
thstone is offline   Reply With Quote
Old 06-11-2012, 12:22 PM   #5
Registered User
 
Join Date: Jul 2005
Location: MA
Posts: 880
Quote:
Originally Posted by thstone View Post
*** Long Term Update ***

The pedal upgrade greatly improved my heel-and-toe technique and I can blip off downshifts at will and with ease.

The perforated pedals work great and look cool (at least to my eye) but can be a little slippery when your shoes are wet. If you live where it rains, then the rubber grip set might be a better choice.
Thank you, sir!
__________________
98 Arena Red 986
Stroked & Blown is offline   Reply With Quote
Old 06-11-2012, 12:50 PM   #6
Registered User
 
Join Date: Nov 2008
Location: Atlanta
Posts: 188
Nice looking setup. I did something similar with a different brand, back in 2005. Can't remember now where I got them. But included the dead pedal, for that completed dressed up look. This was sufficient to make h&t work an easy fit for me.

NoGaBiker is offline   Reply With Quote
Post Reply


Posting Rules
You may not post new threads
You may not post replies
You may not post attachments
You may not edit your posts

BB code is On
Smilies are On
[IMG] code is On
HTML code is On
Trackbacks are On
Pingbacks are On
Refbacks are On


All times are GMT -8. The time now is 10:46 PM.


Powered by vBulletin® Version 3.8.7
Copyright ©2000 - 2024, vBulletin Solutions, Inc.
Content Relevant URLs by vBSEO 3.6.0
Copyright 2024 Pelican Parts, LLC - Posts may be archived for display on the Pelican Parts Website -    DMCA Registered Agent Contact Page