 03-10-2011, 01:31 PM
|
#1
|
|
Registered User
Join Date: Apr 2010
Location: Canada
Posts: 3,153
|
manual top
hi. has anyone converted their soft top to manual operation? if so, some questions ...
- did you leave the transmissions in or build a different pivot point for the boomerangs (or do you operate the tonneau cover seperately from the roof)?
- what about all the sensors and microswitches - did you remove them?
- how do the top/tonneau cover behave when down - do they bounce around at all?
thanks for your help.
|

|

|
|
03-10-2011, 06:01 PM
|
#2
|
|
Registered User
Join Date: May 2008
Location: MN
Posts: 327
|
I converted my top to a manual top for a long weekend when I was on vacation and one of the cables broke. I just disconnected the arms from the transmission on both sides, then I could manually raise the clamshell and raise or lower the top, then manually lower the clamshell again. At least I could put the top down for the rest of the vacation.
Not sure if that helps. I wouldn't want to do it all the time, but it worked until I got home and replaced the cable.
|
|
|
|
|
03-10-2011, 07:18 PM
|
#3
|
|
Registered User
Join Date: Apr 2010
Location: Canada
Posts: 3,153
|
thanks. did the clamshell rattle around when not connected to anything?
|
|
|
|
|
03-10-2011, 11:01 PM
|
#4
|
|
Registered User
Join Date: Jun 2007
Location: Freeport, New York
Posts: 472
|
Quote:
|
Originally Posted by The Radium King
thanks. did the clamshell rattle around when not connected to anything?
|
The clamshell will rattle around a little when not connected to anything.
All four pushrods have to be disconnected for a completely manual operation.
The real problem is that, at speed, perhaps when going over a rise, there is a slim possibility that the canvas top could catch air and cause a disaster.
You would have to devise a way to securely hold down the clamshell to eliminate that possibility.
Regards, Maurice.
|
|
|
|
|
03-11-2011, 09:44 AM
|
#5
|
|
Registered User
Join Date: Mar 2006
Location: Orlando, FL
Posts: 998
|
mine had been "converted" to manual for couple years now. one of the cables broke and I have not had the time money or real need to get it fixed. I simply disconnected and removed the two struts, nothing else. clam shell and top get operated by hand. oddly I kinda like it this way. know I know I will be able to open or close the top when I want to and not determined by whether all the micro switches decide they are going to work LOL.
__________________
kabel
Orlando - 99 BMW M Coupe (autocross toy), '11 Mazdaspeed 3 (dog hauler), '99 10AE Miata (the new daily driver)
|
|
|
|
|
03-11-2011, 09:56 AM
|
#6
|
|
Registered User
Join Date: Apr 2010
Location: Canada
Posts: 3,153
|
there's something to be said about simplicity, which is part of why i'm asking the question and thinking about the change. did you disconnect the struts that attach the transmission to the roof, or the ones that attach the transmission to the clamshell? i'm trying to decide whether to leave the transmissions in place and just disconnect the cables and motor (to provide some resistance to things flopping around) or whether to pull it all out and operate both manually and independent of each other.
|
|
|
|
|
04-06-2012, 08:53 AM
|
#7
|
|
Registered User
Join Date: Jun 2007
Location: Freeport, New York
Posts: 472
|

Excellent work!
Regards, Maurice.
|
|
|
|
|
08-18-2011, 01:57 AM
|
#8
|
|
Registered User
Join Date: Apr 2006
Location: malibu
Posts: 7
|
Manual Top
I converted my '02 top to manual operation after one of the cables broke. I disconnected the front bars that connect the canvas top to the transmissions. I replaced the cables and synchronized the transmissions. I now use the button to raise the clamshell then manually raise or lower the top and use the button to lower the clamshell. Just have to lower clamshell before latching the top or the switch doesn't work. I wouldn't change back now that I've lived with it. It's as fast or faster than fully motorized and provides better access to the engine hatch. Before I used the transmission for the clamshell I used a bungee cord but I was less than happy with the need to get out to operate the top. I can put the top up or down while belted in the drivers seat.
Jerry
|
|
|
|
|
08-18-2011, 04:19 AM
|
#9
|
|
Registered User
Join Date: Jun 2007
Location: Freeport, New York
Posts: 472
|
Quote:
|
Originally Posted by Canyon Racer
I converted my '02 top to manual operation after one of the cables broke. I disconnected the front bars that connect the canvas top to the transmissions. I replaced the cables and synchronized the transmissions. I now use the button to raise the clamshell then manually raise or lower the top and use the button to lower the clamshell. Just have to lower clamshell before latching the top or the switch doesn't work. I wouldn't change back now that I've lived with it. It's as fast or faster than fully motorized and provides better access to the engine hatch. Before I used the transmission for the clamshell I used a bungee cord but I was less than happy with the need to get out to operate the top. I can put the top up or down while belted in the drivers seat.
Jerry
|
Jerry:
Excellent workaround and you definitely have the best of both worlds. Once you made the decision that the OEM system was not worth fixing as it was delivered, that sounds to me like the way to go.
There is a hack that will let you operate the clamshell's "hydraulic" pushrods via the transmissions' V-levers, but it involves wiring into the electric motor and bypassing the double relay, IIRC.
Maybe going one step further, if you install an OEM '03 or '04 top and frame assembly as a unit, would yield the most reliable and least expensive to maintain mod, while still being able to remain seated while operating the top ( i.e. "NO CHOP" !
Regards, Maurice.
Last edited by schoir; 08-18-2011 at 04:20 AM.
Reason: remove duplicate salutation
|
|
|
|
|
04-03-2012, 09:34 PM
|
#10
|
|
Registered User
Join Date: Jul 2006
Location: PA
Posts: 71
|
Thanks Schoir, But...
Schoir, thank you for such detail in your description, but I'm still lost. I stared at the shop manual and read your post for 20 minutes, while looking at the same pieces of metal seemingly assembled together permanently with some kind of hidden Porsche magic wand. The shop manual showed how to disassemble, but only while the top is completely down but mine is up. And they aren't even making sense to me with their terminology and I certainly don't see any red caps anywhere.
I'm uploading some pics.
Is the nuckle what I disassembled below to expose Area #2? There is what looks like a steel cap in Area #2, but that POS doesn't want to come off and there is no room to get anything between it and it's plastic casing. I will refer to Area #1 in the next pic.
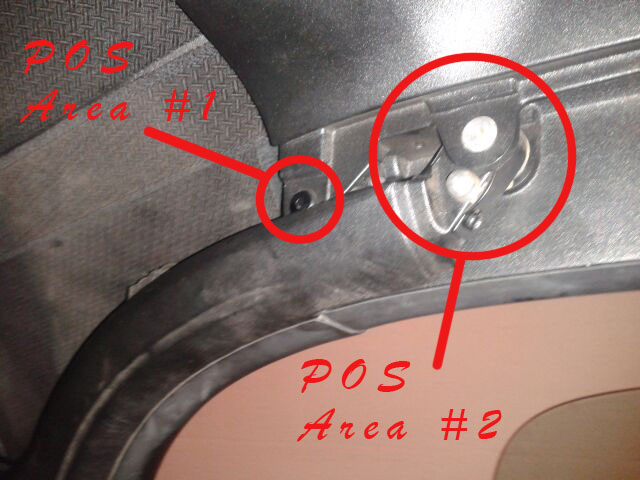
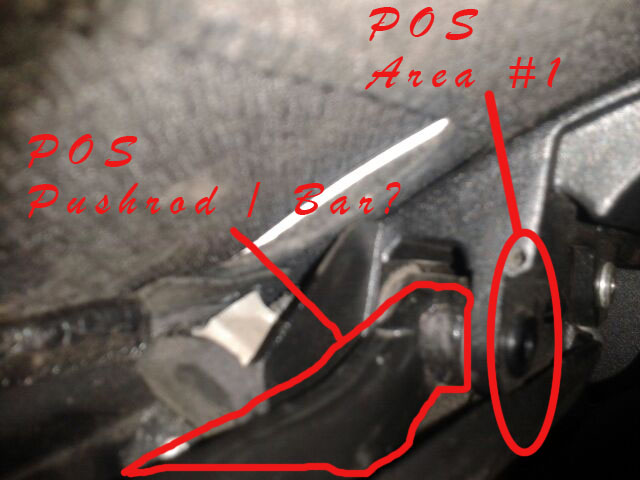
What I think is the pushrod or some kind of bar lays behind Area #1 below. But there is no way to disconnect any of this. Am I completely off and need to look between the seats and doors somewhere?
I want this top completely manual, I'll get speedster bumps or something to secure it, but I no longer want to rely on 5,000 points of failure every time I'm caught at night or in the rain. Please help, I'm not far from taking a razor to it and making it a permanent convertible.
|
|
|
|
|
04-04-2012, 10:30 AM
|
#11
|
|
Registered User
Join Date: Jun 2007
Location: Freeport, New York
Posts: 472
|
Quote:
Originally Posted by rock88hard

Schoir, thank you for such detail in your description, but I'm still lost. I stared at the shop manual and read your post for 20 minutes, while looking at the same pieces of metal seemingly assembled together permanently with some kind of hidden Porsche magic wand. The shop manual showed how to disassemble, but only while the top is completely down but mine is up. And they aren't even making sense to me with their terminology and I certainly don't see any red caps anywhere.
I'm uploading some pics.
Is the nuckle what I disassembled below to expose Area #2? There is what looks like a steel cap in Area #2, but that POS doesn't want to come off and there is no room to get anything between it and it's plastic casing. I will refer to Area #1 in the next pic.
What I think is the pushrod or some kind of bar lays behind Area #1 below. But there is no way to disconnect any of this. Am I completely off and need to look between the seats and doors somewhere?
I want this top completely manual, I'll get speedster bumps or something to secure it, but I no longer want to rely on 5,000 points of failure every time I'm caught at night or in the rain. Please help, I'm not far from taking a razor to it and making it a permanent convertible. |
Rock:
You are looking in the completely wrong area.
The bolt that you want to remove can be seen if you look straight down into the convertible top well while standing facing where the door meets the rear quarter panel. Look down and just inboard of where the B-pillar is folded down in a horizontal position. The bolt is recessed inside the center of the V-lever.
Go to this link, and take a look at the photo on page 19 of the Part II PDF: installinga'03-'04glasstopandframeona'97 - mikefocke2
(go to the bottom of the page to find the link to the Part II PDF).
That photo will show you the 19mm bolt that you can access while the top is down, but you will need a "small offset" 19mm box end wrench to get it in there. Sears sells one that works well.
Once you remove the 19mm bolt, the V-lever will come off and that will give you access to the both the front and the rear pushrods, whose anchoring locations are
depicted in that photograph.
Regards, Maurice.
|
|
|
|
|
04-04-2012, 12:13 PM
|
#12
|
|
Herr Geschwindigkeit
Join Date: Nov 2008
Location: Grand Blanc, MI
Posts: 34
|
My top has been in "Manual" mode for a while now after I let a friend borrow the car and somehow one push rod cap broke, one push rod got bent, and one of the levers got bent. (Don't let friends borrow expensive cars)
I ended up having to disconnect all 4 push rods and I took the two levers off of the transmissions.
In this picture, I took off #4 and #10 from both sides, then took the nut (#32) off of the lever (#9)
|
|
|
|
|
04-04-2012, 12:28 PM
|
#13
|
|
Registered User
Join Date: Jun 2007
Location: Freeport, New York
Posts: 472
|
Quote:
Originally Posted by silentfrosty
My top has been in "Manual" mode for a while now after I let a friend borrow the car and somehow one push rod cap broke, one push rod got bent, and one of the levers got bent. (Don't let friends borrow expensive cars)
I ended up having to disconnect all 4 push rods and I took the two levers off of the transmissions.
In this picture, I took off #4 and #10 from both sides, then took the nut (#32) off of the lever (#9)
|
That's it.
For reference from the diagram, #4 is the front pushrod, #10 is the black "hydraulic" pushrod, #32 is the 19mm bolt that is on with loctite from the factory, and #9 is the V-lever.
Regards, Maurice.
|
|
|
|
|
04-04-2012, 12:31 PM
|
#14
|
|
Registered User
Join Date: Jul 2006
Location: PA
Posts: 71
|
Thanks Folks!!!!!!
|
|
|
|
|
04-05-2012, 08:10 AM
|
#15
|
|
Registered User
Join Date: Jul 2006
Location: PA
Posts: 71
|
I don't see how anyone can peacefully convert their top to manual if the top is up.... Well I'm learnin my Porsche a lesson or 3. Yesterday was stage 1 of my full on assault. You see, the manual suggests I use the bar from the included kit to remove the pin. The pins weren't playing nice, so I used it for more than that.....
I snapped, broke, and cracked plenty of pieces to get there. It took 3 hours. I got all the pins out of everything and all the available bars are free moving, but the top still won't go down! Here is a pic from before my phone died, about an hour into it.
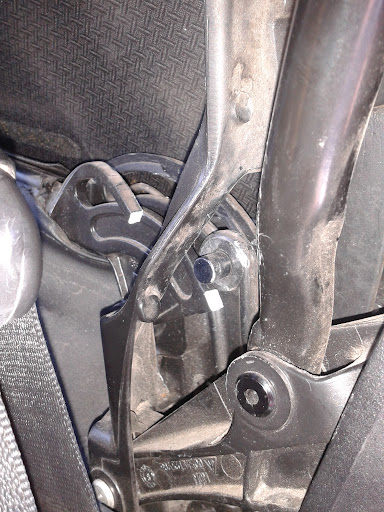
I can't see the hydraulic bars from the cab, they are tucked under the clamshell. So today I have to figure out a way to break or snap those MF'ers off. I just hope the Speedster Humps don't require something that I snapped or will snap/cut. Wish me luck, or give me advise before I tear this freakin thing off Hulk style!
|
|
|
|
|
04-05-2012, 09:09 AM
|
#16
|
|
Registered User
Join Date: Jun 2007
Location: Freeport, New York
Posts: 472
|
Quote:
Originally Posted by rock88hard
I don't see how anyone can peacefully convert their top to manual if the top is up.... Well I'm learnin my Porsche a lesson or 3. Yesterday was stage 1 of my full on assault. You see, the manual suggests I use the bar from the included kit to remove the pin. The pins weren't playing nice, so I used it for more than that.....
I snapped, broke, and cracked plenty of pieces to get there. It took 3 hours. I got all the pins out of everything and all the available bars are free moving, but the top still won't go down! Here is a pic from before my phone died, about an hour into it.
I can't see the hydraulic bars from the cab, they are tucked under the clamshell. So today I have to figure out a way to break or snap those MF'ers off. I just hope the Speedster Humps don't require something that I snapped or will snap/cut. Wish me luck, or give me advise before I tear this freakin thing off Hulk style! |
The reason the top will still not go down is because the two sets of pushrods are still connected. Even if you "tear this freakin thing off Hulk style", the clamshell will not move as long as the black "hydraulic" pushrods are connected.
It is definitely possible to get the top down manually when you start out with a top that is stuck in the closed position.
You have to get access to the pushrods and their connections. To do that, you first have to reach through the roll bar hoops and unhook the vinyl apron from its two hooks by grabbing the hard vinyl bar edge of the vinyl apron and rotating the bottom edge down and towards you. That will unhook it from the clips that are on the left and right side of the rear firewall of the convertible top well.
Once you get that vinyl apron out of the way, you can reach the black hydraulic pushrods and the V-levers. You will also be able to reach the front pushrods and can easily disconnect those by unscrewing the 10mm bolt with fat washer that holds the two metal pieces of the front pushrod together. That will give you a free-moving canvas top.
The black hydraulic pushrods are a little more difficult because they are exerting a great amount of pressure on pulling and holding the clamshell down tight. If you can't pop off the black "hydraulic" pushrods from their respective steel balls on the V-lever, you can get the same result by popping off the little metal clip from the body-colored clamshell support arms.
The support arms are part #15. That little metal clip is #12 on the diagram supplied by Silentfrosty. Once you pop off that little metal clip, you can push the black "hydraulic" pushrod out of the hole in the support arm.
If you have no patience, you can easily get a 19mm socket onto the factory-loctited bolt that holds the V-levers onto the transmissions. That will release both sets of pushrods and will allow the top to move manually part of the way. Once you can move it part of the way, all of the tension will be released and you can pry off the pushrods.
In the unlikely event that you still have the cosmetic thin black plastic covers on the body-colored support arms, you can rotate them off to get access to that #12 clip. The cosmetic covers are part #34.
Regards, Maurice.
|
|
|
|
|
04-23-2012, 07:44 PM
|
#17
|
|
Theoretical propagandist
Join Date: Dec 2011
Location: Pacific Northwest
Posts: 793
|
Well, there have been a few threads posted since I first asked this question and several of them mentioned retaining the operation of the clam shell but ditching the top. Some have mentioned that they did this and it involved a fair bit of work??? So, knowing that someone had done this I dug into reading everything from Mike to Pedro and data in between when it dawned on me how simple this mod to do.
Step 1: Open the top to service mode
Step 2: Release the rain shield on the top to expose the push rod linkage and tension cable.
Step 3: Pop the safety tension cable off
Step 4: Using an allen head socket remove the bolt holding the push rod for that drives the convertible frame from each side (leave the hydraulic push rod for the clam shell alone)
Step 5: With the allen screw removed, pop the front of each push rod off of the "B" pillar connection (white on left side, red on the right side). You will probably have to pull back on the top to allow the push rod to have some space so it can come free from the ball connection it is attached to.
Step 6: Reattach the safety tension cable back in place.
Step 7: Reattach the rain shield.
Step 8: Enjoy the manual operation of the top and the motorized operation of the clam shell.
I also went ahead and did the electrical mod so I can operate the top with out having to engage the hand brake and what I have now ended up with is a top that I can open and close by hand while belted into my seat and have the clam shell controlled from the dash panel button. As for operation at speed, top was not going anywhere at very enjoyable speeds.
__________________
When life throws you curves, aim for the apex...
|
|
|
|
|
07-06-2017, 07:36 PM
|
#18
|
|
Registered User
Join Date: Jun 2017
Location: Racine, Wi
Posts: 11
|
Newbie question
How do I execute the electrical mod to eliminate the need to raise the handbrake?
(I'm working on a new to me car with a stick top as one issue and a mouse chewed console wiring loom as another, perhaps the electrical fix will help me get my top working once I have all of the mechanicals recombobulated?)
|
|
|
|
|
07-06-2017, 07:44 PM
|
#19
|
|
Registered User
Join Date: Sep 2008
Location: Florida
Posts: 2,497
|
You bend pin 15 on the top controller relay and ground it to bypass the parking brake.
You bend pin 18 to allow you to operate the top while in motion.
|
|
|
|
 Posting Rules
|
You may not post new threads
You may not post replies
You may not post attachments
You may not edit your posts
HTML code is On
|
|
|
All times are GMT -8. The time now is 10:34 AM.
| |


 2002 Porsche Boxster
 Natalie
 Esmeralda
 Gadget
 Sasha
Sasha Gertrude
 Bernice
 Mrs. T
 Hybrid Mode


