 08-25-2009, 09:24 PM
|
#1
|
|
Registered User
Join Date: Jul 2009
Location: California
Posts: 56
|
Anyone have hyper white or Hid kit for their boxster?
Hi i'm looking to get a set of hyper white bulbs or an hid kit for my boxster. Not sure which way to go an Hid kit is more expensive but i'm not sure why? Is it because the light is more intense than the stock lights? I was also thinking of just getting a pair of bulbs to switch out the headlights with some hyper white bulbs. I have a glacier white boxster and want to make it look more clean with some hyper white bulbs.
Anyone have any pictures or videos of their cars with hyper whites or even like a mild blue or and hid kit?
|

|

|
|
08-25-2009, 11:48 PM
|
#2
|
|
Registered User
Join Date: Jul 2009
Location: Kansas
Posts: 83
|
I just installed a HID kit from xenon experts, they had it on sale for $70. Well worth the effort and money in my opinion and it wont melt your headlights as higher wattage bulbs often do.
Its not as good as litronic headlights, but night visibility is greatly improved.
No affiliation. http://www.xenonexpert.com/ddm_kit_sale.html
I went with 35 watt 6000k kit.
I will post a pic once i get back in town.
|
|
|
|
|
08-26-2009, 05:46 AM
|
#3
|
|
Registered User
Join Date: Jul 2009
Location: California
Posts: 56
|
Quote:
|
Originally Posted by al83s
I just installed a HID kit from xenon experts, they had it on sale for $70. Well worth the effort and money in my opinion and it wont melt your headlights as higher wattage bulbs often do.
Its not as good as litronic headlights, but night visibility is greatly improved.
No affiliation. http://www.xenonexpert.com/ddm_kit_sale.html
I went with 35 watt 6000k kit.
I will post a pic once i get back in town. |
Nice i like the white with blue hue. Can i ask which bulbs you got? they have a list from h1-h13 and other numbers. it says 35w is oem wattage i'm not sure what the 6000 k means but looks really good.
|
|
|
|
|
08-26-2009, 05:57 AM
|
#4
|
|
Registered User
Join Date: Jul 2009
Location: California
Posts: 56
|
also was the installation difficult? Did you have to drill anything or cut and splice any wires? Are there any negative effects from doing this that you noticed? I just found out that the 35w runs cooler than the stock lamps so it lasts longer is this true?
I'm awaiting pics too hehe i'd like to see what it looks like on a boxster. 
|
|
|
|
|
08-26-2009, 08:58 AM
|
#5
|
|
Registered User
Join Date: Jul 2009
Location: Kansas
Posts: 83
|
Somebody correct me if Im wrong.
35 watt is street legal, 55 isnt.
4300, 5000, 6000 etc. all refer to the Kelvin Temperature, thus affect the color of the light from yellow-white-blue-purple etc.
As temp increases, light intensity drops thus I wouldn't go higher than 6000K (personal choise, since I do alot of night/bad weather driving and visibility is more important for me than looks).
Just search "HID" on this forum and you will come across several HID retrofit examples.
Some kits will require drilling a hole on the headlight back cover (dont worry, kit comes with a gromet and long enough wires), but I managed to squize mine in without any modifications. It is not much harder that replacing burned out bulb, plug n play.
Hope it helps.
|
|
|
|
|
08-26-2009, 09:37 AM
|
#6
|
|
Registered User
Join Date: Jul 2009
Location: California
Posts: 56
|
Quote:
|
Originally Posted by al83s
Somebody correct me if Im wrong.
35 watt is street legal, 55 isnt.
4300, 5000, 6000 etc. all refer to the Kelvin Temperature, thus affect the color of the light from yellow-white-blue-purple etc.
As temp increases, light intensity drops thus I wouldn't go higher than 6000K (personal choise, since I do alot of night/bad weather driving and visibility is more important for me than looks).
Just search "HID" on this forum and you will come across several HID retrofit examples.
Some kits will require drilling a hole on the headlight back cover (dont worry, kit comes with a gromet and long enough wires), but I managed to squize mine in without any modifications. It is not much harder that replacing burned out bulb, plug n play.
Hope it helps.
|
I think i'm just going to go with the ones that you got. $70 is not a bad deal and i like the color that it makes from the website, when you post pics i can see what it looks like on the boxster. You metioned you squeezed yours in, what do u mean by that? You squeezed the wires through somewhere? thanks for the info
Also if i just want to change the low beam bulbs how many sets would i need? Just the 1 set right?
Last edited by bigborian; 08-26-2009 at 10:24 AM.
|
|
|
|
|
08-27-2009, 02:59 PM
|
#7
|
|
Registered User
Join Date: Oct 2007
Location: Dallas, TX
Posts: 295
|
What bulb type did you go with?
__________________
TimAustinW
http://i226.photobucket.com/albums/d...ignature-1.jpg
02 Seal Grey, NHP Headers w/ Highflow Cats/2ndary Bypass Pipes, smoked side markers/3rd brake light, exterior match interior trim, 986 Lloyds Mats, 986 deck lid emblem, arctic silver intake grills, ipod link, painted calipers, Glass Window Robbins Top with defroster kit, Bose Sound System, Leather lower door panels, Console Lid w embroidered crest; Stainless door sills; Painted Bumperettes; Custom Hood Crest
|
|
|
|
|
08-28-2009, 05:40 AM
|
#8
|
|
Registered User
Join Date: Jul 2009
Location: California
Posts: 56
|
Quote:
|
Originally Posted by TimAustinW
What bulb type did you go with?
|
I got the h7 bulbs and the 6000k 35w hid kit
|
|
|
|
|
08-28-2009, 09:58 PM
|
#9
|
|
Registered User
Join Date: Jul 2009
Location: Kansas
Posts: 83
|
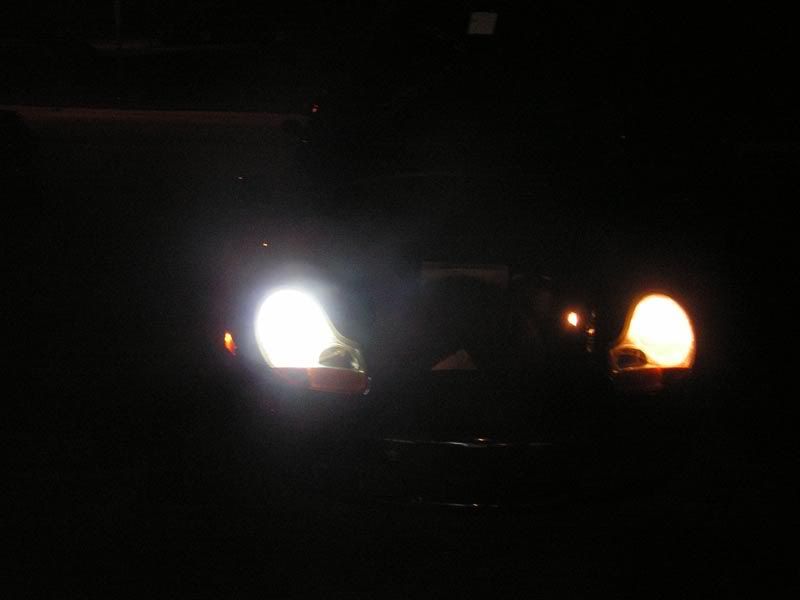
I managed to squize ballast and igniter within the headlight housing (under back cover).
Here are the pictures to compare stock halogen to 6000k Hid.
Although light patterns look different - its normal due to safety reasons and not due to messed up headlights. I did before and after and patterns are the same, just brighter.
Also, camera was in the automatic mode, so the color is not exactly spot on, but you can clearly see the difference it made. yep, its h7 and you only need one set for low-beam installation. High beams will stay functional. btw, low beam is the top bulb.
Last edited by al83s; 08-28-2009 at 10:06 PM.
|
|
|
|
|
08-29-2009, 07:52 PM
|
#10
|
|
Registered User
Join Date: Jul 2009
Location: California
Posts: 56
|
NICE thanks man! I got em yesterday and i put em in today. I will post some pics in a little bit they look rad. We did a pamper day for the boxster we changed fuel filter, spark plugs and did the HIDs after. You were right it was a very simple install and the lights look great. The only difficult part was trying to find a socket that fit the little hole to pop the headlight off. We used a deep socket 4mm and it worked perfect. We just shoved all the extra parts in the headlight assembly and then closed the backside of it.
I'll post pics in a few but yea i might even write up a diy for it. For this particular one i guess
|
|
|
|
|
08-29-2009, 08:06 PM
|
#11
|
|
Registered User
Join Date: Jun 2007
Location: Bowmanville, Ont
Posts: 295
|
Much brighter on the road now?. I find my stock lowbeams a tad weak for some of the country driving I do. I'd hate to hit a deer, the car doesn't have enough trunk space for all that venison 
Quote:
|
Originally Posted by bigborian
NICE thanks man! I got em yesterday and i put em in today. I will post some pics in a little bit they look rad. We did a pamper day for the boxster we changed fuel filter, spark plugs and did the HIDs after. You were right it was a very simple install and the lights look great. The only difficult part was trying to find a socket that fit the little hole to pop the headlight off. We used a deep socket 4mm and it worked perfect. We just shoved all the extra parts in the headlight assembly and then closed the backside of it.
I'll post pics in a few but yea i might even write up a diy for it. For this particular one i guess
|
__________________
-- 02 Boxster S
-- Black/Black
-- Sideskirts/PSE
|
|
|
|
|
08-29-2009, 08:14 PM
|
#12
|
|
Registered User
Join Date: Jul 2009
Location: California
Posts: 56
|
Quote:
|
Originally Posted by Sputter
Much brighter on the road now?. I find my stock lowbeams a tad weak for some of the country driving I do. I'd hate to hit a deer, the car doesn't have enough trunk space for all that venison |
YEa it's quite a difference. I'm gonna go out and take some pics in a few and i'll upload them tonight. I'm bout to go out for the night though so i guess u'll see it tomorow :-p
great easy little mod and makes a big difference in looks and visibility. Looks real clean on a glacier white boxster
|
|
|
|
|
08-30-2009, 08:40 AM
|
#13
|
|
Registered User
Join Date: Jul 2009
Location: California
Posts: 56
|
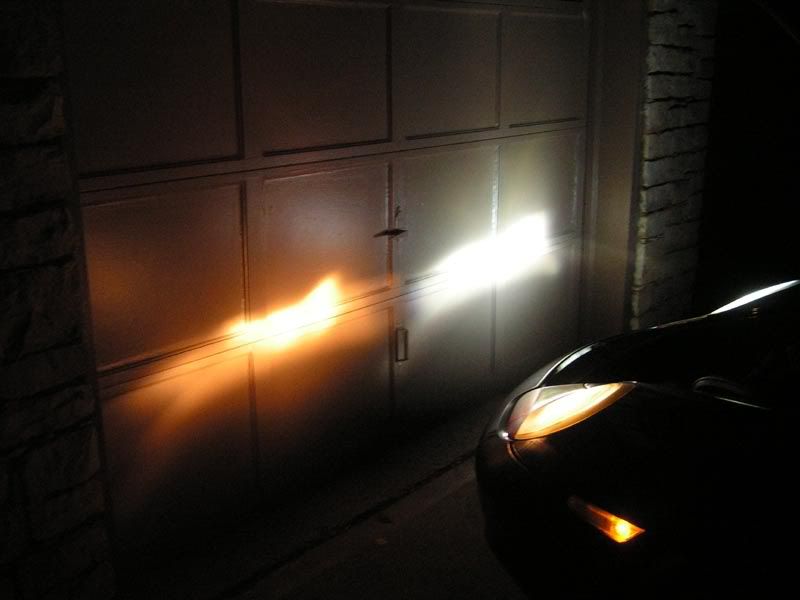
Here are the pics as promised. Also about the visibility it's true that you can see more cause the light shines out more but the only thing is that the light is slightly blue so it's a little darker than the nasty stock yellow ones.
I wanted to take more pics at different locations but we just took some in front of our house and our friends place. I think they look amazing really makes it look clean and for a great price too. $70 not too bad at all for such an amazing difference in looks.
Here are the pics
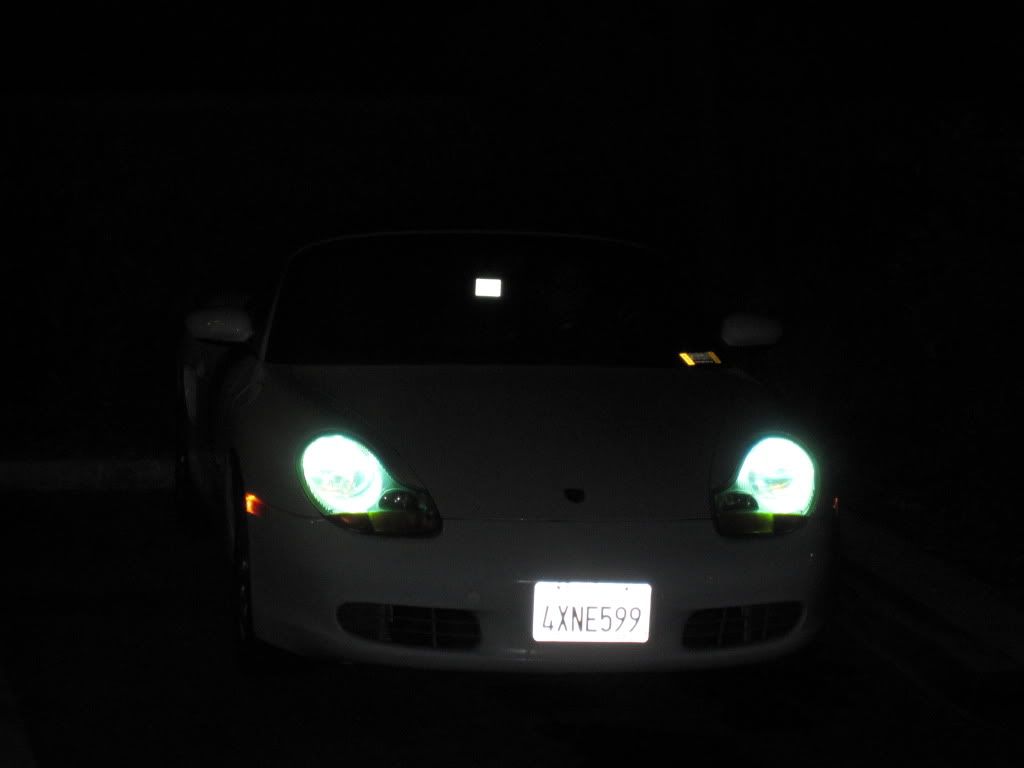
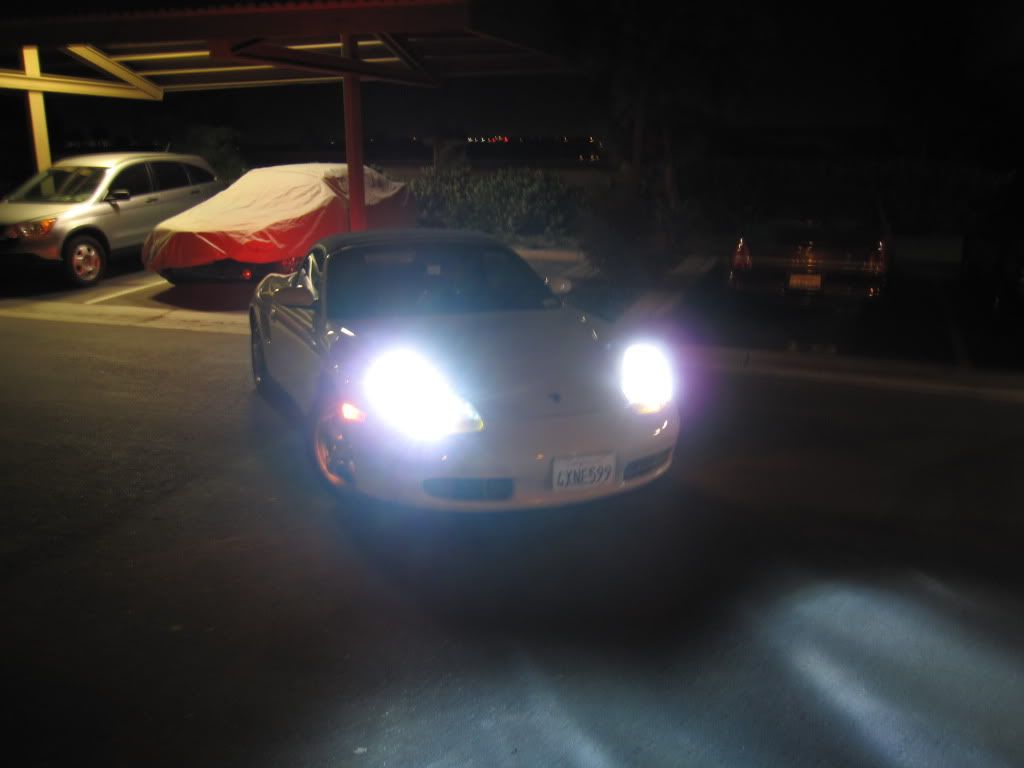
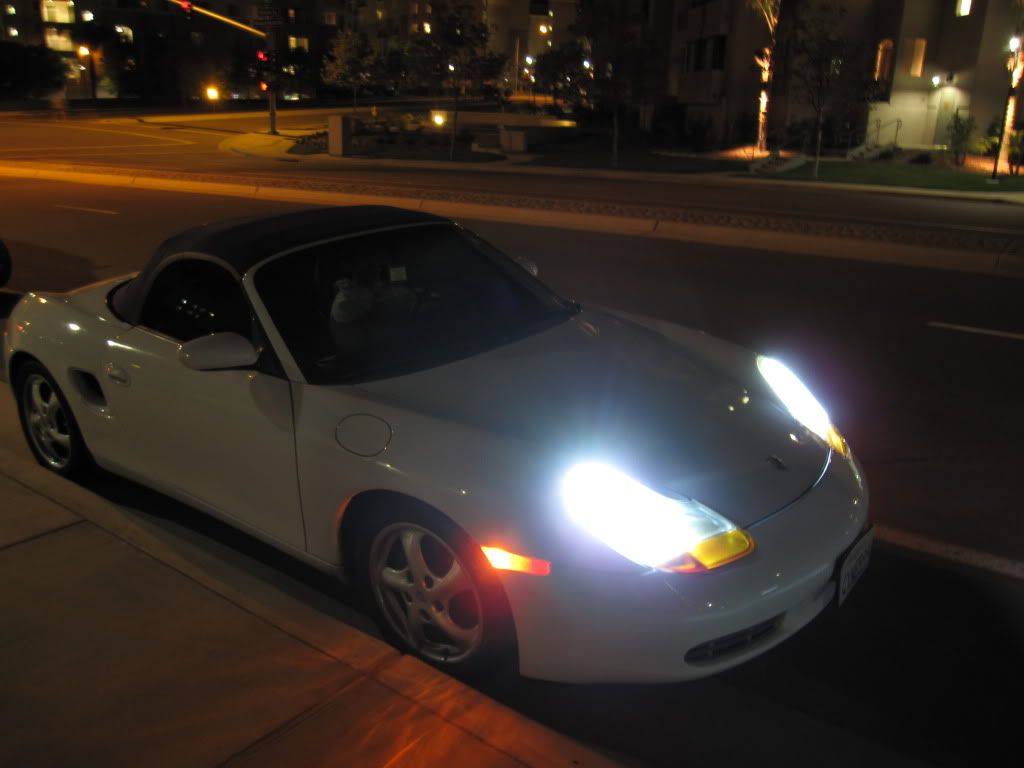
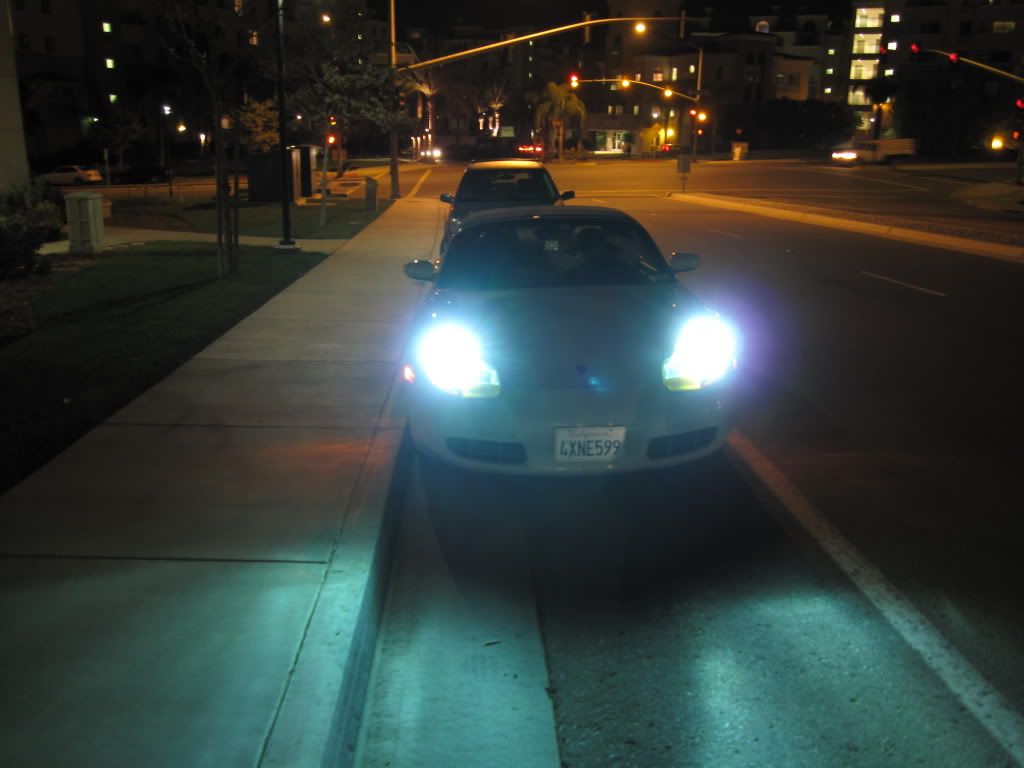
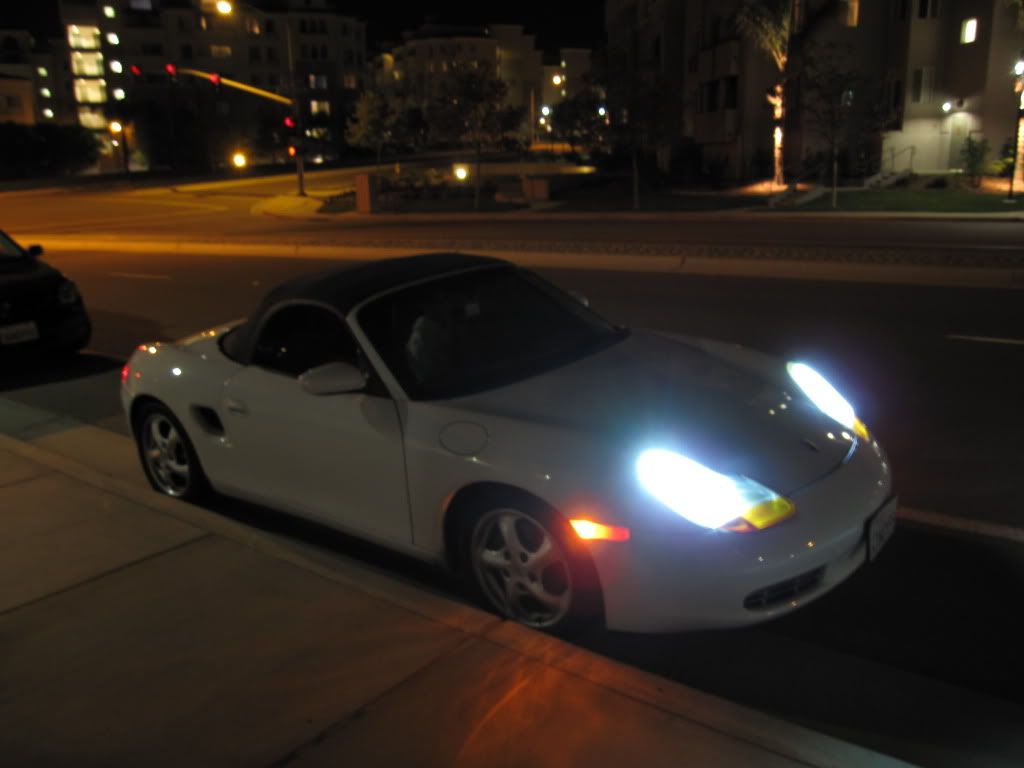
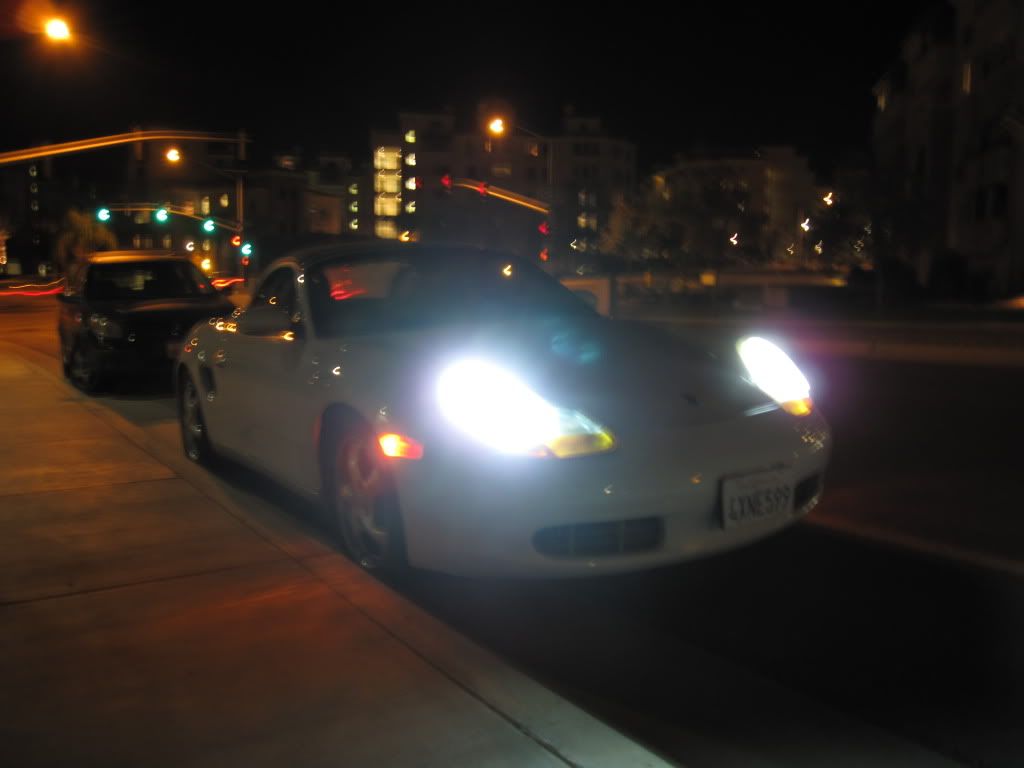
You can tell from some of the pictures that's it's slightly blue from certain angles. It's just all around awesomeness i'm very pleased with it
|
|
|
|
|
08-31-2009, 06:53 AM
|
#14
|
|
Registered User
Join Date: Oct 2007
Location: Dallas, TX
Posts: 295
|
Got mine on order. Should be here by Wednesday! Thanks for the pics! Can't wait! :dance:
__________________
TimAustinW
http://i226.photobucket.com/albums/d...ignature-1.jpg
02 Seal Grey, NHP Headers w/ Highflow Cats/2ndary Bypass Pipes, smoked side markers/3rd brake light, exterior match interior trim, 986 Lloyds Mats, 986 deck lid emblem, arctic silver intake grills, ipod link, painted calipers, Glass Window Robbins Top with defroster kit, Bose Sound System, Leather lower door panels, Console Lid w embroidered crest; Stainless door sills; Painted Bumperettes; Custom Hood Crest
|
|
|
|
|
08-31-2009, 07:11 AM
|
#15
|
|
Registered User
Join Date: Jul 2009
Location: California
Posts: 56
|
Like al83 said you can just shove the ballast and everything into the head light assembly once you get everything hooked up and close the plate behind it. I'll write a diy for it a little later but now gotta get to work. It's really easy to do it only took me a while cause i was making it more difficult than it was. Don't over think it too much it's much easier than you think it will be at least it was that way for me.
|
|
|
|
|
08-31-2009, 11:43 AM
|
#16
|
|
Registered User
Join Date: Jul 2009
Location: California
Posts: 56
|
ok here's a quick step by step
1.) remove the carpeting on the sides of the front trunk. You should see a small round plug looking thing on both sides go ahead and remove that it should pop right out.
2.) there is a small nut driver looking thing in there that you have to use a very small deep socket to turn. I used a 4mm deep socket (regular socket won't worry because the socket is too thick for the small hole) When you turn it, it will pop the entire headlight housing off. This is because there is a small latch looking thing underneath it that pulls the headlight out of the socket that it's attached too.
3.) On the back of the head light there is a cover with a tab ont he top side of it find this and push down and it comes right off.
4.) The bulb that you want to change is the top bulb. There is a little metal clip that holds the bulb in remove this and take the bulb out of the housing.
5.) Once the bulb is removed from the housing you can disconnect the bulb connectors and remove the bulb completely. It's connected to the yellow and brown wires that i believe go to the battery, as a live wire and a ground.
6.) Now take your new bulbs take off the plastic protective casing and put them in the housing of your head lights. You should be able to make the plastic piece that is on the bulb and the housing fit snug. I also put the metal clip back on half of the bulb to make sure that it sits tight.
7.) Now the part that i thought was tricky. You kit comes with a 35w Ballast, you want to connect it all up so that everything is connected together. The only part that you have to connect to the original head light assembly are the red and black wires that go into the former yellow and brown wires that the last bulb was connected to
8.) Then connect the bulb connectors to the ballast connectors male/female to female/male
9.) There is another connector that you connect together as well male/female i think both comes off the ballast but i'm not 100% sure i don't remember. If you connected everything up you're good to go. Make sure that the connections from the bulbs are going to the ballast and that's really all you need.
10.) put everything back and your set.
|
|
|
|
|
08-31-2009, 09:28 PM
|
#17
|
|
Registered User
Join Date: Jan 2008
Location: Triad NC
Posts: 15
|
Yellow Bulbs?
I have litronics in my 2000 S and I put ultra yellow bulbs in my high beam and fog. The high beam gives a Lemans look at night and makes for much better contrast when driving a high speed. I also replaced my front city lights with white LED which look better and last longer than the standard bulbs.
|
|
|
|
|
09-01-2009, 08:16 AM
|
#18
|
|
Registered User
Join Date: Sep 2006
Location: chicago
Posts: 3,510
|
the cheapest HID slim kits can be found on DDM site. (google DDM HID or something like that)
they were 50 bux shipped.
have those on my bike and they are awesome.
__________________
http://i34.tinypic.com/157yslk.jpg
"I couldn't find the sports car of my dreams, so I built it myself." ~F. Porsche
Gemballa springs::litronics::Eurotech 18s(275/225)::B&M::MOMO wheel::
exhaust cutouts::EVOcoldair intake::OEM smoked tails & sidemarkers::
colormatched bumperettes::Top Speed Pro-1 exhaust::
my cardomain/pictures page
|
|
|
|
|
09-04-2009, 08:10 AM
|
#19
|
|
Registered User
Join Date: Oct 2007
Location: Dallas, TX
Posts: 295
|
Thanks for the write up BigBorian! I'm installing mine today!
__________________
TimAustinW
http://i226.photobucket.com/albums/d...ignature-1.jpg
02 Seal Grey, NHP Headers w/ Highflow Cats/2ndary Bypass Pipes, smoked side markers/3rd brake light, exterior match interior trim, 986 Lloyds Mats, 986 deck lid emblem, arctic silver intake grills, ipod link, painted calipers, Glass Window Robbins Top with defroster kit, Bose Sound System, Leather lower door panels, Console Lid w embroidered crest; Stainless door sills; Painted Bumperettes; Custom Hood Crest
|
|
|
|
|
09-04-2009, 11:08 AM
|
#20
|
|
Registered User
Join Date: Oct 2007
Location: Dallas, TX
Posts: 295
|
Wow! What an amazing difference. Best cheap mod I've done to my boxster. :dance:
__________________
TimAustinW
http://i226.photobucket.com/albums/d...ignature-1.jpg
02 Seal Grey, NHP Headers w/ Highflow Cats/2ndary Bypass Pipes, smoked side markers/3rd brake light, exterior match interior trim, 986 Lloyds Mats, 986 deck lid emblem, arctic silver intake grills, ipod link, painted calipers, Glass Window Robbins Top with defroster kit, Bose Sound System, Leather lower door panels, Console Lid w embroidered crest; Stainless door sills; Painted Bumperettes; Custom Hood Crest
|
|
|
|
 Posting Rules
|
You may not post new threads
You may not post replies
You may not post attachments
You may not edit your posts
HTML code is On
|
|
|
All times are GMT -8. The time now is 12:24 AM.
| |


 Linear Mode


