Over the weekend I replaced my coolant tank in my 1999 Boxster as it has been leaking for a while. I learned a few things in the process and wanted to share a slightly alternate way of doing the job.
Before tackling the replacement I reviewed the multiple how-to instructions on the various forums and websites. The consensus I took away was disconnecting the hoses from engine side of the manifold was a pain in the rear. Most of what I have read instructs to unfasten the tank and the manifold and pull it into the trunk as far as possible to access the hose clamps. I started with this approach.
I removed the carpet in the trunk, sucked all the coolant out of the tank and removed the parts from the tank. I then disconnected the oil fill tube from the engine side of the manifold. I had recently replaced the tube and changed the spring clamp to a worm drive clamp. I figured it was easy to unhook and it one less thing to try and pull into the trunk.
I unfastened the tank and manifold and pulled it as far as possible into the trunk. I could only get it into the trunk by about an inch. The manifold barely cleared the attachment studs. I was able to pull off the bottom hose as that one has no clamp. I messed around with the other clamps using different pliers and could squeeze them a bit, but I had no room to slide them forward and off the manifold nipple. Being frustrated and getting nowhere I decided to try and disconnect things from the engine compartment.
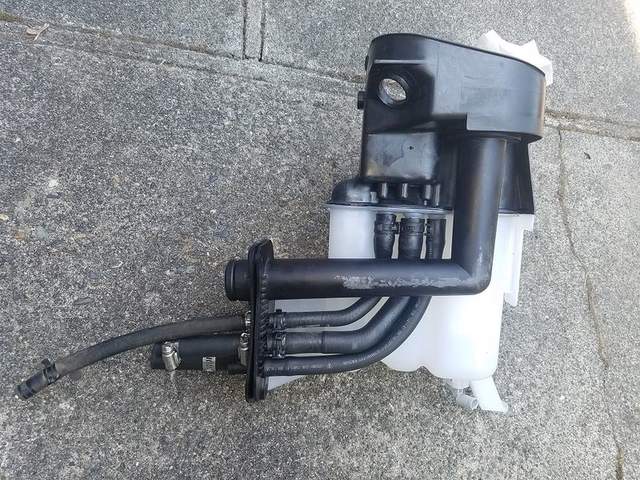
From the engine compartment you can barely touch the manifold/tank outlet and their clamps. Seeing them or getting a remote spring clamp tool on the clamps is near impossible. Knowing how difficult it was to get my remote tool on the oil fill spring clamp I decided to try and disconnect the short rubber hoses that attach to the manifold and the hard metal lines. See attached parts diagram #6 & #23 highlighted in red.
For this approach I started by removing the oil fill tube. With it out of the way you have some room to work and you can actually see the rubber hose to metal tube connections. I was able to remove the clamp on the hose from then middle nipple on the manifold with my remote tool. I then did the clamp for the hose from the tank outlet with a pair of needle nose vice grips. The upper hose from the manifold is really long and has a small clamp that easily can be reached with a pair of pliers. See parts diagram #17 highlighted in red above.
The tank and the hoses are easily pulled into the trunk. I will warn you that about 1 cup of coolant will spill out on the ground with the above method.
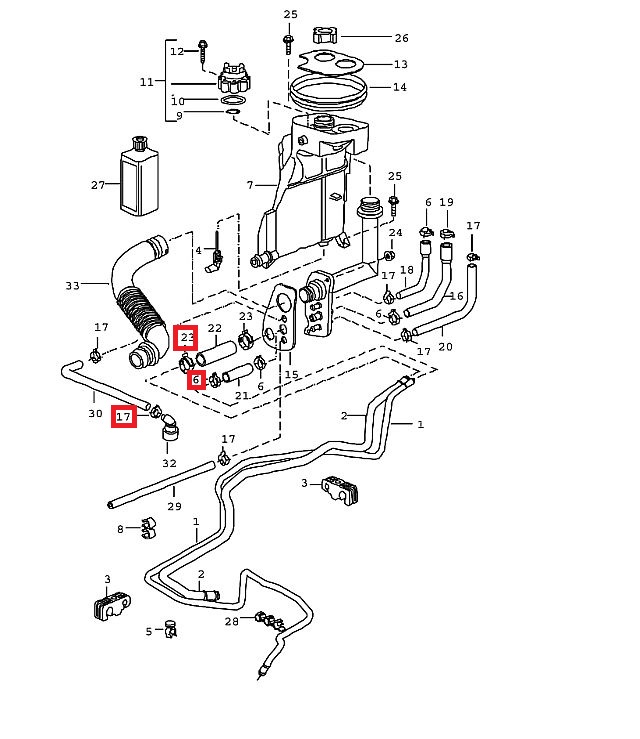
On to the installation. Hook up your new tank to the manifold on the trunk side. Attach all of your hoses to the engine side of the manifold. See pictures. You could also hook up your oil fill tube at this time, but I did not.
With the tank like this you can now feed the hoses through the trunk bulkhead and loose attach the manifold to the two studs. Dont fully tighten them down because it makes it hard to get the hoses started on the metal lines. Go into the engine compartment and reconnect your hoses. I used a small 2-3 inch long ratchet to tighten hose clamps at the metal tube connections.
You can see in the attached pictures I swapped my spring clamps for worm drive clamps. I did the manifold side just because. Maybe the next tank replacement (Hopefully Not) they can be accessed via the trunk?