Go Back   986 Forum - The Community for Porsche Boxster & Cayman Owners > Porsche Boxster & Cayman Forums > Show and Tell Gallery

Post Reply
 
LinkBack Thread Tools Display Modes
Old 12-23-2015, 11:13 PM   #1
Registered User
 
Join Date: Sep 2014
Location: Canada
Posts: 94
The Listening Tests

When selecting the component speakers, I first turned to Google and found the #1 rated speakers were the Hertz HSK165XL, so I found where they were sold and went for a listen.

I first listened to their top-of-the-line speakers, the Mille MLK2TW components that retailed for $1400, but at the time was on sale for $800. They were horrible. No musicality and extremely harsh. Cars with these types of speakers are what I like to call Torture Chambers.

Next were the HSK165XL. These were much better than the Milles, but I still found them overly harsh to my ears. These were $500 at that time.

The next speakers at $400 were the HSK165 (without the XL) and these were much better. It had the same dynamic punch as the XLs but a much more natural and smooth presentation, and very balanced. I briefly compared these to the Alpine R series component speakers and there was no comparison. The Alpines weren't even in the same class. They also had a cheaper Hertz component set from their Dieci line for $200. There was a notable drop in quality. These sounded cheap, hollow, but inoffensive, similar to what you would find with typical component speakers in factory systems. So I decided to go with the HSK165.

I also decided to replace the dash speakers like so many others have done. These would only be used for top fill only, so I didn't want to spend a lot of money. I compared the Alpine SPS410 with the Hertz Dieci DCX1003. They were both awful, but the Hertz had a more natural sound so that's what I picked. The Alpines had peaky highs and mid-bass, typical of many coaxial speakers, sounding like you had already hit the "loudness" button on the receiver.
newBgeek is online now   Reply With Quote
Old 12-23-2015, 11:25 PM   #2
Registered User
 
Join Date: Sep 2014
Location: Canada
Posts: 94
Speaker Installation

I initially thought about creating a custom sub box in the space used by the rear storage cabinet, but after examining the space, I realized I'm never going to get a decent sub in that tiny space. Any space saving sub, even the factory Bose sub, is going to be a compromise. So I decided the best way to get decent base is to use the existing sub enclosures in the doors, but replacing the drivers with the ones from the component set. While plastic isn't the ideal enclosure material, there was no other way to get a decent sized enclosure in such a tight space.


Here is a comparison of the existing door sub, and the speaker that will replace it.

There are other threads which detail the modification the existing door enclosures, so I won't get into the details. I used 3/4" MDF to create the baffles. These baffles will be screwed into the enclosure since I don't trust any glue to withstand the constant pounding of such a large magnet. They are shaped to be as large a possible, while still fitting inside the door panels.


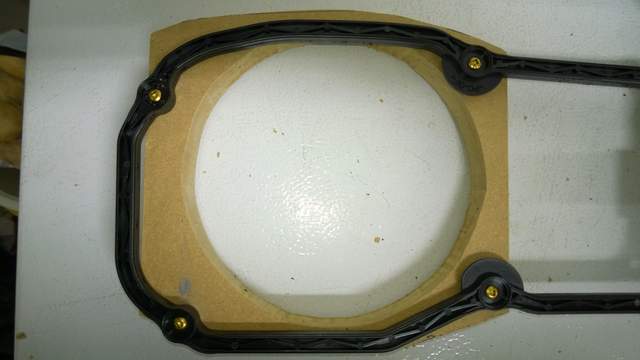
I used the trim piece as a template for the screw holes.


Here is a photo of the attached baffle, with plenty of Goop to ensure that it is airtight.


Here is the right-side enclosure with the wiring connector attached. I just pulled it from the front and re-drilled another hole in the side. This allows me to snap the connector back into the existing socket in the door. I used the existing wiring in the doors after I realized it is virtually impossible to run a new wire in the existing door harness without pulling out the door and harness, which would have been too much work.


Here is the finished right-side speaker enclosure installed. Note that the trim ring, which is not shown here, is used to dampen the sub enclosure. Since the baffle used up 4 of the screw holes, I cut the trim ring and attached the last 2 remaining screws to get at least some dampening.

I was a little worried that I wouldn't be able to fit the tweeter in the driver's side kick panel due to the fuse box location, but it actually doesn't get in the way. You do need to cut into the door a bit, but the space behind is empty. This was cut with a hole saw with the kick panel out of the car, but the fuse door still attached.


I used a dremel tool to slowly expand the hole until the tweeter just snapped in. The fuse door can still be removed easily without the tweeter popping out.


Here are the finished driver's side speakers.


The passenger side kick-panel didn't come out as easily, so I just pulled it back and cut the hole in-place, putting a piece of wood behind to ensure I don't drill into the wiring harness behind the panel.

Dash speakers are one of the worst locations for speakers, because the back waves reverberate through the dash producing virtually 100% harmonic distortion.


I attempted to dampen the back waves by cutting up some old T-shirts and stuffing them around the dash speakers.

Last edited by newBgeek; 12-23-2015 at 11:39 PM.
newBgeek is online now   Reply With Quote
Old 12-23-2015, 11:28 PM   #3
Registered User
 
Join Date: Sep 2014
Location: Canada
Posts: 94
Amp and Head-Unit Selection

I chose the Alpine MRV-F300 4-channel amp for it's flexible configurations and small size, so that it will fit beside the existing factory amp. My plan was to bridge the Alpine to power the component set at 150W per channel, and use the factory amp at 40W per channel to power the dash speakers.

While there are slight differences in sound quality between different amplifiers, I personally wouldn't worry about it, just buy a quality brand and as much power as you can afford while still fitting in the space that you have available. And avoid buying amps that are designed for subwoofers to drive your component speakers.

For the head-unit, I chose the Pioneer DEH-X8700BS for it's ability to play FLAC files and HD radio. Call me old school, but I still wanted a CD player as well. I also like how quickly Pioneer seems to connect to Bluetooth devices.


Here is the wiring run for the RCA cables and speaker wires for the tweeters, into the very convenient grommet behind the battery, all nicely loomed.


Here is the finished install of the amp and crossovers. I pulled the door wires from the factory amp harness using suitable sized drill bits to push the pins out and wired the door speakers up front. The tweeter speaker wires were sent to the cabin in the loom. I used a dremel to open up some space to sneak the wiring through the plastic case behind the spare tire, and up through another grommet behind the amp where there is a convenient grounding bolt for the amp ground. I used some left-over 8-gauge power wire from my car audio days to wire the power for the amp and a 40-amp in-line fuse that is connected close to the battery.

With the spare tire in place, there is zero loss of storage space, and no lost space in the passenger compartment. So there is no compromise in driving pleasure or usability.

Last edited by newBgeek; 12-23-2015 at 11:45 PM.
newBgeek is online now   Reply With Quote
Old 12-23-2015, 11:31 PM   #4
Registered User
 
Join Date: Sep 2014
Location: Canada
Posts: 94
Listening Tests

I hooked up the amp and head unit first and did some preliminary listening as I was replacing the speakers.


The factory dash speakers, I would classify as junk. Comparing those with the replacement, there was a huge improvement. I can certainly understand how most people would be pleased with replacing the dash speakers. There is finally some bass where there was none before and much clearer highs. However, in hindsight, the dash speakers were a totally unnecessary step as they are trounced by the component speakers and add very little to the overall sound quality of the final product.

In comparing the door speakers, which are just a subwoofer in the stock system, I was stunned at just how good they really are with proper power delivery and matched with the component tweeters and component crossovers. I believe it is due to the large voice coil and magnet for the small size of the speaker, and that they were specifically designed for that enclosure. They are 2 ohm speakers, which will draw a little more power from the amp, but modern amps should handle them with no problem. The sound was a bit shallow in the upper bass, but punchier in the lower bass. However, at this point I had already converted one side so I was committed to do the other. The component woofers from the kit are very good as well, not as punchy in the lower bass as the factory subwoofer, but have a much broader sound. Anyone who wants the most bang-for-buck might consider only the HT25 tweeters and component crossovers that came in the kit and save themselves a bunch of work by not replacing the subwoofers.

Overall, the final product has met with my expectations. The bass is very good for a system without a true subwoofer. Playing DJ Magic Mike's Ultimate Subwoofer Test won't rattle the windows, but you will feel it in your chest, and it will find anything that vibrates in your car. The drum beats from Fanfare for the Common Man from the IASCA test CD are very powerful and very convincing.

The tweeters are wonderful, and I don't heap praise lightly. They are among the best that I have heard. Very clear, bright, detailed, and without a trace of sibilance. Female vocals really come to life. The trumpet attacks on John Williams Duel of the Fates is spot on and will have you grinning. You will be searching your music collection for high quality recordings.

Regardless of the genre of music that you enjoy, jamming to Stevie Ray, Country, or Classical, a system that is musically accurate will be able to play it back as the producers intended. It's not that hard or expensive. It just takes some very careful planning and your Boxster can have the sound quality that is as luxurious as the brand deserves.
newBgeek is online now   Reply With Quote
Post Reply


Posting Rules
You may not post new threads
You may not post replies
You may not post attachments
You may not edit your posts

BB code is On
Smilies are On
[IMG] code is On
HTML code is Off
Trackbacks are On
Pingbacks are On
Refbacks are On


All times are GMT -8. The time now is 04:17 PM.


Powered by vBulletin® Version 3.8.7
Copyright ©2000 - 2025, vBulletin Solutions, Inc.
Content Relevant URLs by vBSEO 3.6.0
Copyright 2025 Pelican Parts, LLC - Posts may be archived for display on the Pelican Parts Website -    DMCA Registered Agent Contact Page