 11-01-2008, 07:42 AM
|
#1
|
|
Registered User
Join Date: Oct 2008
Location: Beverley East Yorkshire UK
Posts: 302
|
 Help required with interior trim!
Hi,
This is my first post and am hoping someone can help!After buying some silver interior trim there is one of the items I am having trouble with,its the three strips that run across the dash I have looked for screws, pulled the edges even had a little poke with an electrical screwdriver!but to no avail I don't want to damage anything so have stopped trying for now. I would be very grateful for any pointers as the new pieces are starting to gather dust in my garage,
fingers crossed.
|

|

|
|
11-01-2008, 11:54 AM
|
#2
|
|
Registered User
Join Date: Dec 2006
Location: Chicago
Posts: 291
|
I believe they are held in by screws that are screwed in from the back. It takes a contortionist to get them out if you want them intact.
|
|
|
|
|
11-01-2008, 02:07 PM
|
#3
|
|
Registered User
Join Date: Oct 2008
Location: Beverley East Yorkshire UK
Posts: 302
|
Thanks for that info Shaman I will stop trying to force them off now and ask for the assistance of my wife (small hands slim wrists)
|
|
|
|
|
11-02-2008, 06:25 AM
|
#4
|
|
Registered User
Join Date: Feb 2008
Location: San Diego, CA
Posts: 88
|
The only method of removing those 3 strips would be to remove the entire dash from the car.
|
|
|
|
|
11-02-2008, 10:30 AM
|
#5
|
|
Registered User
Join Date: Oct 2008
Location: Beverley East Yorkshire UK
Posts: 302
|
Are you sure about that Rareair ? the gent I bought them from had them removed to have carbon fiber items fitted by a guy that looks after his car,he told me it took no more then a couple of hours but did not see how it was done,the strips are un marked so I don't believe they where forced off but I can't see the dash been removed in that time.
Do you have first hand experience of this mod? 
|
|
|
|
|
11-02-2008, 10:43 AM
|
#6
|
|
Registered User
Join Date: Dec 2006
Location: Chicago
Posts: 291
|
Looks like the two small pieces can be popped off. The longer one is held in by screws. Check out this thread.
|
|
|
|
|
11-02-2008, 11:05 AM
|
#7
|
|
Registered User
Join Date: Oct 2008
Location: Beverley East Yorkshire UK
Posts: 302
|
Cheers Shaman,I will have to register to check out that thread as I am not a member yet,might even go into my garage now and have a go at the small pieces again.
|
|
|
|
|
11-02-2008, 01:13 PM
|
#8
|
|
Registered User
Join Date: Dec 2005
Location: South Riding, VA
Posts: 322
|
The 3 strips are held by a total of 11 screws. I recently removed my dash for another project and painted these while everything was apart.
That renntech link posted by shaman1204 has several different ways to remove the strips- very informative. Also, well worth a small donation for access to fault codes, TSBs and the retail Porsche parts price database.
One idea that I didn't see was to remove the passenger side airbag to get at the screws. To do this you disconnect the battery, remove the foam liner above the footwell, remove the AC/heater duct (it just pulls out), remove the electrical connector to the airbag (make sure you wait a few minutes after disconnecting the battery), from under the dash remove two bolts and the airbag can be pulled out. You should be able to get to most of the screws for the long strip.
Good luck,
mike
|
|
|
|
|
11-02-2008, 01:34 PM
|
#9
|
|
Registered User
Join Date: Oct 2008
Location: Beverley East Yorkshire UK
Posts: 302
|
Thanks Mike that sounds much more like my kind of D.I.Y.
Thanks to all you guys,very very helpfull. 
|
|
|
|
|
11-02-2008, 01:47 PM
|
#10
|
|
www.klisstle.com
Join Date: Sep 2004
Location: Charlotte, NC
Posts: 926
|
I replaced the three strips on my car in a couple of hours. It was a lot easier for me because I removed the vents on each end of the dash to install new ones, and had the center dash assembly and the instrument pod out to do some mods. This made access to the two smaller strips very easy.
The longest strip was a bigger pain for me. Like derb describes I removed the passenger airbag to help get access to the screws. I don't remember all of the details, but I believe I broke the long strip out of frustration before removing the airbag. It didn't matter much because I wasn't reusing the old strips.
Take your time and many breaks if you get frustrated. It will look great when you are done.
Best of luck and post some pictures when finished.
ddb
|
|
|
|
|
11-03-2008, 10:55 AM
|
#11
|
|
Registered User
Join Date: Oct 2008
Location: Beverley East Yorkshire UK
Posts: 302
|
Will definately post some before and after pictures ddb, but don't hold your breath!
Saw some of your Boxsters pics on show and tell, its a very clean machine never seen a white 986 in the UK it suits it well.
|
|
|
|
|
11-07-2008, 12:11 PM
|
#12
|
|
Registered User
Join Date: Oct 2008
Location: Beverley East Yorkshire UK
Posts: 302
|
pulled the instrument pod out this afternoon as the bulb behind the clock had blown, while I had it in bits I decided to upgrade with blue neons too (gave it a good clean inside as well) anyway with my head upsidedown in the footwell and a flexy spring shafted driver I managed to remove the screws on both the short pieces I even used the screws to fix the silver ones back on!
Just the long strip to do now,so time permitting tomorrow airbag out and job done. 
|
|
|
|
|
11-08-2008, 10:25 AM
|
#13
|
|
Registered User
Join Date: Oct 2008
Location: Beverley East Yorkshire UK
Posts: 302
|
All done! thanks for all the input.
Finished the job today,took the foam padding and side vent tube out and was suprised to see that all the screws for the long trim where visible,no need to take out the airbag(maybe because of UK spec?)took lots of pics during and after installation if anyone is interested I will try and post them.
Thanks for everyones advice, I think thats what gave me the confidence to tackle it in the end!
|
|
|
|
|
11-08-2008, 02:00 PM
|
#14
|
|
www.klisstle.com
Join Date: Sep 2004
Location: Charlotte, NC
Posts: 926
|
Christian,
Glad to hear you were successful!
I believe removing the airbag would have allowed you to gain access to the screws sitting in the passenger seat versus reaching them from underneath the dash. The important thing is you were able to get to them.
I would love to see some interior and exterior pictures of your car.
Thanks,
ddb
|
|
|
|
|
11-09-2008, 03:48 AM
|
#15
|
|
Registered User
Join Date: Oct 2008
Location: Beverley East Yorkshire UK
Posts: 302
|
I'm sure it would have been far easier sat in the passenger seat and removing the screws, then my legs over the roll bar, arms above my head and head pushed into the footwell !!(I will do that next time!)will post interior pics as soon as my son shows me how to do it!the quality may not be too great as I used my N95(it was in the car at the time)I will be posting some exterior shots on show and tell when I can get out and take some as the weather is pretty crappy at the moment rain,rain and more rain.I must warn you the colour of my car does get some negative comments from the general public over here as it is peppermint green (same as the 964RS colour) but I love it and it is the original special factory option.It would be a dull world if all Boxsters where silver or dark blue!
Catch you later ddb
And thanks for your interest.
|
|
|
|
|
03-18-2009, 07:24 PM
|
#16
|
|
Registered User
Join Date: Sep 2006
Location: California
Posts: 713
|
Quote:
|
Originally Posted by Christian H
I'm sure it would have been far easier sat in the passenger seat and removing the screws, then my legs over the roll bar, arms above my head and head pushed into the footwell !!(I will do that next time!)will post interior pics as soon as my son shows me how to do it!the quality may not be too great as I used my N95(it was in the car at the time)I will be posting some exterior shots on show and tell when I can get out and take some as the weather is pretty crappy at the moment rain,rain and more rain.I must warn you the colour of my car does get some negative comments from the general public over here as it is peppermint green (same as the 964RS colour) but I love it and it is the original special factory option.It would be a dull world if all Boxsters where silver or dark blue!
Catch you later ddb
And thanks for your interest.
|
Hi, would you be able to post some pictures please? I'm interested in doing this mod!
__________________
http://farm4.static.flickr.com/3420/...90927559_o.jpg
Some stuff for sale: M030 S 24mm front sway bar, M030 base 19.6mm rear sway bar, 996 GT3 OEM Porsche Motorsport front strut mounts monoball "camber plates"
WTB: looking for some 5-7mm spacers with extended bolts
|
|
|
|
|
03-19-2009, 12:30 PM
|
#17
|
|
Registered User
Join Date: Oct 2008
Location: Beverley East Yorkshire UK
Posts: 302
|
Quote:
|
Originally Posted by chaudanova
Hi, would you be able to post some pictures please? I'm interested in doing this mod!
|
I'll see what pictures I can find and post them over the weekend,since this first post I have actually changed them again from silver to exterior body colour, the second time took less then an hour from start to finish,this mod was a lot less daunting then I first thought.
|
|
|
|
|
03-19-2009, 05:30 PM
|
#18
|
|
www.klisstle.com
Join Date: Sep 2004
Location: Charlotte, NC
Posts: 926
|
chaudanova,
I was so focused on the task when I installed the horizontal strips (and some other parts) I didn't even think to take any pictures, sorry.
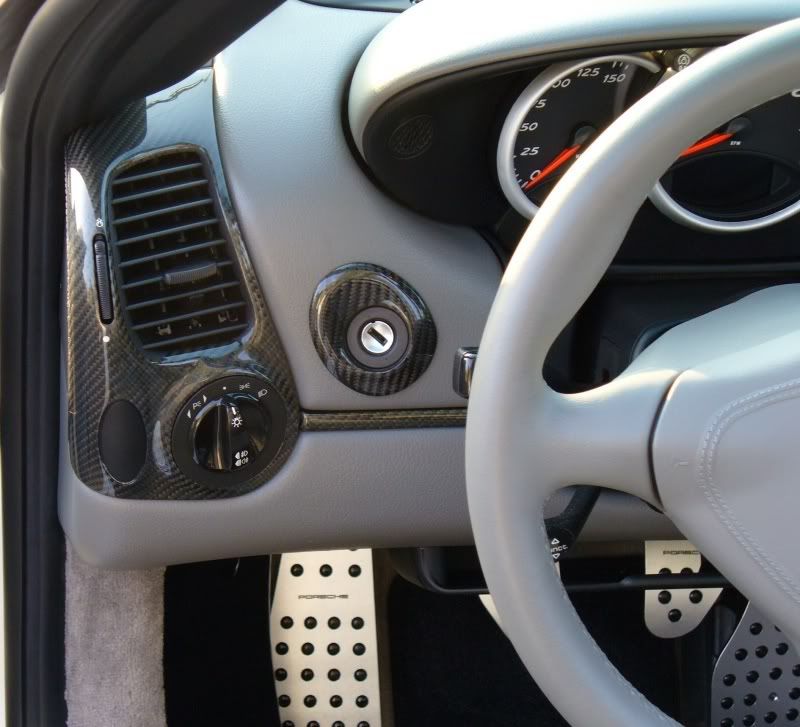
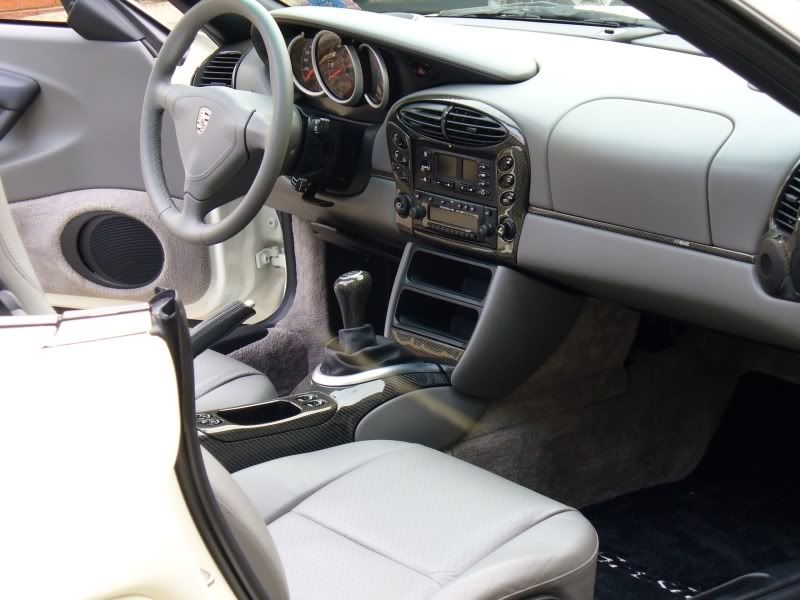
Here are a few pictures of my interior.
ddb


|
|
|
|
|
03-20-2009, 05:37 AM
|
#19
|
|
Registered User
Join Date: Oct 2008
Location: Beverley East Yorkshire UK
Posts: 302
|
Quote:
|
Originally Posted by chaudanova
Hi, would you be able to post some pictures please? I'm interested in doing this mod!
|
Could not find any pictures from when I changed the trims over, but I took these pictures today to give you a good idea of how to tackle the mod,there may be slight differences between left and right hand drive cars and maybe the age of car but I would assume they should all be very similar.
These are the silver trims that I removed,they show the screw holes and clips on the rear
Firstly remove the foam cover under the dash,this is held with two plastic screws
Next pull the air vent tube down(squeezing it together at the same time helps)
This will allow access to the torx screws
The weapons of choice,flexy driver and hand light.
Seven torx screws in total(size T10) on the passenger trim,the silver item in the picture is the air bag(there are two screws on each of the drivers side trims)
Then its just a case of undoing all the screws,as ddb stated take your time and take breaks if you get fustrated its well worth it.
The drivers side is the same set up with two screws in each,if you need help send me a pm.
Last edited by Christian H; 11-17-2017 at 02:55 PM.
|
|
|
|
|
04-23-2010, 11:49 AM
|
#20
|
|
Registered User
Join Date: Oct 2008
Location: Beverley East Yorkshire UK
Posts: 302
|
Last edited by Christian H; 08-10-2010 at 12:22 PM.
|
|
|
|
 Posting Rules
|
You may not post new threads
You may not post replies
You may not post attachments
You may not edit your posts
HTML code is On
|
|
|
All times are GMT -8. The time now is 06:10 AM.
| |


 Peppermint piglet
 0
0 


 Linear Mode


