Go Back   986 Forum - The Community for Porsche Boxster & Cayman Owners > Off Topic > Off Topic Discussions

Post Reply
 
LinkBack Thread Tools Display Modes
Old 05-08-2020, 06:16 PM   #1
Registered User
 
husker boxster's Avatar
 
Join Date: Sep 2006
Location: Omaha
Posts: 2,947
Wheels
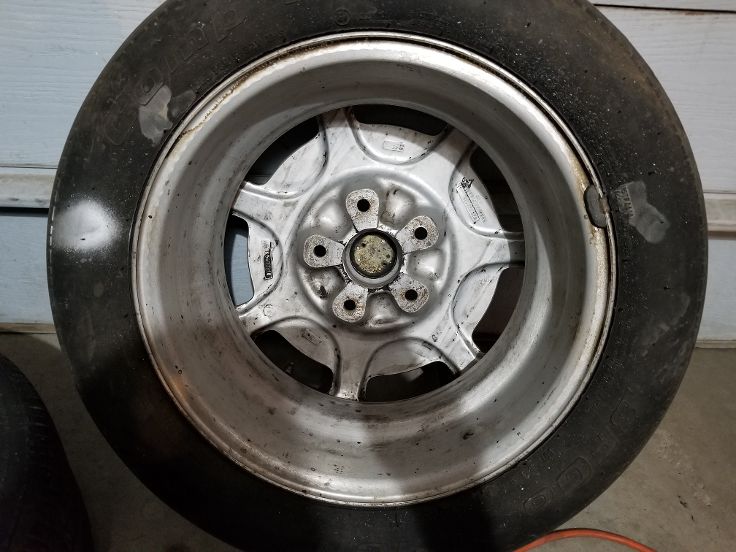
Nothing I tried would dissolve the paint on the inside of the wheels, so I got the 800 grit sand paper out and finished the other three wheels. They now all look like this.


Sunroof
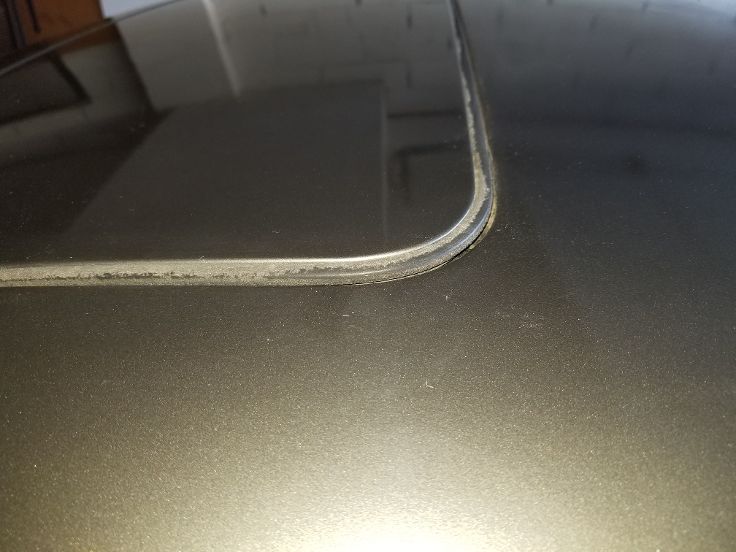
Moved on to the sunroof. When pushing the button, you would hear things trying to happen, but the sunroof wouldn't move. As you can see here, the sunroof was a tad high on the left rear and seemed to be poking on something about an inch from the rear. The sunroof was loose on the right side.


I pulled the cover off the sunroof motor / trans area. I removed the motor and tried running it via the switch. It worked fwd and back. Then removed the trans and connected it to the motor. The trans worked when I did the switch. So the sunroof mechanism is bunged up. 928s are supposed to come with a sunroof wrench which is used to manually open and close the sunroof, but this is one of a very few items that's missing with my car. However, I have a friend in our club who has an 87 S4 5spd and he was wanting to give it some exercise and see my S4 (we live approx 50 mi apart). He brought his sunroof wrench with him. I replaced the trans and inserted the wrench, turned it while my friend pushed down on the sunroof. It moved! With a little work, we got it all the way open.


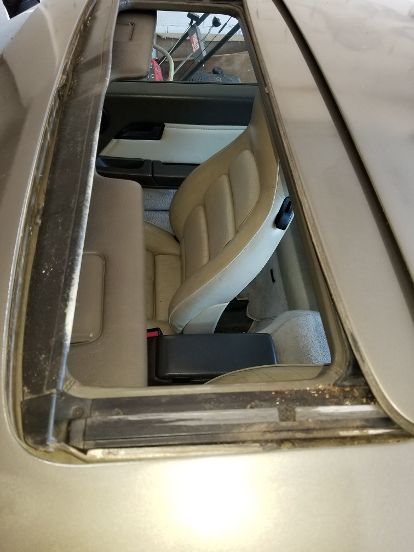
It will take a bit of work to clean the tracks, but getting it open was progress. And all the mechanical / electrical parts work.

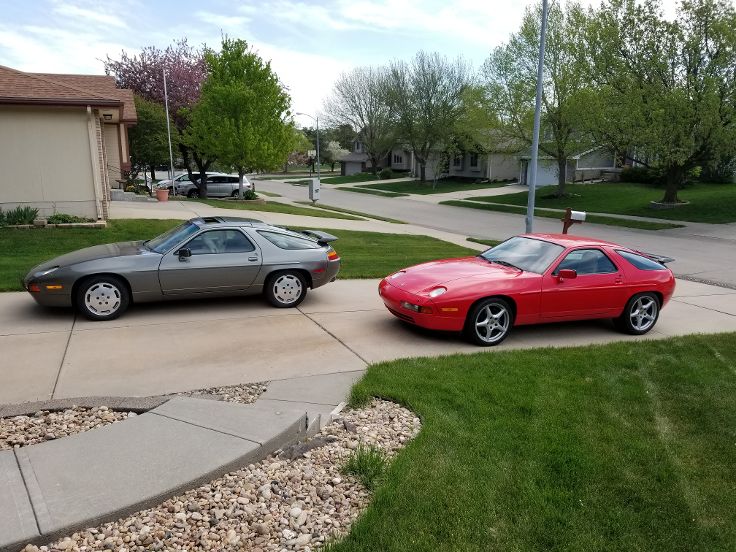
Here's a pic of my friend's 928. It's very nice.


Trans Fluid
Time to move to the automatic trans flush. I put the Mistress up on ramps to give me plenty of room to maneuver under her. Once I got her up in the air, I found 2 problems:


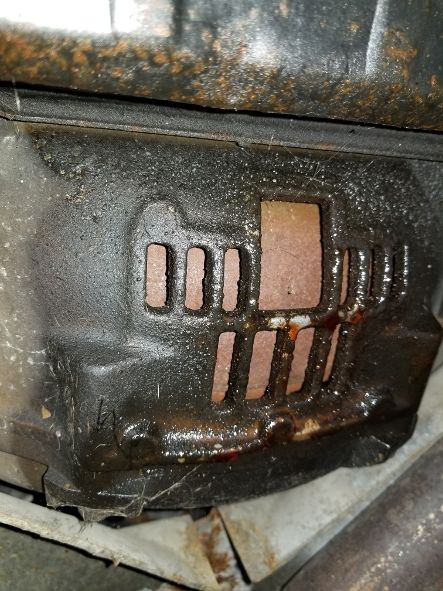
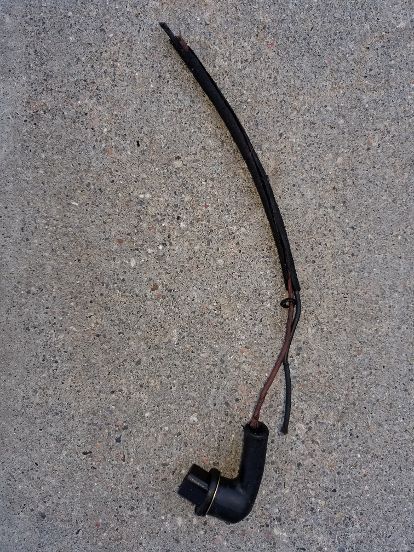
Problem 1 is an electrical line that was broken in 2 places. I'd seen this line hanging down before, but now was the time to address it. Discovered that it's the line for the trans kick-down (dropping to a lower gear when you step on it and it evidently also changes the timing). Problem 2 is apparently the seal in the front of the trans that was leaking. That's not good. Will have to think about this one. Here's what the kick-down line looks like when removed.


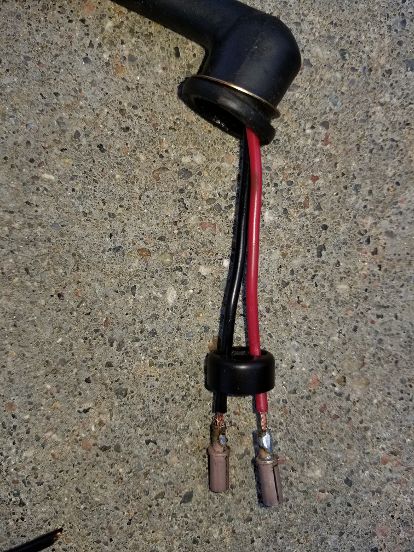
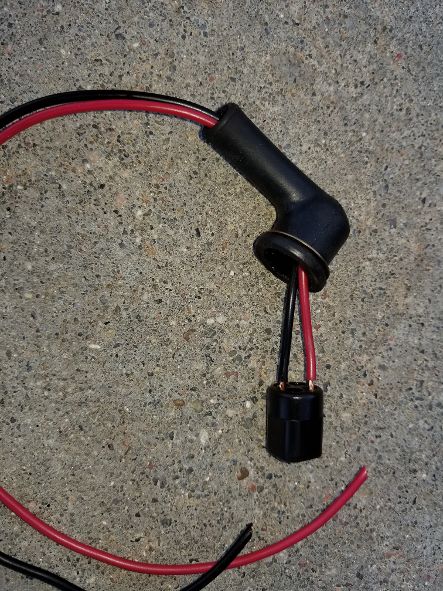
The end of the wires wasn't a big deal, but the broken wires by the rubber elbow cover was going to be a problem. My plan was to splice some new wires inside the cover. I moved the elbow away from the connector and discovered the connector came apart with screws and revealed two female ends with wires soldered into them. I unsoldered the wires and soldered 2 new wires into them. Put it back together and it was good as new. All I have to do is splice it to the existing wires.


I decided to move ahead with flushing the fluid. Addressing the seal will mean removing the trans. I'm not ready to tackle that job. Maybe the seal will expand after driving a bit?

I'm at my max for pics in this post so I'll continue in a 2nd post.
__________________
GPRPCA Chief Driving Instructor
2008 Boxster S Limited Edition #005
2008 Cayman S Sport - Signal Green
1989 928 S4 5 spd - black

Last edited by husker boxster; 05-08-2020 at 07:56 PM.
husker boxster is offline   Reply With Quote
Old 05-08-2020, 07:23 PM   #2
Registered User
 
husker boxster's Avatar
 
Join Date: Sep 2006
Location: Omaha
Posts: 2,947
Trans Fluid pt II
I pulled the drain plug on the trans, then removed the pan. The torque converter also has a drain plug. I thought the torque converter would be inside the trans pan area but it's separate. In fact, the area where the leak is is where the TC is located.


You rotate the flywheel until the TC drain plug appears in the open area of the grates. After about 20 min of going under the front of the engine to rotate the flywheel and then crawling under the center of the car to look at the trans and not finding the drain plug, I asked my neighbor to watch for the drain plug while I turned the flywheel. It took a quarter turn for it to appear. I thanked my neighbor for his help.

I drained the torque converter and let the trans drip overnight. The existing fluid didn't look too bad - had a nice red look to it. The old filter didn't look very dirty either. The next day I cleaned up the parts, put the new pan gasket on the pan, and put everything back together, including a new filter.


Now for the hard part - refilling the trans. Porsche in their infinite wisdom put the reservoir next to the trans and also next to a muffler. And unlike a normal car, there isn't an easy way to access the reservoir unless you crawl under the car. To fill it, you have to remove the reservoir cap, fill the trans, start the car and let the torque converter fill, add more fluid, then run the car thru each gear, fill again, and then put the cap on before shutting the engine off. If you shut the engine off before putting the cap on, fluid will gush out. However, the cap is at an odd angle and tough to put on under ideal conditions, but you'll be dealing with a hot trans and an even hotter muffler. I wasn't looking forward to that and procrastinated a few days.

I posted on RL to see if there was another way. Turns out there is. Porsche put a 90 deg port on the trans with a check valve.


With the proper attachment, you can connect a hose to the port and push the trans fluid in. But I don't have the proper attachment. Someone said you could attach a hose with a clamp. It just so happens the tube I used to fill the trans on my Cayman fit nicely on the port. I put a small hose clamp on it. Would the fluid push the check valve open or would it squirt out the end of the hose? I'd just purchased a giant syringe from Pelican and it came with 2 lines - a solid and a flexible line.


The solid line fit right inside my trans tube, so I attached it to the hose with a hose clamp. I put the flexible line into the gallon of trans fluid (it requires 2 gallons). I'd connect to the flexible line, draw a syringe full of fluid, then attach it to the fill hose. First try worked like a charm - no spilled fluid and the check valve opened. It all went in the trans. I pumped the 1st gallon into the trans. That filled the reservoir to a good level.


Time to start the engine, which sucked a bunch of fluid into the torque converter. Put 2 more quarts in after starting the engine. Ran her thru the gears. Put another quart in and ran it thru the gears again. Put another quart in. Shut the engine off. The reservoir was at the proper level and didn't leak.


While the engine was running, I checked for gas leaks. No leaks around the injectors and the fuel pump was dry too.

I planned on replacing the high pressure power steering hose while she's on the ramps. Should be simple - a banjo bolt on ea end of the hose. But I did some research and found you have to remove the alternator to get to the front bolt of the hose. And to remove the alternator, you have to unbolt the fan shroud and move it up so 1 of the alternator bolts can be removed. To get to the rear hose bolt, you have to remove the sway bar hold down and let the sway bar swing down. I might sleep on that job (for a few days).

Next up are the plug wires and the last fuel line replacement.
__________________
GPRPCA Chief Driving Instructor
2008 Boxster S Limited Edition #005
2008 Cayman S Sport - Signal Green
1989 928 S4 5 spd - black

Last edited by husker boxster; 05-09-2020 at 05:32 AM.
husker boxster is offline   Reply With Quote
Old 05-17-2020, 08:08 PM   #3
Registered User
 
husker boxster's Avatar
 
Join Date: Sep 2006
Location: Omaha
Posts: 2,947
Steering Wheel
I ordered the leather for the steering wheel a while back. A good week went by after ordering and I hadn’t received it yet, so I called the guy. He remembered I had ordered the gray-green leather. He said it was about ready to send. OK. Another good week goes by and I still haven’t gotten anything. I’m beginning to wonder if I’ve just flushed $100 down the crapper? Call him again. He apologizes and says he’s been extremely busy. Says he’ll ship it out in an hr and get the tracking number to me. A couple hrs go by and no email. The next morning there’s an email from him with a tracking #. Thank goodness. The leather actually arrives a day early and it appears to be a perfect match. The kit comes with 2 curved needles, silver thread and instructions. Besides the wheel sections, there’s also pieces that will need to be glued onto the base of the wheel. While I haven’t had a haircut in 2 mo, I’m not going to attempt sewing and gluing the leather onto the wheel even w/o a haircut occurring. I’m going to see if my leather dying guy will do the sewing. I want it to look nice now that I have the proper leather.

Spark Plug Wires
I purchased a set of wires a while back and set them aside for the proper time. There were various colors available but I chose red. When it was finally time to do the plug wires, I found that set to be not a very good replacement. They were too long and looked sloppy. The guru in Dallas had a set of wires that were an exact match to the factory wires and even came with the plastic clips that hold the wires in formation. So I bit the bullet and bought a 2nd set of expensive of plug wires. They arrived and looked perfect. The red set is going to ebay.

This particular iteration of the 928 engine has 2 distributors – one on each cylinder bank. Here’s the engine with the spark plug wires removed.


You would think the wires for the 4 cylinders of right bank would go to the right distributor and the 4 cylinder wires of the left bank to the left distributor. But that would be wrong. Porsche decided to route the wires from the 2 center cylinders of ea bank to the opposite side’s distributor. So cylinder wires for 2 & 3 of the right bank go to the left distributor and cylinder wires for 6 & 7 on the left bank go to the right distributor. To keep the wires organized as they cross over the front of the engine, Porsche created a fence that’s bolted onto the front of the engine. The left hand wires go behind the fence and the right wires go in front of it. Took several attempts (like 5) to get everything spaced properly and ensure they’re sequenced properly (7 above 6 and 3 above 2), but once it was all aligned properly it looked factory.

I also took advantage of having access to the last fuel line I needed to replace while the plugs wires were removed and the radiator hoses unhooked. Here’s a pic of the new line on the left and the old line on the right.


The old line connected to a regulator on the left side of the engine, went under the thermostat housing, snaked its way into the intake valley, then over the right cam cover and connected to the incoming fuel line (the actual fuel flows the opposite direction but easier to describe it this way). The old line on the right has a small section that is rubber and this is the problem area. As the rubber gets old, it can crack, causing fuel to spray on a hot engine. Not good unless you like 928 BBQ. The new line just goes in an arc and eliminates all the snaking around. Once I had the spark plug wires all connected, I put the new fuel line on.

Here are the results.


And here’s the finished product with the radiator hoses reattached.


I filled up the radiator overflow tank and was ready to test fire. She started right up and ran well. I check for any fuel leaks with the new line. There were a few tiny drops around the fitting at the regulator. I figure I can give the nut a small turn with the wrench to tighten it up. As soon as I touch the nut, it squirts gas. Poof! The center of the engine starts on fire! Crap! Normally I’m prepared with a garden hose and I have Punkin out in the driveway out of harm’s way. I have neither, as I was in a bit of a hurry. I rush to shut the engine off (I have to open the door since the windows don’t go up and down). The flames are still going. I had a bucket of water handy that I’d been using to clean something. Luckily there was enough water in the bucket to dowse the flames and I didn’t need to crack open the fire extinguisher. I figured I’d have all kinds of problems with burned wires to now track down. Amazingly, there appeared to be 0 damage. Wow! I tightened the nut, backed Punkin out of the garage, and got the garden hose ready. She fired right up (in a good way). No issues with running and no more pesky droplets.

I was in a hurry prior because I wanted to take her out on a test run in the neighborhood. So now I’m wondering if that’s a good idea. Still no fuel leaks. I decide to take a 5 gallon bucket half full of water, along with a gallon jug of water and the fire extinguisher on my test drive. Decide to venture out of the neighborhood and into rush hr traffic to go to the local gas station for a dab of fuel. Everything went well other than she died a block from the return trip home, but instantly restarted and got me back.

Sorry, no video of the fire but here's a boring video of the test drive adventure, if you’re interested in watching.


Sunroof
Yesterday I worked on the sunroof. I cleaned the opening, which was very dirty. The tracks were grimy so I sprayed some carb cleaner on them to clean them. There were a couple of spots on the track rails that had their paint worn off. I assumed this was where there was extra rubbing, so took a hammer and 2x4 and knocked them down a bit. The sunroof moved better manually but still not free enough for the motor to do the job. I’ll need to do more research as the article I have on removing the sunroof must be for a different model yr as nothing he’s saying is matching up. There’s only 1 video on YT but it’s for an 83 and it’s different. Back to the Internet.

Title
I found out the inspection site is open for business, but the DMV is closed. You have to put your paperwork in an envelope and drop it in a box. The DMV folks will then handle your paperwork and mail the newly issued title to you. Things never go well at the DMV under “normal” conditions and I can see LOTs of potential problems with this system, so I need everyone’s positive energy on this as I get the nerve up to give up possession of the title, bill of sale, and the power of attorney from the seller into a drop box. What could go wrong? Thanks in advance for positive thoughts.

But my friend dropped his 09 Cayman S off this afternoon. I need to clean the interior, take some pics, and write the ad, so the shark is on the sidelines for a few days as I prepared to sell his CS for him.
__________________
GPRPCA Chief Driving Instructor
2008 Boxster S Limited Edition #005
2008 Cayman S Sport - Signal Green
1989 928 S4 5 spd - black

Last edited by husker boxster; 05-18-2020 at 03:37 AM.
husker boxster is offline   Reply With Quote
Old 06-07-2020, 06:05 PM   #4
Registered User
 
husker boxster's Avatar
 
Join Date: Sep 2006
Location: Omaha
Posts: 2,947
Title
I dropped the title off in a drop box at the DMV mid-May. About a week went by and I got a phone call from the DMV. The nice lady said I needed to print off a Cert of Title form from their website, fill it out, and drop it into the DMV box. I had just put my info into the envelope and wrote my name, address, and the fact I only needed a title on the envelope. Hadn’t seen any form on their website. So I asked the lady if everything else looked OK and they just needed the form? YES, I was told. So I find the form, print it off, fill it out, and drop it into the DMV box. This is a Tue so I figure maybe Thu but probably Fri for my title. Not in the mail on Thu or Fri. Sat I see the mailman drop a fat envelope into my mailbox. I rush to see and yes it’s from the DMV.

I open the envelope and the cover letter says I have 30 days to respond or my info goes to the back of the line. I look at page 2 and it’s a Cert for Title form with the signature and address block highlighted to be filled out (you know how they like to use those yellow highlight markers at the DMV). I was shocked that I’d missed that and was certain I’d filled those fields out as I looked it over carefully when filling it out. I notice the other info in the form has been typed in. I didn’t do that. They filled out the form and sent it to me. I guess the DMV’s left hand doesn’t know what the right hand is doing. Also attached was my bill of sale. Great, now they’ve got my info separated too. I sign and fill out the address and head back to the DMV to drop the bundle into the box. I estimate Wed at the earliest to get the title.

Monday I get a skinny letter from the DMV. It’s my title. HORRAY!!! Once again, left hand – right hand, as there’s no way they could have processed the form I dropped off on Sat and gotten the title into the mail and to my house by Mon afternoon. At this point I don’t care, I have the title. On Fri I got another letter from the DMV returning my bill of sale. Was glad to have that back.

Key
Now that I have a valid title, I could pursue getting a key made based on VIN. The company in NC needed proof of ownership before they’d get the process started. So I call them Mon afternoon. Get vm, leave a msg. Try again Tue afternoon. Same thing – vm, leave msg. I took a chance and texted them a copy of the title and my driver’s license along with a msg about wanting a key. Wed afternoon I was just about to call again, when the nice lady called me. We got all the details worked out and then she said something encouraging – that depending on where this order landed in the schedule, it could be a week for the key to arrive. I thought the website said 4-8 wks, so this was very good. We’ll see, but it’s ordered and on its way.

Steering Wheel
I had called a few upholstery shops about sewing the new leather on my wheel. The first 2 said no, but I found a shop who said they’d have their upholstery guy look at it if I brought it down but he wasn’t in (it was Fri of Memorial w/e). I contacted them on Tue and was told the upholstery guy wasn’t in and they didn’t know when he’d be back - as in multiple days. Hmmm… It’s an upholstery shop and the upholsterer’s whereabouts are unknown? That’s a bit odd and maybe I need to rethink this. I call several more shops in the greater metro area. No one wants to do a steering wheel. They all show fancy interiors they’ve done on the websites, why can’t they do a steering wheel? I find a shop who says he might be able to do it and he’s relatively close to my house and it’s on the way to the DMV, so I stop by for him to look. He did qualify on the phone that he’s getting old and his hands aren’t as steady as they used to be, so he might not want to do the job after looking at my wheel but I need a break so I stop by. Didn’t take him long to decide he didn’t want the job. He said if he did take it, he would’ve had to charge $300 due to all the hours it would need. I think back to the website where I bought the leather. They would have done the job for the $300 too. At the time I thought that was rather high, but if no one locally wants to do it, I might have to send the wheel to slowpoke in FL. I mention my curious experience with the other shop that can’t find their upholsterer and he wrinkles his nose and says he wouldn’t recommend them. He said that shop takes on work they’re not qualified for and the results aren’t good. I didn’t get the impression he was dogging them because they’re his competition, rather he’s just an old guy w/o a filter. Good to know.

I expand my search and call a shop in Lincoln. He says he might be able to do it but would want to look at it first. The next day I needed to go to Fremont to inventory some Porsche parts a friend wants me to help him sell (keep an eye on the classifieds), so I decided to make a big loop out of it and go to Lincoln from Fremont. Tory looks it over and says he thinks he can do it but it will be around 8 hrs of labor - $150-175. And it would be 4 wks. I was fine with the price (I didn’t tell him the other est) but would like it a bit sooner. I didn’t expect him to drop everything he was doing to work on this but that was a bit long. He changes to 2-2.5 wks. Works for me. I’ve received a few phone calls from him asking intelligent questions, so I somehow feel hopeful. If he can make his estimated time frame, he should be done sometime late this wk or early next.

Windshield
I was watching a WatchJRGo video on YT recently. I follow his series already, but he’s just bought an 87 944 for $500 and he’s nursing it back to life. In one of the comments, someone suggested he use carparts.com to locate some part he needed. The site searches salvage yards for your part. I inputted my shark’s info for a windshield and 8 (EIGHT!) locations said they have one. Some even as low as $150. Oh happy day! I call the first on the list (based on mileage from my zip). Yep they have it. Nope, they won’t ship it. 2-8 same story. No one will ship. How does your local windshield shop get their windshields? Is there some windshield fairy who makes them magically appear overnight? There has to be a way to ship a windshield. Regardless, they won’t so I need a plan B. I think about renting a vehicle and going on an epic road trip. However, the closest ones are in the 800-900 mile range (there was one listed in Alaska but I didn’t call them). When budgeting for a Wheeler Dealer trip, I est $225 / day for costs (hotel, gas, food). I would need 4 days based on the mileage traveled and when you get the cost of the rental and windshield thrown into the equation (some in the $300-500 range), you’re looking at around $1100. Porsche of Omaha wants $1300 for a new one delivered by Stuttgart's windshield fairy. May have to bite the $1300 bullet.

I was at the dentist on Thu and reconnecting with the office people after the quarantine. They asked me what I was working on and I said the shark, but I was having a hard time finding a windshield. One of the ladies suggested a local shop in an OMA suburb. I called them Fri but they couldn’t help. I decided to go thru the list of windshield shops locally as the only one I’d tried was Safelite. Obviously got a lot of NOs, but one guy says he’ll contact some of his buddies on the east coast and see if they have one. Since we’re talking about windshield shops, I imagine the windshield fairy will be able to do her magic if one is located. Fingers crossed.

Sunroof
My friend with the red 928 emailed me photos from the 928 shop manuals on how to remove a sunroof. Getting the headliner out is step 1 and almost the hardest. It’s held onto the sunroof by 3 screws that are very small and recessed back in the sunroof just beyond my hand’s length. I loosened them and then removed them with mechanical fingers. Not looking fwd to putting them back in when reassembling. The sunroof comes off next and is held in place by 4 bolts in front and 2 screws on the side runners. I pull 3 screws per rail, raise the rail and pull the header bar out (it keeps the sunroof sliding even). Use the crank to move the cables fwd. Houston, we have a problem.


The cable on the passenger side has a pin missing. This pin connects to the sunroof and is used to move it fwd and back. I locate a used one and it arrived Wed. It takes a bit of finagling to get the two sides to line up even when you put the transmission back in but I finally get them to line up properly. I’ve cleaned the tracks and the guide cables move freely. I drop the sunroof back in for a test run. It seems a bit tight half way in but I get it to go. When I return it to closed, there’s a tiny scratch on the exterior. Ouch. Obviously, a bit to high. I play with the adjustments and think I’ve got it nailed. The sunroof moves freely open and closed. I ground down the offending extra protruding part of the bolt that caused the scratch. This is what it looked like before surgery.


After I removed the sunroof headliner, the underside looked like this.


Obviously Red Green had worked on it. The leather ends had curled up and the duct tape was used to hold them down, except the duct tape eventually curled too. After removing the old duct tape and the glue it left behind, I superglued the leather ends down and then took the Dremel and lightly ground the edge down. Now looks like this.


I did this work while I waited for the cable to arrive. Now that the sunroof is moving properly, I decided to attempt to put the headliner back in. Had to wrestle with it a bit but got it back in place. Now all I had to do was put those 3 impossible screws back in. Attempted the 1st one but had a moment of clarity – maybe I better check what the sunroof looks like from the outside before I put the headliner permanently in and cover up the adjustment bolts. Good thing I did because it looked low all around. I played with the adjustments and got it to look better but it’s still a tad low.


I think it’s time to put the motor back in and do a test run regardless. Get it all back together and all plugged in. Hit the switch… Nothing. Dang, the switch & motor worked before I took it out. I get the fuse box diagram out and track down the sunroof fuse. A bit oxidized but good. Take the motor out and about to get into serious diagnostics. Then it hits me – I didn’t have the key in the ignition and turned to the ON position. DOH! I put the motor back in and try this time with the ignition ON. The sunroof opens about 2 inches and then stops but the motor keeps running. I think the plastic gear in the trans that converts the motor motion into cable gear motion is stripped. Think that probably happened when the sunroof was jammed closed. The trans works with the sunroof tool because the tool connects directly to the metal gear on the trans that moves the cables. So I found a trans from my new buddy in the ATL. He’s dropping it into the mail tomorrow, prob here by the end of the week. Project on hold, but I can work on the adjustments and crank it by hand. Do I look $50 lighter?

Tomorrow my new window switches are scheduled to arrive. I took a chance by ordering a pair w/o doing any electrical tests on the current ones. There’s a very high percentage chance the switches are the problem as RL is filled with threads of people having to replace theirs. Not a robust design. Also included in my order from our site sponsor is an odometer gear, so tearing my dash apart is also on the agenda. That will be a tufor as I need to check / test the electrical connections of the wire loom connectors into the dash. I currently only have the gas gauge working and RL searching says that’s probably because the connectors are not passing current to the dash gauges. The dash pod moves up and down with the adjustable steering wheel and one solution to the no working gauges is to slam the dash pod up and down several times to make the connections work. Reminds me of a story my mom tells. Back in the late 70s we had a 76 Mercury Marquis and Ford products during this era had a tendency for the automatic transmission to only go part way into park, resulting in your car rolling away. Our Merc would do this occasionally. My folks were on vacation in South Dakota and the trans had the half into park situation. Mom said dad started shoving the trans handle violently back and forth many times. She said people were walking by and looking aghast at my dad in his fit of rage. But it went into park afterwards. If only dad was here to see if he could fix my 928.
__________________
GPRPCA Chief Driving Instructor
2008 Boxster S Limited Edition #005
2008 Cayman S Sport - Signal Green
1989 928 S4 5 spd - black

Last edited by husker boxster; 06-07-2020 at 07:52 PM.
husker boxster is offline   Reply With Quote
Post Reply


Posting Rules
You may not post new threads
You may not post replies
You may not post attachments
You may not edit your posts

BB code is On
Smilies are On
[IMG] code is On
HTML code is On
Trackbacks are On
Pingbacks are On
Refbacks are On


All times are GMT -8. The time now is 07:30 AM.


Powered by vBulletin® Version 3.8.7
Copyright ©2000 - 2025, vBulletin Solutions, Inc.
Content Relevant URLs by vBSEO 3.6.0
Copyright 2025 Pelican Parts, LLC - Posts may be archived for display on the Pelican Parts Website -    DMCA Registered Agent Contact Page