So it's been a while. Caught a nasty cold at Thanksgiving that's slowed me down significantly. I thanked the guy in KC for offering to buy my shark, but I felt like I'd be letting $$$ go if I sold it before it ran. Plus I want to see this thru (and I'm starting to like her).
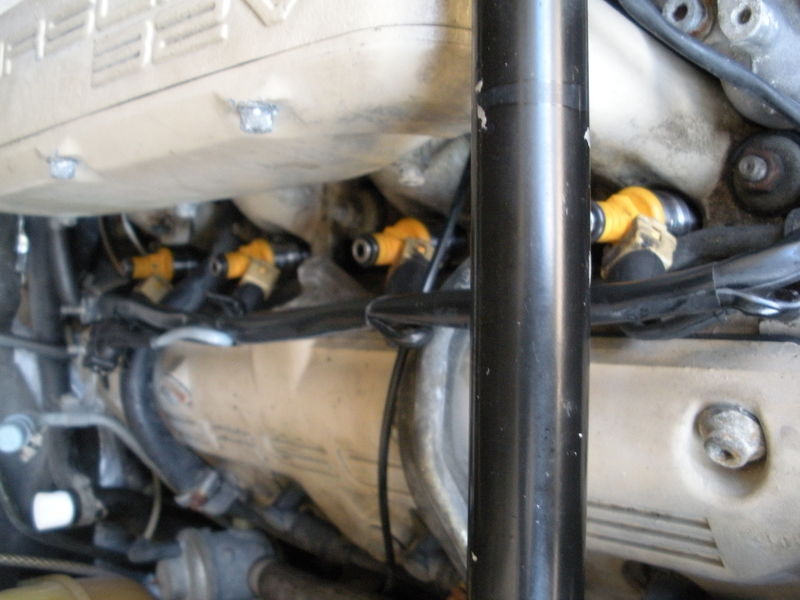
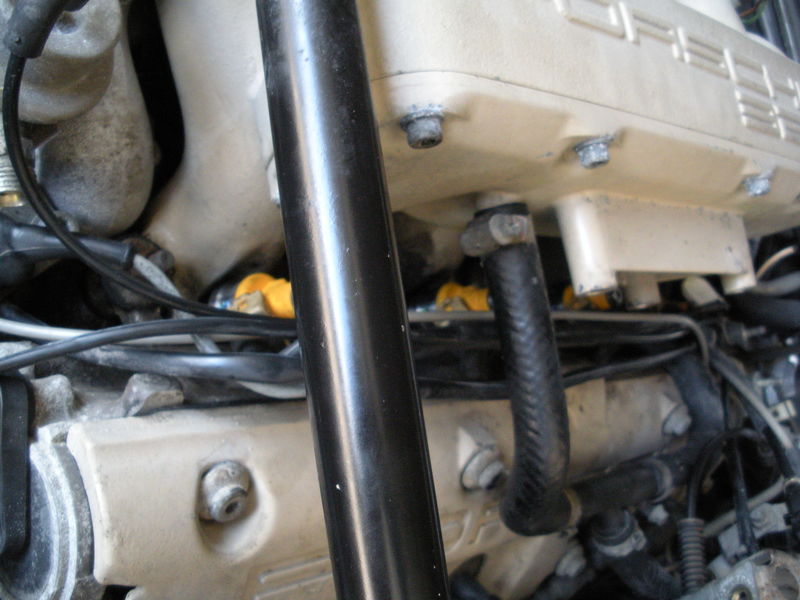
I put the new injectors in (pictured) and then topped it off with the fuel rails (not pictured).
I pulled the plugs and put a bit of Marvel Mystery Oil into each cylinder. Figured it would be wise to let them soak in it for a while before I start her.
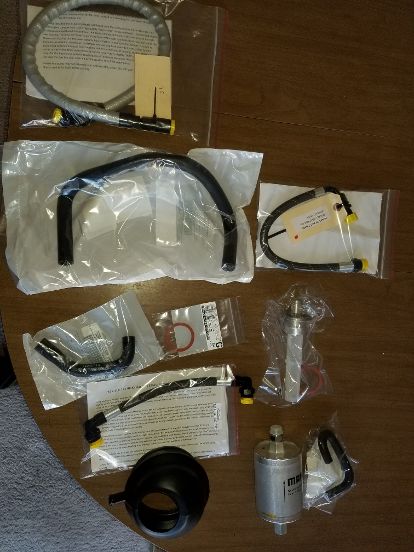
I have a table full of fuel related parts.
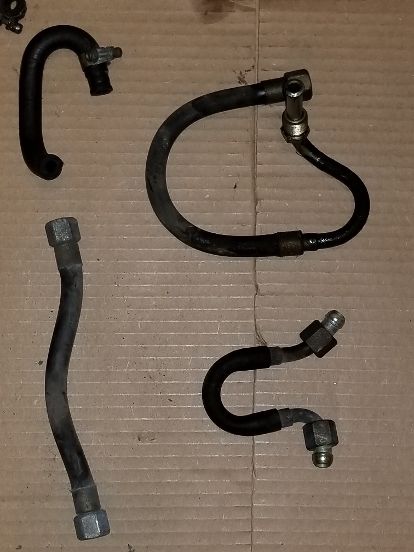
Then I started removing 30 yr old fuel hoses in the engine compartment. Several are on the back side of the engine.
Here are the new replacements.
The plastic is where the MAF should be. Easier to work on the hoses with it off.
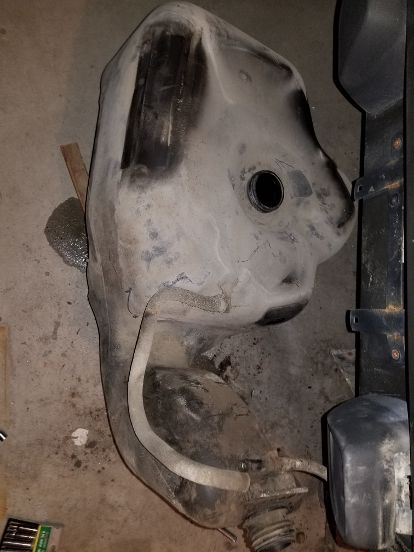
Then I turned my attn to the the gas tank. I got the cover off the fuel pump and filter and drained the gas. Didn't look too bad (the fuel in the injectors didn't look bad either).
It didn't smell bad so I tossed it in my lawn mower and mulched the leaves in my yard.
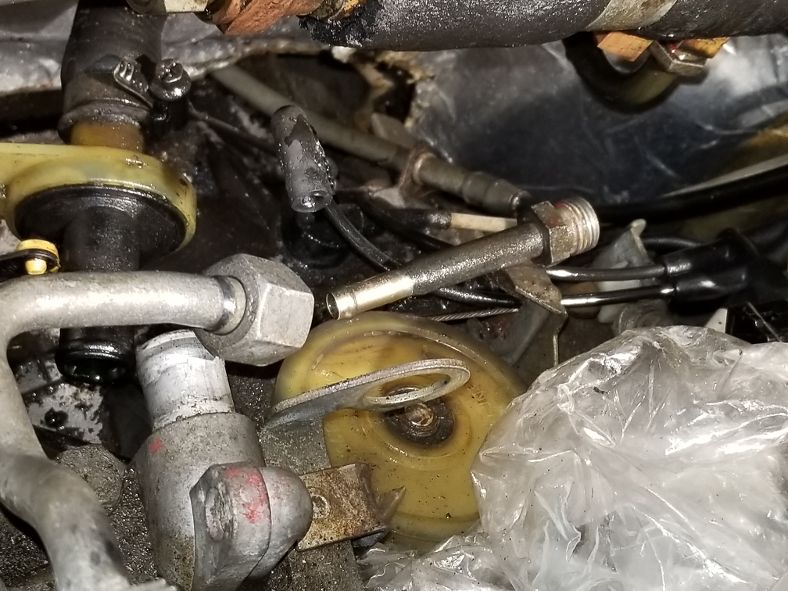
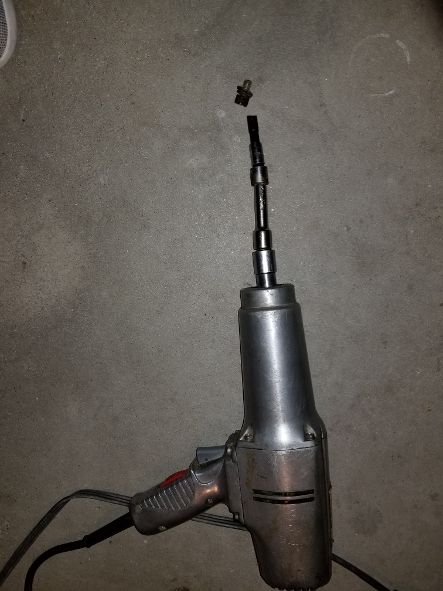
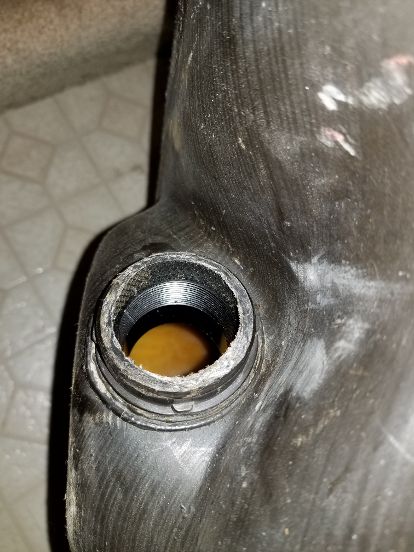
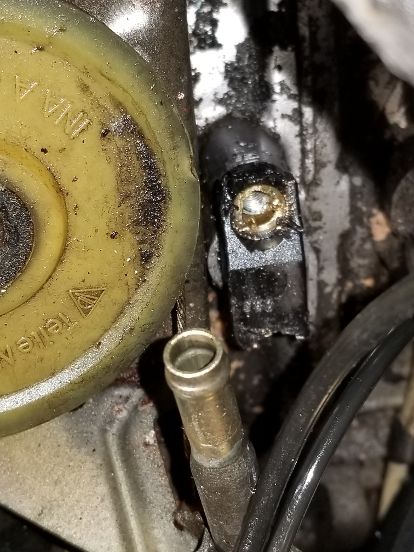
At the moment, I'm stymied by a stuck bolt. It's by the nozzle and holds the nozzle in place. I've sprayed it with aerokroil but I've run out of it and can't find any locally. Been using a WD40 penetrating oil as an alternative. The bolt has the hex insert and unfortunately it's a bit rounded (maybe due to being stuck).
I took a big chance by taking a dremel and cut a slot into the bolt.
I placed a rag into the fuel nozzle and put a wet rag over the area. There were a few sparks when I cut it. I had a bucket of water and a fire extinguisher close by. And I put my driving helmet on for fire protection. Luckily no explosions. However, the bolt is still stuck. I've been spraying it for several days. And I have one of those impact tools that has a screwdriver bit in it and when you strike it with a hammer, it twists counter-clockwise. But to no avail. The screwdriver bit is smaller than the slot so it's not getting max force with a strike. May have to think of a Plan B or C. Heat is not an option.
That's my update. If I can get that bolt off and the tank out, I can insert the new strainer, filter, and hoses. Then I'll be ready to attempt a start.
__________________
GPRPCA Chief Driving Instructor
2008 Boxster S Limited Edition #005
2008 Cayman S Sport - Signal Green
1989 928 S4 5 spd - black
Last edited by husker boxster; 12-14-2019 at 05:19 AM.
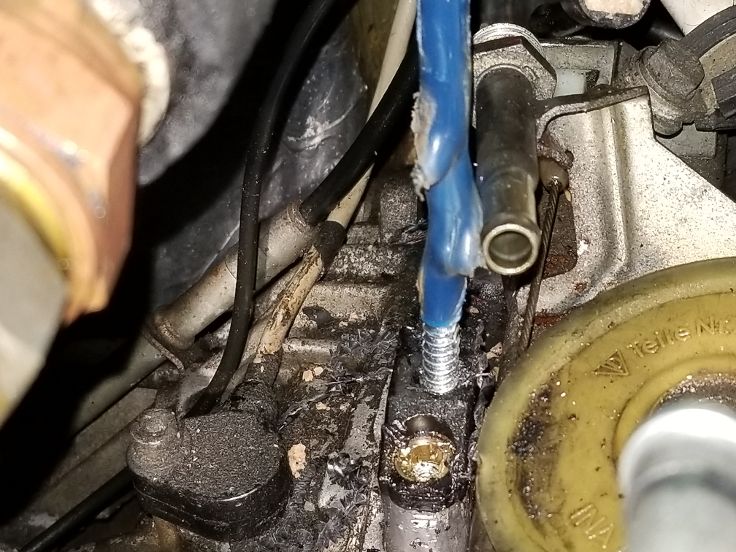
Sat at our monthly Porsche breakfast, someone said they had an impact wrench I could borrow. So I stopped by his house. Unfortunately, it was the same kind of tool I had - you put a bit in it and strike it with a hammer and it twists. However, he had a larger straight screwdriver bit than mine, so maybe it would provide more torque on the bolt. While it fit the slot in the bolt better, it didn't budge it even when striking it with a BFH (I was avoiding using a BFH in case I missed or the face slipped on the wrench). Dang!
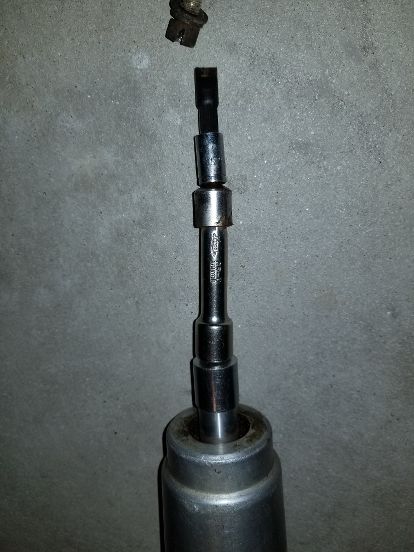
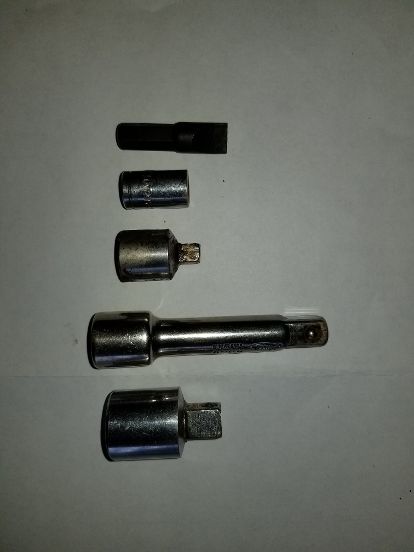
But I got an idea. I built a concoction of of bits that would end up on the end of my mom's impact wrench (well it's really my dad's but he's been gone for 33 yrs). I put the screwdriver bit into a 5/16 socket, added a 1/4 to 3/8 socket, then a 3/8 extension, and finally a 3/8 to 1/2 drive socket. Stuck it on the impact wrench, put it on the bolt, and let her rip. 4 sec later it was spun off and free! Hallelujah!!!
Took a little more work to get the tank completely out, but it's on the ground.
__________________
GPRPCA Chief Driving Instructor
2008 Boxster S Limited Edition #005
2008 Cayman S Sport - Signal Green
1989 928 S4 5 spd - black
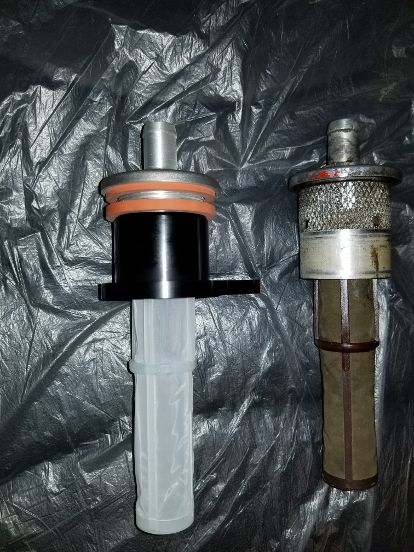
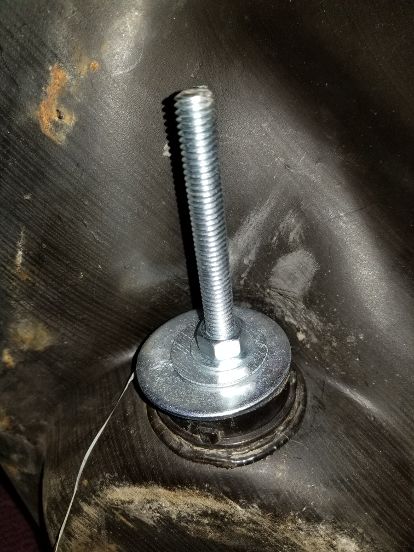
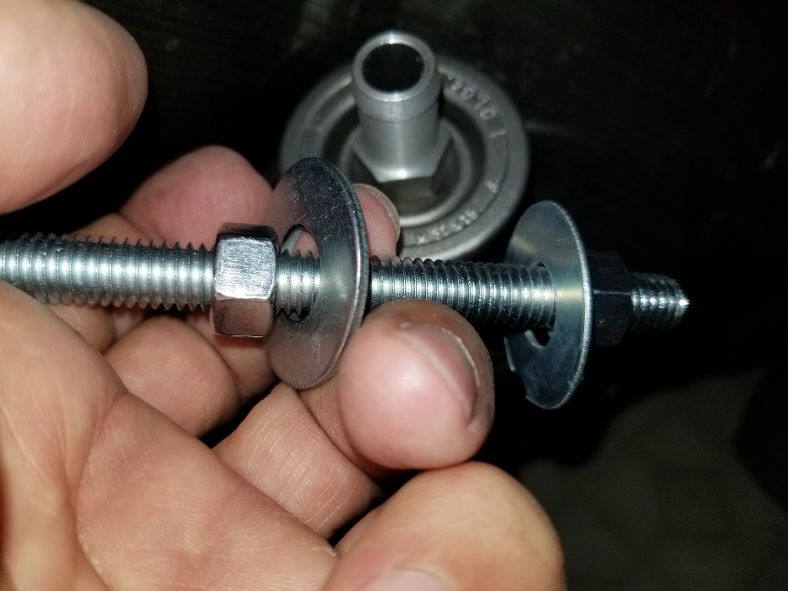
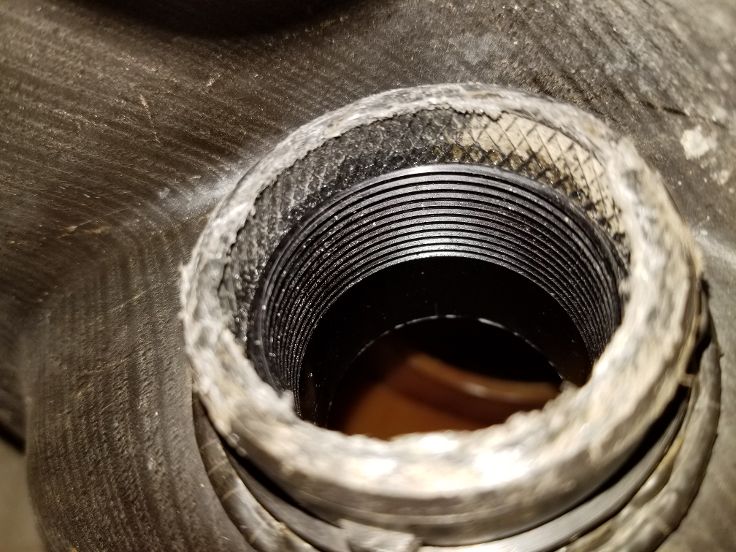
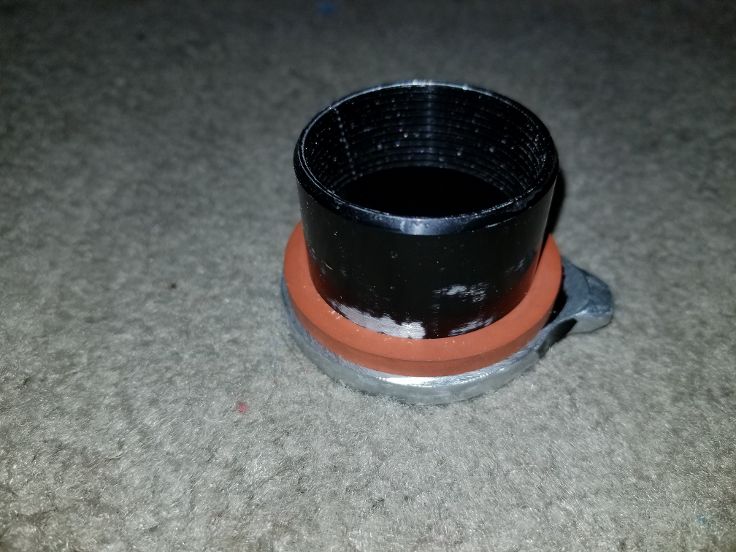
Been working on replacing the fuel strainer in the btm of the tank. It screws into a metal collar that's stuck inside the plastic tank. In theory, you unscrew the old strainer and screw the new one in. Good theory but not reality when the strainer doesn't break loose from the collar. Used the impact wrench but the collar, not the strainer, just spun in the neck. Got the strainer / collar combo out. Here they are, old strainer + collar on right, new strainer on left:
I soaked the threads inside the collar and tried my darnedest to remove the collar from the old strainer, esp without tearing up the teeth on the collar. No luck. Put a thread out on the RL 928 forum and got a resp that said throw the collar away and buy Roger's replacement. It looked promising, so I purchased it.
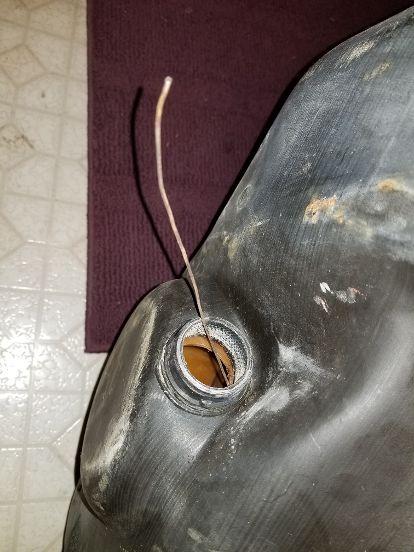
To install the new collar, you have to fish it on a wire that starts at the top of the tank in the sending unit hole, which isn't big enough to stick my hand, let alone my arm, thru. Got the wire fished thru properly.
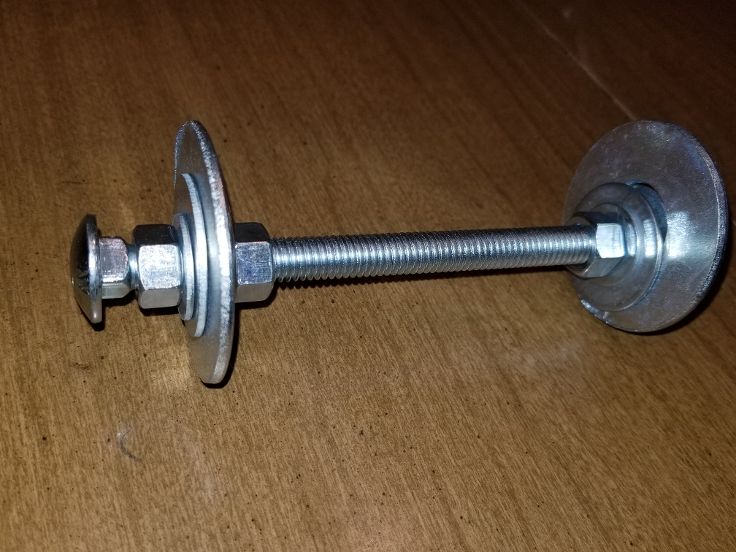
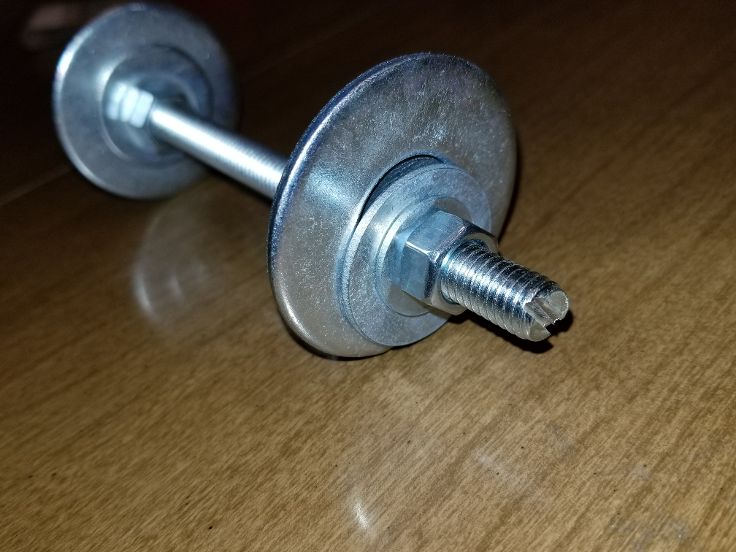
With some mechanical fingers, I'm able to get the collar close enough to the hole that I can get my fingers on the collar and get it lined up but not into the neck. Put some thought into it and developed a puller from a 6" carriage bolt, a 3/8, 7/16, and 3/4 flat washer. I cut a slot in the end so I could hold it in place with a screwdriver when tightening it down.
Fished the puller into the tank and grabbed it with the fingers. Put the washers on the outside and began tightening it down.
Can feel it sliding into the neck. This is good. Release the puller and check my work. The collar is in the neck but only 1/2 way.
Since I'm sitting at 8 pics and only allowed 10, the rest of my story in the next post.
__________________
GPRPCA Chief Driving Instructor
2008 Boxster S Limited Edition #005
2008 Cayman S Sport - Signal Green
1989 928 S4 5 spd - black
Last edited by husker boxster; 12-31-2019 at 12:03 PM.
Unfortunately, the collar was too low to catch the threads of the strainer. Fished the puller back in and ran it a bit farther and then backed it off. Collar stayed in same place. Looks like the inner tank baffle is holding the collar at it's current place and won't let it go further. Hmmm...
So I thought about it and decided to try a smaller version of my puller, so I could see what was going on.
I was correct - the puller would move the collar up the hole but it would go back down when released. Put some more thought into the situation and decided to try a bead of super glue higher up in the hole, then use the small puller to position the collar high enough that the glue catches the collar. Left it sit overnight with the puller in place. This morning I removed the puller and the collar was holding in a higher position.
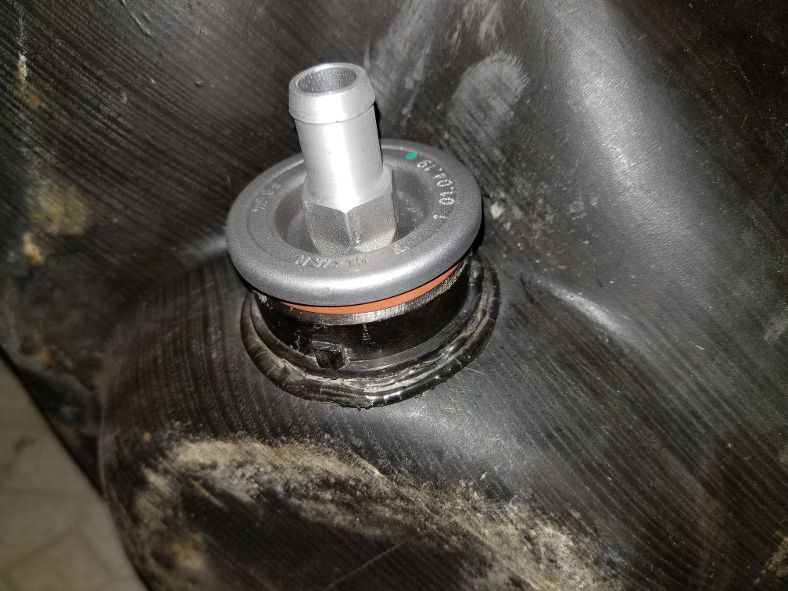
I carefully placed the strainer in the hole and lightly started to screw it in. It caught! I was able to tighten it down. Success!
Guess the acid test is when it's back in the car and I add some fuel. I should mention that the 6" bolt was a tad long. Had issues with getting it fished out. I cut it down to 5", which was better, but 4.5" would be optimal.
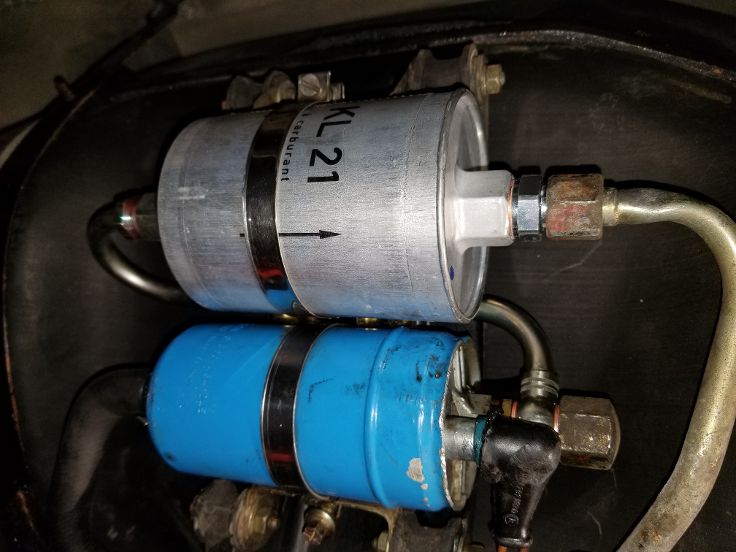
Next up is putting the tank back in and attaching the fuel pump and new fuel filter. Waiting for a connecting pipe between the pump and filter. Supposed to arrive on Mon (fingers crossed). May not be too long before a test start.
__________________
GPRPCA Chief Driving Instructor
2008 Boxster S Limited Edition #005
2008 Cayman S Sport - Signal Green
1989 928 S4 5 spd - black
Last edited by husker boxster; 12-31-2019 at 12:24 PM.
The mistress has been up to her normal tricks. Someone on 928 RL suggested testing the tank before putting it back in. I had thought about this too, so decided to go that route. I put the tank in my large oil drain pan and put some fuel in it to see how tight the strainer was. Steady stream of gas. Tightened the strainer a bit more, but still gas. Tightened some more. Pop. The strainer came out. It appeared the super glue had held the collar where I glued it - 1/8" below the top of the neck. I thought once the strainer caught the collar, it would break the glue bond and suck it up all the way. Being low in the neck, the first couple of threads on the strainer were catching but that's all.
So I took a chisel and knocked the collar out. Decided I needed to modify the collar and knock the arm off by 50%. No turning back now. Got it small enough so it would snap past the inner walls (so gas wouldn't slosh around when low) yet had enough arm left to allow it to catch when tightening.
Fished it back in with the wire, then fished the big puller in and gave it a ride. It felt like it was going further. Released the puller and looked. It was fully up in the neck. Success!
Repeated the gas test. An occasional drop. Have been adding a quarter turn and think I have it. This was all over the weekend of Jan 3.
On Mon I worked at getting the tank back in. When I was taking it out, I had gravity working with me. It was my enemy putting it back in. Was able to finagle it back in place with the help of a jack stand. Fought a vent hose that attaches at the nozzle and goes thru a body panel and into the tank. It's a molded hose kind of in the shape of a squared off S. Had it attached to the tank and got it fished thru the body and onto the tank neck but it was a good wrestling match. Got the replacement bolt in at the nozzle (the old one that had been stripped) and I was set. I still had to put the leg straps on the tank that actually holds it in place. Cleaned up the fuel pump and bracket that attach onto the legs. The banjo line connecting the fuel filter and fuel pump was supposed to arrive Mon but the new arrival date was Wed. While I waited, it was another chance to test the strainer. Put 1.5 gallons of gas in and no leaks.
The last item arrived Wed and I could begin final assembly, or so I thought. The line that arrived has a banjo fitting on one end and requires a copper washer on each end to seal it. It's possible to reuse the old washers if you anneal them, so I found my old benzine torch and gave it a shot. Probably got 30 sec of good heat on them before the torch burped and caught fire. I threw it and luckily the flame went out rather than the tank exploding. According to RL, you have to heat the copper until it turns red and then dunk in water. I was no where close to red and wasn't going to try a 2nd time, so I set out on an adventure to find a couple of new washers (as opposed to ordering 2 at $0.50 ea, paying $10 for shipping, and waiting another week). Stopped at O'Reilly's. They had a few small packs of copper washers but none in the size I needed. The guy helping me found an assortment pack that looked like it had some in the size I needed. Great, but I had to buy 110 various sized washers for $20 so I could get the 2 I needed (they were a perfect match, however). If anyone needs any copper washers, let me know, I have a few extras.
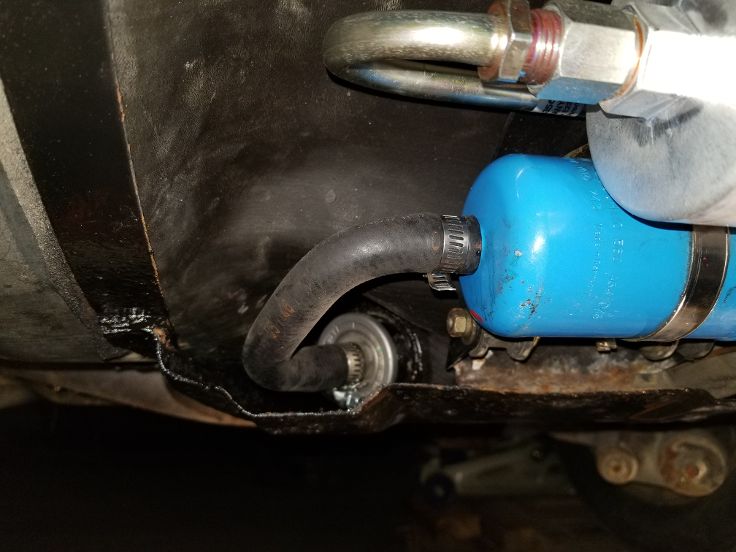
So yesterday, still with no leaks, I put the tank straps back on, then put the fuel pump / fuel filter combo on, and hooked them all up. Put an additional 2 gal of gas in. Checked this morning and dry as a dessert.
Finished up with replacing the gas gauge sending unit and buttoning up the top of the tank.
Today I plan on taking off the left bank timing belt cover so I can watch if the belt is turning, then on Tue afternoon a friend is coming over to assist with attempt #1 of igniting her - hopefully in a good way. Will have an extinguisher handy.
__________________
GPRPCA Chief Driving Instructor
2008 Boxster S Limited Edition #005
2008 Cayman S Sport - Signal Green
1989 928 S4 5 spd - black
Last edited by husker boxster; 01-12-2020 at 08:43 AM.
My friend came over Tue to assist with the 1st attempt at starting. He ran the key while I looked down the left cam cover to watch the timing belt. The engine spun fine and the belt turned over fine too. But no start.
Didn't hear anything clicking in the fuel pump area at ignition. Checked the FP fuse - it was fine. Tracked down the FP relay and swapped it with the backup lights relay. Heard a clicking at the fuse box area but still nothing at the FP. So I disconnected the line off the fuel filter that heads to the front of the car. It was dry as a dessert. So the fuel pump wasn't working.
Checked with the experts at RL. They gave me 5 things to try. Bought 2 new relays (only two in town) and tested various relays in the horn slot to be sure they were good. There are 3 important relays associated with starting, so I put my 2 new relays in along with 1 that tested good on the horn slot. Still no start.
So I used a jumper wire in the FP relay slot. This should cause the FP to run full time, which it did. This says the pump is good (saving me $300) but it's not getting any juice.
While I had the pump pumping, I tried starting, but no luck. The lack of juice could be one of the two ECUs has gone bad, which is a common problem. Or it could be something else. The search continues...
__________________
GPRPCA Chief Driving Instructor
2008 Boxster S Limited Edition #005
2008 Cayman S Sport - Signal Green
1989 928 S4 5 spd - black
Last edited by husker boxster; 01-17-2020 at 07:41 PM.
My friend came over Tue to assist with the 1st attempt at starting. He ran the key while I looked down the left cam cover to watch the timing belt. The engine spun fine and the belt turned over fine too. But no start.
Didn't hear anything clicking in the fuel pump area at ignition. Checked the FP fuse - it was fine. Tracked down the FP relay and swapped it with the backup lights relay. Heard a clicking at the fuse box area but still nothing at the FP. So I disconnected the line off the fuel filter that heads to the front of the car. It was dry as a dessert. So the fuel pump wasn't working.
Checked with the experts at RL. They gave me 5 things to try. Bought 2 new relays (only two in town) and tested various relays in the horn slot to be sure they were good. There are 3 important relays associated with starting, so I put my 2 new relays in along with 1 that tested good on the horn slot. Still no start.
So I used a jumper wire in the FP relay slot. This should cause the FP to run full time, which it did. This says the pump is good (saving me $300) but it's not getting any juice.
While I had the pump pumping, I tried starting, but no luck. The lack of juice could be one of the two ECUs has gone bad, which is a common problem. Or it could be something else. The search continues...
Hopefully the resolution will be easier than the fuel tank challenge. Following...
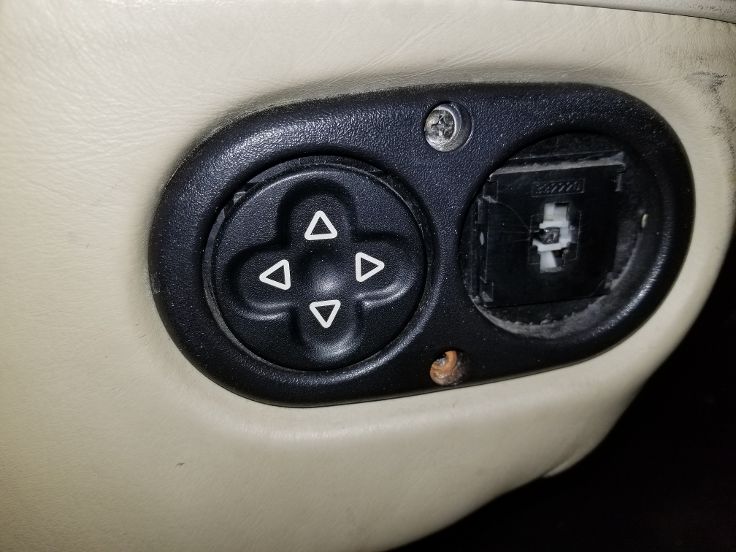
I haven’t posted in a while. I’ve been busy diagnosing my no starting issue. I’m currently fighting her with replacing the CPS, which I’m hoping is the problem. Since it’s taking me sooo long to extract it, I decided I needed a quick win to make me feel better so I turned my attn to the front seats. But first, a little background info.
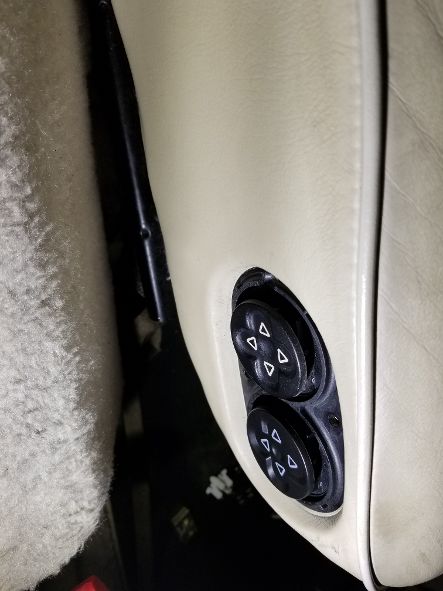
The forward / back buttons on both seats were broken off. They’re on a very spindly plastic arm and I imagine somewhere in its 30+ yr existence became brittle and snapped off. When I did my initial battery test back in Nov, I found both seats moved by bumping the stub that was left. The passenger seat had more stub to work with than the driver’s seat. I ordered 2 new switches and put them on my kitchen table while I worked on the fuel system.
With the starting issue being either the CPS or one of the computers gone bad, one of the options was to take out the computer and send it to ORE for diagnosis. I thought this would be a good time to take the seats out before I pull the computer, in case that disables all electronics. It would be a good time to work on the seats and clean the interior while the computer was gone. I figured I’d do the passenger seat first and then devise a plan for the driver’s seat later. I connect the battery and push the passenger seat back far enough to get the front bolts out. Then move the seats fwd as far as it will go. However, it’s not far enough to access the rear bolts. I can see by marks on the console carpet that the seat is stopping a good 2” short, which would be the distance I’d need to get to the rear bolts. Dang! At our local PCA monthly breakfast, someone suggested the seat drive line may have dirt or grime on them, causing the stoppage. Typical 928 situation – she’s fighting me at every turn, even with something simple like removing a seat. This was all a couple of wks ago. I moved back to the engine compartment to fight the CPS extraction. I figure I'll change the CPS first and see if that's my starting issue. If not, the computer check is next.
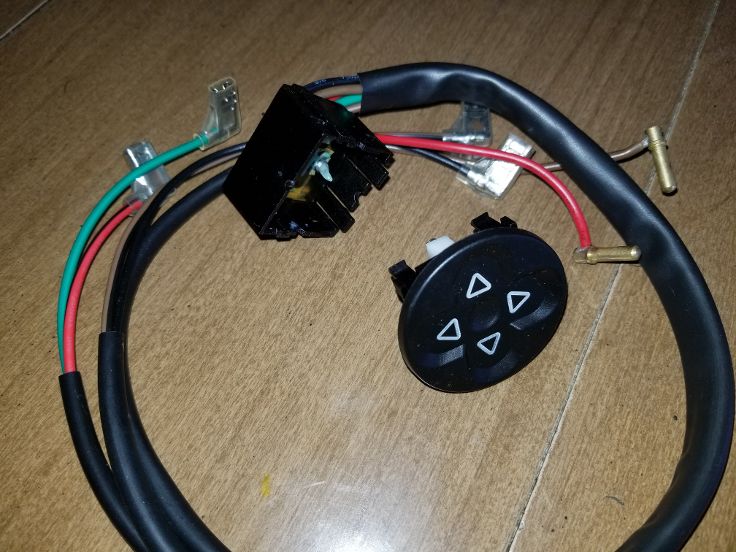
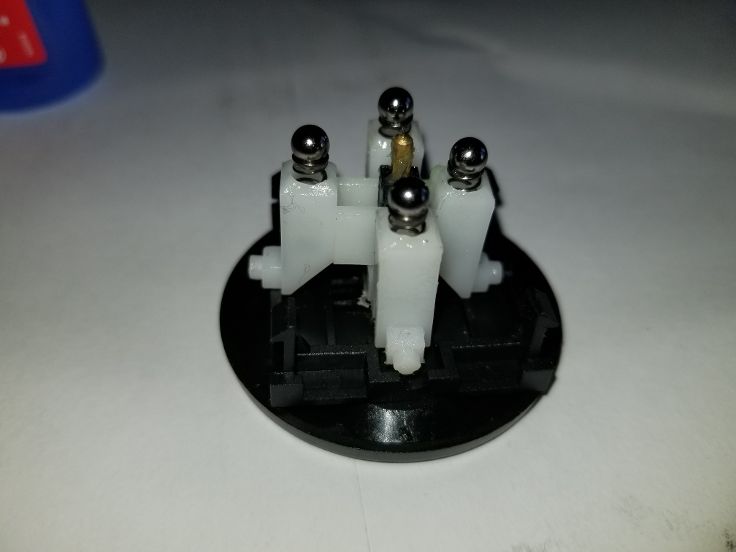
With the CPS being harder to extract than an impacted molar, I got an idea for the seats. If I can’t take the seat out and replace the entire switch and wires, how about pulling the internals of the new switch out and snapping them into the existing one? I open the pkg of a new switch and look it over. It appears the internals will snap out, so I carefully attempt to do that without breaking a perfectly good $80 switch. It works – I got it out.
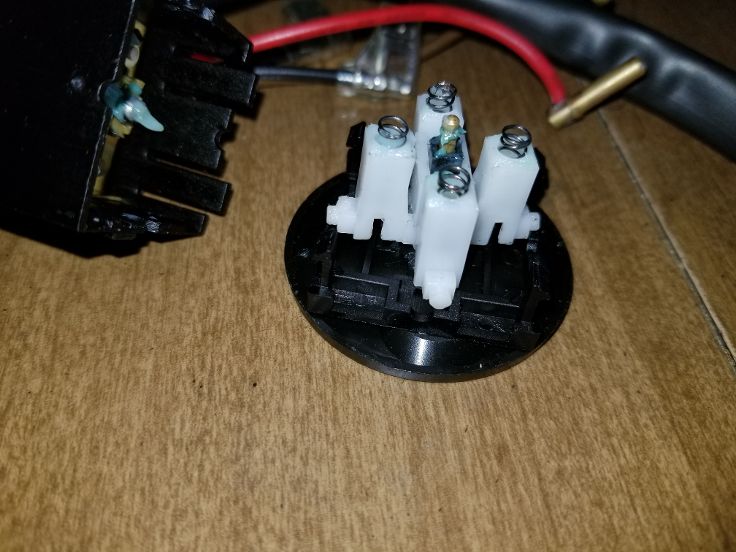
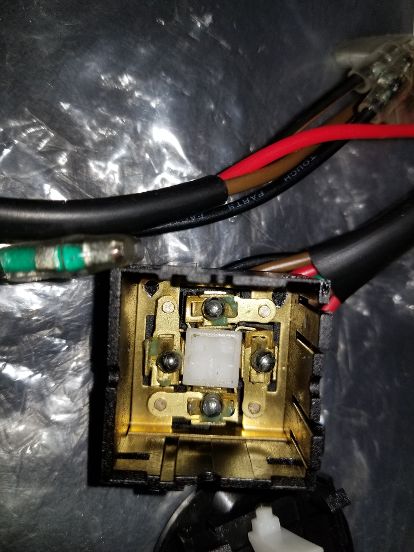
I decide to do the driver’s seat first since I already had the internals pulled. I take the switch and the wires / case of the new switch to the garage. I notice there are 4 ball bearings still in the case that need to be transferred to the existing case.
When the new case is on the kitchen table, the bearings sit nicely in place. When the case is turned vertical, like in the seat, the bearings fall out without the internals in. Hmmm… This is going to be a problem. I decide to buy some dielectric grease, grease up the bearings, and put them on the springs. The plan was the grease would hold the bearings in place long enough for me to snap the unit into the case. The plan worked on my 1st attempt. Hooked the battery up and the driver’s seat moved fwd / back and the bottom cushion went up / down. Yay!
Now all I had to do was the same on the passenger side. Should be simple. I snap the internals out of the new and existing switches. Grease up the bearings, ready to snap it in. The bearings won’t stay in place when I rotate the internals vertical. No matter how many times I try, they fall off. Simple my a$$. I decide to leave them in the grease overnight and hopefully will stay in place in the morning. Same thing the next day – a bearing falls off with each attempt. I clean all the grease off the bearings and springs and implement Plan B.
Let it sit for an hr, then grease up the bearings, and attempt to snap it in. It works! Hook up the battery and the seat moves fwd / back, up / down. Success!
A minor victory and it doesn’t get her any closer to running, but I needed something positive to keep my sanity. Hopefully soon I’ll have the story of the CPS replacement ready to publish but not until I get that molar out. While I had the cushion in the up position, I could see a ton of crap on the drive bolt thread, so I'll need to knock it off and spray some cleaner on it. Hopefully then it will stop fighting me and I'll be able to actually remove the seats.
I guy can always dream...
__________________
GPRPCA Chief Driving Instructor
2008 Boxster S Limited Edition #005
2008 Cayman S Sport - Signal Green
1989 928 S4 5 spd - black
Last edited by husker boxster; 02-12-2020 at 08:59 AM.
hb - I've finally started on my '84 928S in the past few weeks - it's kind of my New Years resolution to get it running and on the road for restoration.
I've discovered like you have - when it gets too frustrating, spend some time on an easy win.
But yeah... even the easy wins aren't easy with this car.
Keep pressing forward!
__________________
I think I have a Porsche problem...
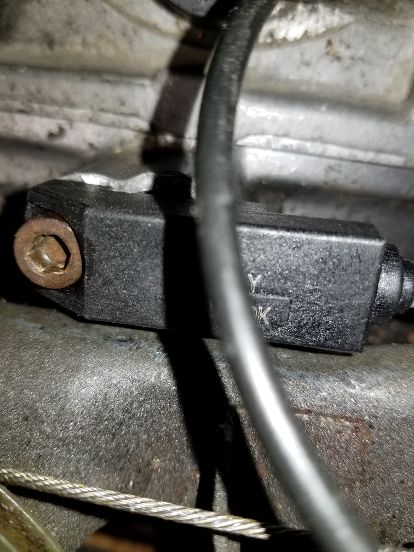
The lack of starting is pointing to 2 possibilities the LH computer or the crank position sensor. Since the tach wasnt bouncing at ignition, the CPS was a likely candidate (plus it was only $50 for a replacement vs $500 for a computer rebuild), so thats where I started.
Like any CPS, its located on the flywheel and is in a crappy spot to get at. On the 928, its on top of the bell housing at the back of the engine. Wouldnt you know, I had to remove 2 of the fuel lines I just put in along with several other items to get to the CPS. At least this time the fuel lines didnt fight me. There were a couple of items that I couldnt remove unless I wanted to take the intake manifold off, which I didnt, so I worked around them but they made life a little more difficult (whats new?).
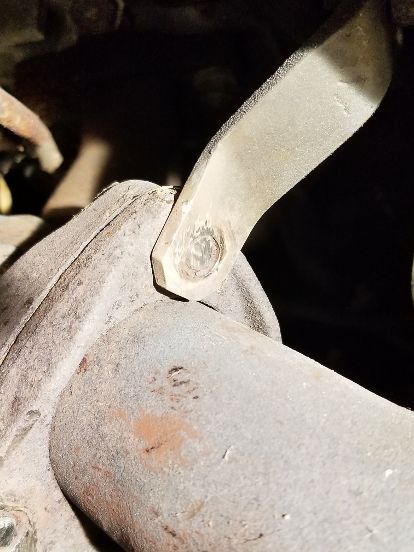
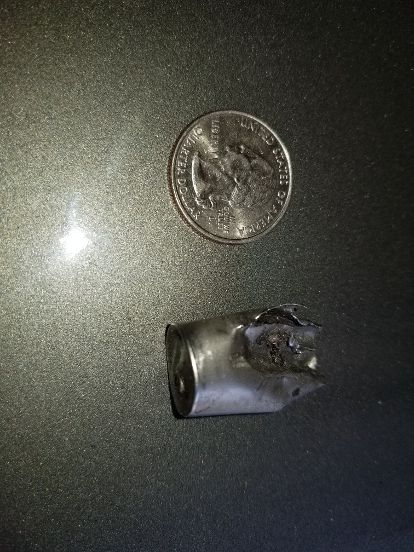
Of course the CPS was stuck in the hole. I was able to get a claw hammer onto the chord section of the CPS and I gave several yanks hoping it would release it. All that did was break a portion of the T off.
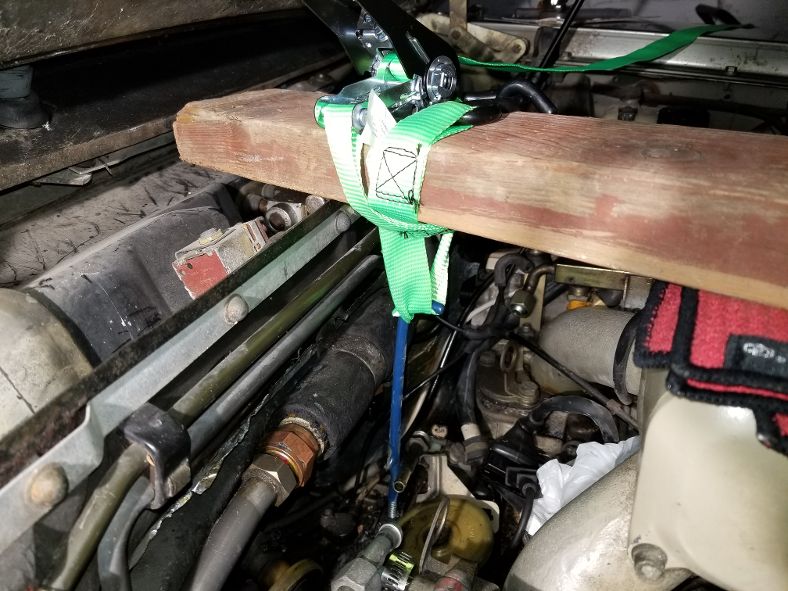
Next attempt was to drill a hole in the CPS, put a lag bolt into it, and try to tug it out. Due to remaining parts in the engine bay, I wasnt able to use a normal drill and drill bit, so I bought several 12 long bits and they worked fine. I set a cpl of 2x4s across the intake manifold and firewall and ran a rachet strap around the lag bolt.
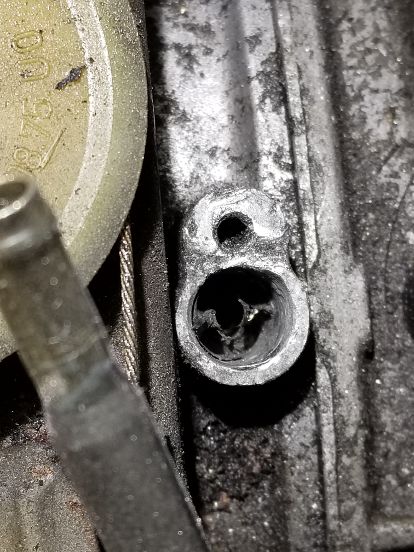
Unfortunately, when I tightened the strap, the bolt just pulled out of the CPS. I was able to get the bolt back in a 2nd time, so I left some tension on it overnight along with generous squirts of aerokroil hoping in the morning it would pop out. Nope, the lag bolt came out without the CPS. Time for more drastic measures. I chipped the top part of the T off.
Next began a series of steps to remove 4 sections of the lower part of the T. The first layer is about ¼ of solid plastic. I drilled a bunch of holes and got the majority of the plastic out. However, there were plastic remnants in the hole and the edge wasnt smooth, which was going to be necessary for the next step. So I bought a Dremel extension with the hope of using it on the cheap Dremel knockoff Id bought at Harbor Freight to use on the gas tank removal. Naturally the cheapo Dremel wasnt made for attachments, so I tried hooking the extension on my drill. That didnt work either. So I broke down and bought Dremel 200, which took the attachment. I was able to get the 1st layer clean, nice, and level.
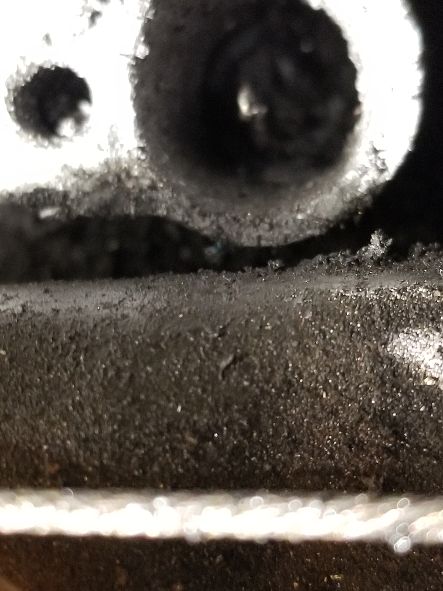
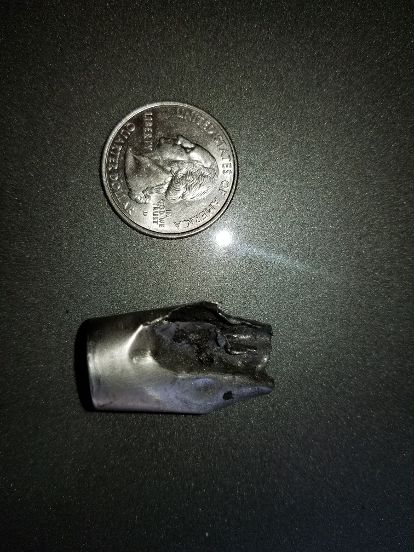
As you can see, theres a rare earth magnet in layer 2. Its not something you can drill out, so you have to drill around the edge of it and pull it out. Its about 1 long.
Once I got it out, there was some more clean-up work to get to the next level.
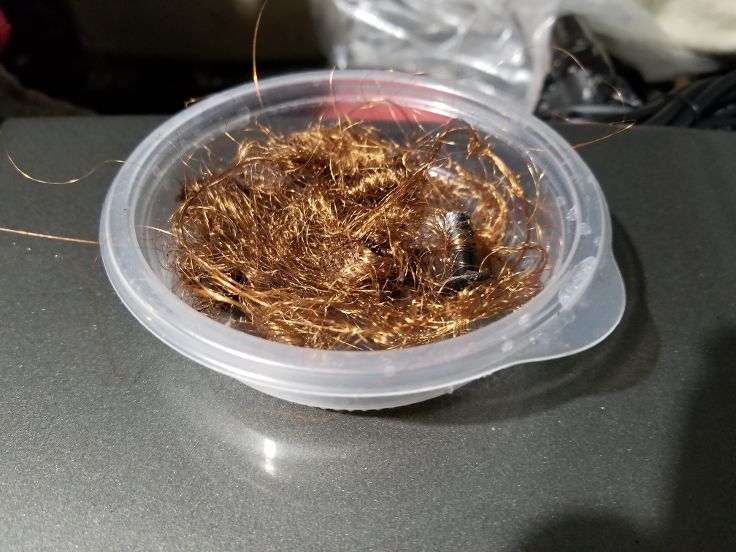
Next up was extracting the voluminous amounts of cooper wire strands. It took a lot of picking with a needle nosed pliers.
Now all that was left was the aluminum cap at the bottom. This was going to be the trickiest step, as you need to crimp the cap inward with a screw driver and pull it out with the needle nosed pliers. I got it crimped but could never get it pulled out. Worked on it for 2 days. Then my biggest fear occurred it became too loose from crimping and fell down the hole and on top of the flywheel. Crap. I can reach it with a pliers but it wont pull thru the hole. I have 2 options now. Im going to attempt to grab it with some mechanical fingers but I dont think thats going to work. Option 2 is to pull the plate off the bottom of the bell housing and rotate the engine and the cap should work its way out the bottom. What could go wrong?
The only silver lining with this last option is I needed to pull the plate anyway to check the thrust bearing play. However, Ive been avoiding this procedure because the plate is held on by 6 bolts and 2 of the bolts are impossible to remove unless you drop the exhaust pipe. Im sure those 30 yr old exhaust bolts will jump off without issues. The articles on RL say to not put those 2 bolts back on the plate and I was hoping there would only be 4 bolts for me to take off. But no, all 6 are there, which probably means the thrust bearing play has never been measured (it seems the Achilles heel of 928 32V automatics is not releasing the tension on the flex plate once a yr). So Ill start that adventure in the hopes I can finish the CPS extraction at the same time.
__________________
GPRPCA Chief Driving Instructor
2008 Boxster S Limited Edition #005
2008 Cayman S Sport - Signal Green
1989 928 S4 5 spd - black
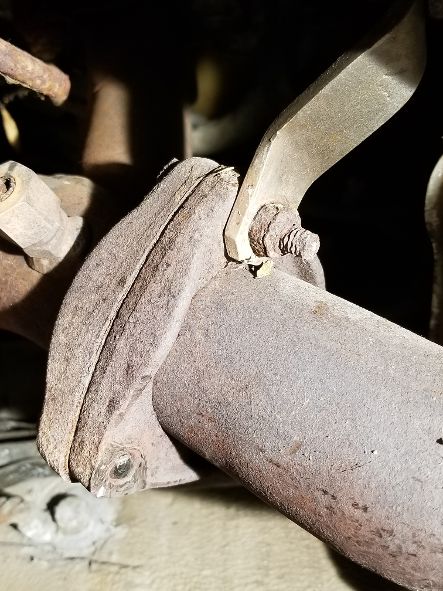
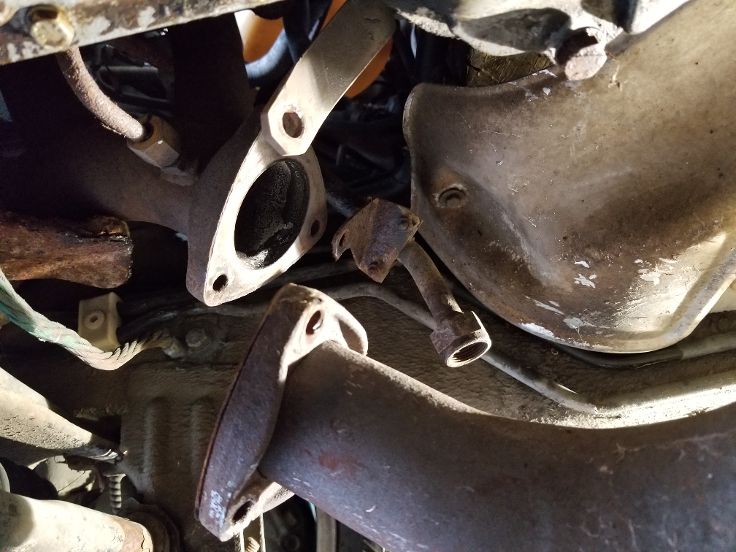
In order for me to move fwd with the 928, I must remove a plate on the bottom of the bell housing. The plate is held on by 6 bolts, 4 of which are easy to get to. The back 2 however, are not accessible unless the exhaust pipes are dropped from the exhaust manifolds. There are 2 exhaust manifolds that each have a flange with 3 bolts holding the exhaust pipe to the manifold. Of course the 3 nuts are fused onto the bolts AND the flanges, and won't budge when trying to remove them with a wrench.
So the nuts must be cut off. But there's no room for a hack saw. Time for a dremel to grind them off. Other than the nut at the bottom of each flange that can actually be cut off, the top 2 must be ground off. Takes a bit longer, but is doable with the dremel. Spent parts of 5 days working on this. After doing a couple, I figured out a system that worked faster on the remaining nuts. All 6 are ground off.
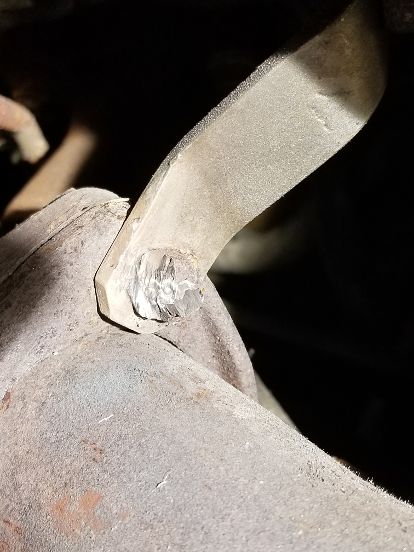
But I'm not out of the woods yet, as I need to get the flanges separated which will allow me to lower the exhaust pipes. The remaining bolts are still fused in the flanges. The next step? Heat. I bought a new benzene torch, as my old one almost caused an explosion. There are 2 types - a lower temp one using blue bottles of fuel and a hotter version using a yellow bottle. Since I have a few old blue bottles already in the garage, I bought the blue torch. Tried it on the 1st bolt I’d ground the nut off and it wasn't hot enough. I called a mechanic friend and he suggested the yellow torch. So I went back and bought it (I've always needed 2 benzene torches). It did heat the metal to red but it didn't loosen the nuts - that's when I decided to grind them off. Now I'll heat the metal to red hot and hopefully drive the bolts out of the hole. At the very least, I hope I can get the exhaust pipe flange off the bolts, allowing the exhaust pipes to drop down. If that doesn’t work, my mechanic friend has an acetylene torch and he can get them off. But that escalates the project.
So after I got all the nuts off and before I tried yellow heat, I gave 1 of the bolts on the driver’s side a few good whacks with a hammer and punch. It flew out and the vibration knocked a 2nd bolt half way out. The 3rd bolt gave a bit more resistance, but it came out too. I had the driver’s side out. The bottom passenger side bolt still wouldn’t come out (this is the one I tried early on and assumed all were stuck because of this one). Went to the top of the flange and both popped out with some persuasion. I took a small screw driver and carefully drove it between the flanges and they cracked loose. Took the punch and hammer to the last bolt and it popped out. Yay!
But no time to celebrate just yet. There was a pipe running down from the engine bay to the cats and it was joined together by a nut on a threaded flare section. This pipe was keeping the exhaust pipe from dropping down. The bottom, immovable nut was a 22mm and I had a flared wrench for it. But the other nut was big. I measured it at 27mm and went on a journey to find an open end wrench at a parts store, while the nuts soaked in Aerokroil. Took me 3 tries to find one but I was in business. Got home and tried working them loose. No go after several attempts. Decided to try blue heat on it since the line appeared to be a non-steel or iron composite. Gave the big nut a good bit of heat, then tried my wrenches again. It came loose! I loosened the nut and the exhaust dropped down. Finally, some success.
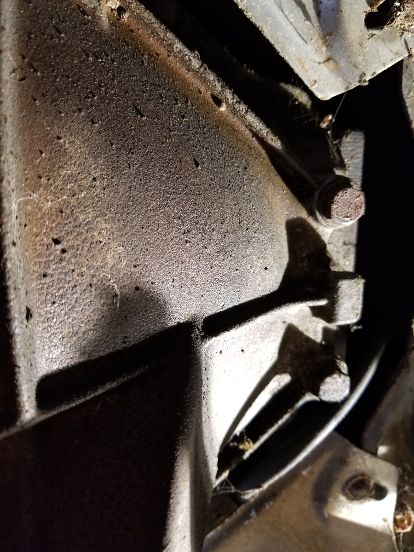
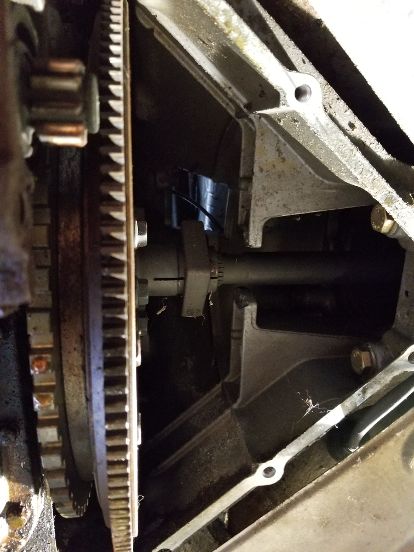
I loosened the 2 previously inaccessible bolts on the plate and removed it. I painted some stripes on the flywheel, one on top and one on the bottom, so I could tell when I’d turned the flywheel 180 deg. Then went on top and made sure the offending cap was clear of the hole. Turned the flywheel and the cap came out. More success.
Decided to do some clean-up on top of the bell housing before putting everything back together. Also took the opportunity to clean one of the twelve ground wires on a 928 that can cause electrical issues. This makes the 10th of 12 that I’ve cleaned. This one is normally buried but only required 1 bolt and wire to be removed to get to it since I already had a bunch of stuff removed for the CPS. Then put the CPS in and got the pig tail routed and connected. Sweet Baby Jesus, the CPS sure looks good back in place.
I’m going to put the fuel lines back on tomorrow and hopefully try starting it again. Then on to measuring the thrust bearing.
__________________
GPRPCA Chief Driving Instructor
2008 Boxster S Limited Edition #005
2008 Cayman S Sport - Signal Green
1989 928 S4 5 spd - black
Last edited by husker boxster; 03-21-2020 at 09:03 PM.
Here in the Rust Belt, bolts like that are par for the course.
Anyway, good luck starting the car. I'm excited and at the same time scared for you. In the back of my mind I'm still worried about the condition of the timing belt. The fact that you cranked the engine and it still held should make me feel better, though.


 1997 Porsche Boxster
 2018 Porsche Macan


 2002 Porsche Boxter S
 2001 Porsche Boxster S
 1999 Porsche Boxster
 1999 Porsche Boxster
 1999 Porsche Boxster
 1999 Porsche Boxster
 2000 Porsche Boxster
 1999 Porsche 996 C4
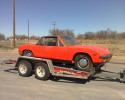 1972 Porsche 914
 1984 Porsche 928S
 1984 Porsche 928S
 1985 BMW 635 Csi


 Linear Mode


