Go Back   986 Forum - The Community for Porsche Boxster & Cayman Owners > Porsche Boxster & Cayman Forums > DIY Project Guides

Post Reply
 
LinkBack Thread Tools Display Modes
Old 08-31-2017, 12:14 AM   #1
Registered User
 
Join Date: May 2015
Location: Greater Seattle, WA
Posts: 534
Rear Trailing Arm Rebuild DIY

As an alternative to replacing the rear trailing arms with new parts, as initially suggested in this renntech thread, I found it is indeed possible to rebuild the existing, rattling rear trailing arms. Through this I also gleaned some additional observations and recommendations, not covered in either above-linked thread, which I'll outline below.

Because arm removal and reinstallation are already covered above, I won't focus more than just this one paragraph on those aspects, but will mention I had no problem simply jacking up the rear, placing the rear on jack stands, removing the rearmost undercar shield, and using a 21mm combination wrench above with 18mm socket below with breaker bar to remove the two bolts holding each arm. No wheel removal was necessary, no preloading of the suspension was necessary, and the trailing arm could be easily removed and installed this way (rear undercar shield not yet removed in below picture, FYI):


Once the old arms are removed, you may want to clean them up. Brake parts cleaner and paper towels are very effective to clean aluminum. I find the chlorinated brake parts cleaner will not attack nitrile gloves. (Non-chlorinated will eat nitrile gloves up over the course of a couple minutes or so.). You can use more gentle, water-based "all-purpose cleaners" also, but they'll just work slower. However, as brake parts cleaner is probably not good for the rubber boots, its good case for using milder options around them. Cleaned up trailing arms below, even at ~120k miles, are already looking like new:

(Also shown above are snap-ring pliers and screwdriver, to remove boot retention clips.)

Next, we'll want to make these used arm perform at least as good as (or ideally, better than) new!

I was able to feel some shifting in the one spherical bearing which in my car, I believe was making noise. I went ahead and preventively rebuilt the bearing in both. By rebuilding, I mean cleaning, re-lubricating, and tightening up the clearances. It's amazing how much noise just a few thousandth of an inch of play in these bearings can allow to be transmitted into the cabin!

To get at the spherical bearing for service, use snap ring pliers to remove the outer c-clips...


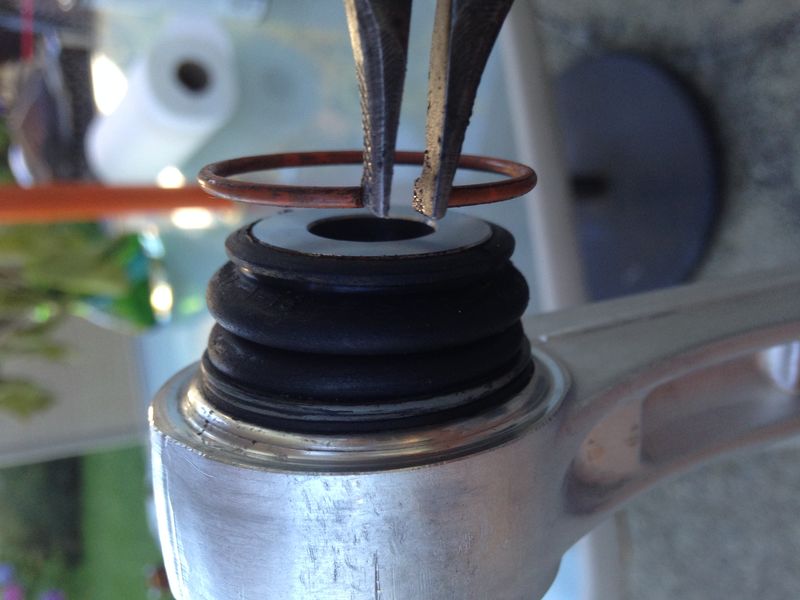
...and the small screwdriver the work off the spirolox retainer on the boots on either side of the spherical bearing:


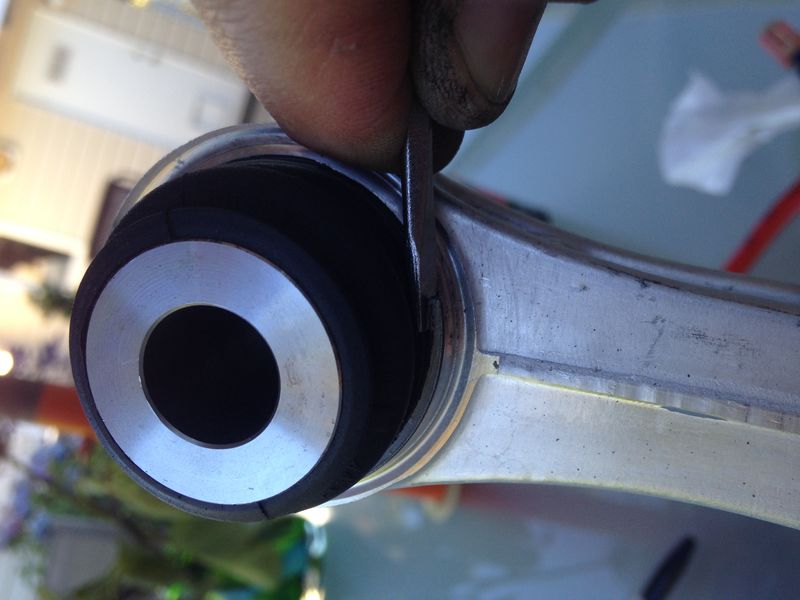
You will find the spherical bearing is retained by the machined aluminum housing on one side...


...and a pressed-in steel retainer on the opposite side (along with a thin, white plastic insert lining the spherical joint):


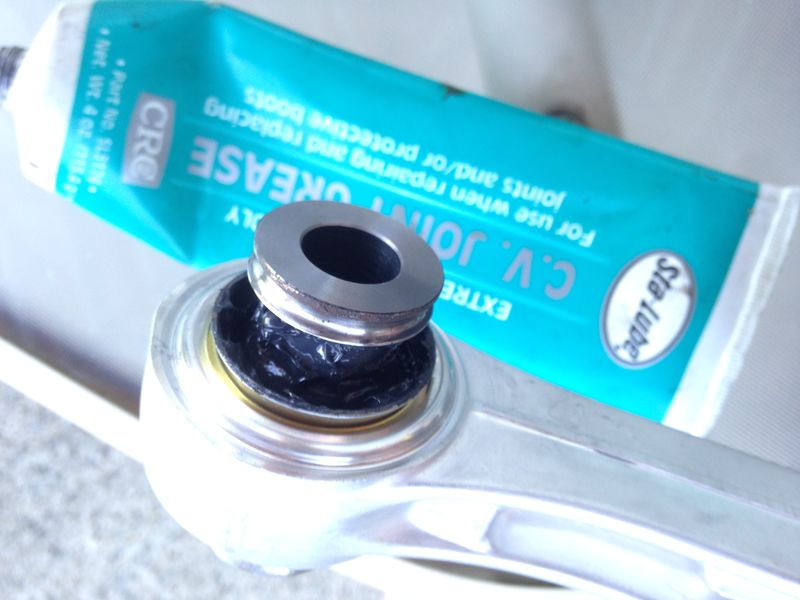
Since the bearing was fairly tight, instead of completely disassembling this crimped together assembly, I decided to try add additional lubrication in place and trying working it in, prior to tightening the crimped assembly to take up the play. The old grease was not in bad shape, but I added extra which I thought seemed most likely to be compatible. The dark color of the grease and extreme pressure application indicated likely molybdenum disulhide additive ("moly") was used. CV joint grease has moly, so I added some of that and worked it into the joint by both pivoting and spinning around the moving part afterwards:


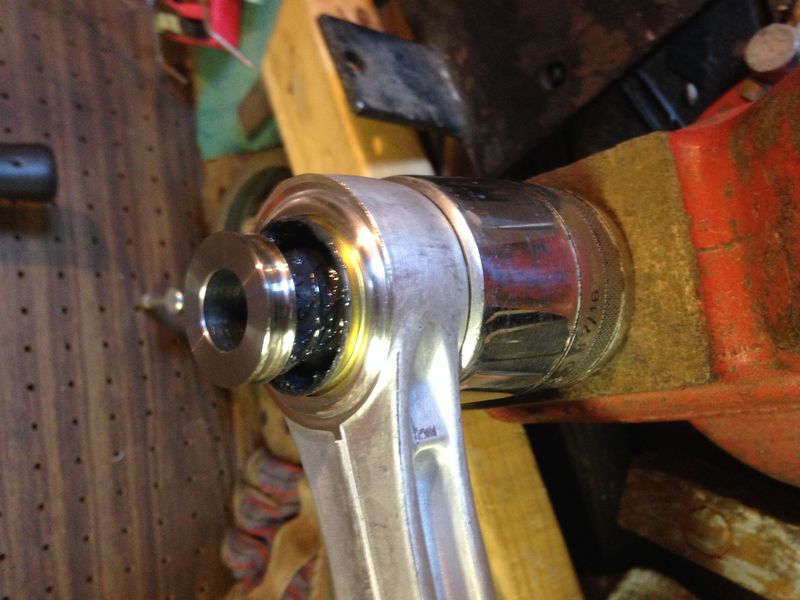
I used a 1-7/16" socket to support the all-aluminum side of the housing...


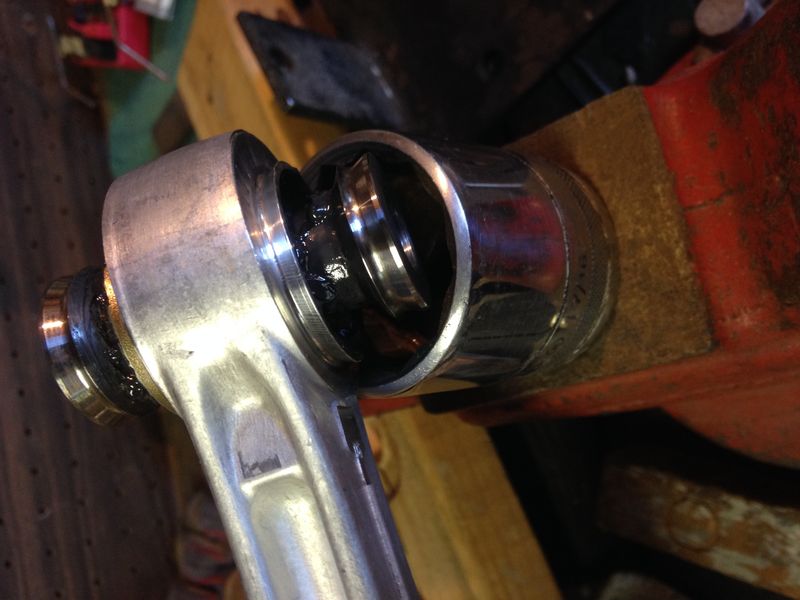
...and a 1/8" round punch, with a small sledge hammer, to "upset" or add additional crimping at the rolled up "hump" where the aluminum housing retains the steel insert:


I supported the bearing-free end up the trailing arm with a piece of wood to hold the bearing end flat on the socket, so I could repeatedly hammer blows with the punch around the crimped circle:


[DIY content continues on next post...]

__________________
2001 Boxster

Last edited by jakeru; 08-31-2017 at 12:39 AM.
jakeru is offline   Reply With Quote
Old 08-31-2017, 12:23 AM   #2
Registered User
 
Join Date: May 2015
Location: Greater Seattle, WA
Posts: 534
Here you can see I have a start at going around the crimp with the punch for the first time. I found several round trips around was necessary, and angling the punch inwards to dig the corner in deeper and apply some inward pressure on the lip of steel insert, to get the desired noticeably increase binding action I was looking for on the spherical bearing.


I stopped hammering when there was a moderately noticeably increase bind on the spherical bearing, because I wanted to tighten it up, give the joint was already "broken in", I didn't want it to bind as hard as a brand new trailing arm. (I understand they are difficult to even move by bare hands). I found it took quite a lot of hammering action to accomplish this - hard blows delivered multiple times around the crimp. No need to be shy here! Just make sure the punch, and support on the back side are all in the right spot before you hit with that sledge.

Here's what the tightened up joint looks like:


Once you've got your re-lubricated, tightened up joint, you'll want to replace the boots and clips. I found reinstalling inner spirolox clip to be the most difficult, and ended up vice-gripping each end of the spirolox, and rotating the spiral open larger, then installing over the receiving rubber groove, before releasing the vice grips while guiding the spirolox into the target rubber groove with a small screwdriver. (..whew - a lot of monkey business to reinstall those spirolox!). Re-installing the outer circlips with the earlier shown pliers on the other hand, was a piece of cake.


Re-install both of your freshly rebuilt trailing arms, and as stated in the other linked threads above. torque those retaining fasteners (both front and rear) to the spec of 118 ft-lbs.

In my opinion, you shouldn't worry about pre-loading the suspension (as it makes no difference with spherical bearings anyway), reinstall the rear under-car shield with the 10mm plastic nuts, and enjoy your new quiet ride! Suspension alignment shouldn't be affected through this.

One cautionary warning on this noise fix, as others have reported when replacing the arms with new, is once this obnoxious source of noise has been taken care of, you may start hearing some other, more quiet noises. (However, I assure you, taking care of these obnoxious noises is still worth it, and also as I hope you've learned in this thread, needn't require you to fork over hundreds of $ on new, unnecesssry replacement parts, either)!

Cheers!
__________________
2001 Boxster
jakeru is offline   Reply With Quote
Old 08-31-2017, 12:42 AM   #3
Registered User
 
Nine8Six's Avatar
 
Join Date: Sep 2013
Location: Montreal, QC. (currently expat to Shanghai)
Posts: 3,249
Whoa that is pretty tidy man, me like a lot. HD also, thanks for that man

As much as I enjoy reading a lot of blah on the other side, although 95%+ valuable info, there is still nothing better than to see stuff turning real

Who knows, might be able to do my own links when they are shot now (saved me $500~750 labor!). Awesome work and info Jake
__________________
______________________________
'97 Boxster base model 2.5L, Guards Red/Tan leather, with a new but old Alpine am/fm radio.
Nine8Six is offline   Reply With Quote
Old 08-31-2017, 08:25 AM   #4
Multi-Boxer Driver
 
Deserion's Avatar
 
Join Date: Nov 2010
Location: Orange Park, FL
Posts: 1,406
Garage
Nice writeup. I don't think brake cleaner would hurt the boots, otherwise it would harm caliper piston seals.

Maybe for kicks I should try this on the old set I have in the garage.
__________________
-Chris
2004 Porsche Boxster 2.7
1991 Porsche 911 C2 Targa 3.6
2017 Subaru Outback 3.6R
Deserion is offline   Reply With Quote
Old 08-31-2017, 08:41 PM   #5
Motorist & Coffee Drinker
 
78F350's Avatar
 
Join Date: Jul 2014
Location: Oklahoma
Posts: 3,665
Garage
Thanks for taking the time to post this. I have an old set of arms that I didn't dispose of and a car that's rattling. Hope to get it done soon and swap them out.
Quote:
One cautionary warning on this noise fix, as others have reported when replacing the arms with new, is once this obnoxious source of noise has been taken care of, you may start hearing some other, more quiet noises.
Another easy to fix rattle, while you have the car raised, is the rear sway bar bushings. ~20 years can harden them even on a low mile car.
Just be sure to buy the right size: 101 Projects for Your Porsche Boxster: Project 59: Front/Rear suspension Overhaul Parts

__________________
I am not an attorney, mechanic, or member of the clergy. Following any advice given in my posts is done at your own peril.
78F350 is offline   Reply With Quote
Old 09-01-2017, 04:42 AM   #6
Registered User
 
Join Date: Sep 2016
Location: Stow, MA
Posts: 918
Garage
New trailing arms cost so little it doesn't make any sense to try to repair them. The forces are also so great that I doubt a repair like this will hold. Remember that all acceleration forces, and all rear braking forces are transferred to the chassis through the trailing arms. Not to speak about the bangs from pot holes.
__________________
2004 Boxster S Silver - FUNTOY
2002 Boxster Base Guardsy Red - FUNBOX
1987 Caterham Super 7 1700 Supersprint
2009 Mercedes Benz CLK 350 convertible
1941 Dodge Luxury Liner Coupe
Anker is offline   Reply With Quote
Old 09-05-2017, 07:21 PM   #7
Registered User
 
Join Date: May 2015
Location: Greater Seattle, WA
Posts: 534
Thanks for the words of encouragement and appreciation, 78f350, Deserion, and nine8six! I hope this is useful to other forum members who are considering doing repairs & improvements themselves.

Anker - I also appreciate you weighing in, but must respectfully disagree about sharing your personal opinion that this repair "doesn't make sense", and your assertion that the "forces are so great" [that] "it won't hold".

Obviously, the forces are pushing the limit (if only, by just a a bit!) on what "new" design bearing would hold, or otherwise the factory joint wouldn't have developed any slop, even the small amount I observed in my joints (I'd guesstimate only one of my two 120k miles joints had only about .005"-.010" play - althogh it is enough to hear going over pavement joints in the cabin of the car).

However, the likely weakest material involved in these joint is the white plastic balljoint liner, which is probably teflon (PTFE) or something similar, used for reduced friction.

Teflon-lined aftermarket spherical bearings or "heim joints" are readily available for applications like camber plates, as are metal-on-metal spherical bearings, which give more static friction AKA "stiction" than the teflon-lined variety. The teflon-lined spherical bearings generally need more surface area (larger dimensions) to deal with the same load as a metal-on-metal joint. So, I'll bet it's the plastic liner that's first piece to deform in these Porsche 986 joints...

Anyhow, I think it most likely that the factory teflon liner probably got pounded a bit (.005"+ very plausible compression, as given the piece is probably .065" or so thick, that's only ~10%+ thickness reduction) after this sort of high miles, 100k+ mile use. Even if the aluminum housing gets pounded, forced a bit more into a shape which conforms with the inner metal spherical bearing, I'd surmise that rebuilding in the way I describe (by tightening up a "seasoned" or "broken in" joint like this evenly, while also ensuring the lubrication and sealing from the outside elements is "as good or better than new"), stands more of a chance for going longer than the original design ~100k than simply buying a "new", unseasoned, not broken in plastic-lined joint, and simply replacing with that. That's because the softer surfaces which get deformed in use, after being brought closer together after being "broken in", may then be more resilient against further deformation or wear.

But then again, that's just my theory. If a new joint lasting only another ~100k is good enough for your needs, the several hundred $ parts cost doesn't matter, you or your mechanic aren't required with necessary equipment or skill to repair (which I attempt to help you decide and facilitate by detailing here), then by all means, replacing with new is probably your best bet. Hope that information helps!

__________________
2001 Boxster

Last edited by jakeru; 09-05-2017 at 09:30 PM.
jakeru is offline   Reply With Quote
Post Reply


Thread Tools
Display Modes

Posting Rules
You may not post new threads
You may not post replies
You may not post attachments
You may not edit your posts

BB code is On
Smilies are On
[IMG] code is On
HTML code is On
Trackbacks are On
Pingbacks are On
Refbacks are On


All times are GMT -8. The time now is 08:02 AM.


Powered by vBulletin® Version 3.8.7
Copyright ©2000 - 2024, vBulletin Solutions, Inc.
Content Relevant URLs by vBSEO 3.6.0
Copyright 2024 Pelican Parts, LLC - Posts may be archived for display on the Pelican Parts Website -    DMCA Registered Agent Contact Page