Location: Montreal, QC. (currently expat to Shanghai)
Posts: 3,249
Quote:
Originally Posted by tommydorsey
Fred - I originally ordered a set because they looked cool. After seeing how they are made - jeez, they are incredible!!!
Thanks Jim! Trying to have them fit for Porsche cars that's for sure. 100% of those caps are made for good friends so a lot of care goes into making those things. Exclusive stuff so might as well have them looking good as much as looking cool
Quote:
Originally Posted by Terryg
I am in no hurry so don't feel pressured! On another issue does that mean the lettering can say anything or is there a lot of work involved in changing the wording?
Terry, certainly doable however, and don't take this wrongly, but I was hoping for you guys to use the template I've provided in an earlier post + a vector based software to do your own! Just so I don't have to go back & forth for draft approval, mods, etc, etc In any case, if you are not happy with the 'default' script, shoot me a PM and I'll see what I can do for you mate
Quote:
Originally Posted by lowpue
Don't know if I missed the boat but if possible I would love two sets: a gunmetal set with silver cap and a red set. If you have some still let me know how to pay you.
Thanks for the kind words! Can;t say for sure if I'll have any left, to be honest it doesn;t look like it but you just never know... some may change their mind and I might end up with a spare or two I'll post here for sure if that happens. Fingers crossed
In the Media this week:
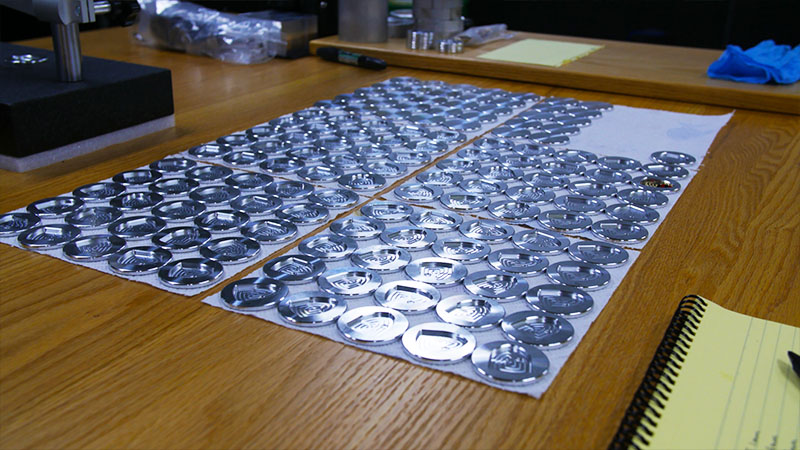
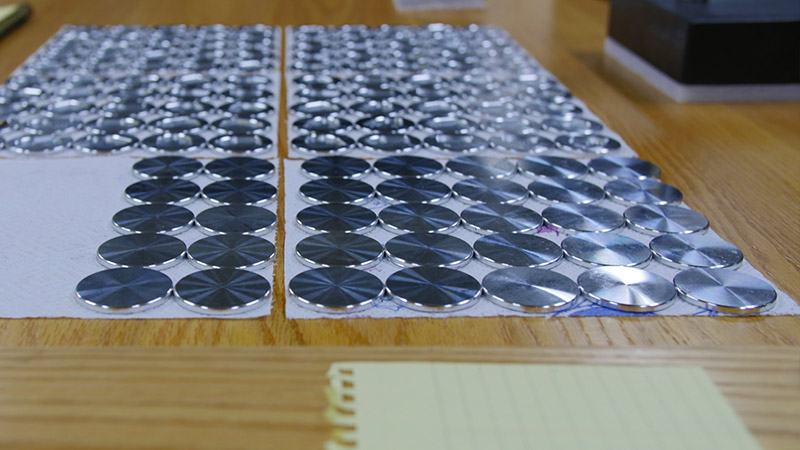
^ So the first milling Op on those center/centers is to face the back of them. Te lathe finishes the front surface, were the badge goes, but does leave a nasty finish on the backside. Ti fix this, we have to load them up by pair in the milling machine and take a light cut to get that mirror finish! Details... its all about details
^ So poor I can't even afford a decent workbench dedicated to the machines lolll This has to be the most ridiculous set-up of all time e.g. what happen if I bump in that skinny bar stool?! Time to get a nice table custom made I think...
^ Adapters and centers are done!!! All left to do now if the main cap
^ Kept a few center 'solid' so I can laser some of my mate's custom request/visuals. Can;t wait to get those Sepultura stars completed (see previous pages/renders, in black w/star).
^ Preparing for this weekend's job (the main cap). Here I'm prototyping a precision thread that will accommodate the adapter. The adapters are
"deep freeze @ =22 degree Celsius prior assembly so this thread has to be right. No "lock-thigh & no-glue" on that thread. A plain a simple locking mechanism using thermal expansion (trade secrets, again!)
^ Precision threading... had to made 5 diff size to find the correct one. So the aluminum cap has to be heated at 40 degree and the adapter deep-freeze for things to work. Once both parts are at room temp, its permanent... no way to get this unscrewed (got one chance at this loll)
Some Video:
__________________
______________________________
'97 Boxster base model 2.5L, Guards Red/Tan leather, with a new but old Alpine am/fm radio.
Thanks for the kind words! Can;t say for sure if I'll have any left, to be honest it doesn;t look like it but you just never know... some may change their mind and I might end up with a spare or two I'll post here for sure if that happens. Fingers crossed
Thanks, please PM me if that is the case. Thanks again.
__________________
2020 Taycan Turbo S - DD Rain
2015 Huracan - DD Sun
2002 Boxster - Play Car
2000 C2 Aero - Track Car
1965 Dodge Coronet 440 - Nostalgia


![Custom Center Caps for Porsche Wheel [from CAD, prototyping to finish]](/forums/iconimages/diy-project-guides/custom-center-caps-porsche-wheel-%5B-cad-prototyping-finish%5D_ltr.gif)


 I'll post here for sure if that happens. Fingers crossed


 Hybrid Mode


