Go Back   986 Forum - The Community for Porsche Boxster & Cayman Owners > Porsche Boxster & Cayman Forums > DIY Project Guides

Post Reply
 
LinkBack Thread Tools Display Modes
Old 02-10-2015, 05:06 PM   #1
Beginner
 
Jamesp's Avatar
 
Join Date: Mar 2013
Location: Houston
Posts: 1,659
Garage
Fixing a boogered thread

So I saw a thread regarding a possible exhaust leak and it prompted me to post how to repair a boogered exhaust manifold thread. Imagine working on your box all day, you're tired, but almost done, just a few more bolts to put in before cranking it up. While installing the exhaust manifolds, the first manifold goes in without issue, as does the second except for that last bolt. That one refuses the grab the lead thread, removing the other bolts isn't helping, rotating the bolt backwards to find the lead thread is inconclusive, but it's time to press on. Finally, after all the jiggering around the bolt seems to grab the lead thread, finally. Being careful rotating it by had a turn or so it seems to confirm wishful thinking that it must have caught the lead thread, it must have! The next mistake is picking up a wrench and giving the bolt a twist, and after half a turn reality makes itself plain, you're the proud owner of a boogered head bolt thread. Steel bolt, aluminum head, guess where the boogered thread is. So after coming to the conclusion that this is a job for tomorrow, how to proceed? Well, this happened to a friend of a friend (FOAF) of mine. There are plenty of recovery options. one is to remove the head, take it to a machine shop, and have them put a helicoil in the offending bolt hole re-assemble the engine and give it another shot. Another is to put in a helicoil yourself, and as this is a DIY...

First buy a helicoil kit from a nearby auto parts store for the size bolt you'll be using

Second make a drill jig to drill a hole 90 degrees into the hole you'll be re threading. FOAF used a very square 2X2 piece of pine, a drill press, and the helicoil drill to make a pilot hole for drilling the head. Note the drill stop which is critical to drill to the correct depth and no more.


The jig was carefully positioned onto the head using the drill bit to center over the threads to be drilled, and held into position with a floor jack.

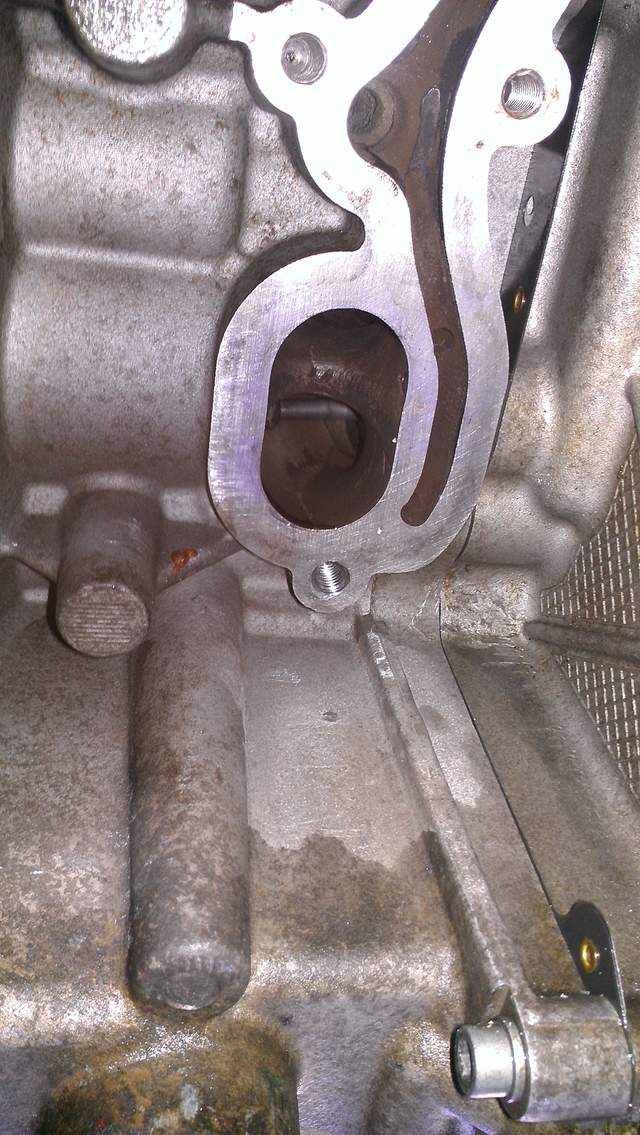
Drilling the end hole resulted in the following


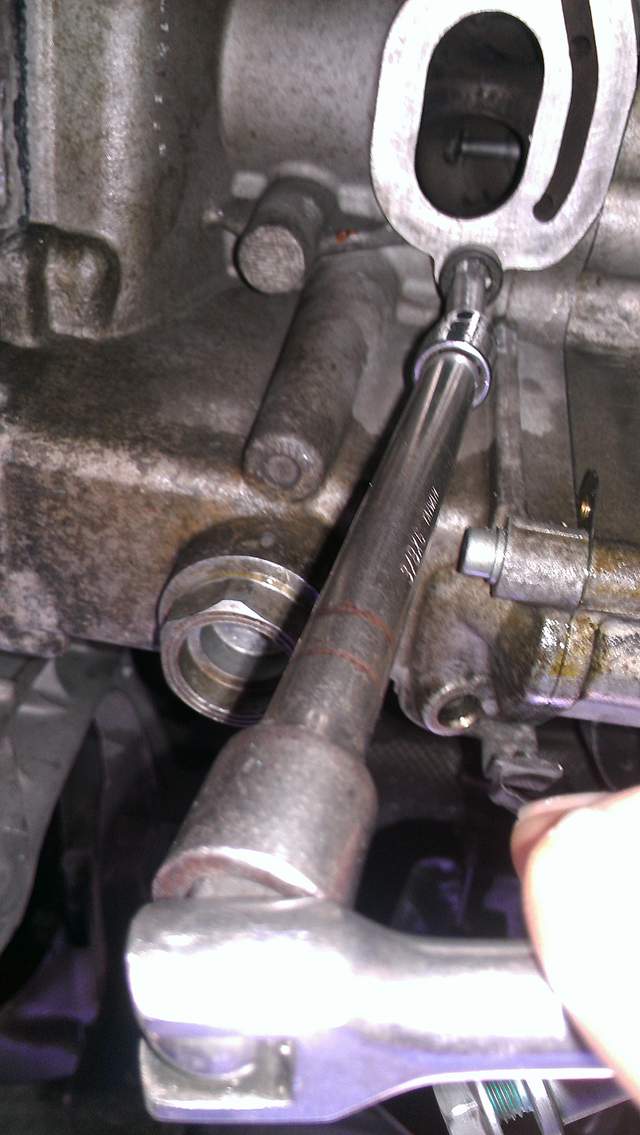
Then the same jig was used to guide the tap for the helicoil, again using the floor jack to hold the jig in place.


After starting threading (several turns) using the vice grips for control, a square bit, extension, depth gauge, and breaker bar were used to complete the threading.


After that, the helicoil kit was used to install a helicoil so the exhaust manifold can be bolted up tightly without leaks.


The nice thing about helicoils is the repaired thread is stronger than the original. So next time a friend of a friend of yours boogers a thread, take a day off, make a jig and pick up some helicoils to make it right.

__________________
2003 S manual
Jamesp is offline   Reply With Quote
Old 02-10-2015, 06:10 PM   #2
Registered User
 
woodsman's Avatar
 
Join Date: Feb 2013
Location: Land of naught
Posts: 1,302
Really neat solution James' FOAF.
__________________
Death is certain, life is not.
woodsman is offline   Reply With Quote
Old 02-10-2015, 08:43 PM   #3
Registered User
 
rdass623's Avatar
 
Join Date: Apr 2014
Location: new orleans
Posts: 249
did you use some red locktite on the helicoil? I generally do so to avoid having the helicoil back out if furure removal is necessary. by the way good job and attention to detail!!
__________________
2005 Porsche Boxster S, 2000 Porsche Boxster 2.7L Base, 2000 Mazda Miata LS Supercharged, 2010 Toyota Tacoma TRD Off Road
Previous Vehicles: 2005 Ford Mustang GT, 1986 Alfa Romeo Spider, 1971 Alfa Romeo GTV, 1999 Ford Mustang
1977 Toyota Celica GT
rdass623 is offline   Reply With Quote
Old 02-10-2015, 11:25 PM   #4
Registered User
 
Nine8Six's Avatar
 
Join Date: Sep 2013
Location: Montreal, QC. (currently expat to Shanghai)
Posts: 3,249
Nice write up mate, you make it sound so simple.

Key to success is patience... these things can't be rushed. Understood you meant all that by saying 'taking a day off' lol
__________________
______________________________
'97 Boxster base model 2.5L, Guards Red/Tan leather, with a new but old Alpine am/fm radio.
Nine8Six is offline   Reply With Quote
Old 02-11-2015, 02:48 AM   #5
Beginner
 
Jamesp's Avatar
 
Join Date: Mar 2013
Location: Houston
Posts: 1,659
Garage
Quote:
Originally Posted by rdass623 View Post
did you use some red locktite on the helicoil? I generally do so to avoid having the helicoil back out if furure removal is necessary. by the way good job and attention to detail!!
Locktite was not used due to the uncertainty of how it would react in the high heat of the exhaust. If the helicoil backs out on removal another can be put in its place.
__________________
2003 S manual
Jamesp is offline   Reply With Quote
Old 02-11-2015, 04:04 AM   #6
Registered User
 
kk2002s's Avatar
 
Join Date: Sep 2012
Location: S. New Jersey
Posts: 1,239
Garage
Good food for thought
I have a less than desirable oil sump plate hole not giving the most comfortable torque ability
So I'm looking at either heli coil or tapping up one size
At 7-8 ft/lbs it's less critical (Not the keeping oil in the engine part) then Exhaust manifold, which must be much higher torque
__________________
2002 S - old school third pedal
Seal Grey
kk2002s is offline   Reply With Quote
Old 02-11-2015, 04:44 AM   #7
Registered User
 
WillH's Avatar
 
Join Date: Feb 2015
Location: QC
Posts: 412
When replacing my headers I had three bolts break. O/A torch helped a great deal on removal, but some of the bolts would appear to have been made from cheese.
Probably should have tried the mig trick but didn't.

After buffing flat the remains of the bolts with a dremel I cut off the header flange from the original dead headers and remounted for a guide. Using the appropriate sized center punch I had a place to begin drilling with ccw bits in a an ascending order.
No luck in removing the remains meant drilling for helicoil.
The flange helped to insure that the drilling was located as precisely as possible considering that it was done whithout removal from the car.

That wood trick would have been helpfull for keeping everything straight, remove some stress from the operation.

WillH is offline   Reply With Quote
Post Reply


Posting Rules
You may not post new threads
You may not post replies
You may not post attachments
You may not edit your posts

BB code is On
Smilies are On
[IMG] code is On
HTML code is On
Trackbacks are On
Pingbacks are On
Refbacks are On


All times are GMT -8. The time now is 02:00 PM.


Powered by vBulletin® Version 3.8.7
Copyright ©2000 - 2024, vBulletin Solutions, Inc.
Content Relevant URLs by vBSEO 3.6.0
Copyright 2024 Pelican Parts, LLC - Posts may be archived for display on the Pelican Parts Website -    DMCA Registered Agent Contact Page