 11-18-2015, 07:23 AM
|
#701
|
|
Registered User
Join Date: Dec 2012
Location: FL
Posts: 4,144
|
|

|

|
|
12-01-2015, 12:07 PM
|
#702
|
|
Registered User
Join Date: Aug 2015
Location: Boise, ID
Posts: 83
|
Sounds like a horrible experience, but I'm glad to see everyone's glad you're back (I joined the site not long ago and have been reading of your projects with great interest.)
When everything gets back to some sort of normalcy, I look forward to doing business with you.
|

|
|
|
12-01-2015, 06:48 PM
|
#703
|
|
Registered User
Join Date: Nov 2013
Location: PA
Posts: 299
|
Fred - Welcome Back, glad to hear you're back home. I really used to like going to Thailand - but after hearing your story I think I will avoid it.
Best thoughts to you & your family.
Don
__________________
2004 Boxster S
|
|
|
|
|
12-02-2015, 03:28 PM
|
#704
|
|
Registered User
Join Date: Apr 2012
Location: Missouri
Posts: 134
|
Welcome back Fred! Hope you recover soon
|
|
|
|
|
02-20-2019, 07:50 AM
|
#705
|
|
Dads Technical Support
Join Date: Jan 2019
Location: Alabama
Posts: 16
|
@Nine8Six,
I've read through this thread and read about your woes near the end. Unless I've missed it though, I didn't see any statements as to whether or not the Skybreaker is still available for order. My dad just bought his 2001 Boxster and this is the sort of classy add-on that I would surprise him with as a gift.
Steve
|
|
|
|
|
02-20-2019, 08:10 AM
|
#706
|
|
Registered User
Join Date: Mar 2017
Location: Los Angeles
Posts: 356
|
Interested
If you do make these available again, I will buy one!
|
|
|
|
|
02-27-2019, 09:09 AM
|
#707
|
|
Registered User
Join Date: Feb 2019
Location: Kernersville, NC
Posts: 294
|
Me too! Even though I don't how much they are/were... haven't made it through the whole thread.
|
|
|
|
|
01-07-2020, 11:25 AM
|
#708
|
|
Registered User
Join Date: Sep 2013
Location: Montreal, QC. (currently expat to Shanghai)
Posts: 3,249
|
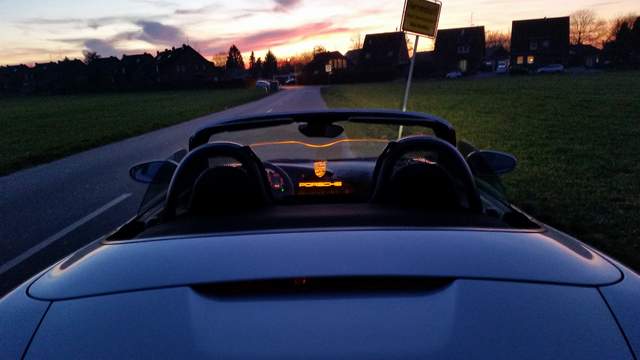
SkyBreaker V2
Hey folks,
Wanted to revive this thread, pardon me! Let's excite the idea of prototyping the "SkyBreaker Version II" 
A lot of you guys asked for a kit and that recently got me thinking; while waiting for production machines to free up it would be a good idea to look up at members' requests for that SkyBreaker again before cracking on another batch of those. Two of the most recurrent requests below:
- Custom colors: A lot of you asked for RGB led. Therefore 16,777,216 possible colors.
- Brake light/Safety add-on: Synchronizing the brake pedal action and turning ON the RED led at full brightness. 3rd brake light essentially.
Let me know what you guys think. I'm personally all up for the challenge and willing to engineer this so that Version 1 can easily be retrofitted with Version 2's hardware if anyone is interested to upgrade, or vice versa e.g. to save cost.
Price: I'm looking at getting some extra panels hard-coated in the very near future. Problem remains the mfg's "min.qty" requirement so this is why I'm going to give it my best shot and add-on those requests. Hopefully this will get a few more of you guys to join our SkyBreaker Club! Of course the Version II will cost $986.00 (LEDs and M3 screws are optional too) but in all seriousness, I really doubt it will end up costing much more than what it did before (+20~30 bucks max, I'm guessing).
Ideas, suggestions, comments, flaming, requests; All Welcome!
__________________
______________________________
'97 Boxster base model 2.5L, Guards Red/Tan leather, with a new but old Alpine am/fm radio.
Last edited by Nine8Six; 01-07-2020 at 11:29 AM.
|
|
|
|
|
01-07-2020, 11:30 AM
|
#709
|
|
Registered User
Join Date: Feb 2019
Location: Kernersville, NC
Posts: 294
|
Count me in! I'd be happy just with version 1 though. I don't personally need the ability to change colors or do the brake light thing, though I can see how others would.
__________________
1998 Boxster
2015 BMW M4 Dinan Stage 3
2016 BMW S1000XR
2015 Ninja 300
|
|
|
|
|
01-07-2020, 12:00 PM
|
#710
|
|
Registered User
Join Date: Apr 2014
Location: Seattle
Posts: 362
|
$986 seems appropriate ")
If I'm reading this correctly. Syncing the lights on the skybreaker to illuminate brighter than normal, at the same time as the 3rd brake light, every time you press on the brakes?
Would take away from the longevity of the lights?
Sounds like a great safety feature though, I'm all for it.
__________________
2000 Boxster S, SPEC stage 1 clutch, Fabspeed sport headers, Fabspeed secondary cat deletes, Billy&Boat muffler, EVOM air intake, Ben006's Custom Short Shifter, Pedro's TechnoBrace, Eibach rear sway bar, De-snorkeled, Fred's custom projector HL
|
|
|
|
|
01-07-2020, 12:31 PM
|
#711
|
|
Registered User
Join Date: Sep 2013
Location: Montreal, QC. (currently expat to Shanghai)
Posts: 3,249
|
Quote:
Originally Posted by TTGator

Count me in! I'd be happy just with version 1 though. I don't personally need the ability to change colors or do the brake light thing, though I can see how others would.
|
Thanks Gator. Sure thing, I'll get one out for you 
Quote:
Originally Posted by Dubaday
If I'm reading this correctly. Syncing the lights on the skybreaker to illuminate brighter than normal, at the same time as the 3rd brake light, every time you press on the brakes?
Would take away from the longevity of the lights?
|
Something like that. If I've clearly understood what many requested...
Example:
My SkyBreaker ambient color is that superb porsche amber color and brightness dimmed down (duty cycle of 5%). When I press on the brake the led will automatically glow RED at full brightness (duty-cycle of 100%). When I release the brake this all goes back to that superb porsche amber color and brightness dimmed down (duty cycle of 5%).
25k~50k hours on the led, generally (thermally managed properly). Not sure how many years this makes, too lazy to click the MS Calculator, but I'm sure its a lot.
Counting you in man, thanks!
__________________
______________________________
'97 Boxster base model 2.5L, Guards Red/Tan leather, with a new but old Alpine am/fm radio.
|
|
|
|
|
01-07-2020, 12:52 PM
|
#712
|
|
Registered User
Join Date: Apr 2014
Location: Seattle
Posts: 362
|
Quote:
Originally Posted by Nine8Six
Something like that. If I've clearly understood what many requested...
Example:
My SkyBreaker ambient color is that superb porsche amber color and brightness dimmed down (duty cycle of 5%). When I press on the brake the led will automatically glow RED at full brightness (duty-cycle of 100%). When I release the brake this all goes back to that superb porsche amber color and brightness dimmed down (duty cycle of 5%).
25k~50k hours on the led, generally (thermally managed properly). Not sure how many years this makes, too lazy to click the MS Calculator, but I'm sure its a lot.
|
So if I wanted the SkyBreaker ambient color red, it would just be a dimmed red, and upon pressing the brakes, it would be full brightness red, got it!
Just a thought, what if your car's 3rd brake light is wired for the multi-pulse blinks before staying fully lit? would it effect the SkyBreaker in any way? OR..... what if the SkyBreaker was able to do that too?  IDK, just coming up with ideas
__________________
2000 Boxster S, SPEC stage 1 clutch, Fabspeed sport headers, Fabspeed secondary cat deletes, Billy&Boat muffler, EVOM air intake, Ben006's Custom Short Shifter, Pedro's TechnoBrace, Eibach rear sway bar, De-snorkeled, Fred's custom projector HL
|
|
|
|
|
01-07-2020, 01:05 PM
|
#713
|
|
Registered User
Join Date: Sep 2013
Location: Montreal, QC. (currently expat to Shanghai)
Posts: 3,249
|
Quote:
Originally Posted by Dubaday
OR..... what if the SkyBreaker was able to do that too? IDK, just coming up with ideas |
We'll end up using a 32bits ST micro or those 10bits atmel avr. Not sure which but either way it will be fully programmable with gpio + a usb port where we'll be able to re-program it to do whatever-we-need-it-to-do (sense, flash, blink, pulse, fade, rainbow this, spectrum that, colors memory, preferred brightness levels, etc etc). Your creativity is the limit really...
Let's see! Might just need to tap the signal, vcc and ground wires from the brake pedal sensor just a few inches under the steering column. If some crazy custom flash is needed elsewhere I don't see any problem, yet, I'll help out with that no worries
__________________
______________________________
'97 Boxster base model 2.5L, Guards Red/Tan leather, with a new but old Alpine am/fm radio.
|
|
|
|
|
01-07-2020, 01:13 PM
|
#714
|
|
Registered User
Join Date: Apr 2014
Location: Seattle
Posts: 362
|
Hell yes I can't wait
1,986% IN
__________________
2000 Boxster S, SPEC stage 1 clutch, Fabspeed sport headers, Fabspeed secondary cat deletes, Billy&Boat muffler, EVOM air intake, Ben006's Custom Short Shifter, Pedro's TechnoBrace, Eibach rear sway bar, De-snorkeled, Fred's custom projector HL
|
|
|
|
|
01-07-2020, 02:12 PM
|
#715
|
|
Who's askin'?
Join Date: Mar 2018
Location: Utah
Posts: 2,448
|
Quote:
Originally Posted by Nine8Six
Hey folks,
Wanted to revive this thread, pardon me! Let's excite the idea of prototyping the "SkyBreaker Version II"
A lot of you guys asked for a kit and that recently got me thinking; while waiting for production machines to free up it would be a good idea to look up at members' requests for that SkyBreaker again before cracking on another batch of those. Two of the most recurrent requests below:
- Custom colors: A lot of you asked for RGB led. Therefore 16,777,216 possible colors.
- Brake light/Safety add-on: Synchronizing the brake pedal action and turning ON the RED led at full brightness. 3rd brake light essentially.
Let me know what you guys think. I'm personally all up for the challenge and willing to engineer this so that Version 1 can easily be retrofitted with Version 2's hardware if anyone is interested to upgrade, or vice versa e.g. to save cost.
Price: I'm looking at getting some extra panels hard-coated in the very near future. Problem remains the mfg's "min.qty" requirement so this is why I'm going to give it my best shot and add-on those requests. Hopefully this will get a few more of you guys to join our SkyBreaker Club! Of course the Version II will cost $986.00 (LEDs and M3 screws are optional too) but in all seriousness, I really doubt it will end up costing much more than what it did before (+20~30 bucks max, I'm guessing).
Ideas, suggestions, comments, flaming, requests; All Welcome!
|
Uhhhhh...... "DUH......"!
Of COURSE i'm in!
Wicked cook stuff!
Put me on the list, please. One with all those bells and whistles.
Sent from my SM-G970U using Tapatalk
|
|
|
|
|
01-07-2020, 02:41 PM
|
#716
|
|
01 Seal Gray 986 S
Join Date: Sep 2019
Posts: 167
|
In. Very in.
|
|
|
|
|
01-08-2020, 06:01 AM
|
#717
|
|
1998 Boxster Silver/Red
Join Date: Sep 2017
Location: 92262
Posts: 3,095
|
Awesome!
Saw the original post a couple years ago... but can't recall what you're asking price was (not going to read 36 pages, sorry). Can you share with me/us what will be your asking price(s) this time around?
I could be very in. Thanks!!
Awesome.
__________________
1998 Porsche Boxster
|
|
|
|
|
01-08-2020, 07:07 AM
|
#718
|
|
Registered User
Join Date: Sep 2013
Location: Montreal, QC. (currently expat to Shanghai)
Posts: 3,249
|
RGB LED pcb and circuit
Silver986, I'm aiming to get it out as low cost as possible. Let me estimate the number of man hours that will go into the assembly, BOM and handling and I'll revert back with a final number. One thing sure atm it has to be under $199.95 
*******
So... let's get things started shall we. Spent most of yesterday's evening researching for what I thought would have been an easy find (a compatible 5mm wide RGB led strip that is) and ended up wasting nearly half day trying. Just nowhere to be found other than those monster size 1/2" wide strips (5050) that could light up a small town. All that to say; Not An Easy Start lol
What do we do when we can't find hardware? That's right, we DIY here at 986forum. So let's make our own in the exact same size and configs as the previous Ver I so all can interchangeable, keeping the same ultra-light design and all that cool stuff. Here I'm using a 1.2mm thick/2 layers stack with 12x (twelve) RGB 3528 LEDs. Identical to the previous set-up with the only exception of upgrading one color for 16 million others.
Step 1: I'm sending this out to a local PCB manufacturing later on today so this should be in-house in a few days only. I already pick-ed up the LED from my local electronic market and been told by the resident experts that they are the most reliable of them all, wide angle projection, has a diffuser overlay and the most popular by the locals. So let's give them a try and we'll move on to the driver and micro right after, and if all goes well!
I'll update with visuals as I go, same old 986forum DIY theme haha!
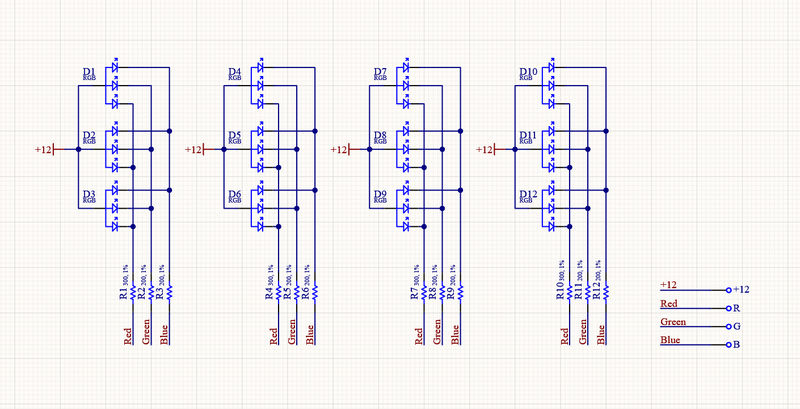
^ Circuit consist of 4 sections in parallel with each of those section consisting of 3 LED connected in series.
Requires 12VdC and pretty standard 'led strip', we aren't inventing anything here.
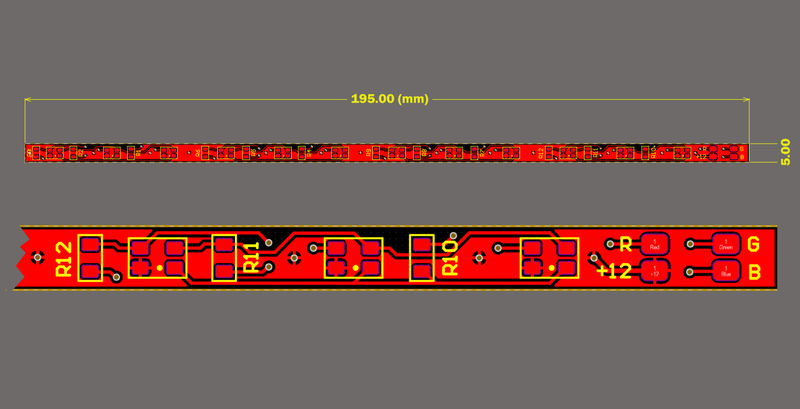
^ Identical size to the previous strip we had so no modifications is required to the existing design! I love doing
pcb but dislike routing those things... 12x 4P led didn't make that task easy on that 5mm wide board :/

^ Final result. Although showing green on the software visual this will be manufactured in black. Just to ensure we
aren't getting that green reflection, I doubt but just in case, same price anyway.
__________________
______________________________
'97 Boxster base model 2.5L, Guards Red/Tan leather, with a new but old Alpine am/fm radio.
|
|
|
|
|
01-08-2020, 09:17 AM
|
#719
|
|
1998 Boxster Silver/Red
Join Date: Sep 2017
Location: 92262
Posts: 3,095
|
~ 2 bills? I'd be in.
I'm assuming, correct me if I'm wrong, that the part will be a plug-and-play... and that we'd be removing our existing windscreen and plugging in your part? Or... are we sending you our existing windscreen and you're fabricating on top of that?
I'm thinking if you're selling the complete package one might just sell their existing windscreen making the purchase of your part a no-brainer. You know... offset the expense of the "cool" part by selling the "boring" part.
Thanks!
__________________
1998 Porsche Boxster
|
|
|
|
|
01-08-2020, 10:24 AM
|
#720
|
|
Registered User
Join Date: Jun 2013
Location: Central Pennsylvania, USA
Posts: 102
|
You already know that I'm in for v2.0, but I wanted to make it official here. :-)
__________________
2000 Boxster S - B.A.D. short shifter and intake plenum - 996 throttle body - Fred's xenon projector headlights - blue LED instrument cluster - and a few other things
Driving this car makes me wish I lived farther away from work!
|
|
|
|
 Posting Rules
|
You may not post new threads
You may not post replies
You may not post attachments
You may not edit your posts
HTML code is On
|
|
|
All times are GMT -8. The time now is 04:45 AM.
| |


![Porsche Wind Deflector with Edge Lighting [from CAD, prototyping to finish]](/forums/iconimages/diy-project-guides/porsche-wind-deflector-edge-lighting-%5B-cad-prototyping-finish%5D_ltr.gif)
 2004 Porsche Boxster S
 Ocean blue
 Linear Mode


