Go Back   986 Forum - The Community for Porsche Boxster & Cayman Owners > Porsche Boxster & Cayman Forums > DIY Project Guides

Post Reply
 
LinkBack Thread Tools Display Modes
Old 06-12-2014, 05:13 PM   #1
Beginner
 
Jamesp's Avatar
 
Join Date: Mar 2013
Location: Houston
Posts: 1,659
Garage
AC Repair Part 1

This post details replacing key components in an air conditioning system. There is no way to complete this job without a vacuum pump, and a set of AC gauges or a scale to weigh refrigerant as you add it to the system. You can also replace the components yourself and then take it to a mechanic for a recharge. If your system has refrigerant in it always take your AC to a certified refrigerant recycler as R134 is odorless, non toxic, and has little effect on ozone or the environment.

Also a serious word on safety. The AC high side pressure is far higher than can pressure. The can runs about 70 psig at about 85 F, the high side can run to about 290 psig at 85 F. Refrigerant can squirt out of the can at 70 psig and freeze your flesh. High side pressure can blow things up (like the can) showering you with shrapnel while simultaneously covering you in liquid refrigerant and freezing your flesh. That's bad. Needless to say, it is important to keep the high side valved off from the low side. Repeat, it is very important to keep the high side valved off at all times. Eye and skin protection is also advised as AC has little margin for error and can hurt you.

AC works by compressing low pressure (1.4 to 1.7 bar) to a high pressure (12 to 19 bar at 85 degrees). Section 8 of the shop manual has graphs of temperature versus high side pressure. The refrigerant gas is compressed and sent through the condensers, at the front of the car where refrigerant gas, wait for it, condenses into a liquid. The liquid continues from the condenser to the receiver dryer (or tank, or desiccant depending on what you read) to the expansion valve where it is flashed into a gas and small droplets of coolant that land in the evaporator (past the expansion valve we are on the low pressure side). The flashed refrigerant fully returns to a gas state in the evaporator dramatically cooling it and enters the low side of the compressor where it starts to loop again. Warm air blown over the evaporator cools and enters the cabin providing AC. The boundaries between the high and low side being the compressor, and the expansion valve. Now you know the condensers are on the high side, and the evaporator is on the low side.

Refrigerant can be added on two ways, by weight (best) which for a Boxster is 850 grams R134, or by checking the low and high side pressure and taking into account the ambient temperature, and humidity. (which is why there is a range of pressures at a given ambient temperature). When I add refrigerant I keep the valve on the can up so liquid does not enter the system, only gas. This takes longer but eliminates the possibility of “slugging” the compressor, that is allowing a slug of liquid to enter the compressor. The liquid is in-compressible, the compressor will try to compress it, and lose. That means you lose too with a broken compressor and a slug to your wallet.

Too much refrigerant will not make the system run better so don't go there, weigh the refrigerant going in, or get the high and low side pressure right.

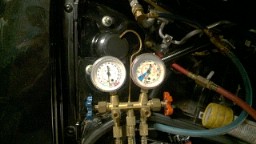
So if weight is so important, why the pressure gauges at all? To measure the health of the system, diagnose problems, and add refrigerant to offset leakage over time as needed (every pressure system leaks a little). Get a book on AC repair and it will tell you how to interpret gauge pressure readings.


It is also important to have the correct amount of PAG oil in the system. ND 8 or PAG 46 is what is needed. This picture is 55 cc of oil drained from the old compressor. A tape line marks top of meniscus.


A total of 195 +/- 15 cc of oil is required in the system and in my case two parts that hold oil are being changed, the receiver dryer and the compressor. The receiver dryer should have approximately 30 cc and the compressor should have approximately 50cc. Typically I simply drain the oil from a used component and then add that amount + a pinch (~ a few cc's use your judgment) more for what is still in the used component and call it good. The oil is typically added to the high and low side compressor ports.

Naturally there is a twist with Boxsters. Adding oil is a little different than other compressors I've worked with. On the installation notes in the Boxster service manual direction is given to open the oil filler screw (bolt in the middle of the compressor in this photo)


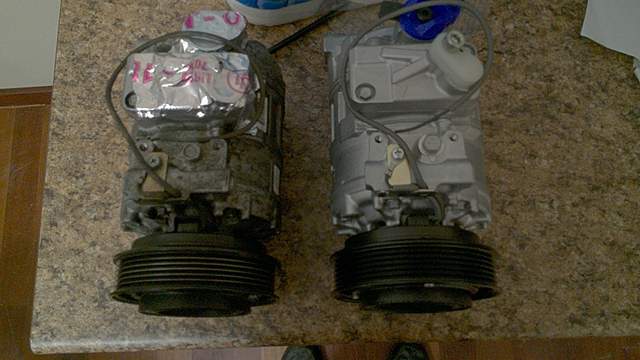
on the compressor and empty approximately 80 cc of oil out, leaving approximately 120 cc in the compressor, then replace the screw. That's a lot of oil considering the compressor is supposed to have 50 cc in it during operation. I replaced the 55cc with 60 cc after draining the new compressor.

The receiver/dryer was also replaced (called the “fluid tank” in the manual and “desiccant” in the parts list) and per the manual it held another 30cc of oil. Mine drained very little and I assumed the oil would not easily drain, so I added 30 cc to the new receiver/dryer. Again, the end goal is to end up with 195 +/- 15 cc of oil in the system.

When replacing AC components don't start the job until you have all of the components you will need to complete the job. The key is to have the refrigerant loop open for as little time as possible. Air and the associated water from humidity and dirt will kill the internal components (particularly the receiver dryer) quickly when the system is open.

Since my compressor is shot (figured that out with gauges) I have to open up the system and might as well replace other components that may be on their way out. The receiver dryer is essentially the filter for the system and as the name implies, it takes water out of the system. Even a few drops of water will freeze in the refrigerant loop and prevent the system from functioning. When opening the loop, I looked for contamination in the oil, essentially any particulate. If found the system must be flushed, a major pain. Luckily for me no particulate was found.

So to start, put the top in the service position and open the front hood. The AC high pressure (high side) and low side are accessed under the right side plastic cover next to the battery cover. Remove that cover, the battery cover and the left hand side cover.

With the engine off, use a set of gauges to access the service ports under the right close out cover, to verify there is no pressure in the system. Do not use a screwdriver to open the AC Schrader valves particularly when the car is running. If you push the high side valve with a screwdriver with the car running you are likely to injure (freeze) yourself with high pressure liquid refrigerant. You can put your eye out quicker than a Daisy 200 Shot Red Ryder Range Model rifle.

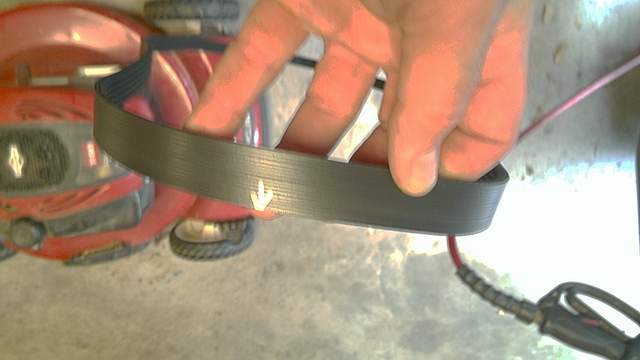
Remove the belt and mark which side faces forward so it is rotating the same way when re-installed. I always install the belt so the writing is right side up when read from the front of the engine, but I marked this one anyway with a sharpie.


If there is no pressure in the system the compressor can be removed.

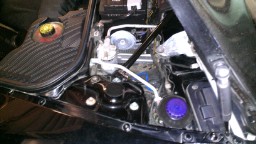
The first step is to suck out the power steering fluid from the reservoir and remove it using the twist lock at its base. Then disconnect the one electrical wire connector between the left side intake runners. Once that is out of the way, go to work on the three bolts holding the compressor in, 2 in front and one in the back, the back bolt being accessed between the intake runners. The front most AC line fitting bolt can be accessed with the compressor in place, but I found that I had to remove the three mounting bolts and slide the compressor forward to access the bolt on the rear most AC line fitting.

I prefer having some tinfoil handy to seal the open lines if needed, but I've been known to use a paper towel plug. Just have something handy to keep the bulk of the air moisture and dirt (all the dirt) out of the system unless your ready to immediately swap in the new compressor which is my preference.

Putting the new compressor in is the reverse of taking it out. Replace the lines, bolt the compressor in, hook up the single electrical wire, and replace the power steering reservoir and fluid.

Next I changed the expansion valve which is located just behind the low and high side valves under the right side closeout cover. This is a simple unbolt and replace job, again have the system open for as little time as possible. Lube the internal parts of the expansion valve with PAG oil before installing.


Last on the hardware list is replacing the receiver dryer. Again an easy unbolt and re-bolt. Changing the green o-ring seals is suggested for all of these replacements, but mine looked new so I simply re-used them. If your system has a leak, replace them all.


After all of the parts replacement was completed, the system was pulled down to vacuum for several hours. I pull it down until the vacuum pump isn't bubbling, then valve off the system and turn off the pump. Then I start the pump and open the system to it. After a few hours of this the pump stops bubbling when re-introduced to the system and I'm done with the vacuum pump. Doing it this way has the advantage of catching a leak in the system before putting in the refrigerant as the pump will continue to bubble if there is a small leak.

__________________
2003 S manual
Jamesp is offline   Reply With Quote
Old 06-12-2014, 05:15 PM   #2
Beginner
 
Jamesp's Avatar
 
Join Date: Mar 2013
Location: Houston
Posts: 1,659
Garage
AC Repair Part 2

Then on to putting in the refrigerant. Either buy a scale and put in precisely 850 grams (my preference) or use the pressure tables in the shop manual and gauges. Super important - the refrigerant is added with the car running to the low pressure side only. That is the refrigerant can is connected to the low pressure side, and never sees the high pressure side, can't stress that enough. Allowing the high pressure into the refrigerant can is the big time safety hazard. It can also result in the introduction of R134 into the atmosphere, and R134 should be recycled as noted above.

Results: High side and low side pressures were in spec. The AC blows cold, but as I have no foam in the heater box, the cold air goes everywhere no matter what climate control settings are used. The windshield fogs in the morning and it takes about a mile of running for the cabin to get comfortable in full sun at 90 F as only a fraction of the air that should be coming out of the AC vents is actually doing so. I guess I know what is coming next as I've already bought the foam.
__________________
2003 S manual
Jamesp is offline   Reply With Quote
Old 06-15-2014, 05:06 AM   #3
pjq
Registered User
 
Join Date: Dec 2010
Location: Eastern canada
Posts: 262
great info Jamesp
pjq is offline   Reply With Quote
Old 06-15-2014, 05:38 AM   #4
Registered User
 
epapp's Avatar
 
Join Date: Aug 2013
Location: Bay Area
Posts: 700
Garage
Just curious, when the gas turns to liquid in the condensers in front of the rads(system has been going for awhile, full swing), what temperature is it? Hot like the coolant?


Sent from my iPad using Tapatalk
epapp is offline   Reply With Quote
Old 06-15-2014, 10:40 AM   #5
Beginner
 
Jamesp's Avatar
 
Join Date: Mar 2013
Location: Houston
Posts: 1,659
Garage
Quote:
Originally Posted by epapp View Post
Just curious, when the gas turns to liquid in the condensers in front of the rads(system has been going for awhile, full swing), what temperature is it? Hot like the coolant?


Sent from my iPad using Tapatalk
It's hot. It's carrying the heat that will be transferred to the air outside of the car from the condensers.
__________________
2003 S manual
Jamesp is offline   Reply With Quote
Old 06-15-2014, 06:11 PM   #6
Custom User Title Here
 
particlewave's Avatar
 
Join Date: Mar 2012
Location: Ft. Leonard Wood
Posts: 6,163
Garage
Excellent write up

Thanks!
__________________
https://youtube.com/@UnwindTimeVintageWatchMuseum
particlewave is offline   Reply With Quote
Old 06-18-2014, 08:27 PM   #7
Registered User
 
rp17's Avatar
 
Join Date: Apr 2011
Location: DFW
Posts: 713
Quote:
Originally Posted by particlewave View Post
Excellent write up

Thanks!
+1 on that! Thank you for documenting this!!!!!!!
__________________
What we're dealing with here is a complete lack of respect for the law.
rp17 is offline   Reply With Quote
Old 06-26-2014, 04:39 AM   #8
Registered User
 
Join Date: Jul 2012
Location: Boston
Posts: 28
great writeup, however, there is one important clarification that needs to be made. The fill amount in the system CANNOT be determined by pressure gauges. This is a two phase system where liquid is present in the receiver dryer and a varying amount of liquid can be present at the same pressure. The pressure reading on the gauges is a function of temperature of the refrigerant and nothing else.

If this were a single phase system,i.e. all gas, then the amount of refrigerant could be inferred by pressure.

Hope this helps
oldboxster is offline   Reply With Quote
Old 06-26-2014, 05:17 PM   #9
Beginner
 
Jamesp's Avatar
 
Join Date: Mar 2013
Location: Houston
Posts: 1,659
Garage
Quote:
Originally Posted by oldboxster View Post
great writeup, however, there is one important clarification that needs to be made. The fill amount in the system CANNOT be determined by pressure gauges. This is a two phase system where liquid is present in the receiver dryer and a varying amount of liquid can be present at the same pressure. The pressure reading on the gauges is a function of temperature of the refrigerant and nothing else.

If this were a single phase system,i.e. all gas, then the amount of refrigerant could be inferred by pressure.

Hope this helps
Hmmm, I'm no AC expert so it appears the Boxster service manual providing low and high side pressures needs to be re-written, as well as the generic AC repair manual I use which shows gauge pressures for underfill, overfill, and a raft of other AC problems.
__________________
2003 S manual
Jamesp is offline   Reply With Quote
Old 07-14-2014, 09:29 AM   #10
Registered User
 
Join Date: Jul 2012
Location: Boston
Posts: 28
i reiterate my prior statement;

The pressure reading on the gauges is a function of temperature of the refrigerant and nothing else.

This is a basic behavior of pure component (R134a) 2 phase system vapor/liquid equilbria governed by the physical properties of the refrigerant

The concept is the same as a propane tank used on a gas grill, pressure guages are not fitted to determine the amount of propane since the pressure is constant until all the liquid is gone, for this reason the weight of the tank is used to determine the amount of propane remaining.

I only made these comments in an effort to enhance the understanding of the system by the other readers on the forum.
oldboxster is offline   Reply With Quote
Old 07-15-2014, 11:17 PM   #11
Registered User
 
Join Date: Apr 2012
Posts: 23
Quote:
Originally Posted by oldboxster View Post
i reiterate my prior statement;

The pressure reading on the gauges is a function of temperature of the refrigerant and nothing else.

This is a basic behavior of pure component (R134a) 2 phase system vapor/liquid equilbria governed by the physical properties of the refrigerant

The concept is the same as a propane tank used on a gas grill, pressure guages are not fitted to determine the amount of propane since the pressure is constant until all the liquid is gone, for this reason the weight of the tank is used to determine the amount of propane remaining.

I only made these comments in an effort to enhance the understanding of the system by the other readers on the forum.
So I've just filled the car with one can of R134a and the AC feels cooler but I just don't think it is as cold as it can get. The gauge on the canister was almost near "Alert" range. Are you saying that I can pump in another can and ignore the gauges?
tiggerkick is offline   Reply With Quote
Old 07-16-2014, 08:35 AM   #12
Registered User
 
Join Date: Jul 2012
Location: Boston
Posts: 28
i presume the "alert" is basically a pressure guage. All automotive AC systems are speced to hold refrigerant by weight, I am pretty sure the boxster calls for 30 ounces. If you dont know know how much was in there to begin with, and how would you, then short of venting the system, drawing a vacuum and then refilling then its pretty hard to know. If you can get a portable temperature measuring tool, often used in food cooking, and stick it in the vent then you will get anywhere from 42-45 DegF on the vent exit with a full charge. Be careful not to introduce air when you are connecting to the system as the air will royally screw things up
good luck
oldboxster is offline   Reply With Quote
Old 07-16-2014, 07:30 PM   #13
Registered User
 
Join Date: Apr 2012
Posts: 23
Quote:
Originally Posted by oldboxster View Post
i presume the "alert" is basically a pressure guage. All automotive AC systems are speced to hold refrigerant by weight, I am pretty sure the boxster calls for 30 ounces. If you dont know know how much was in there to begin with, and how would you, then short of venting the system, drawing a vacuum and then refilling then its pretty hard to know. If you can get a portable temperature measuring tool, often used in food cooking, and stick it in the vent then you will get anywhere from 42-45 DegF on the vent exit with a full charge. Be careful not to introduce air when you are connecting to the system as the air will royally screw things up
good luck
My AC condenser was punctured and let out a stream of the R134a. I've popped in a new condenser and assumed the system is completely empty so I've pumped a can into it so far (18oz). Pelican also mentioned the 30oz the car would take so I guess I'll try and get another 12oz in there. Thanks
tiggerkick is offline   Reply With Quote
Old 07-17-2014, 03:33 AM   #14
Registered User
 
Join Date: Jul 2012
Location: Boston
Posts: 28
hello, if you have changed your condensor then you have for sure introduced air into the system as a result of the change over. I recommend you take it to an AC shop so they can check for leaks at the connection points where you installed a new condensor. Once they make sure there are no leaks then they need to draw a high quality vacuum, to remove any air or moisture in the system and only then add 30 ounces of R134a to the system, making sure no air is reintroduced. If you continue to add refrigerant to the system without evacuating it with a vacuum then it will never perform very well due to the presence of the air in the system. Good Luck! As a side note I just replaced a leaky condensor on my boxster along with the receiver dryer, evacuated the system and refilled with 30oz of refrigerant and now I can achieve 41-42 DegF air temp on the exit of the vent with the ambient at about 82 DegF. I think this is pretty good, the car is as cool as I need it to be and the system cycles on and off indicating it is not under a heavy load to achieve this performance.
oldboxster is offline   Reply With Quote
Old 07-18-2014, 03:18 AM   #15
Beginner
 
Jamesp's Avatar
 
Join Date: Mar 2013
Location: Houston
Posts: 1,659
Garage
Quote:
Originally Posted by oldboxster View Post
i reiterate my prior statement;

The pressure reading on the gauges is a function of temperature of the refrigerant and nothing else.

This is a basic behavior of pure component (R134a) 2 phase system vapor/liquid equilbria governed by the physical properties of the refrigerant

The concept is the same as a propane tank used on a gas grill, pressure guages are not fitted to determine the amount of propane since the pressure is constant until all the liquid is gone, for this reason the weight of the tank is used to determine the amount of propane remaining.

I only made these comments in an effort to enhance the understanding of the system by the other readers on the forum.
If you want to enhance understanding you need to go review the AC cycle pressure enthalpy chart and get back to the forum to enlighten them. You might compare and contrast that to the working cycle of a propane tank which doesn't have one. I do agree with you on one point, and that is temperature and pressure are correlated with saturated vapor, but there is much more to the story than that.

I also agree that if the system has been open then air entered the system, along with water in the form of humidity. The drier is now saturated and there will be free water in the system which will turn to ice and stop the system from working. That takes a few drops. You need to replace the drier and the PAG oil lost in the drier and condenser, pull a vacuum on the system, let it sit so the PAG and non metallics off gas, do it again several times until no more off gassing is noted, then refill with 30 ounces BY WEIGHT, or 850 grams of R134a.
__________________
2003 S manual
Jamesp is offline   Reply With Quote
Old 07-25-2014, 03:15 PM   #16
Registered User
 
Join Date: Apr 2012
Posts: 23
Took the car to a shop per recommendation and had them evacuate and change out the receiver dryer before filling it back up. Vents blowing cool now, thanks.

tiggerkick is offline   Reply With Quote
Post Reply


Thread Tools
Display Modes

Posting Rules
You may not post new threads
You may not post replies
You may not post attachments
You may not edit your posts

BB code is On
Smilies are On
[IMG] code is On
HTML code is On
Trackbacks are On
Pingbacks are On
Refbacks are On


All times are GMT -8. The time now is 04:19 PM.


Powered by vBulletin® Version 3.8.7
Copyright ©2000 - 2024, vBulletin Solutions, Inc.
Content Relevant URLs by vBSEO 3.6.0
Copyright 2024 Pelican Parts, LLC - Posts may be archived for display on the Pelican Parts Website -    DMCA Registered Agent Contact Page