 11-12-2012, 06:19 PM
|
#21
|
|
Registered User
Join Date: Nov 2012
Location: Illinois
Posts: 2
|
Bi-zenon retrofit is awesome
I enjoyed the nice step by step post on the HID projectors retrofit. And I agree....at first the project seems a bit overwhelming. But once you get into it and take your time things start to fall into place. I don't own a Porche(yet) but I have done several HID projector retrofits, the most recent on my future son-in-law's Saturn Vue. I had already upgraded his headlights with HID's but as most everyone finds out after they do this, the HID output is so intense that it creates terrible glare and scatterted light coming out of the factroy reflector housings since they were never intended for HID's. You will love the way they light up the road but the poor souls you come upon in the opposite direction will really not like you and usually flash you. It can actually creat an unsafe glare which could actually be dangerous. So we went ahead and did the bi-xenon projector retrofit.
I think there are some folks who don't completely understand how bi-zenon projectors work. The term bi-zenon basically means two beams; low and high. Zenon refers to the HID(High Intensity Discharge) bulbs that are used which are 2- 3 times as bright as halogens. The projectors are engineered to focus the light to give a much better light field than halogen reflectors. The projectors are engineered with a shield inside the projector that blocks the upper part of the beam which creates a flat line across the light field in front of the car. This focuses the intense HID light in front of the car but below the sight line of oncoming cars. When the high beams are activated a solenoid inside the projector unit drops the shield which releases all of the focused light from the projector and fills the area above the cutoff line delivering phenominal high beam coverage.
What I have learned from the retrofits I did is that the most important step is the alignment of the projectors inside the headlight housing. Since the projector beam has a flat horizontal cutoff line it must be aligned absolutely level. If not the beam will be higher on one side than the other creating either blinding glare to oncoming drivers if the left side(left hand drive cars) is too high or reduced light on the road in front of the left side of the car if the beam is high on the right. Also, the alignment of the centerline of the beam is very important, although some adjustment can me made with the left to right headlight adjusters if your car has them. Our saturn has only vertical adjusters so the beam alignment was critical. When aligned properly the horizontal cutoff lines of both projectors should match perfectly.
My first couple of retrofits were done using Morimoto Mini's. Because of their design they are a little easier to retrofit but don't offer quite as good of a beam coverage because of there smaller 2 1/2" lense and smaller reflector bowl. My latest install was done using FX-R II's which have 3" lenses and a bigger reflector bowl. Because of their larger size the FX-R's won't fit in all housings. They are more difficult to retrofit because the original headlight reflector housings must be cut to accept the projectors. When the fit and alignment is confirmed the projectors are epoxyied into place. If you are prepared for the extra work the FX-R's will reward you with amazing beam coverage that rivals factory projector headlights. We also went with the 55w HID's instead of the 35w for even a little extra punch.
Once you convert to bi-zenon projector HID's you will never be able to drive comfortably with halogen headlights again. The extra light output adds a level of confidence while drivng at night and in the rain that is difficult to explain to halogen users. I would consider some halogen headlights to be downright dangerous. If you want to feel safer while driving at night you really should consider doing a bi-zenon HID projector retrofit. If you don't feel comfrotable doing it yourself there are companies that offer the service but expect to pay upwards of $700 for the package. Considering the added safety they offer the investment would be well worth it.
|

|

|
|
11-12-2012, 06:25 PM
|
#22
|
|
Registered User
Join Date: Nov 2012
Location: Illinois
Posts: 2
|
Black Flame Customs(I think they have changed their name but you sould still be able to find them) supplied me with a butly rubber sealant that worked awesome. It is black and is very moldable and softens at a lower temp than the factory sealant of most newer cars. It comes in a roll that will do quite a few headlights. It is about 5/16' diameter and a little too thick for the groove in the housing so I stretched and worked it down to a smaler diameter before forcing it into the groove in the headlight housing.
Hope this helps,
Hugh
|
|
|
|
|
12-28-2012, 01:29 AM
|
#23
|
|
Registered User
Join Date: Aug 2012
Location: Lichfield, England
Posts: 6
|
I have a pair of headlamps that have burnt lenses (like these started off) in the shed if anyone wants to buy them for a project.
They are UK (RHD) but I doubt that would be an issue if you are retro fitting new units into the casings.
Get in touch if interested.
James
|
|
|
|
|
12-28-2012, 07:44 PM
|
#24
|
|
Registered User
Join Date: Nov 2010
Location: Georgia
Posts: 117
|
Let me try this again! LOL
Last edited by Hawkeye71; 12-28-2012 at 07:49 PM.
Reason: Did not upload pic.
|
|
|
|
|
12-28-2012, 07:47 PM
|
#25
|
|
Registered User
Join Date: Nov 2010
Location: Georgia
Posts: 117
|
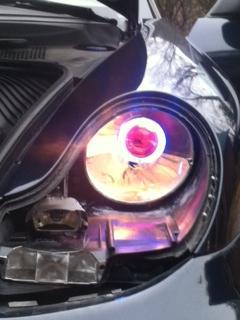
Just got finished with this install! Didn't have to drill out the hole or make a notch for the bulb. I did have to trim the "shelf" and remove the light shield. I bought a different set of projectors. I might catch some grief for it but I went with the blue angle eye and the red demon eye centers.
I also managed to fit everything in the head light assembly. So its a plug and play like the factory headlight assembly.
Here's a pic of a test of the lighting. It doesn't really do it justice. It's a bright red and blue.
The HID's are the stuff! My wife's Acura has them and I've owned a few BMW's with them. I missed them so much! Not any longer!! Thanks so much for the step by step 986_inquiry!
I'll get more pics up as soon as it stops raining and the sun comes up! LOL!
Last edited by Hawkeye71; 12-28-2012 at 07:50 PM.
|
|
|
|
|
03-16-2013, 08:28 AM
|
#26
|
|
Registered User
Join Date: Jan 2007
Location: BC
Posts: 1,354
|
Anyone having any issues with the Morimoto Minis? According to this site they are plagued with quality problems. I'd love to do this retrofit, but not multiple times and with unsure end results.
How To: Pre-Install Morimoto Mini Tips
__________________
2001 Boxster, 5 spd, Seal Grey
|

|
|
|
03-16-2013, 10:39 AM
|
#27
|
|
Registered User
Join Date: Mar 2012
Location: Arizona
Posts: 720
|
Quote:
Originally Posted by Hawkeye71

Just got finished with this install! Didn't have to drill out the hole or make a notch for the bulb. I did have to trim the "shelf" and remove the light shield. I bought a different set of projectors. I might catch some grief for it but I went with the blue angle eye and the red demon eye centers.
I also managed to fit everything in the head light assembly. So its a plug and play like the factory headlight assembly.
Here's a pic of a test of the lighting. It doesn't really do it justice. It's a bright red and blue.
The HID's are the stuff! My wife's Acura has them and I've owned a few BMW's with them. I missed them so much! Not any longer!! Thanks so much for the step by step 986_inquiry!
I'll get more pics up as soon as it stops raining and the sun comes up! LOL!
|
Red HID projectors? How's the visibility?
|
|
|
|
|
03-19-2013, 09:05 PM
|
#28
|
|
Registered User
Join Date: Nov 2010
Location: Georgia
Posts: 117
|
There only red when the driving lights are on. There normal projector HIDs when I turn the lights on. So visibility is great! Actually better then my wife's factory Acura projector HID.
|
|
|
|
|
04-20-2013, 10:39 AM
|
#29
|
|
Registered User
Join Date: Jan 2007
Location: BC
Posts: 1,354
|
I'd love to do this, but 1) I want to keep it plug n play, and 2) I have the stock daytime running lights that run on low beam.
Anyone in Canada done a xenon project retrofit?
__________________
2001 Boxster, 5 spd, Seal Grey
|
|
|
|
|
04-20-2013, 11:40 AM
|
#30
|
|
still plays with cars...
Join Date: May 2011
Location: Baden, ON, Canada
Posts: 1,088
|
Quote:
Originally Posted by clickman
I'd love to do this, but 1) I want to keep it plug n play, and 2) I have the stock daytime running lights that run on low beam.
Anyone in Canada done a xenon project retrofit?
|
Click,
Ditto on trying a project like this. I have my original (scorched) amber headlights to practise on. Just gotta get off the couch and buy a set of bixenon projectors and get at it.
Particlewave posted this thread FYI: headlight connector pinout outlining the headlight stock pinout configuration, so it looks like p&p is a possibility.
__________________
Six speed 2000 Boxster S
Arctic Silver on Metropol Blue | LN Dual Row IMSR | Arctic Silver console, spoiler frame & bumperettes | Crios mod | Technobrace | RoboTop module & modified convertible top relay for one-touch roof operation
|
|
|
|
|
04-21-2013, 06:46 AM
|
#31
|
|
Homeboy981
Join Date: Jan 2012
Location: Sherman, TX
Posts: 663
|
They are not cookies, but I could even handle 225 degrees for 10 mins. recipe for great looking headlights!
Ahhh! You KNOW it is GOOD writeup - when you think to yourself, "I can do that!"
2 thumbs up!
__________________
2002 Porsche Boxtser S - Silver & Chrome - Died from IMS failure AFTER IMS was replaced!
|
|
|
|
|
05-01-2013, 07:15 AM
|
#32
|
|
Registered User
Join Date: Apr 2013
Location: Saratoga, NY
Posts: 172
|
Nice write-up! Looks great
__________________
2001 Boxster S 6speed- weekend warrior
2015 Explorer Sport- New DD
2011 Taurus SHO- Sold
2010 CBR1000RR- Sold
|
|
|
|
|
05-04-2013, 09:58 AM
|
#33
|
|
Custom User Title Here
Join Date: Mar 2012
Location: Ft. Leonard Wood
Posts: 6,169
|
FYI: I would not suggest mounting ballasts inside of the headlight enclosure. I did this and one of my ballasts died after only 45 minutes of night driving. I pulled over, popped the headlight out, and removed the back cover to check the ballast. It was so hot that it softened the insulation on the wires.
Mounting them to the back of the cover like the OEM litronics seems like the best way to go. Keeps it all as one single unit and allows air to circulate around the ballast. 
EDIT: ballast is ok. It just went into thermal protection. I have since mounted the ballasts to the rear covers like OEM.
__________________
https://youtube.com/@UnwindTimeVintageWatchMuseum
Last edited by particlewave; 05-09-2013 at 05:21 PM.
|
|
|
|
|
08-24-2013, 07:54 AM
|
#34
|
|
Registered User
Join Date: Aug 2013
Location: Sarasota, Florida
Posts: 1
|
Is there any group buy event going on that you know for TRS?
|
|
|
|
|
10-07-2013, 06:56 PM
|
#35
|
|
Registered User
Join Date: May 2012
Location: Brisbane, Australia
Posts: 6
|
Question for the electrical gurus out there
I have a set of can bus ballasts, but given the headlight connects straight into the back of the light connector how do I connect the canbus connector?
I've searched the net for a canbus lead that I can wire into the existing projector leads in the headlight, but can't find any.
I don't want to cut the canbus tail on the ballasts.
What I think I need is a test lead, which has a male end on one end and loose wires on the other.
Thanks
|
|
|
|
|
10-07-2013, 09:38 PM
|
#36
|
|
Registered User
Join Date: Sep 2013
Location: Montreal, QC. (currently expat to Shanghai)
Posts: 3,249
|
Quote:
Originally Posted by PCC
Question for the electrical gurus out there
I have a set of can bus ballasts, but given the headlight connects straight into the back of the light connector how do I connect the canbus connector?
I've searched the net for a canbus lead that I can wire into the existing projector leads in the headlight, but can't find any.
I don't want to cut the canbus tail on the ballasts.
What I think I need is a test lead, which has a male end on one end and loose wires on the other.
Thanks
|
I am not a guru in anything, but my wife says I am
Whatever Canbus, AC or DC ballasts, they all comes with a POS and NEG terminal. To my knowledge there are no specific canbus end connector. Mine simply came with loose ends +/- wires.
Strip both ends, get rid of the (now useless) plastic H7 headlight connector, twist the wires together and use lead & soldering iron to secure the new wire connection. I am using heat shrink wire wrap but you could also use electrical tape to cover the set-up (it's always dry there).
Snap plugs (see pic below) could also be an easy-1-2-3 option but I personally prefer to have all my connections welded... especially where there are vibrations and all.
hope this helps and congrats on your conversion. I bet, like myself, you regret to have waited a decade to upgrade those fugly stock headlights So simple to do.

__________________
______________________________
'97 Boxster base model 2.5L, Guards Red/Tan leather, with a new but old Alpine am/fm radio.
|
|
|
|
|
10-09-2013, 02:55 PM
|
#37
|
|
Registered User
Join Date: May 2012
Location: Brisbane, Australia
Posts: 6
|
Thanks for the advice
I was reluctant to cut the canbus tail but I don't appear to have any other option.
Have had some replacement led units fitted after the first lot burnt out and cracked. Updated version appears to be better. With the hid projectors fitted should be a lot less heat than the halogens.
Will post some pics when finished
|
|
|
|
 Posting Rules
|
You may not post new threads
You may not post replies
You may not post attachments
You may not edit your posts
HTML code is On
|
|
|
All times are GMT -8. The time now is 08:18 AM.
| |


 Udo
Udo "Bernie" - PONZI that 'made off' with my money!
 Linear Mode


