Go Back   986 Forum - The Community for Porsche Boxster & Cayman Owners > Porsche Boxster & Cayman Forums > Boxster General Discussions

Post Reply
 
LinkBack Thread Tools Display Modes
Old 01-19-2025, 02:33 PM   #1
Registered User
 
Join Date: Jan 2024
Location: los angeles
Posts: 7
Rear main seal depth

Hi folks,

I just removed and replaced the IMS bearing. So far so good. I put the new RMS on, and tapped it in a little too deep. Spec says 4mm, I've got between 6 and 7mm depth. I didn't use any fancy installer, unfortunately. Should I remove it and put another one in and be more careful next time?
I'd really prefer to nip any RMS issues in the bud at this point.

Thank you,

Steve
Los Angeles

alfasteve is online now   Reply With Quote
Old 01-19-2025, 04:07 PM   #2
Registered User
 
Join Date: Sep 2018
Location: Illinois
Posts: 232
Garage
I’m not a pro mechanic but looking at at crank I have, I think you’re fine. If you search a little, I recall seeing advice to seat a little deeper to avoid leaks from running on the same surface. I did seat a little deeper on one I replaced with no ill effects so far.
__________________
A cynic is a man who, when he smells flowers, looks around for a coffin.
-H. L. Mencken
Newsguy is online now   Reply With Quote
Old 01-20-2025, 06:36 AM   #3
Registered User
 
Join Date: Feb 2005
Location: It's a kind of magic.....
Posts: 6,504
The correct depth for the PTFE RMS is 13 mm, which can be a bear to obtain evenly without the correct tool, which you can rent from LN Engineering. This is a write up I did on another forum:

OK, pretty simple actually. If it is not out already, you need to pull the old seal. Normal way is to thread a small screw into the body of the seal and pull it out with pliers, being extremely careful to not let the screw scratch either the crank flange or the seal bore. Using a small lint free cloth and a bit of acetone, carefully wipe off any grease, oil, or residue left by the old seal. Both the bore and flange must be scrupulously clean, no fingerprints or any other materials should remain.


I've pulled down this diagram to help with the explanation:
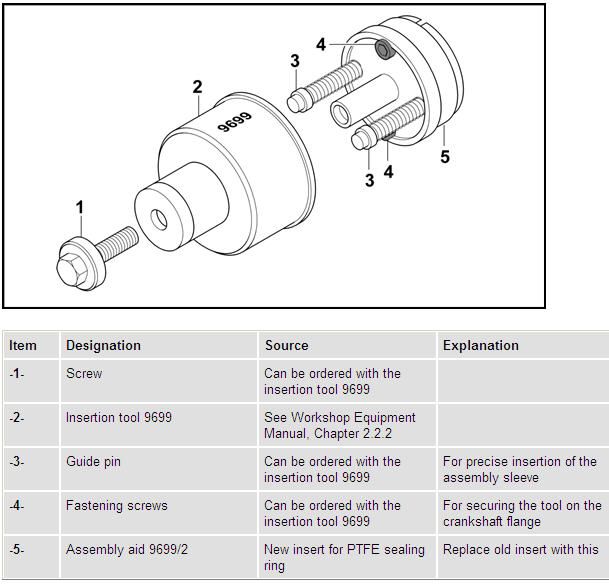


Now slide the new seal over the assembly aid, being careful to not get fingerprints on the mating surfaces, clean nitrile gloves are the order of the day for this step. Attach the assembly aid (item #5 above) to the rear of the crank flange. I don't think the old flywheel bolts will do for this, my tool came with two bolts with small Torx style heads that fit inside the two openings. I sure you can find a metric Allan head bolt that would do the same job, but I think the old flywheel bolts have too large a shoulder on them which would get in the way. This assembly aid does not have to be overly tight, I just run it down with a 1/4 drive ratchet until they are snug. Now slide the insertion tool (#2 above) over the two guide pins and up against the seal, holding it there until you can get the large tightening screw started by hand and threaded down until it is holding the seal. Now, using a wrench or ratchet, carefully tighten the screw until the tool just bottoms against the assembly aid, which should set the seal at the prescribed 13MM insertion depth:


Now remove the large screw and insertion tool, then the assembly aid, and admire your new correctly installed PTFE seal.
__________________
Anything really new is invented only in one’s youth. Later, one becomes more experienced, more famous – and more stupid.” - Albert Einstein
JFP in PA is online now   Reply With Quote
Old 01-20-2025, 07:39 AM   #4
Registered User
 
Join Date: Jul 2021
Location: Finland
Posts: 23
There's also this tool if you have access to a 3D printer.
I used it last winter and it worked great.

Makrilli is online now   Reply With Quote
Post Reply


Posting Rules
You may not post new threads
You may not post replies
You may not post attachments
You may not edit your posts

BB code is On
Smilies are On
[IMG] code is On
HTML code is On
Trackbacks are On
Pingbacks are On
Refbacks are On


All times are GMT -8. The time now is 10:25 PM.


Powered by vBulletin® Version 3.8.7
Copyright ©2000 - 2025, vBulletin Solutions, Inc.
Content Relevant URLs by vBSEO 3.6.0
Copyright 2024 Pelican Parts, LLC - Posts may be archived for display on the Pelican Parts Website -    DMCA Registered Agent Contact Page