 03-30-2025, 08:18 PM
|
#421
|
|
Registered User
Join Date: Apr 2023
Location: Oregon
Posts: 545
|
Quote:
Originally Posted by elgyqc

Of all the stuff you mention I would only consider changing the AOS simply because it is a lot easier to do with the engine out.
|
It would have to be an aftermarket AOS, because the chances I'd shell out $1650 for a Genuine Porsche AOS are practically nonexistent. I much prefer Amazon's $55 alternative:
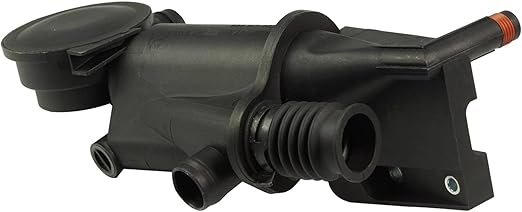 https://www.amazon.com/Bapmic-99610702304-Separator-Crankcase-1997-2002/dp/B01MZAEBC6/
__________________
2000 986 base
Arctic Silver/black
2.7 liter
5-speed manual
|

|

|
|
03-31-2025, 04:44 AM
|
#422
|
|
Registered User
Join Date: Jan 2019
Location: PA
Posts: 1,726
|
Quote:
Originally Posted by LoneWolfGal
It would have to be an aftermarket AOS, because the chances I'd shell out $1650 for a Genuine Porsche AOS are practically nonexistent. I much prefer Amazon's $55 alternative:
|
Where did you get the $1650 price? Pelican has a genuine Porsche for $192.
https://www.pelicanparts.com/More_Info/99610702304.htm?pn=996-107-023-04-M100&bc=c&SVSVSI=0784
__________________
2002 Boxster Base - Arctic Silver - Tiptronic
2010 Subaru Forester
1980 Ford C-8000 Custom Cab Emergency-One Fire Truck
__________________
"I never lose. I either win or I learn." -Nelson Mandela
|

|
|
|
03-31-2025, 05:55 AM
|
#423
|
|
Registered User
Join Date: Jan 2019
Location: PA
Posts: 1,726
|
What's more difficult to replace than the AOS with the engine in is the coolant tank. That's a real PITA to do and 100 times easier with the engine out. Just a suggestion, if you haven't already addressed it.
Pelican has that, too. Yeah, it's pricey, but yours is 25 years old, unless it has been changed already. Is it white or yellow? If it's yellow, recommend changing it. If you could only do one, I'd do the tank because in comparison, the AOS is much easier to do with the engine in, plus the AOS won't leave you stranded if it goes bad.
__________________
2002 Boxster Base - Arctic Silver - Tiptronic
2010 Subaru Forester
1980 Ford C-8000 Custom Cab Emergency-One Fire Truck
__________________
"I never lose. I either win or I learn." -Nelson Mandela
Last edited by piper6909; 03-31-2025 at 06:01 AM.
|
|
|
|
|
03-31-2025, 07:36 AM
|
#424
|
|
Registered User
Join Date: Feb 2005
Location: It's a kind of magic.....
Posts: 6,649
|
Quote:
Originally Posted by LoneWolfGal
|
You won't be so happy when it dies after two weeks. We only use the factory part.
Sunset Porsche out in you neck of the woods has them for $156.
__________________
Anything really new is invented only in ones youth. Later, one becomes more experienced, more famous and more stupid. - Albert Einstein
|
|
|
|
|
03-31-2025, 09:25 AM
|
#426
|
|
Registered User
Join Date: Apr 2023
Location: Oregon
Posts: 545
|
Quote:
Originally Posted by piper6909
What's more difficult to replace than the AOS with the engine in is the coolant tank. That's a real PITA to do and 100 times easier with the engine out. Just a suggestion, if you haven't already addressed it.
Pelican has that, too. Yeah, it's pricey, but yours is 25 years old, unless it has been changed already. Is it white or yellow? If it's yellow, recommend changing it. If you could only do one, I'd do the tank because in comparison, the AOS is much easier to do with the engine in, plus the AOS won't leave you stranded if it goes bad.
|
I'm gun-shy now. Is this the part of which you speak?
https://www.pelicanparts.com/More_Info/99610614708.htm?pn=996-106-147-08-M100&bc=c&SVSVSI=
__________________
2000 986 base
Arctic Silver/black
2.7 liter
5-speed manual
|
|
|
|
|
03-31-2025, 09:58 AM
|
#427
|
|
Registered User
Join Date: Apr 2023
Location: Oregon
Posts: 545
|
Quote:
Originally Posted by JFP in PA
You won't be so happy when it dies after two weeks. We only use the factory part.
Sunset Porsche out in you neck of the woods has them for $156.
|
I can't seem to find that AOS at Sunset searching for "AOS" and "air oil separator." (I'm not having much luck searching for parts, obviously.) I will go with factory parts whenever possible. Except, for example, when they want $265.48 for an "air tube," and that's with Sunset's $22.59 discount:
https://www.******porscheparts.com/oem-parts/porsche-air-tube-99611311755
(Pelican won't permit links to competitors' products, so replace asterisks with "sunset.")
__________________
2000 986 base
Arctic Silver/black
2.7 liter
5-speed manual
|
|
|
|
|
03-31-2025, 10:09 AM
|
#428
|
|
Registered User
Join Date: Jan 2019
Location: PA
Posts: 1,726
|
Quote:
Originally Posted by LoneWolfGal
|
That's the coolant tank, yes.
|
|
|
|
|
03-31-2025, 10:21 AM
|
#429
|
|
Registered User
Join Date: Dec 2009
Location: Orange County, CA
Posts: 1,996
|
Quote:
Originally Posted by JFP in PA
You won't be so happy when it dies after two weeks. We only use the factory part. Sunset Porsche out in you neck of the woods has them for $156.
|
Luke at Sunset is a gentleman!
|
|
|
|
|
03-31-2025, 11:00 AM
|
#430
|
|
Registered User
Join Date: Apr 2021
Location: Bay Area
Posts: 209
|
AOS is part # 996-107-023-04 I would also order one of these as it makes installing the lower hose clamp much easier - 999-512-630-00
__________________
'98 Boxster 986
'87 911 Carrera Cabriolet
Last edited by elav; 03-31-2025 at 11:08 AM.
|
|
|
|
|
03-31-2025, 11:42 AM
|
#431
|
|
Registered User
Join Date: Feb 2005
Location: It's a kind of magic.....
Posts: 6,649
|
Quote:
Originally Posted by LoneWolfGal
I can't seem to find that AOS at Sunset searching for "AOS" and "air oil separator." (I'm not having much luck searching for parts, obviously.) I will go with factory parts whenever possible. Except, for example, when they want $265.48 for an "air tube," and that's with Sunset's $22.59 discount:
https://www.******porscheparts.com/oem-parts/porsche-air-tube-99611311755
(Pelican won't permit links to competitors' products, so replace asterisks with "sunset.") |
Give Luke and the crew at Sunset a call, they will hook you up at reasonable $.
__________________
Anything really new is invented only in ones youth. Later, one becomes more experienced, more famous and more stupid. - Albert Einstein
|
|
|
|
|
03-31-2025, 06:49 PM
|
#432
|
|
Registered User
Join Date: Apr 2023
Location: Oregon
Posts: 545
|
So, AOS and coolant tank. Anything else in the "must replace" category?
__________________
2000 986 base
Arctic Silver/black
2.7 liter
5-speed manual
|
|
|
|
|
04-01-2025, 06:00 PM
|
#433
|
|
Registered User
Join Date: Apr 2023
Location: Oregon
Posts: 545
|
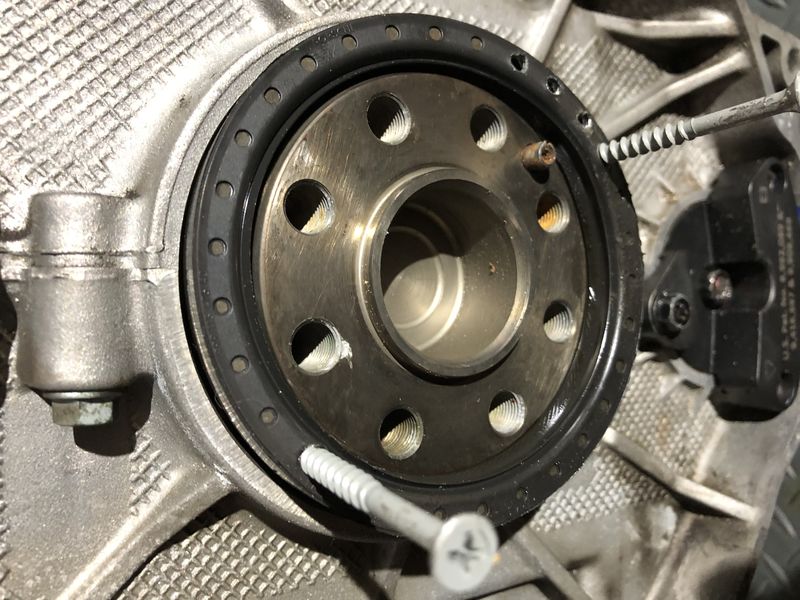
The new rear main seal has been installed. Getting the old seal out required some determined reefing on the sheetrock screws, but it finally popped out. The tool used to seat the new seal worked like a charm. All in all, it was an easy job, as others who've done it can attest.
__________________
2000 986 base
Arctic Silver/black
2.7 liter
5-speed manual
|
|
|
|
|
04-01-2025, 06:21 PM
|
#434
|
|
Registered User
Join Date: Apr 2023
Location: Oregon
Posts: 545
|
I intended to include these photos in the previous message, but I clicked "Submit" by mistake and editing doesn't allow uploading photos, even under "Go Advanced." Mutter, mutter... And I thought I had taken a shot with the seal completely out, but I thought wrong. Not much to see, just blackness surrounding the crankshaft.
As I said, this was an easy procedure. Wish they all were that easy. Wish replacing the cam chain wear pads would be that easy. That's the next project on the schedule. Actually, it might not be too bad, as long as I: (1) fully understand the procedure, (2) take it slow and careful — there's no hurry, (3) be meticulous, and (4) take lots of photos. (Photos kinda come in handy when putting things back together, I've found.)
Removal of old RMS:
 New RMS, ready to be seated:
 Tool in place:
 New RMS, seated
:
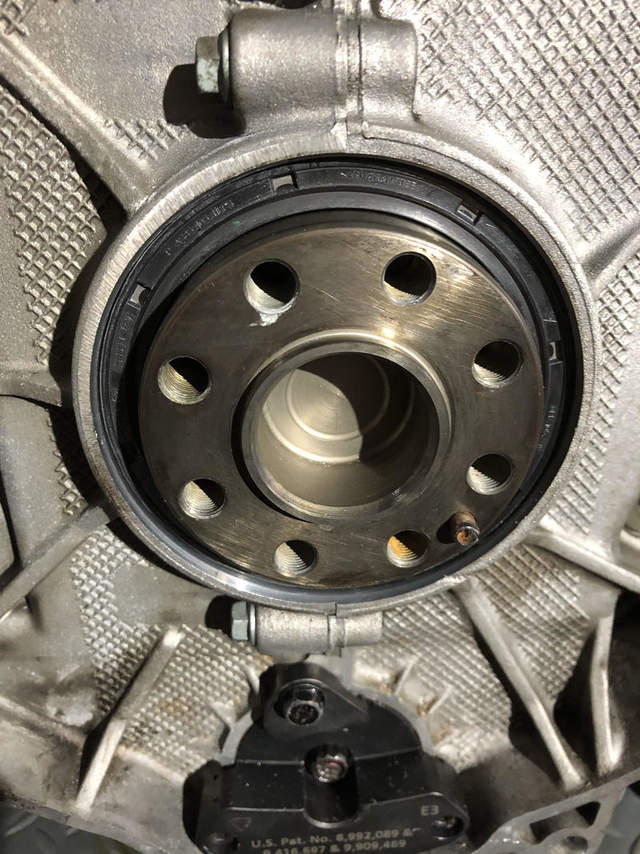
Supposedly, the tool actually seats the new seal in a slightly different place, to avoid wear from the old seal. Not surprisingly, I couldn't detect the difference.
__________________
2000 986 base
Arctic Silver/black
2.7 liter
5-speed manual
Last edited by LoneWolfGal; 04-02-2025 at 08:52 PM.
|
|
|
|
|
04-02-2025, 06:23 AM
|
#435
|
|
Registered User
Join Date: Sep 2018
Location: Illinois
Posts: 305
|
You answered my question before I had a chance to ask. So it does seat in a slightly different depth! Very interesting, as the two I have had apart showed a light line where the seal rides, but not deep enough to feel it. Tough stuff!
__________________
A cynic is a man who, when he smells flowers, looks around for a coffin.
-H. L. Mencken
|
|
|
|
|
04-02-2025, 09:31 PM
|
#436
|
|
Registered User
Join Date: Apr 2023
Location: Oregon
Posts: 545
|
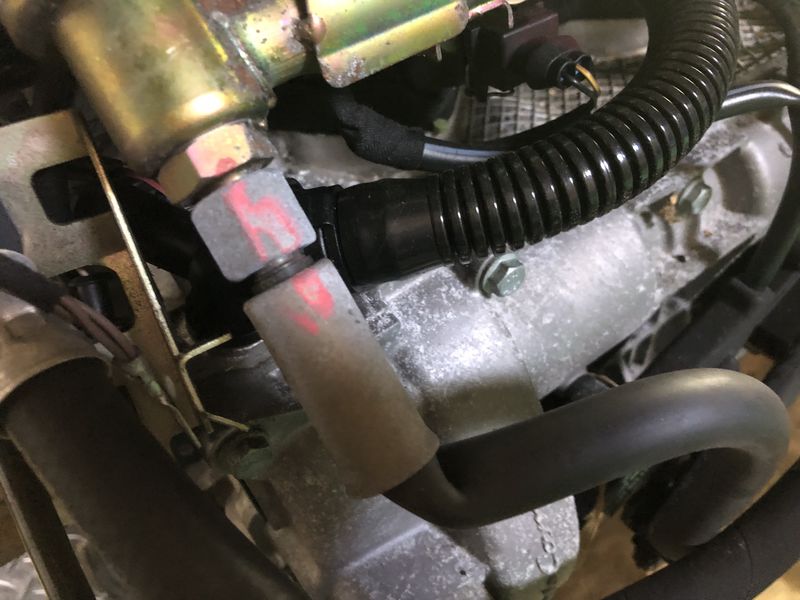
See the rubber hose connected to the fuel rail? Note the crimp next to its metal sleeve. The hose got munched when they packed the engine for shipping. Haven't priced a replacement yet. I'm afraid to.
__________________
2000 986 base
Arctic Silver/black
2.7 liter
5-speed manual
Last edited by LoneWolfGal; 04-06-2025 at 12:23 PM.
|
|
|
|
|
04-03-2025, 03:25 AM
|
#437
|
|
Registered User
Join Date: Jan 2019
Location: PA
Posts: 1,726
|
Quote:
Originally Posted by LoneWolfGal
Note the rubber hose connected to the fuel rail. Then note the crimp next to its metal sleeve. The hose got munched when they packed the engine for shipping. Haven't priced a replacement yet.
|
To me that looks more like someone twisted the hose during installation. I can't see how packing would cause that, unless they put a banding strap over it.
What's that hose for? Can't you pull one off your other engine?
|
|
|
|
|
04-03-2025, 07:26 AM
|
#438
|
|
Motorist & Coffee Drinker
Join Date: Jul 2014
Location: Oklahoma
Posts: 3,947
|
Quote:
Originally Posted by piper6909
To me that looks more like someone twisted the hose during installation. I can't see how packing would cause that, unless they put a banding strap over it.
What's that hose for? Can't you pull one off your other engine?
|
That's fuel return at the pressure regulator. It should be easy to pull from the old engine.
__________________
I am not an attorney, mechanic, or member of the clergy. Following any advice given in my posts is done at your own peril.
|
|
|
|
|
04-03-2025, 08:00 AM
|
#439
|
|
Registered User
Join Date: Sep 2018
Location: Laval QC
Posts: 854
|
Quote:
Originally Posted by piper6909
To me that looks more like someone twisted the hose during installation. I can't see how packing would cause that, unless they put a banding strap over it.
What's that hose for? Can't you pull one off your other engine?
|
That is a fuel line, I think the return.
As suggested by piper... use the old one or:
- has the kink really damaged the line?
- if so a shop that deals in hydraulic equipment may be able to fix it for less than the Porsche part.
__________________
Grant
Arctic Silver 2000 Boxster S - bought with a broken engine, back on the road with the engine replaced
Green 2000 Boxster 5-speed and 1978 928 auto
1987 924S 5-speed (Sold) - Blue 2000 Boxster 5 spd (Sold)
|
|
|
|
|
04-03-2025, 08:20 AM
|
#440
|
|
Registered User
Join Date: Apr 2023
Location: Oregon
Posts: 545
|
Quote:
Originally Posted by piper6909
To me that looks more like someone twisted the hose during installation. I can't see how packing would cause that, unless they put a banding strap over it.
|
That's exactly what they did — it was under one of two wide nylon ratchet straps, strapped tightly around the engine. The hose is the only casualty. All the other hoses, tubes, wiring looms, and connectors look almost new. I really have no complaint. Whoever pulled the engine took exceptional care to disconnect all hoses, etc., making sure they remained intact, rather than simply cutting them for expediency. Had they done that, I probably would have passed on this engine.
__________________
2000 986 base
Arctic Silver/black
2.7 liter
5-speed manual
Last edited by LoneWolfGal; 04-03-2025 at 08:57 AM.
|
|
|
|
 Posting Rules
|
You may not post new threads
You may not post replies
You may not post attachments
You may not edit your posts
HTML code is On
|
|
|
All times are GMT -8. The time now is 11:41 PM.
| |


 Parts Car, car parts
 Honda Del Sol(s)
 "Hers"
 My Original '99
 The 78 F350
 This
This That
That The S 2.5
 Other
Other Boxster
 Linear Mode


