This post will examine the wiring and connections that, when corroded or loose, cause the 986 airbag light to illuminate.
Background
The seat belt receptacle issue is commonly resolved by replacing the receptacle and/or the electrical connectors between the receptacle and the car. Neither the receptacle or electrical connector kit sold by Porsche is cheap. The cost of the electrical connector kit really surprised me; at roughly $65 for a few wires and a some common electrical connectors in order to address poor connectivity. I suspected this simple connectivity issue could be resolved either for free or just a couple $.
Identifying the electrical connectors
Below the driver (left) and passenger (right) seat there large black electrical connectors. These large black connectors contain two large wires with rounded "bullet" style electrical contacts and a few thinner gauge wires with "amp" style connectors. The larger wires with bullet connectors are used to supply power to the seat. The thinner gauge wires with "amp" connectors are used to measure the seat belt receptacle position (whether the seat belt is buckled or not).
The image below shows me holding the thin wire connector after it was removed from the large black connector. If you were to purchase a new seat belt receptacle, this wire and connector would come attached.
You can also see the two large gauge power wires that are attached to the large black connector. In bottom left you can see a white connector with green and blue wires - this connector is unrelated to the to seat belt/airbag light issue.
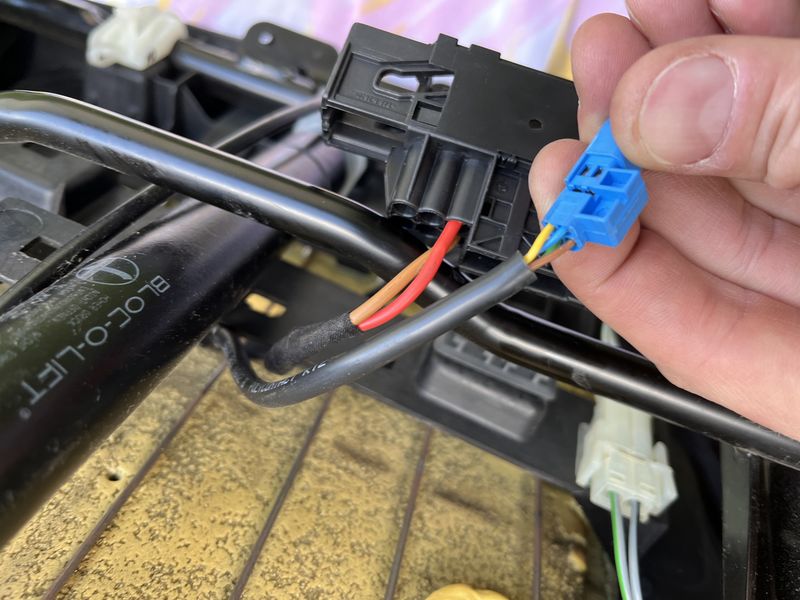
Not shown in the picture, but still associated with this issue, is the grounding wires that are bolted to a ground stud attached to the body of the car under each seat.
The airbag light and associated seat belt receptacle issue can commonly be attributed to one of the following:
- Corrosion on the amp connectors
- Moisture/water in the connector of airbag computer
- Corrosion on the ground plug or eyelet connectors
- Loose amp connectors.
- Frayed or broken wiring.
From my understanding, Porsche began production with tin amp connectors for the seat belt and ground. Over time the tin would corrode and the connection would fail. In order to address this issue, Porsche released a wiring kit to replace the tin amp and ground connectors with gold plated connectors. While the gold plated connectors are not nearly as prone to corrosion as tin, there is still the potential for corrosion on the gold plated connector, copper wire where it's crimped to the connector, and ground stud.
My car has the updated gold connectors.
Troubleshooting
First things first, remove the the seat. Don't try to perform the following procedures while the seat is still in the car. There are videos on YouTube showing how to remove the seat.
For cleaning the connectors, I used DeOxit D100L-2DB from Amazon.
I assumed that my issue with either with corrosion, a loose connector, or a broken wire. I inspected all of the wiring and did not see any broken wires. The wire could be frayed inside of the sheathing but I assumed my issue was more likely to be corrosion, which I would attempt to address next.
Cleaning Corrosion
I began addressing any corrosion at the ground stud. I removed the nut and wires and then used a wire brush to clean the stud and nut. I then used DeOxit on the eyelet connectors AND where the wire is crimped to the connector. I added a very small amount of anti seize lubricant to the stud and reinstalled the ground wires.
Next, I moved my focus to the smaller gauge wires that come from the car. These wires are crimped with "amp" connectors. An example amp connector is shown below:

In order to properly inspect and clean these connectors, I removed their housing from the large black connector and then removed decided to remove each connector from the housing.
Below is an image of the amp connectors inside the housing for the seat belt receptacle on the drivers side. The passenger side connector is green. In the far bottom right, you can see the spade/shovel shaped "lock-tab" for each connector.

Below are the steps to remove each connector from the housing:
- Take a photo of the connector in order to remember the ordering of the wires.
- Push the wire further into the housing.
- Gently use a screwdriver to push down on the lock-tab of the connector. Refer to the "amp" connector image above to see the lock-tab.
- While pressing the lock tab down, slowing and gently pull the wire out of the connector. The tab may get stuck at a second spot while pulling the wire, out. Repeat steps 1-3.
With the female amp connectors removed from the connector, you can use the DeOxit to clean the crimped wire and connector.
I also decided to address any possibility of a loose connector by using a flat-head screwdriver to gently bend the tabs (indicated in red below) more inward, hopefully creating a tighter connection with the male connector.
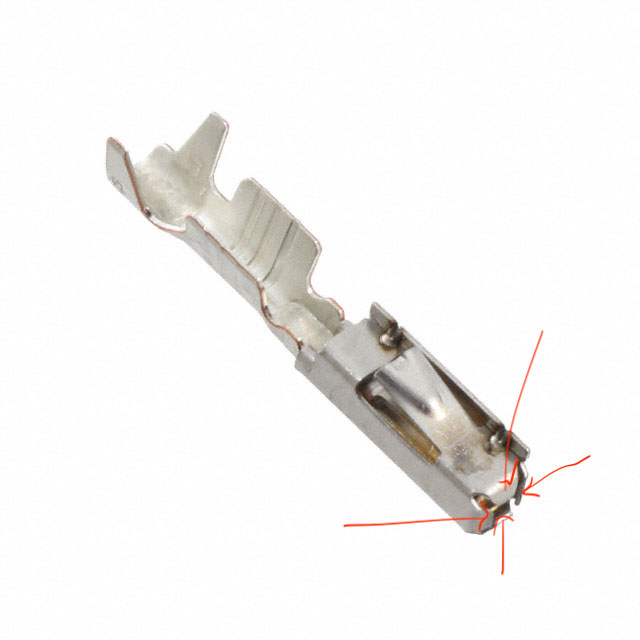
I then used a small flat-head screwdriver to gently pry up the lock-tabs on each connector in order to ensure they would be secure when reinstalled in the housing. I then slid each connector back into the housing.
I repeated this process for the male connectors attached to the wiring from the seat belt receptacle.
Checking for more connections
After I cleaned the ground and small gauge wire connections, I figured I should also check for any other corrosion that could exist within the seat belt receptacle. Since it was common for the receptacle to be replaced in order to resolve connectivity issues, I figured there must be some switches or something inside which are prone to corrosion.
I was able to pry open my seat belt receptacle from the bottom using a plastic pry tool. The plastic shell is like a clam shell and the two pieces appear to be glued with super glue. Part of the shell split and one of the molded plastic posts used to align the two shells broke.
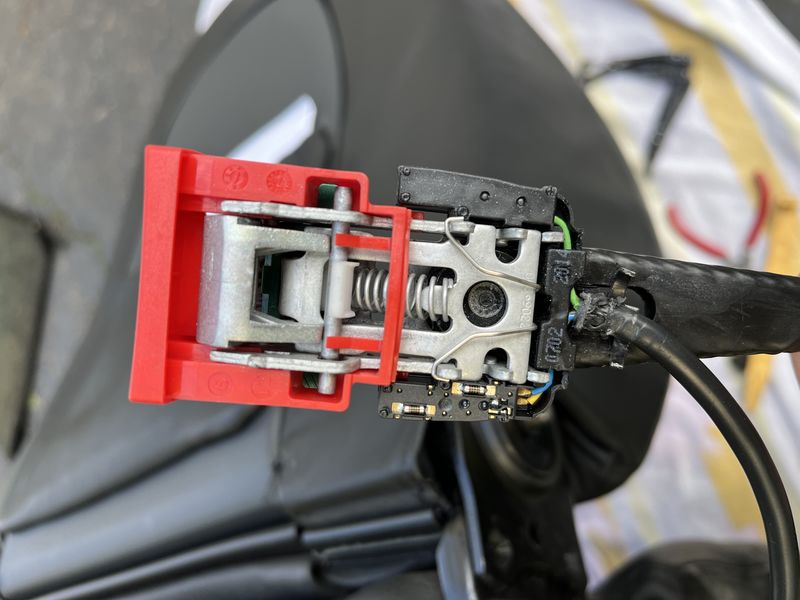
Inside the receptacle you can see two resistors. The one shown above the blue wire measured 100ohms and the one above the yellow wire measured 300ohms.
Below are more pictures of inside the receptacle.
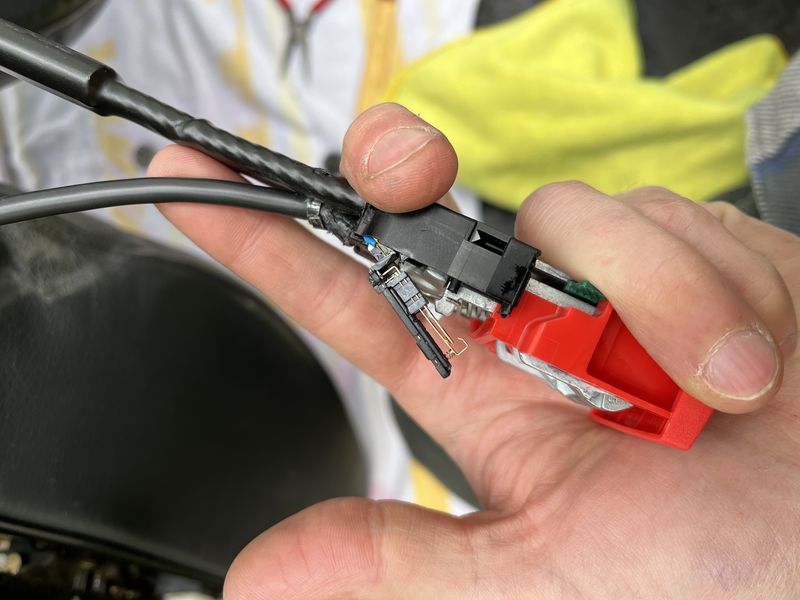
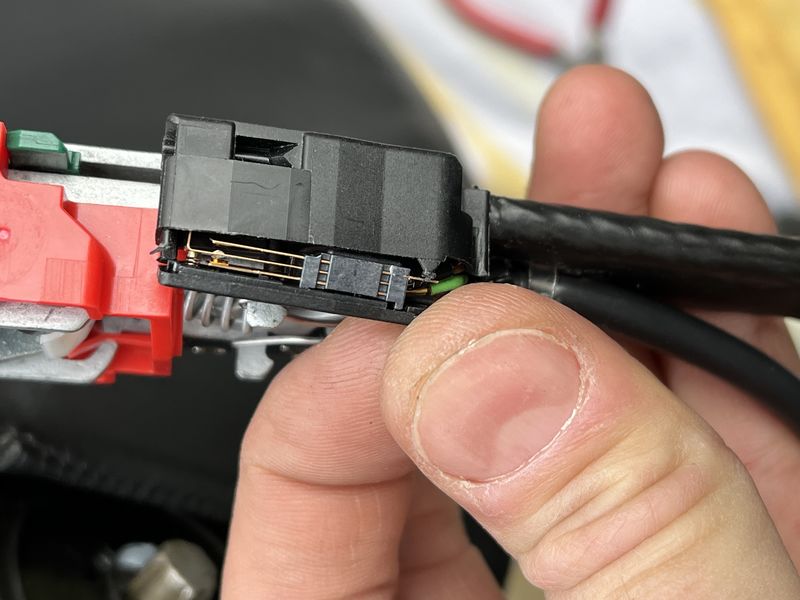
All of the connections and leaf switches did not have any visible corrosion. I would not recommend disassembling the seat belt receptacle as it's unlikely to be the source of your issue.
I used some gel super glue to put the plastic shells back on seat belt receptacle.
Results
Since performing this work I have driven 100+ miles over multiple days and have not had the airbag light return.
Summary
Hopefully this information shows that there are only 3 likely sources of connectivity issues related to the seat belt receptacle: Ground connections/stud, female amp connectors, male amp connectors. The gold plated leaf switches or crimped connections inside the seat belt receptacle are unlikely to corrode, though the they can be cleaned by carefully opening the receptacle, however damage to the plastic shell is likely.
More importantly, I hope this information can show how to replace or repair the amp connectors without having to purchase the Porsche wiring kit or a new seat belt receptacle. These connectors are made by TE Connectivity AMP Connectors. You will need a crimping tool in order to install them.