Go Back   986 Forum - The Community for Porsche Boxster & Cayman Owners > Porsche Boxster & Cayman Forums > Boxster General Discussions

Post Reply
 
LinkBack Thread Tools Display Modes
Old 03-08-2024, 07:40 PM   #21
Registered User
 
Join Date: Feb 2024
Location: Ohio
Posts: 9
Quote:
Originally Posted by BruceH View Post
Mike, I am not near my car right now but there is a picture of my harness in my review on the website where you bought the unit. The biggest issue I had was I didn’t realize that the RCA cable jacks need to be connected to the back of the unit and the other end into the harness. Once I did that it was pretty easy. The RENNLIST thread had some good info on it too. I can get a picture of the back of mine early next week if you are still working on it.
You mentioned the RCA jacks plugging back into the head unit - which red and white RCAs did you connect? I have two male connectors coming from the car wiring harness side but four on the head unit side. Two are labeled AUX IN and two are labeled AUDIO OUT. I assumed audio out is the one I want but no luck..

Maybe a stupid question, but what is the brown connector from your review photo? Unless I dragged it out of the way when relocating my climate controls I don't have this one.


Lack of instructions has me scratching my head a bit I've got power to the head unit and it turns on and functions, but no sound comes out (the important part!) and I'm struggling to understand which cables I actually need to connect and which are extras or unused in my specific case (I have a 2000 S, so no Bose and no MOST but I do have the decklid speakers w/o the rear sub).

alexpinson5 is offline   Reply With Quote
Old 03-10-2024, 08:38 AM   #22
Registered User
 
Join Date: Feb 2024
Location: Ohio
Posts: 9
Update: while waiting on my last message to be approved by the mods I spent some more time digging and figured it out.

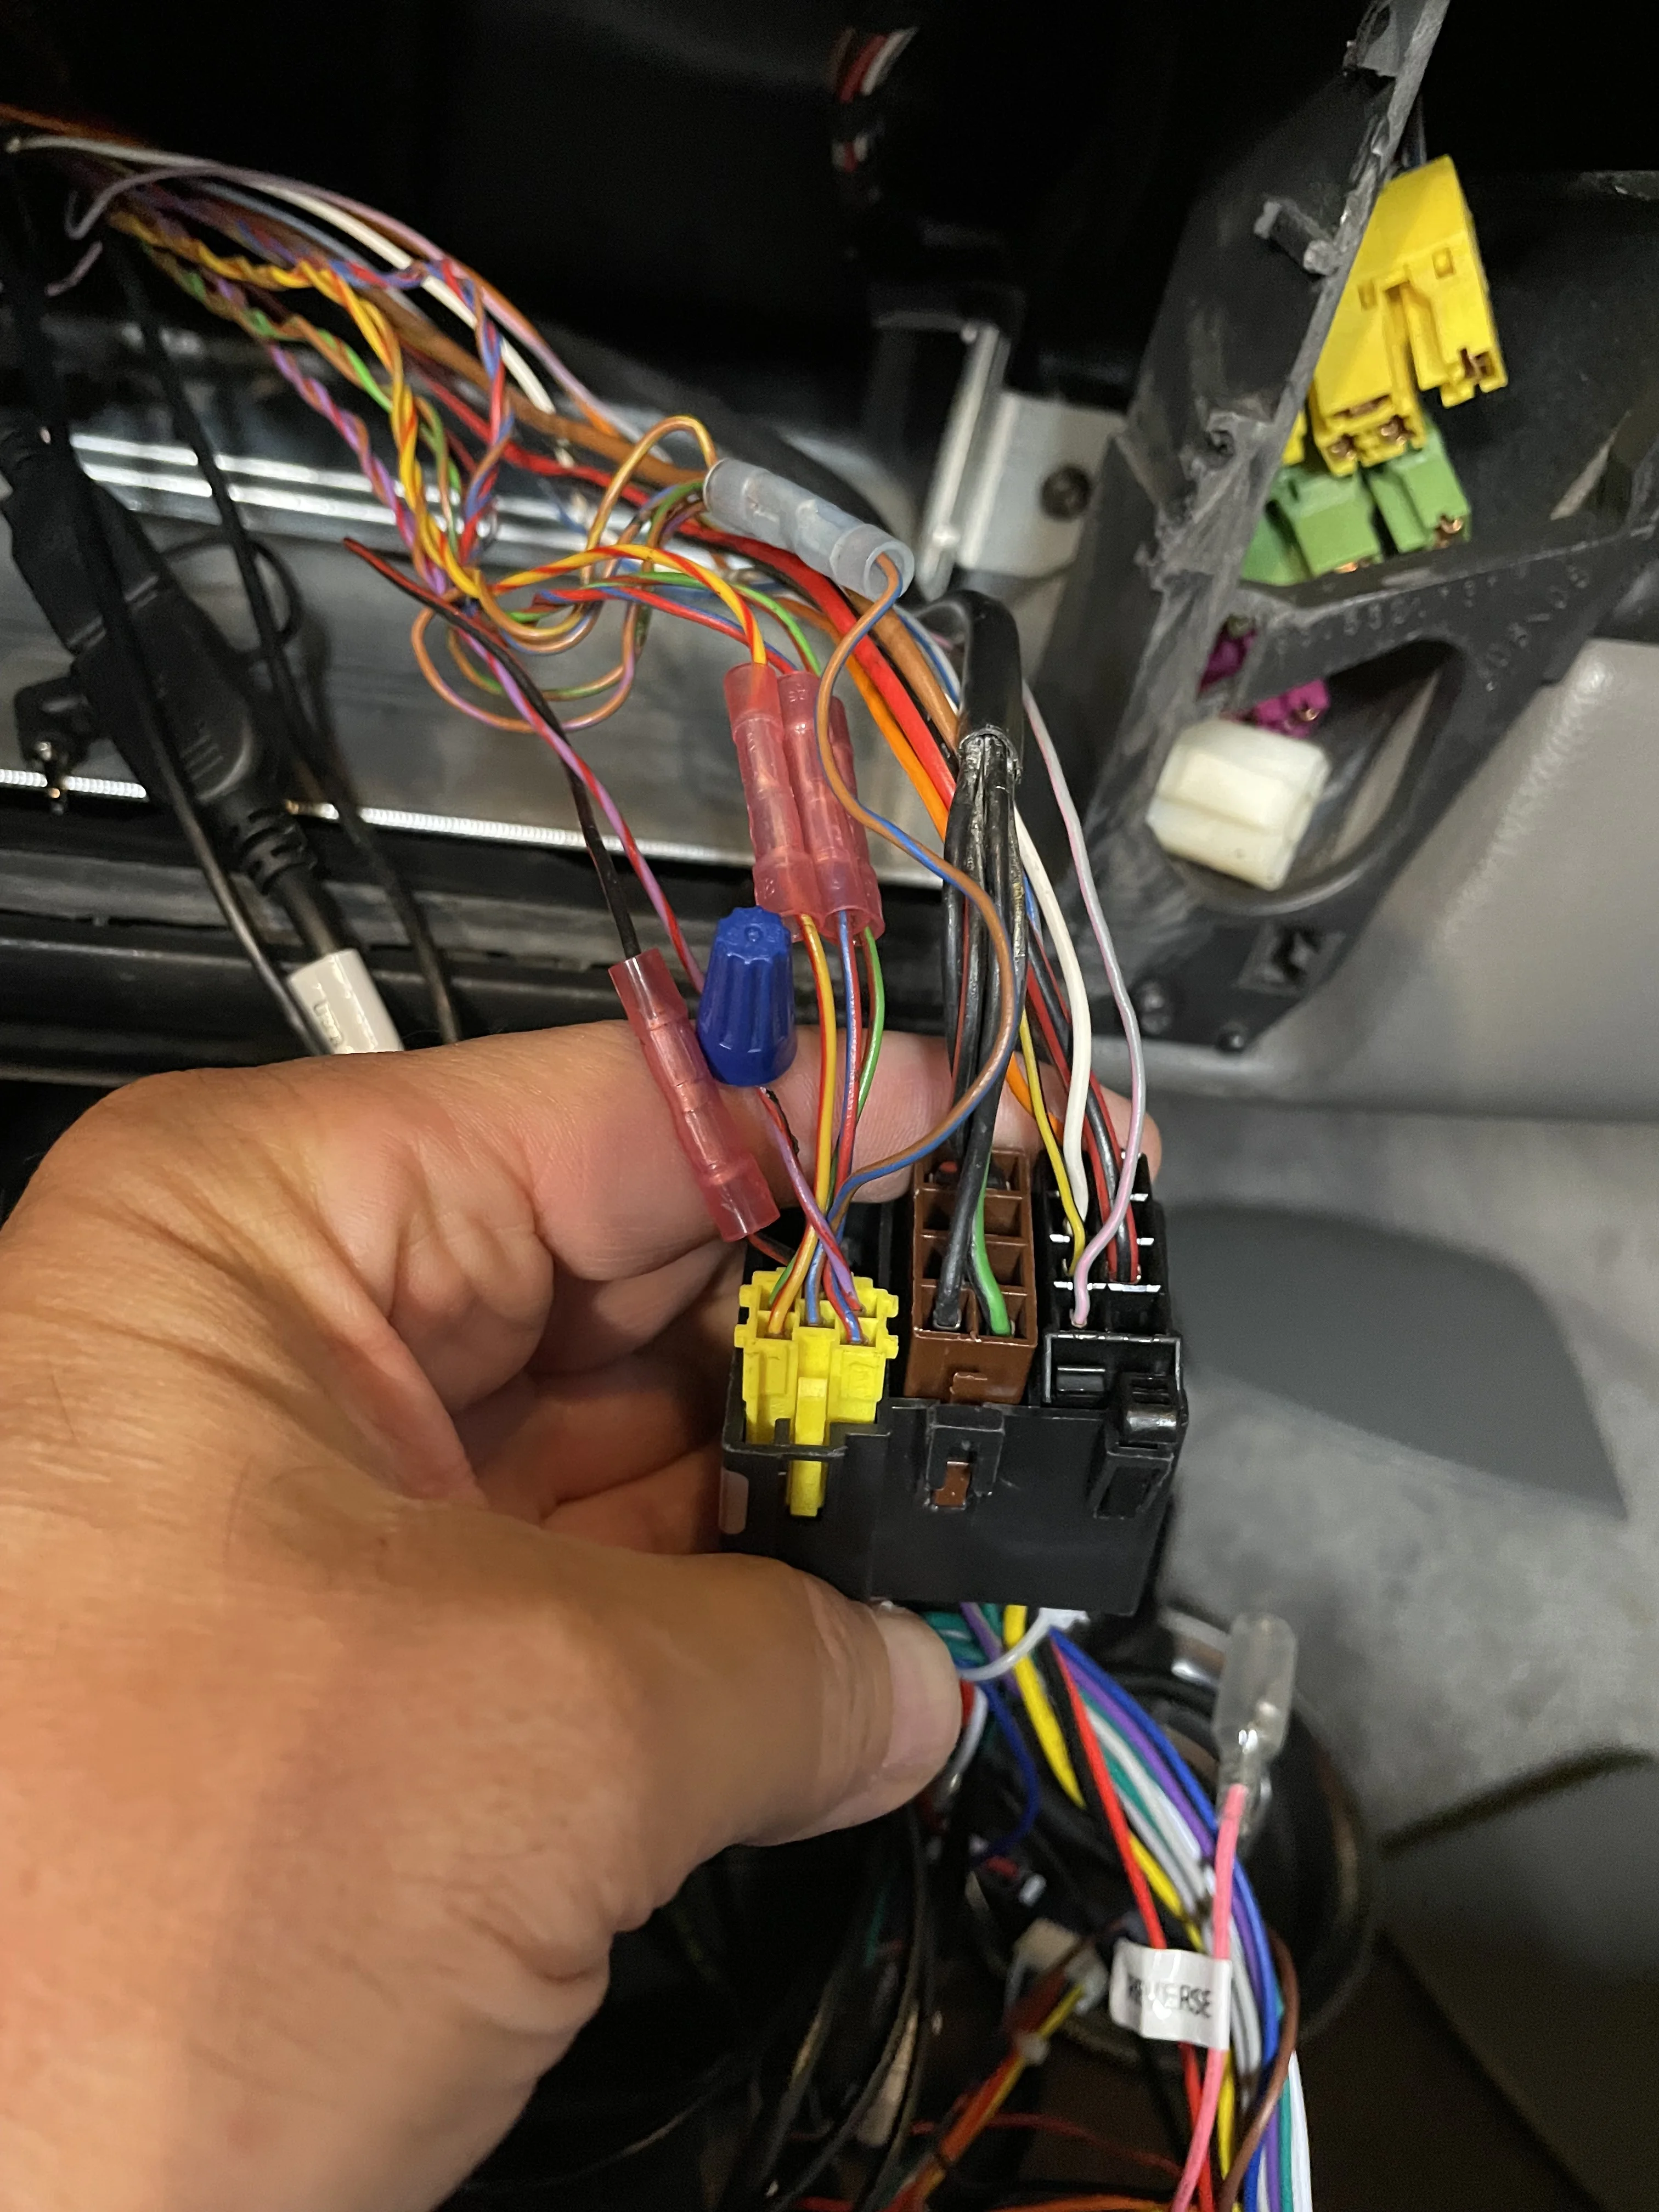
My biggest issue was that I'd unplugged the "radio amplifier switch control" (p/n 99664520105) when I relocated the climate controls. I'd seen cars without it and just assumed it wasn't necessary, but as soon as I plugged it in and got the RCA connections right it worked perfectly. I've never pressed a button on that panel, so I'm going to leave it plugged in and just zip tie it underneath the center console so I can keep my cubby where it's at.

As for the RCA connectors, there were two pairs coming out of the head unit side of the wiring harness and one pair from the car-side of the harness. The car-side cables were black and the HU-side were black for one pair (AUX IN) and grey for the other (AUDIO OUT (iirc)). I assumed the black cables went to the matching black cables but the grey pair ended up being correct and as soon as I plugged those in everything worked like a charm.

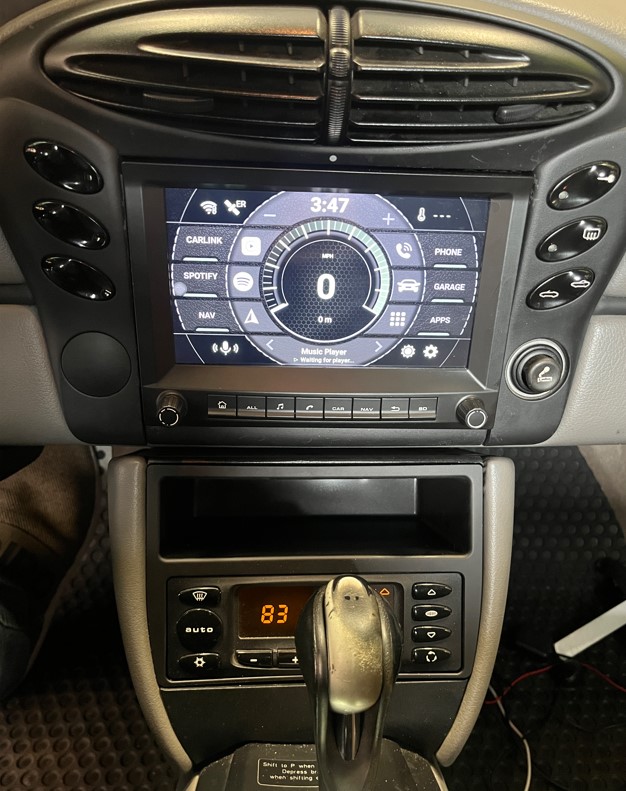
Once I figured out the user error setup was pretty easy and it was more or less plug and play. I loosened the gauge cluster so I could attach the antennas to the dash (running the cables down through the gauge cluster) and I ran the SIM card dongle and USB cable down by the drivers footwell. My plan is to add a panel-mount USB port to the back of the cubby I added so that I don't have dangling cables anywhere.

My only gripe, like I've seen echoed a few times, is that the mounting solution SUCKS. There are four metal tabs that I guess should click into place but they did nothing on my car. Maybe I cut away too much of the bezel to fit the unit, but it was completely loose once I installed it. I used some 3M exterior panel double sided tape to hold it in place. Works pretty well and was easy enough to install, although I wish I'd used thinner tape as you can see a bit of grey along the top. Going to try to camouflage this a little next. Here's how it turned out for me:
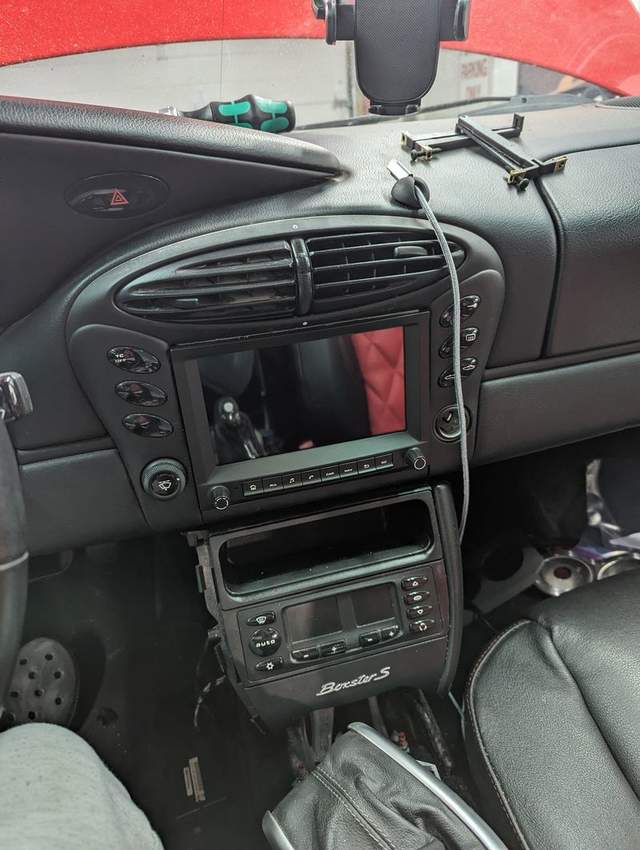
alexpinson5 is offline   Reply With Quote
Old 03-17-2024, 12:38 PM   #23
Registered User
 
Join Date: Mar 2024
Location: az
Posts: 2
Did you need to buy a specific radio bracket for this headunit?
jfal95 is offline   Reply With Quote
Old 03-17-2024, 12:44 PM   #24
Registered User
 
BruceH's Avatar
 
Join Date: Jun 2012
Location: Bedford, TX
Posts: 2,712
Garage
No. You have to remove some plastic that is there, I used a Dremel. In the end, it friction fits perfectly for me YMMV
__________________
______________________________________________
2001 Boxster S Lapis Blue
TS Cat Bypass Pipes and exhaust
iPad Mini Dash Install
DEPO Tail Lights
BruceH is offline   Reply With Quote
Old 03-17-2024, 12:45 PM   #25
Registered User
 
Join Date: Mar 2024
Location: az
Posts: 2
Quote:
Originally Posted by BruceH View Post
No. You have to remove some plastic that is there, I used a Dremel. In the end, it friction fits perfectly for me YMMV
Haha. thanks for the quick reply. Just bought one. I'll post some pics when I get it installed. Cheers!
jfal95 is offline   Reply With Quote
Old 03-17-2024, 12:47 PM   #26
Registered User
 
BruceH's Avatar
 
Join Date: Jun 2012
Location: Bedford, TX
Posts: 2,712
Garage
Great! Yeah, just sitting here watching college basketball �� so I saw it pop up. Good luck with the install, I couldn't be happier with mine.
__________________
______________________________________________
2001 Boxster S Lapis Blue
TS Cat Bypass Pipes and exhaust
iPad Mini Dash Install
DEPO Tail Lights
BruceH is offline   Reply With Quote
Old 03-22-2024, 08:32 PM   #27
Registered User
 
Join Date: Oct 2008
Location: Canyon Lake, Texas
Posts: 801
just finished mine recently too! wish I would have done this a LONG time ago!

stateofidleness is offline   Reply With Quote
Old 03-23-2024, 05:51 AM   #28
Registered User
 
BruceH's Avatar
 
Join Date: Jun 2012
Location: Bedford, TX
Posts: 2,712
Garage
Looks great! Yes, it is a very nice upgrade, well worth doing.

__________________
______________________________________________
2001 Boxster S Lapis Blue
TS Cat Bypass Pipes and exhaust
iPad Mini Dash Install
DEPO Tail Lights
BruceH is offline   Reply With Quote
Post Reply


Posting Rules
You may not post new threads
You may not post replies
You may not post attachments
You may not edit your posts

BB code is On
Smilies are On
[IMG] code is On
HTML code is On
Trackbacks are On
Pingbacks are On
Refbacks are On


All times are GMT -8. The time now is 04:06 AM.


Powered by vBulletin® Version 3.8.7
Copyright ©2000 - 2024, vBulletin Solutions, Inc.
Content Relevant URLs by vBSEO 3.6.0
Copyright 2024 Pelican Parts, LLC - Posts may be archived for display on the Pelican Parts Website -    DMCA Registered Agent Contact Page