 05-29-2021, 10:36 AM
|
#1
|
|
Seal1968
Join Date: May 2019
Location: Chatsworth, Canada
Posts: 137
|
Seal's Bi-xenon headlight revirgination project
I received my package from The Retrofit Source!
And so the project begins...headlights out, seals off (they are toast) now baking in the sun.
Here we go! 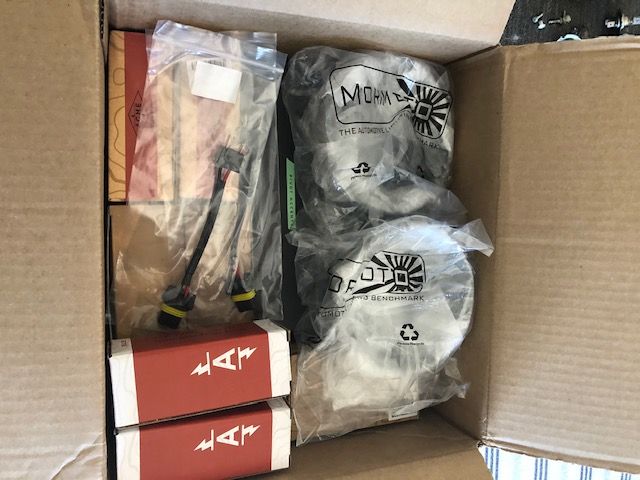

|

|

|
|
05-29-2021, 10:38 AM
|
#2
|
|
Seal1968
Join Date: May 2019
Location: Chatsworth, Canada
Posts: 137
|
Stay tuned for updates folks. Baking in the sun, then will get to cracking these open.

|
|
|
|
|
05-29-2021, 11:08 AM
|
#3
|
|
Registered User
Join Date: May 2017
Posts: 1,180
|
Doubt the sun is going to help. If it did then these would all fall apart sitting in the driveway.
Look though Help Me DIY's youtube videos. He did a complete 2 part video on how to do this.
https://www.youtube.com/watch?v=SXotn-sdyLo&t=55s
__________________
2000 Boxster Tiptronic
2003 Boxster
2003 996 C2 Cab
2002 996 (SOLD)
1986 944 (gone but missed)
|
|
|
|
|
05-29-2021, 02:09 PM
|
#4
|
|
Registered User
Join Date: Apr 2021
Location: Lansing, MI
Posts: 382
|
What did you exactly get from TRS?
I did the full retro fit using FX-R a while ago... a long project, but effects were awesome.
__________________
Current rides: 2003 Porsche Boxster MT (me), 2019 Bolt LT (me), 2015 Audi Q5 (wife), 2008 VW Rabbit (2.5 inline 5, MT, well, for kid... but you now, it is the 5 straight)
Previous: 2014 Fiat 500e, 2016 KIA Forte5 SX, 2016 Fiat 500X, and some old days: Trabant, Fiat 126p...
|
|
|
|
|
05-29-2021, 04:13 PM
|
#5
|
|
Seal1968
Join Date: May 2019
Location: Chatsworth, Canada
Posts: 137
|
Well, pre-warming them actually. I was waiting for my wife to finish baking, but I got into some beers so that is it for the day. 
I got the mini Morimoto bi-xenons that it seems everyone gets.
Then I added some black "Apollo" design shrouds with led halos to hook up the daytime running lights. The halos will shine through the shroud's open slots surrounding the headlight.
Should look pretty cool.
I'll probably crack them open tomorrow when my wife is out.
|
|
|
|
|
05-29-2021, 04:32 PM
|
#6
|
|
Registered User
Join Date: Apr 2017
Location: Indiana
Posts: 1,512
|
What shrouds are you using? Did they offer a centering bracket? If not its gonna be a tight fit in there.
|

|
|
|
05-30-2021, 05:40 AM
|
#7
|
|
Seal1968
Join Date: May 2019
Location: Chatsworth, Canada
Posts: 137
|
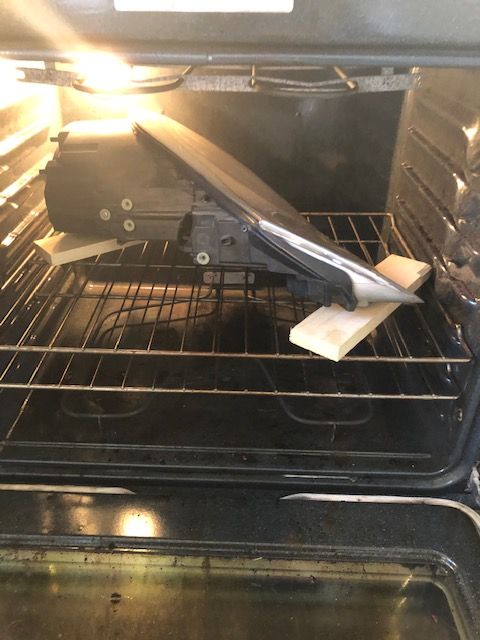
OK. I watched quite a few videos on cracking these things open, and decided to follow Particlewave's guidance.
I baked them at 225 for 15 minutes in the over, resting on some pieces of pine.
|
|
|
|
|
05-30-2021, 05:43 AM
|
#8
|
|
Seal1968
Join Date: May 2019
Location: Chatsworth, Canada
Posts: 137
|
Then I followed the advice to use a putty knife as a backer, then a small flat blade screwdriver to get under the lip...left it there to hold the gap, then moved about 3 inches away and did the same.
You can literally hear the silicone tearing as you go.
Then I went straight for my small flat pry bar, used the putty knife to protect the edge and twisted it until the seam opened to the top.
Then I used my hands only.
5 minutes, tops.


|
|
|
|
|
05-30-2021, 05:44 AM
|
#9
|
|
Seal1968
Join Date: May 2019
Location: Chatsworth, Canada
Posts: 137
|
Then to remove the inner cover, 2 phillips screws and voila...ready to dive in.
I think this was the easy part? lol
Anyway, to answer JBauer...yes I got centric rings to ensure a good fit.
Jimmy at The Retrofit Source was awesome to help put the kit together.

|
|
|
|
|
05-30-2021, 06:30 AM
|
#10
|
|
Seal1968
Join Date: May 2019
Location: Chatsworth, Canada
Posts: 137
|
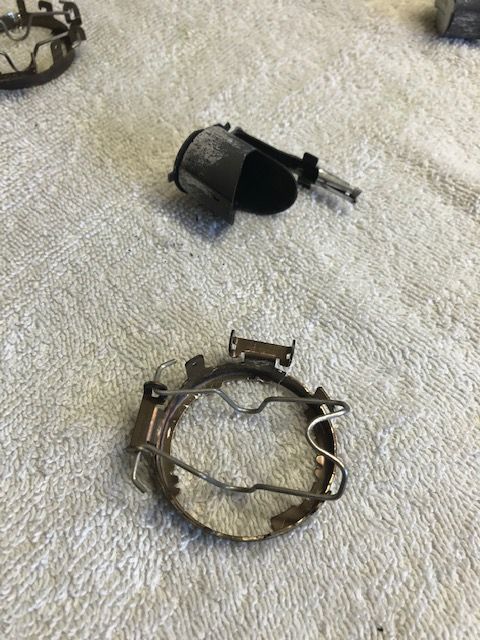
Getting started, I need to remove the halogen shield and bulb holder to dremel it flush.
This will allow the light unit to sit square in the bowl, and secure with the nut from the back.
Now off to get my father in law's dremel.
Slow and steady, no rush.

|
|
|
|
|
05-30-2021, 06:35 AM
|
#11
|
|
Seal1968
Join Date: May 2019
Location: Chatsworth, Canada
Posts: 137
|
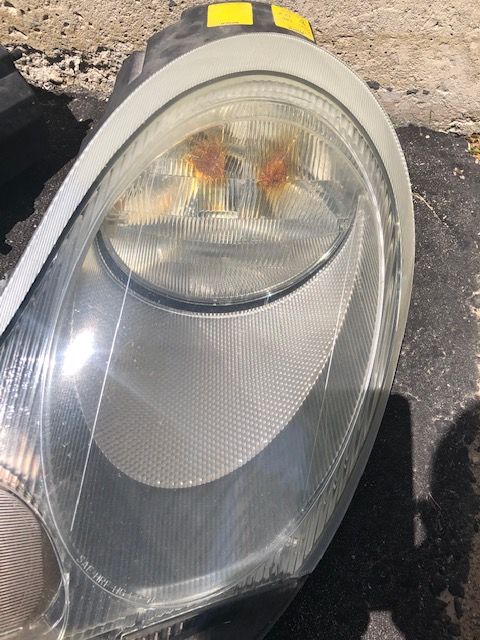
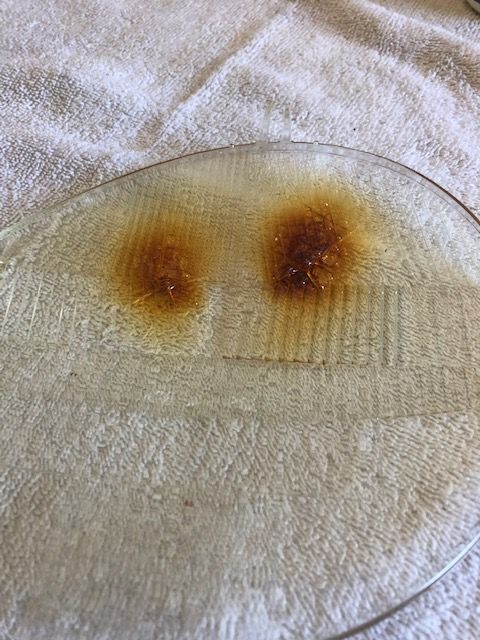
Oh, and to remove the lens, it was simple...a small pic tool, pry behind at 3 o'clock and they pop out.
They are toasted.
The lens is cracked, very thin and actually bubbled on the inside.

|
|
|
|
|
05-30-2021, 02:02 PM
|
#12
|
|
Seal1968
Join Date: May 2019
Location: Chatsworth, Canada
Posts: 137
|
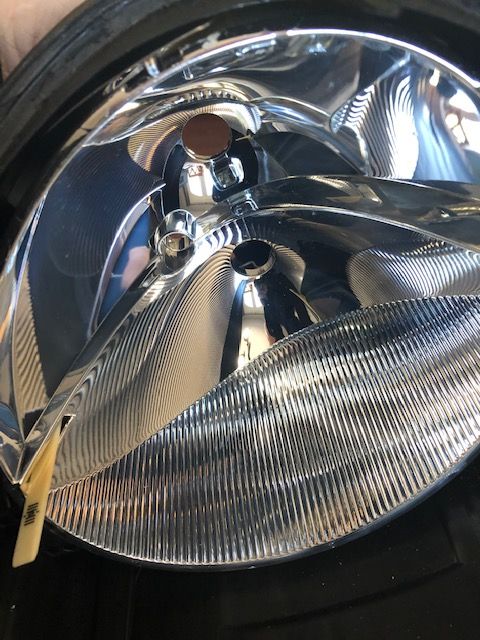
Test fit of the projectors...sitting square and level.
Now sorting the wiring.


|
|
|
|
|
06-04-2021, 08:11 AM
|
#13
|
|
Registered User
Join Date: Oct 2019
Location: Central Florida
Posts: 253
|
Thanks for the PM and the thread. Very helpful. Hopefully I take the plunge soon.
I'm assuming high beams go away with these right?
|
|
|
|
|
06-04-2021, 01:30 PM
|
#14
|
|
Registered User
Join Date: Feb 2016
Location: SE USA
Posts: 324
|
What do you plan on using to reattach the lens to the headlight?
|
|
|
|
|
06-04-2021, 05:05 PM
|
#15
|
|
Seal1968
Join Date: May 2019
Location: Chatsworth, Canada
Posts: 137
|
OK, an update.
I test fired, and success...low beams work on the first try! Very pleased I didn't screw up. So far so good.
Next I want to use the bi-xenons as high and low beam, given that's what they're made for. I am not a fan of having things not work like a "factory" setup.
So, I got a Canbus to plug in which should allow the high/low beam function to work.
I believe this tells the system to allow both low and high beam firing in the projector solenoid. Just sorting this out now - if I understand the rep from Retrofit Source correctly, I think it goes in between the ballast and the projector.
Will be testing on the weekend.
And JBauer...you asked about the shrouds and fitment...the shrouds and halos I ordered are too big as it turns out after all. Good eye sir!
Since I'm using the reflector bowl like the early kits done by particlewave and Nine8Six, they won't work as the projector is not centered in the housing. If I bought one of those kits from the Retrofit lab that reuses the sockets from the reflector, they would be fine.
It was a good thought - no worries though, they will take them back as a return.
As such, I also decided on a different solution for the DRLs...maybe the fog light hack, or simply replace the small bulb with a LED. That way, its an easy replacement versus re-opening the housing to replace a failed halo at some point.
I will be testing out the canbus over the weekend.
If it works I'll disassemble, spray the reflector, and I will hardwire some of the wires versus all the garbled connectors to ensure a tidy fit.
Once that's all done, I will use black Permatex sealant for automotive and polish the lens.
Stay tuned folks.
|
|
|
|
|
06-05-2021, 09:23 AM
|
#16
|
|
Registered User
Join Date: Apr 2021
Location: Lansing, MI
Posts: 382
|
The high beam low beam may not be so easy to accomplish....
Low beam turns off when high beam is activated, am I right?
Low beam supplies power to the ballast. When you pull high beam, the power from high beam light bulb should remain on the high beam light bulb, but also should power the solenoid opening the shield on the projector.
If the low beam gets deactivated, the projector light supply goes dark. To keep it going you can setup a small relay or a circuit that would provide current in either situation.
Unless the low beam stays on with high beam... I am not sure and too lazy to check myself. 
However, a few years ago when I did full retrofit in 2009 Elantra, I left the high beam operational along with the projector.
Since then I loved driving this car at night on twisty roads. Man, it was like a daylight.
__________________
Current rides: 2003 Porsche Boxster MT (me), 2019 Bolt LT (me), 2015 Audi Q5 (wife), 2008 VW Rabbit (2.5 inline 5, MT, well, for kid... but you now, it is the 5 straight)
Previous: 2014 Fiat 500e, 2016 KIA Forte5 SX, 2016 Fiat 500X, and some old days: Trabant, Fiat 126p...
|
|
|
|
|
06-05-2021, 03:07 PM
|
#17
|
|
Seal1968
Join Date: May 2019
Location: Chatsworth, Canada
Posts: 137
|
You are correct sir. Flick high beams, projector out, "shield/flap" opens...but not much good without the proper juice.
The standalone H7 Canbus does not work like I thought it would.
I dug deeper into the threads here and it turns out that there needs to be some additional relays and more wiring done. I found a diagram someone made up for the high beam flash and DRL dimming. It's just not a road I want to go down.
So, I've made my decision - xenon low beam, "factory" high beam and DRL. Nice and simple. Basically acts like the factory litronics this way (except the self levelling of course).
From what I've read, most that have done the early swaps were not concerned about the high beam function, as the projector is so much better anyway. I've read that the halos have had some failures due to being on all the time and/or heat as well.
I think if I need to simply swap bulbs now and then, that's much better than having to crack open the housing and replace a burnt LED halo.
After more searching (thanks to a fellow Canuck NewArt's post a few years back) I found LED H7 replacements, and LEDs for the daytime running lights. Ordered.
I also remeasured and think the Mini-Gatling gun shrouds will fit just nice...ordered those.
Progress, not perfection.
I think one thing I'm learning from this project is that it's a friggin 20 year old car...it can't have all the same toys as my daily driven A4.
Stay tuned...I now wait for parts.
|
|
|
|
|
06-05-2021, 08:31 PM
|
#18
|
|
Registered User
Join Date: Apr 2017
Location: Indiana
Posts: 1,512
|
Before you order anything else you ought to look into LED projectors. You can have high and low beam without all the extra wiring. A LED projector will fit just like your xenox projector does. I changed mine over to LEDs and the output is better than my factory xenon or my retro fit projector xenons.
|
|
|
|
|
06-06-2021, 07:51 AM
|
#19
|
|
Registered User
Join Date: Oct 2019
Location: Central Florida
Posts: 253
|
Quote:
Originally Posted by JBauer

Before you order anything else you ought to look into LED projectors. You can have high and low beam without all the extra wiring. A LED projector will fit just like your xenox projector does. I changed mine over to LEDs and the output is better than my factory xenon or my retro fit projector xenons.
|
What are you using for the fogs?
|
|
|
|
|
06-06-2021, 09:24 AM
|
#20
|
|
Registered User
Join Date: Apr 2017
Location: Indiana
Posts: 1,512
|
Quote:
Originally Posted by Radman
What are you using for the fogs?
|
I never use the fogs but I converted the housing to accommodate a set of ebay motorcycle projectors.
|
|
|
|
 Posting Rules
|
You may not post new threads
You may not post replies
You may not post attachments
You may not edit your posts
HTML code is On
|
|
|
All times are GMT -8. The time now is 03:50 PM.
| |


 Boxster
 Linear Mode


