OP: What color are you painting your car? White?? or the dreaded black?? I wouldn't take my car to Maaco for a black paint job; white no problems (you can hide all kinds of mistakes in white finish).
I might try Tamco next go round. How is the chemical resistance of their clear? That's all I really care about in a paint.
OP: What color are you painting your car? White?? or the dreaded black?? I wouldn't take my car to Maaco for a black paint job; white no problems (you can hide all kinds of mistakes in white finish).
Excellent they compare it to Glasurit only much cheaper. Lapis Blue, dark blue metallic.
Why the re-spray? Have you tried calling a detailer?
There are quite a few mobile detailers around that will show up to your house and wash and buff your car with guaranteed results. Honestly they might be the ones to call to get advise on where to go get your car painted. I'm sure they refer people for paint all the time.
It's my car.
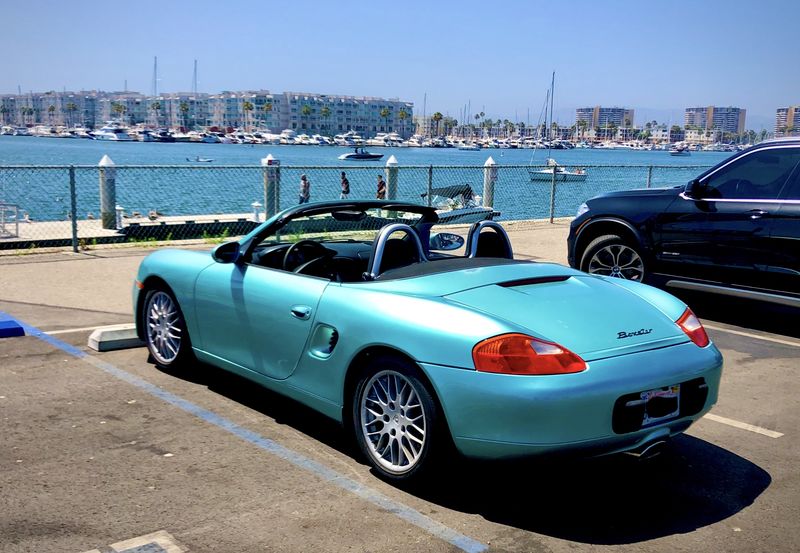
There is peeling clear coat (you can see two small areas of peeled clear coat on the lid for the convertible top in the photo), areas on the hood that are faded, and lots of chips and scratches. I might be able to get away with the horizontal surfaces (hood and trunk lid) painted and the rest detailed, if they can match or blend the color.
But I've already had detailers look at it, and everyone says it needs to be painted, unfortunately.
Any body dings or dents that you couldn't live with?
You might be able to get away with a Maaco job if you aren't apposed to doing some 320 or 500 grit sanding before you send it in. Take the headlighs, tail lights and intake scoops off too.
That's really simple work you can do with a Philips head screwdriver and some patience.
What kind of sanding is required? Just rough it up, or do I need to remove clear coat, or what? And does it matter if I'm doing it by hand, using an orbital sander, or a circular one? I don't have the faintest idea what to do, but I'll do the work if I can learn and it will save me buku bucks.
I have a '99 Boxster I just bought, and after looking around there's no way I can rescue the paint on it. So I need to repaint it.
What should a good paint job cost in Southern California for this car? I don't want to get ripped off. At the same time, I want a good job. I don't want the paint to start peeling a year later or anything.
And for extra bonus points, do you have a recommendation of a good paint shop in the general L.A./Inland Empire area? I live near the border of L.A. and San Bernardino counties.
Thanks for any advice you can give me. A woman taking a Porsche to a shop is prime hunting grounds for ripoff artists, and I want to avoid being taken advantage of. The more knowledge I have going in, the better.
When I managed Porsche's new car fleet in 2003 they sent their cars to Class Auto Center in Long Beach right off 405 Cherry ave exit.
__________________
OE engine rebuilt,3.6 litre LN Engineering billet sleeves,triple row IMSB,LN rods. Deep sump oil pan with DT40 oil.
Last edited by BYprodriver; 08-03-2020 at 11:44 AM.
What kind of sanding is required? Just rough it up, or do I need to remove clear coat, or what? And does it matter if I'm doing it by hand, using an orbital sander, or a circular one? I don't have the faintest idea what to do, but I'll do the work if I can learn and it will save me buku bucks.
Take all of these things, and start with the block and some 220. Dip the 220 in soapy water (or run the garden hose over the piece you are working). Work the sandpaper with the water running (the water flushes the paint so it doesn't clog the sandpaper).
Work the 220 until most of the big scratches and the clear is mostly gone. Don't work all the way to seems in the parts. Another words don't go to the edges where the doors are and where the trunks seal etc.
NOW give your car a good rinsing with clean water. Start with the 500. Do the same with the 500 grit paper as you did with the 220. Try to cross hatch it (do strokes perpendicular to each other). This step should take out most of the clear.
One thing you should NOT have when finished are areas that have flakes. If you have a flake under the base coat your base coat is probably gonna pull up. If you encounter stubborn areas you can sand in one direction away from the higher build area.
^^^^ BUT take all this as a grain of salt i'm only a hobbyist not a professional. Regardless this is what I'd do if I had about $1000 to spend on a paint job.
First, please verify what you're doing. Is your 986 originally Ocean Jade Metallic or are you changing the color to OJM? For some reason I have your car as red in my mind from when you were a member yrs ago. A color change from red to green is best left to the experts.
Second, my comments on the video... Use a sanding block as it keeps more sand paper on the surface of the car. Then do what I'll call cross-hatching motions - sand from 10 to 4 and 8 to 2 on a clock. Use long, sweeping motions. This keeps the sand paper on the contour of the body, with a 986 having a lot of contours. Going 9 to 3 will create flat spots or troughs.
Now for the tough part. To get a properly prepared surface, you'll need to sand it 4 times. Start with 220, next with 320, again with 400, and finally with a Scotch pad. Each time reduces the amount of scratches with the paint feeling almost "smooth" when the Scotch pad sanding is done. You could probably do the first 2 steps with a dual action sander but the last 2 would be best with sanding block for the 400 and by hand with the pad. When my dad and I were rebuilding wrecked cars in the 70s and early 80s, we didn't have dual action sanders so we did all 4 steps by hand. I haven't done body work since my dad passed away 34 yrs ago, but the basics haven't changed based on what I see on today's TV shows.
If you're changing colors, you'll need to remove all the parts that are attached (doors, hood, etc) so you can get paint on all painted surfaces. This means you'll also need to remove any attached parts too. LOTS of work. You won't have to sand these areas to perfection, but you'll have to rough it up enough so paint will stick.
I would assume a 20+ yr old car would have accumulated a few door dings over the yrs. You'll need to deal with them now, as you don't want to leave them and paint over them. This opens a whole new can of worms - body filler. That's a whole 'nuther set of YT videos.
I'm not trying to scare you out of doing it yourself. Just remember - the prep work is the foundation of a great paint job. It's easy to cut corners but the final result will magnify in a negative way any time "savings". It's not rocket science, it is very labor intensive, but it does require a bit of knowledge to get it right.
__________________
GPRPCA Chief Driving Instructor
2008 Boxster S Limited Edition #005
2008 Cayman S Sport - Signal Green
1989 928 S4 5 spd - black
Last edited by husker boxster; 08-04-2020 at 07:08 AM.
First, please verify what you're doing. Is your 986 originally Ocean Jade Metallic or are you changing the color to OJM? For some reason I have your car as red in my mind from when you were a member yrs ago. A color change from red to green is best left to the experts.
You must be thinking of someone else. I was not a member years ago. I've only recently joined since I bought this car in June.
Mrs. Peel's original paint color is Ocean Jade Metallic. That's what drew me to it. And I understand it's a rare color. So I'm not changing the color, I'm just restoring it.
You and others have convinced me that I don't want to tackle this as a DIY project, not even the prep. I'm just going to shell out the bucks to get it done right by a trustworthy painter. I'm not going to boat bed it.
What does that mean? Years ago I had a boat. That boat had a huge, irregularly shaped bed platform. I tried all sorts of things that were cheap solutions, including cutting my own foam, to put a "mattress" on that bed area. For three years I tried things and had three years of a crappy bed. Finally, I gave up and paid the bucks to had a custom mattress created, 6' wide at the top, curving to 9' wide at the bottom. It fit the space perfectly and I slept like a baby. From then on, when I consider cheapening out on a project to save a few bucks, I remember that I spent a lot more in the long run and had a miserable three years, and should have just sprung for getting it done right the first time.
No boat-betting for Mrs. Peel. I'm just gonna shuck out the big bucks necessary to restore her to her original glory.
My apologies. I have you confused with Porsche Chick who was a member several yrs ago. She had a red 986, then moved up to a red 987.2 and I think on to a 911 from there and stopped participating on this forum. It just made sense to me when you mentioned you found your original 986 that you were Porsche Chick.
So an exterior repaint will not cost you as much as a color change since you won't have to remove a bunch of panels and do a bunch of extra sanding / painting.
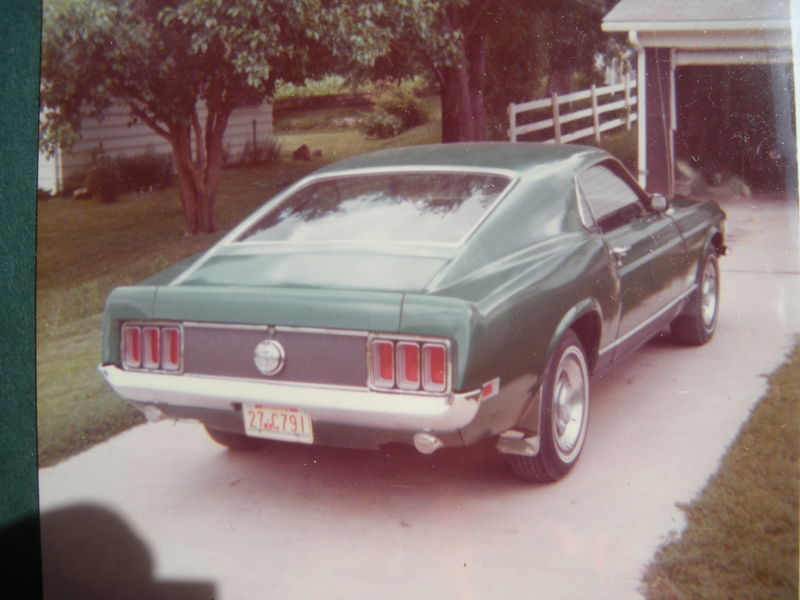
My first car was a 70 Mach 1 that was originally an olive green color (similar to Porsche's Peridot). I hated it and wanted to change the color. Dad was fine with that as long as I did all the extra sanding. Was a crap-load of addl work but was glad I did it. That was also the last color change I ever did (that was in 1976).
Before:
We replaced the trunk lid, tail light, qtr corner piece and the bumper. Repaired everything else, including the qtr panel. This pic is when we got it done hrs before my JR prom. We didn't have time to put the Mach 1 decal on the back but it eventually got put on.
__________________
GPRPCA Chief Driving Instructor
2008 Boxster S Limited Edition #005
2008 Cayman S Sport - Signal Green
1989 928 S4 5 spd - black
First, please verify what you're doing. Is your 986 originally Ocean Jade Metallic or are you changing the color to OJM? For some reason I have your car as red in my mind from when you were a member yrs ago. A color change from red to green is best left to the experts.
Second, my comments on the video... Use a sanding block as it keeps more sand paper on the surface of the car. Then do what I'll call cross-hatching motions - sand from 10 to 4 and 8 to 2 on a clock. Use long, sweeping motions. This keeps the sand paper on the contour of the body, with a 986 having a lot of contours. Going 9 to 3 will create flat spots or troughs.
Now for the tough part. To get a properly prepared surface, you'll need to sand it 4 times. Start with 220, next with 320, again with 400, and finally with a Scotch pad. Each time reduces the amount of scratches with the paint feeling almost "smooth" when the Scotch pad sanding is done. You could probably do the first 2 steps with a dual action sander but the last 2 would be best with sanding block for the 400 and by hand with the pad. When my dad and I were rebuilding wrecked cars in the 70s and early 80s, we didn't have dual action sanders so we did all 4 steps by hand. I haven't done body work since my dad passed away 34 yrs ago, but the basics haven't changed based on what I see on today's TV shows.
If you're changing colors, you'll need to remove all the parts that are attached (doors, hood, etc) so you can get paint on all painted surfaces. This means you'll also need to remove any attached parts too. LOTS of work. You won't have to sand these areas to perfection, but you'll have to rough it up enough so paint will stick.
I would assume a 20+ yr old car would have accumulated a few door dings over the yrs. You'll need to deal with them now, as you don't want to leave them and paint over them. This opens a whole new can of worms - body filler. That's a whole 'nuther set of YT videos.
I'm not trying to scare you out of doing it yourself. Just remember - the prep work is the foundation of a great paint job. It's easy to cut corners but the final result will magnify in a negative way any time "savings". It's not rocket science, it is very labor intensive, but it does require a bit of knowledge to get it right.
I don't think she's looking for a concourse car. Just a simple re-spray on a $5000 car. No reason to shell out $3000 on a car worth just that.
FWIW I think a wee bit of wet sanding and a $1000 Maaco re-spray and the OP will be right as rain.
My apologies. I have you confused with Porsche Chick who was a member several yrs ago. She had a red 986, then moved up to a red 987.2 and I think on to a 911 from there and stopped participating on this forum. It just made sense to me when you mentioned you found your original 986 that you were Porsche Chick.
So an exterior repaint will not cost you as much as a color change since you won't have to remove a bunch of panels and do a bunch of extra sanding / painting.
My first car was a 70 Mach 1 that was originally an olive green color (similar to Porsche's Peridot). I hated it and wanted to change the color. Dad was fine with that as long as I did all the extra sanding. Was a crap-load of addl work but was glad I did it. That was also the last color change I ever did (that was in 1976).
Before:
We replaced the trunk lid, tail light, qtr corner piece and the bumper. Repaired everything else, including the qtr panel. This pic is when we got it done hrs before my JR prom. We didn't have time to put the Mach 1 decal on the back but it eventually got put on.
Ah, the wonderful energy of youth, eh husker?
Though I was much older than you when you did your work on the Mustang (hat's off to you, btwa nice repair following a ton of elbow grease!), I was enough younger when I picked up the Boxster (2006) that I was constantly detailing her. Washing, claying, sometimes polishing, prewax prepping, sealing/waxing (sometimes BOTH), treating the vinyl back window, wheel care, etc etc. Would be nice to still have that energy!
I don't think she's looking for a concourse car. Just a simple re-spray on a $5000 car. No reason to shell out $3000 on a car worth just that.
FWIW I think a wee bit of wet sanding and a $1000 Maaco re-spray and the OP will be right as rain.
I think maybe something in between Maaco and a Concours car. This 21-year old car is in great mechanical condition, with only 50,000 original miles on it. And as soon as I got it I replaced the clutch, the rear axle, convertible top, and a few other things because they had wear. My goal is to make it look and run brand new. It already runs like new.
Now I'm past repairs (for now) and the things I'm trying to fix are cosmetic, such as:
Paint
Restore worn leather seats
Re-wrap steering wheel with leather threading the same color as the exterior paint
Find or make floor mats with Boxster logo and piping the same color as the exterior paint
When the tires are worn, replace wheels with 18" more aggressive wheels
Then make a couple basic improvements:
Heavy duty brakes
Change exhaust for tone and HP
Short throw shifter
Maybe upgrade headlamps
So, this is just part of a project. I'm going to be spending more than the car is worth, anyway, and I'm okay with that. I plan on keeping this car for a long time. And I'd like to be able to show it off now and then. I'm not going to pay $15,000 for new paint, but I'll pay $3,000-$4,000.
I think maybe something in between Maaco and a Concours car. This 21-year old car is in great mechanical condition, with only 50,000 original miles on it. And as soon as I got it I replaced the clutch, the rear axle, convertible top, and a few other things because they had wear. My goal is to make it look and run brand new. It already runs like new.
Now I'm past repairs (for now) and the things I'm trying to fix are cosmetic, such as:
Paint
Restore worn leather seats
Re-wrap steering wheel with leather threading the same color as the exterior paint
Find or make floor mats with Boxster logo and piping the same color as the exterior paint
When the tires are worn, replace wheels with 18" more aggressive wheels
Then make a couple basic improvements:
Heavy duty brakes
Change exhaust for tone and HP
Short throw shifter
So, this is just part of a project. I'm going to be spending more than the car is worth, anyway, and I'm okay with that. I plan on keeping this car for a long time. And I'd like to be able to show it off now and then. I'm not going to pay $15,000 for new paint, but I'll pay $3,000-$4,000.
Base model?
I just got a set of LLOYD floor mats off ebay. They are REALLY nice little expensive but worth it. ($140)
IDK you've got nothing to loose if you attempt to block it down before paint. I mean they are gonna block it down if you go with a $4000 paint job. Try it out (worst case scenario you get a good arm workout) and post your results here and we can judge you.
If you want an inexpensive and quick repair, and it's just the clear coming off you can sand the top layers with 400 wet, then re-clear. No need to break through the basecoat into the primer layer and have to re-spray the entire panel. When sanding the clear it will be a white residue...if you see colour on the sandpaper, you're into the basecoat.
To re-clear you can get 2K clear coat in a rattle can - it has the activator in it, and the UV protection needed. Cans of the 2K clear are @ $35 each.
There's a ton of DIY clearcoat repair videos on YT if you want to tackle this project.
If you feel this above your skill level, a body shop can blow in your hood and top lid easy. They will be able to match the paint codes. Even a Maaco shop could do this for you.


 Mean Motor Scooter
 Parts Car, car parts
 Honda Del Sol(s)
 "Hers"
 My Original '99
 The 78 F350
 This
This That
That The S 2.5
 Other
Other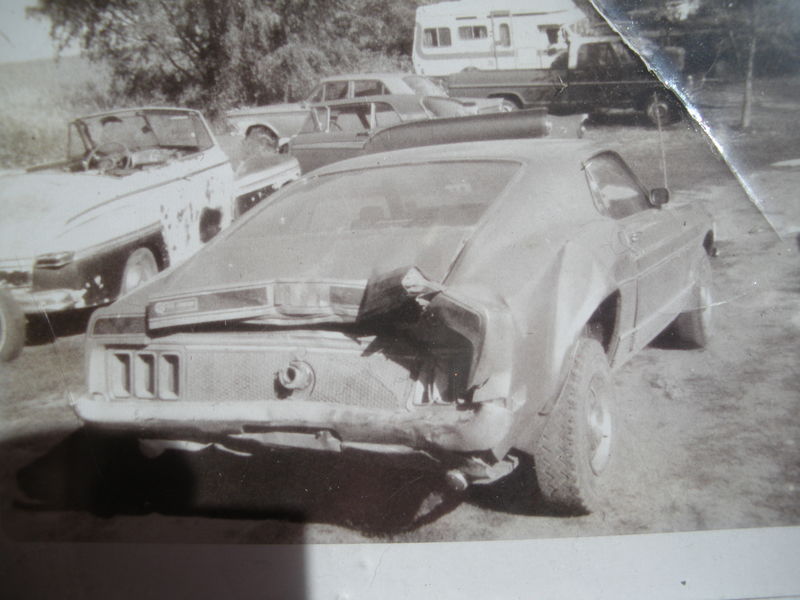
 Linear Mode


