 11-25-2017, 11:28 AM
|
#1
|
|
Registered User
Join Date: Oct 2017
Location: New Jersey
Posts: 86
|
Remove white wax residue from rear bumper plastic bumper things
Sorry I'm not sure what the two bumps by the rear plate are called. I foolishly got compound residue on them. I've tried, so far, without success:
What the heck
|

|

|
|
11-25-2017, 11:43 AM
|
#2
|
|
still plays with cars...
Join Date: May 2011
Location: Baden, ON, Canada
Posts: 1,088
|
Always had good luck with Mothers Back To Black.
Or just prep them and do them to match the car.
It looks great when the bumperettes are colour matched.
Lots of threads on doing this floating around.
__________________
Six speed 2000 Boxster S
Arctic Silver on Metropol Blue | LN Dual Row IMSR | Arctic Silver console, spoiler frame & bumperettes | Crios mod | Technobrace | RoboTop module & modified convertible top relay for one-touch roof operation
|
|
|
|
|
11-25-2017, 11:59 AM
|
#3
|
|
Registered User
Join Date: Sep 2006
Location: Omaha
Posts: 2,959
|
Pink Pearl pencil eraser.
As Steve says, those are bumperettes.
__________________
GPRPCA Chief Driving Instructor
2008 Boxster S Limited Edition #005
2008 Cayman S Sport - Signal Green
1989 928 S4 5 spd - black
|
|
|
|
|
11-25-2017, 12:29 PM
|
#4
|
|
Registered User
Join Date: Oct 2017
Location: New Jersey
Posts: 86
|
Quote:
Originally Posted by husker boxster

Pink Pearl pencil eraser.
As Steve says, those are bumperettes.
|
Thanks gents. Now have gotten really interested in the bumperette removal all together!
|
|
|
|
|
11-25-2017, 02:40 PM
|
#5
|
|
1997 Tip, 2018 Macan
Join Date: Aug 2015
Location: Upland, CA
Posts: 1,338
|
+1 for the Mother's Back to Black.
|
|
|
|
|
11-25-2017, 06:14 PM
|
#6
|
|
still plays with cars...
Join Date: May 2011
Location: Baden, ON, Canada
Posts: 1,088
|
Quote:
Originally Posted by pinksnyper
Thanks gents. Now have gotten really interested in the bumperette removal all together!
|
You can remove them, it only takes a 6mm Allen key, but you expose the bracket they affix to, and the hole in the bumper cover underneath.
Look in my garage photos, theres a pic there of my painted bumperettes.
It takes various grades of sandpaper, high fill primer, base coat and catalyzed clear coat and a couple of days to get it all done.
Bumper Plugs sells complete painted ones, but Im too German to spend that kind of bread.
__________________
Six speed 2000 Boxster S
Arctic Silver on Metropol Blue | LN Dual Row IMSR | Arctic Silver console, spoiler frame & bumperettes | Crios mod | Technobrace | RoboTop module & modified convertible top relay for one-touch roof operation
|
|
|
|
|
11-26-2017, 03:43 AM
|
#7
|
|
Registered User
Join Date: Oct 2017
Location: New Jersey
Posts: 86
|
Quote:
Originally Posted by BoxsterSteve
You can remove them, it only takes a 6mm Allen key, but you expose the bracket they affix to, and the hole in the bumper cover underneath.
Look in my garage photos, theres a pic there of my painted bumperettes.
It takes various grades of sandpaper, high fill primer, base coat and catalyzed clear coat and a couple of days to get it all done.
Bumper Plugs sells complete painted ones, but Im too German to spend that kind of bread.
|
That looks great. For the novice painter, do you have a guide of sorts?
|
|
|
|
|
11-26-2017, 11:19 AM
|
#8
|
|
Registered User
Join Date: Oct 2017
Location: Seattle area
Posts: 174
|
I did something similar with wax. I used some full strength Simple Green and a tooth brush, took it right off...
|
|
|
|
|
11-26-2017, 12:01 PM
|
#9
|
|
Registered User
Join Date: Oct 2017
Location: New Jersey
Posts: 86
|
Quote:
Originally Posted by A8ked
I did something similar with wax. I used some full strength Simple Green and a tooth brush, took it right off...
|
I don't have any on hand. Surprised my full strength goof off didn't work though
|
|
|
|
|
11-26-2017, 12:36 PM
|
#10
|
|
still plays with cars...
Join Date: May 2011
Location: Baden, ON, Canada
Posts: 1,088
|
Quote:
Originally Posted by pinksnyper
That looks great. For the novice painter, do you have a guide of sorts?
|
I started with 400 grit to sand off all the pebble finish, then went to 800 grit then 1000.
Then I laid on a coat of high build primer and sanded with 1500 grit. Did it again.
I sprayed light coats of base coat until the can was empty, then did the same with the catalyzed clear.
__________________
Six speed 2000 Boxster S
Arctic Silver on Metropol Blue | LN Dual Row IMSR | Arctic Silver console, spoiler frame & bumperettes | Crios mod | Technobrace | RoboTop module & modified convertible top relay for one-touch roof operation
|
|
|
|
|
11-26-2017, 04:32 PM
|
#11
|
|
Registered User
Join Date: Aug 2005
Location: Sanford NC
Posts: 2,605
|
I had Bumper Plugs do mine and they exchanged a set they had for mine plus my credit card, of course. They were a perfect match and held up perfectly for the 5 years I owned the car. Never read a bad forum comment about them.
|
|
|
|
|
11-26-2017, 07:01 PM
|
#12
|
|
Registered User
Join Date: Mar 2007
Location: Ohio
Posts: 2,032
|
If you decide to stick with black bumperettes...
I used Back to Black for a while, and liked it reasonably well. Problem was, it didn't last very long. I switched to Forever Black---lasts MUCH longer.
|
|
|
|
 Posting Rules
|
You may not post new threads
You may not post replies
You may not post attachments
You may not edit your posts
HTML code is On
|
|
|
All times are GMT -8. The time now is 08:54 PM.
| |


 Udo
Udo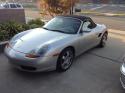 1997 Porsche Boxster
 2018 Porsche Macan
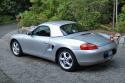 1998 Porsche Boxster
 1991 Porsche Carrera 4
 Linear Mode


