 07-09-2016, 08:18 AM
|
#61
|
|
Registered User
Join Date: May 2016
Location: Surrey, B.C.
Posts: 69
|
Quote:
Originally Posted by vheilman

Couple of questions.
Are these fiberglass, carbon fiber, or?
What is the chance of rub/wear again to body or trunk?
Speed tested?
Painting options? I see yours is black, did you paint it?
Final thoughts: I like the design a lot, but it seems to more than twice what I was expecting. I'm sure it's worth it, but I'll have to wait.
|
To answer your questions,
Yes these will be fiberglass. I would like to do CF as well only if I can make the seam lines invisible.
The ducktail lines up like the original spoiler on the car with the same body line clearance. Will not rub.
Speed test....only to 75 MPH freeway driving. With using 3M two sided tape and the original plastic plugs they will not come off. My dive planes and 996 turbo intake scoops have gone 185 MPH on many track/race cars with only tape and no customer has lost one.
They can be painted. Will come out of the mold in shiny black gel coat like you see on mine.
The parts are going to be made in a three piece mold. When they come out of the mold I have seam lines which need to be cleaned up and made invisible. I cannot and will not make or sell these if the only way to make them presentable is to paint (color match) after the fact. These are actually more money than 4 models of my splitters because of the labor required.
Last edited by Joe toth; 07-09-2016 at 08:23 AM.
|

|

|
|
07-09-2016, 08:20 AM
|
#62
|
|
Registered User
Join Date: May 2016
Location: Surrey, B.C.
Posts: 69
|
Ducktail group buy list:
To sign up copy and paste the latest list and add your name at the bottom
for clarification these are for Boxster up to 2002, 03 and newer are different
1 - NJBoxster2000
2 - Fintro11
3 - rfuerst911sc
4 - Turn3 Autosport
Last edited by Joe toth; 07-09-2016 at 10:52 AM.
|
|
|
|
|
07-09-2016, 11:43 AM
|
#63
|
|
Registered User
Join Date: Jun 2013
Location: Nanaimo, Vancouver Island, British Columbia, Canada
Posts: 916
|
 I will have to wait until the 03- 04 is available
|
|
|
|
|
07-09-2016, 12:25 PM
|
#64
|
|
Registered User
Join Date: May 2016
Location: Surrey, B.C.
Posts: 69
|
Ducktail group buy list:
To sign up copy and paste the latest list and add your name at the bottom
for clarification these are for Boxster up to 2002, 03 and newer are different
1 - NJBoxster2000
2 - rfuerst911sc
3 - Turn3 Autosport
|
|
|
|
|
07-09-2016, 12:34 PM
|
#65
|
|
Registered User
Join Date: Dec 2013
Location: Dahlonega , Georgia
Posts: 1,364
|
I posted this over on the 986 Pelican forum also hope to drum up some additional business over there .
__________________
2002 Boxster S Arctic Silver with black top with glass window and black leather interior. Jake Raby 3.6 SS ( the beast ) with IMS Solution. 996 GT3 front bumper , GT3 rocker covers and GT3TEK rear diffuser and Joe Toth composites rear ducktail spoiler .
|

|
|
|
07-10-2016, 02:44 AM
|
#66
|
|
Registered User
Join Date: Oct 2012
Location: Cincinnati, Ohio
Posts: 373
|
Joe,
Add me to the list.
Please sign me up for 1
Thanks
Van
|
|
|
|
|
07-10-2016, 04:30 AM
|
#67
|
|
Registered User
Join Date: Jun 2016
Location: Detroit
Posts: 211
|
Really nicely done, Joe. Looks like oem.
Any effect on cabin wind noise or turbulence? Any effect on fuel mileage?
|
|
|
|
|
07-10-2016, 05:55 AM
|
#68
|
|
Registered User
Join Date: Dec 2013
Location: Dahlonega , Georgia
Posts: 1,364
|
Joe have you given any thought on payment options ?
__________________
2002 Boxster S Arctic Silver with black top with glass window and black leather interior. Jake Raby 3.6 SS ( the beast ) with IMS Solution. 996 GT3 front bumper , GT3 rocker covers and GT3TEK rear diffuser and Joe Toth composites rear ducktail spoiler .
|
|
|
|
|
07-10-2016, 08:18 AM
|
#69
|
|
Registered User
Join Date: May 2016
Location: Surrey, B.C.
Posts: 69
|
Quote:
Originally Posted by Disaster
Really nicely done, Joe. Looks like oem.
Any effect on cabin wind noise or turbulence? Any effect on fuel mileage?
|
Haven't noticed a difference in either, mind you I've only driven a couple of hundred miles with it on.
|
|
|
|
|
07-10-2016, 08:20 AM
|
#70
|
|
Registered User
Join Date: May 2016
Location: Surrey, B.C.
Posts: 69
|
Ducktail group buy list:
To sign up copy and paste the latest list and add your name at the bottom
for clarification these are for Boxster up to 2002, 03 and newer are different
1 - NJBoxster2000
2 - rfuerst911sc
3 - Turn3 Autosport
4 - Van914
|
|
|
|
|
07-11-2016, 07:50 AM
|
#71
|
|
Registered User
Join Date: May 2016
Location: Surrey, B.C.
Posts: 69
|
Ducktail group buy list:
To sign up copy and paste the latest list and add your name at the bottom
for clarification these are for Boxster up to 2002, 03 and newer are different
1 - NJBoxster2000
2 - rfuerst911sc
3 - Turn3 Autosport
4 - Van914
5 - Edreamsz
|
|
|
|
|
07-11-2016, 08:23 AM
|
#72
|
|
Registered User
Join Date: Jun 2010
Location: The Netherlands
Posts: 53
|
1 - NJBoxster2000
2 - Fintro11
3 - rfuerst911sc
4 - Turn3 Autosport
5- Edreamsz
|
|
|
|
|
07-11-2016, 02:30 PM
|
#73
|
|
Registered User
Join Date: May 2016
Location: Surrey, B.C.
Posts: 69
|
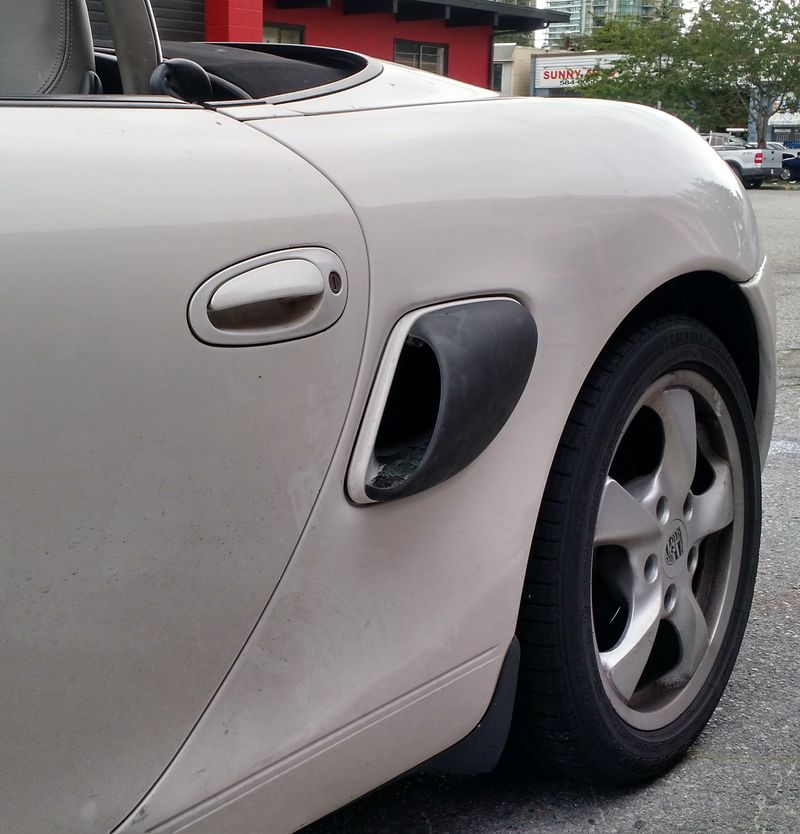
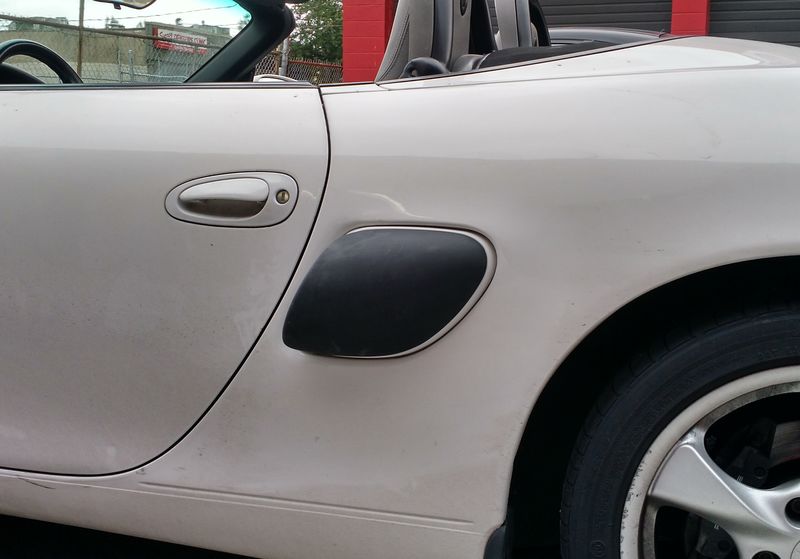
I started fooling around with another piece piece for the car while Im waiting for layers to cure on the ducktail mold.
Feedback welcomed as always

|
|
|
|
|
07-11-2016, 10:12 PM
|
#74
|
|
Registered User
Join Date: Apr 2014
Location: New Jersey
Posts: 47
|
Hi Joe. Not bad. Would like to see a pic of this from the straight back point of view. a couple of thoughts - 1. the intake pieces are different (left/right) so the look of your scoops may be different. 2. I have a cold air intake on my car i.e cone filter and no snorkel. as a rule, I don't drive int he rain but do get caught once in a while. I'm always weary of water getting into the filter. It seems that with scoops the water may accumulate on the bottom and get into the filter. Any ideas? may be some drain holes?
Thanks.
__________________
2000 Boxster S (986)
De-snorkeled withK&N Cold Air intake
Short Shifter 14mm spacers F&B
Secondary Cat delete
Top Speed Test pipes and Exhaust
|
|
|
|
|
07-12-2016, 03:35 PM
|
#75
|
|
Registered User
Join Date: May 2016
Location: Surrey, B.C.
Posts: 69
|
Quick update on the ducktail. First section of the mold is complete, starting to lay up the second part of the mold today.
|
|
|
|
|
07-12-2016, 05:44 PM
|
#76
|
|
Registered User
Join Date: Dec 2013
Location: Dahlonega , Georgia
Posts: 1,364
|
I'm a little surprised that only five have signed up so far, with all the positive feedback I would have thought we could easily get 15 - 20 sold. Oh well there is still time. Joe thanks for doing these .
__________________
2002 Boxster S Arctic Silver with black top with glass window and black leather interior. Jake Raby 3.6 SS ( the beast ) with IMS Solution. 996 GT3 front bumper , GT3 rocker covers and GT3TEK rear diffuser and Joe Toth composites rear ducktail spoiler .
|
|
|
|
|
07-15-2016, 02:54 AM
|
#77
|
|
Registered User
Join Date: Dec 2013
Location: Dahlonega , Georgia
Posts: 1,364
|
Bumping this up from page two........come on guys who else is in ?
__________________
2002 Boxster S Arctic Silver with black top with glass window and black leather interior. Jake Raby 3.6 SS ( the beast ) with IMS Solution. 996 GT3 front bumper , GT3 rocker covers and GT3TEK rear diffuser and Joe Toth composites rear ducktail spoiler .
|
|
|
|
|
07-15-2016, 08:24 AM
|
#78
|
|
Registered User
Join Date: Oct 2015
Location: Austin
Posts: 395
|
I like it a lot but at 450 it is a little out of my budget as I make my own CF and FG parts and a couple of companies I consult for, but the shape is great indeed
|
|
|
|
|
07-15-2016, 09:53 AM
|
#79
|
|
Registered User
Join Date: Dec 2004
Location: McKinney, TX
Posts: 474
|
Add me to the list. Hopefully more will sign up this next week.
|
|
|
|
|
07-15-2016, 09:55 AM
|
#80
|
|
Registered User
Join Date: Dec 2013
Location: Dahlonega , Georgia
Posts: 1,364
|
Thumper makes six signed up 5 more and discount moves to 15 % !
__________________
2002 Boxster S Arctic Silver with black top with glass window and black leather interior. Jake Raby 3.6 SS ( the beast ) with IMS Solution. 996 GT3 front bumper , GT3 rocker covers and GT3TEK rear diffuser and Joe Toth composites rear ducktail spoiler .
|
|
|
|
 Posting Rules
|
You may not post new threads
You may not post replies
You may not post attachments
You may not edit your posts
HTML code is On
|
|
|
All times are GMT -8. The time now is 01:01 AM.
| |


 Linear Mode


