 01-27-2013, 08:33 AM
|
#1
|
|
Registered User
Join Date: Jul 2012
Location: Utah
Posts: 200
|
Brake fluid flush
I am about to flush my brake fluid for my first time since I bought my 02 S in July. I have a power bleeder and know the sequence as far as the wheels go but my question is: At what point do I bleed the clutch, before or after the wheels or does it really matter? It really doesn't address this in the Bentley manual that i can see. Does anyone recommend a brand of brake fluid that is 'the best'? I am sure JDanger uses yellow fluid.  Any things I should be aware of before I tackle this DIY maintenance? Thanks in advance.
__________________
2002 Boxster S
Arctic Silver Metalic
Gray leather/Black Top
|

|

|
|
01-27-2013, 09:34 AM
|
#2
|
|
Certified Boxster Addict
Join Date: Nov 2010
Location: Los Angeles
Posts: 7,669
|
Post removed.
__________________
1999 996 C2 - sold - bought back - sold for more
1997 Spec Boxster BSR #254
1979 911 SC
POC Licensed DE/TT Instructor
Last edited by thstone; 09-07-2018 at 11:57 AM.
|
|
|
|
|
01-27-2013, 09:42 AM
|
#3
|
|
Registered User
Join Date: Feb 2005
Location: It's a kind of magic.....
Posts: 6,659
|
Quote:
Originally Posted by 1olddude

IDoes anyone recommend a brand of brake fluid that is 'the best'?
|
We use ATE Super Blue and Type 200 (same "super DOT 4" fluid, only one has blue dye in it so you can see the change over during a flush).
__________________
Anything really new is invented only in ones youth. Later, one becomes more experienced, more famous and more stupid. - Albert Einstein
|

|
|
|
01-27-2013, 11:03 AM
|
#4
|
|
Registered User
Join Date: May 2011
Location: Miami florida
Posts: 1,591
|
You can bleed the clutch any time, just be sure that the reservoir is completely filled because the line going to the clutch from the reservoir is pretty high up and you can run the clutch circuit dry fairly easily.
__________________
Current car
2000 Boxster 2.7l red/black
Previous cars
1973 Opel Manta
1969(?) Fiat 850 Convertible
1979 Lancia Beta Coupe
1981 Alfa Romeo GTV 6
1985 Alfa Romeo Graduate
1985 Porsche 944
1989 Porsche 944
1981 Triumph TR7
1989 (?) Alfa Romeo Milano
1993 Saab 9000
|
|
|
|
|
01-27-2013, 11:25 AM
|
#5
|
|
still plays with cars...
Join Date: May 2011
Location: Baden, ON, Canada
Posts: 1,088
|
Quote:
Originally Posted by san rensho
You can bleed the clutch any time, just be sure that the reservoir is completely filled because the line going to the clutch from the reservoir is pretty high up and you can run the clutch circuit dry fairly easily.
|
@ San,
Just to clarify, the reservoir we're talking about is the brake fluid reservoir in the frunk, correct?
This is my next "to do" when the garage gets warmer than 40F... winter sucks.
@ Olddude,
This is a really easy-peasy project. I just gravity-flushed my brakes as I'm too bloody cheap to spend the $ on a power bleeder I'll use every second year.
__________________
Six speed 2000 Boxster S
Arctic Silver on Metropol Blue | LN Dual Row IMSR | Arctic Silver console, spoiler frame & bumperettes | Crios mod | Technobrace | RoboTop module & modified convertible top relay for one-touch roof operation
Last edited by BoxsterSteve; 01-27-2013 at 11:28 AM.
|
|
|
|
|
01-27-2013, 12:54 PM
|
#6
|
|
Registered User
Join Date: May 2011
Location: Miami florida
Posts: 1,591
|
Yes, clutch and brakes share the same reservoir.
__________________
Current car
2000 Boxster 2.7l red/black
Previous cars
1973 Opel Manta
1969(?) Fiat 850 Convertible
1979 Lancia Beta Coupe
1981 Alfa Romeo GTV 6
1985 Alfa Romeo Graduate
1985 Porsche 944
1989 Porsche 944
1981 Triumph TR7
1989 (?) Alfa Romeo Milano
1993 Saab 9000
|
|
|
|
|
01-27-2013, 04:26 PM
|
#7
|
|
Theoretical propagandist
Join Date: Dec 2011
Location: Pacific Northwest
Posts: 793
|
Quote:
Originally Posted by san rensho
Yes, clutch and brakes share the same reservoir.
|
^^^This...
__________________
When life throws you curves, aim for the apex...
|
|
|
|
|
01-28-2013, 01:32 AM
|
#8
|
|
Registered User
Join Date: Dec 2008
Location: Queensland, Australia
Posts: 1,522
|
1olddude - just a word of warning from another old dude - the clutch bleed nipple is a real mongrel to get to - getting an spanner in there plus the bleed line while lying prostrate semi coiled on your cocyx can be challenging....
The second time I bled mine, I removed the triagulated alloy bracing plate (bolted under the gearbox) which made life a lot easier - I was changing the transmission oil at the same service so the plate had to be removed anyway.
__________________
2001 Boxster S (triple black). Sleeping easier with LN Engineering/Flat 6 IMS upgrade, low temp thermostat & underspeed pulley.
2001 MV Agusta F4.
|
|
|
|
|
01-28-2013, 03:37 AM
|
#9
|
|
Registered User
Join Date: Feb 2005
Location: It's a kind of magic.....
Posts: 6,659
|
There is no need to remove anything to beed the clutch, you use a short box wrench and get to it from the driver's rear wheel well. 30 sec. job at best........
__________________
Anything really new is invented only in ones youth. Later, one becomes more experienced, more famous and more stupid. - Albert Einstein
|
|
|
|
|
01-28-2013, 05:40 AM
|
#10
|
|
Registered User
Join Date: Mar 2007
Location: Ohio
Posts: 2,032
|
Quote:
Originally Posted by JFP in PA
There is no need to remove anything to beed the clutch, you use a short box wrench and get to it from the driver's rear wheel well. 30 sec. job at best........
|
It's been awhile since I did mine---so it's probably due to be done!---but I recall this being a difficult reach to accomplish as well, similar to Steve Tinker's experience. Dunno if he (like me) lacks a lift, but maybe that's what makes all the difference between a challenge to get to vs not that bad...
|
|
|
|
|
01-28-2013, 09:46 AM
|
#11
|
|
Registered User
Join Date: Feb 2005
Location: It's a kind of magic.....
Posts: 6,659
|
Quote:
Originally Posted by Frodo
It's been awhile since I did mine---so it's probably due to be done!---but I recall this being a difficult reach to accomplish as well, similar to Steve Tinker's experience. Dunno if he (like me) lacks a lift, but maybe that's what makes all the difference between a challenge to get to vs not that bad...
|
I really don't see what the problem is; here is a 986, on jack stands, looking in from the rear of the driver's side wheel well, the bleeder is marked with an arrow:
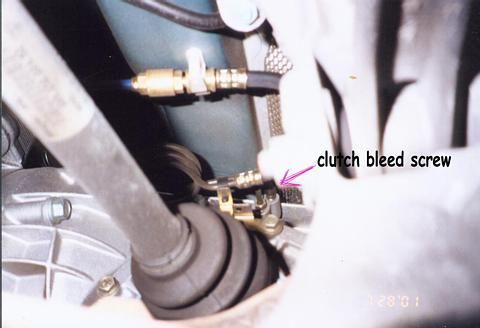
I really helps to have a short (3 1/2 inch long) double box wrench to open it as there is not much room to swing the tool, but otherwise it is pretty straight foward.....
__________________
Anything really new is invented only in ones youth. Later, one becomes more experienced, more famous and more stupid. - Albert Einstein
Last edited by JFP in PA; 01-28-2013 at 10:19 AM.
|
|
|
|
|
01-28-2013, 10:07 AM
|
#12
|
|
Registered User
Join Date: Mar 2007
Location: Ohio
Posts: 2,032
|
Quote:
Originally Posted by JFP in PA
I really don't see what the problem is; here is a 986, on jack stands, looking in from the rear of the driver's side wheel well, the bleeder is marked with an arrow:
I really helps to have a short (31/2 inch long) double box wrench to open it as there is not much room to swing the tool, but otherwise it is prett straight foward..... |
You're no doubt right on this. I've not done a ton of wrenching (none prior to getting the Box), but I have figured out a few things. One is the (seemingly) simple fact that if it's unusually difficult or uncomfortable getting to something, try moving yourself and going at it from an entirely different direction/angle. Maybe I just never did figure out the right approach the day I was bleeding the clutch! ")
|
|
|
|
|
01-28-2013, 10:27 AM
|
#13
|
|
Registered User
Join Date: Feb 2005
Location: It's a kind of magic.....
Posts: 6,659
|
It always helps to have already done about a zillion of them. I've always found this to be a "one handed" project (I prefer to do it left handed); put the box wrench on the bleeder, then put the hose on the bleeder, open the bleeder and watch for the fluid color to change, then close the bleeder, pull the hose and remove the wrench. There is no room to get both hands in there at the same time.
It really does not matter if this is done on a lift or on jack stands, just don’t “over-think” it.
__________________
Anything really new is invented only in ones youth. Later, one becomes more experienced, more famous and more stupid. - Albert Einstein
Last edited by JFP in PA; 01-28-2013 at 10:51 AM.
|
|
|
|
|
01-28-2013, 03:55 PM
|
#14
|
|
Registered User
Join Date: Jul 2012
Location: Utah
Posts: 200
|
Quote:
Originally Posted by JFP in PA
There is no need to remove anything to beed the clutch, you use a short box wrench and get to it from the driver's rear wheel well. 30 sec. job at best........
|
See, this is what makes this the best Porsche forum around. Thanks for the tip.
__________________
2002 Boxster S
Arctic Silver Metalic
Gray leather/Black Top
|
|
|
|
|
09-04-2018, 01:12 PM
|
#15
|
|
Registered User
Join Date: Mar 2017
Location: Los Angeles
Posts: 356
|
I am about to do a brake fluid flush and want to flush the clutch as well.
I have had the car over a year now and don't know the condition of the fluid.
What size "Short stubby" wrench is needed?
Thanks!
|
|
|
|
|
09-04-2018, 01:28 PM
|
#16
|
|
Registered User
Join Date: Dec 2009
Location: Orange County, CA
Posts: 2,014
|
Quote:
Originally Posted by robdelorenzo
What size "Short stubby" wrench is needed?
Thanks!
|
Rob, I believe that you will require a 11 mm wrench.
|
|
|
|
|
09-04-2018, 02:52 PM
|
#17
|
|
Registered User
Join Date: Mar 2017
Location: Los Angeles
Posts: 356
|
Great.
Thank you Gilles.
I am looking forward to this project - new rotors, pads, hardware, screws, bolts, fluid, the works!
I just rolled over 160k and still going strong.
|
|
|
|
|
09-06-2018, 02:48 PM
|
#18
|
|
Registered User
Join Date: Mar 2017
Location: Los Angeles
Posts: 356
|
Ok Gang, one more question before I do my first brake job on my 02 Base.
I have bought everything under the sun except some type of anti-squeal product.
Since I bought new dampers for the pistons, do I need to use some type of anti-squeal product on the back of the brake pads like I used to on The American Cars that I have owned?
I'm used to coating the back of the brake pads with that orange goop and I am wondering if I need something similar for this job.
As always, thanks!
|
|
|
|
|
09-07-2018, 07:32 AM
|
#19
|
|
Registered User
Join Date: Sep 2016
Location: Stow, MA
Posts: 918
|
No, its either or. I gave up on the pistons because they kept getting stuck.
__________________
2004 Boxster S Silver - FUNTOY
2002 Boxster Base Guardsy Red - FUNBOX
1987 Caterham Super 7 1700 Supersprint
2009 Mercedes Benz CLK 350 convertible
1941 Dodge Luxury Liner Coupe
|
|
|
|
|
09-07-2018, 11:40 PM
|
#20
|
|
Registered User
Join Date: May 2013
Location: North Alabama
Posts: 2,079
|
Quote:
Originally Posted by robdelorenzo
Ok Gang, one more question before I do my first brake job on my 02 Base.
I have bought everything under the sun except some type of anti-squeal product.
Since I bought new dampers for the pistons, do I need to use some type of anti-squeal product on the back of the brake pads like I used to on The American Cars that I have owned?
I'm used to coating the back of the brake pads with that orange goop and I am wondering if I need something similar for this job.
As always, thanks!
|
I had a sequel that I could not get rid of and with only 7 K miles on the pads. I purchased new pads and shims (buffers) for all 4 wheels, I found that the screws in the shims were loose and causing the squeal...the new shims screws were also not tight at all. I used locktite on the screws in the new shims and did the complete brake job....quiet as a church mouse after a year
|
|
|
|
 Posting Rules
|
You may not post new threads
You may not post replies
You may not post attachments
You may not edit your posts
HTML code is On
|
|
|
All times are GMT -8. The time now is 03:12 AM.
| |


 Porsche Boxster
 Udo
Udo Esmeralda
 Gadget
 Sasha
Sasha Gertrude
 Bernice
 Mrs. T
 FunToy
 Linear Mode


