 07-25-2011, 01:01 PM
|
#1
|
|
Registered User
Join Date: Mar 2007
Location: Ohio
Posts: 2,032
|
Motor mount re-assembly question
Putting my motor mount back together, using an aftermarket mount. When assembled, it looked like this:
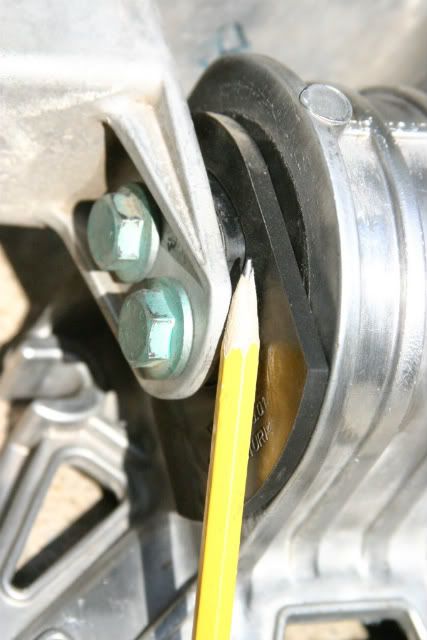 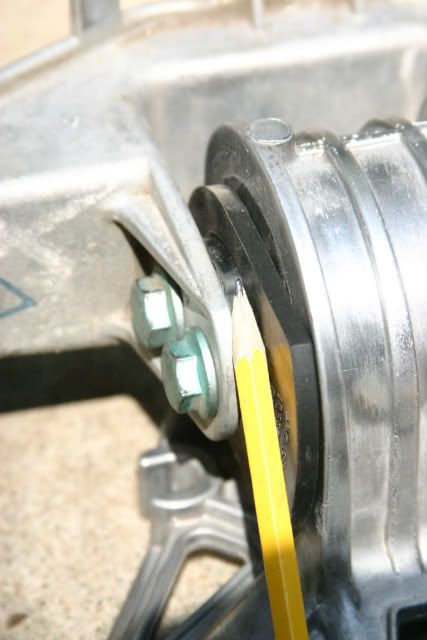
When I took everything apart, I don't recall there being that much of a gap between the engine mount and the yoke. In other words, the rubber stops on either side of the rubberized mount (one is just to the right of the pencil) just kind of dangle loosely. In fact, on the one side (where the pencil is) I'm pretty sure I could fit a second one in there. Both bolts are torqued to the required 48 ft-lbs.
Does this look right?
|

|

|
|
07-25-2011, 02:15 PM
|
#2
|
|
Registered User
Join Date: Aug 2010
Location: Germany
Posts: 97
|
That looks ok
I just did mine this weekend, and had the same gap.
My guess is that the rubber pieces are just to prevent metal-to-metal contact if the engine flexes sideways.
|
|
|
|
|
07-25-2011, 02:29 PM
|
#3
|
|
Registered User
Join Date: Jun 2007
Location: Littleton, CO
Posts: 456
|
Aren't those thin black plastic pieces supposed to be mounted differently? I think the part number should be opposite of where they are. I think they should be down in the yoke. In other words, the shorter end of the plastic should be on the pencil side. Fitment of these thin pieces over the metal part of the mount should work better one way than the other. Can someone please confirm this for me?
__________________
"Of all the extreme sports I've ever participated in- windsurfing, kite boarding, wake boarding, tow-in surfing and snowboarding- skiing, for me, made everything else easy."
-Chuck Patterson
|
|
|
|
|
07-25-2011, 02:30 PM
|
#4
|
|
Registered User
Join Date: Mar 2007
Location: Ohio
Posts: 2,032
|
Thanks. Got an email response from Pedro (where I got the mount re-done)--in 3 minutes! He basically said what you said. 
|
|
|
|
|
07-25-2011, 03:19 PM
|
#5
|
|
Registered User
Join Date: Mar 2007
Location: Ohio
Posts: 2,032
|
Follow-up question:
Has to do with replacing the bolts attaching the yoke to the body (these being the ones that sometimes come out nut + stud and sometimes nut followed by stud):
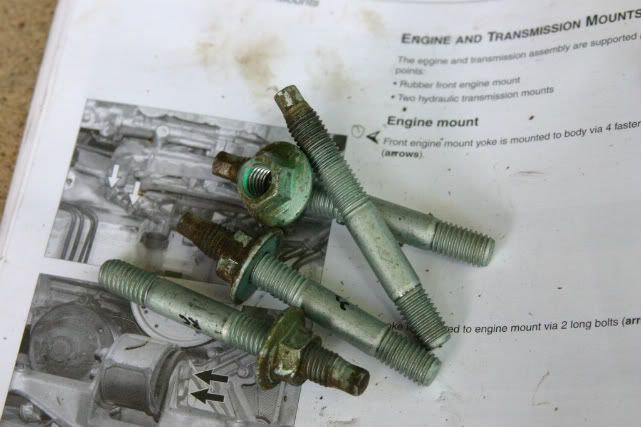
Bentley says to torque it to 48 ft-lb, but I assume that's just for the nut itself. The studs (with the 7 mm head on them) I would think you would just tighten until they're snug, then crank the nuts to 48. Right?
|
|
|
|
|
07-25-2011, 03:51 PM
|
#6
|
|
Registered User
Join Date: May 2011
Location: Miami florida
Posts: 1,591
|
Quote:
|
Originally Posted by Frodo
Follow-up question:
Has to do with replacing the bolts attaching the yoke to the body (these being the ones that sometimes come out nut + stud and sometimes nut followed by stud):
Bentley says to torque it to 48 ft-lb, but I assume that's just for the nut itself. The studs (with the 7 mm head on them) I would think you would just tighten until they're snug, then crank the nuts to 48. Right? |
NO! You have to torque the studs into the frame at 48 ft-lbs. Then torque the nuts onto the studs at 34 ft-lbs. If the studs aren't torqued, thay can pull out of the frame, goobering the threads in the frame. Then you will be in a world of ********************.
__________________
Current car
2000 Boxster 2.7l red/black
Previous cars
1973 Opel Manta
1969(?) Fiat 850 Convertible
1979 Lancia Beta Coupe
1981 Alfa Romeo GTV 6
1985 Alfa Romeo Graduate
1985 Porsche 944
1989 Porsche 944
1981 Triumph TR7
1989 (?) Alfa Romeo Milano
1993 Saab 9000
|
|
|
|
|
07-25-2011, 04:19 PM
|
#7
|
|
Registered User
Join Date: Mar 2007
Location: Ohio
Posts: 2,032
|
So you can put 48 ft-lbs of torque on those little 7 mm heads without chewin' them up?? And, regarding torque values, Bentley says
Engine yoke to body 48 ft-lb They don't distinguish between the nuts and the studs. 
|
|
|
|
|
07-26-2011, 07:48 AM
|
#8
|
|
Registered User
Join Date: Nov 2005
Location: Florida
Posts: 529
|
People tend to ...
... get all bent out of shape about tightening torques and trying to be perfect about it.
Most of the torque-wrenches sold on the market don't get calibrated regularly and the values have to be all over the place.
Most of the time a more-or-less tightening is what's done.
I am extremely conscious of torque values in only selected places such as internal engine components, etc. where I use a digital and calibrated torque wrench to follow the specified values. Also in these cases the pattern used in tightening can be as important as the torque applied.
For most jobs I just do a "manual" tightening.
After you've tightened a few fasteners in your life you get a "feel" for it.
It's like golf. You should always have the same swing, the difference in each shot (long game or approach) is the club.
In our case the difference is the wrench. You should tighten basically with the same hand strength, but using a 5 in wrench vs a 12 in wrench will offer vastly different torques on the fastener. That's why each wrench is a bit longer, depending on it's aperture size.
Most people also tend to over-tighten fasteners.
I constantly get cars where the owner has completely sheared off a fastener due to over tightening.
Use a torque wrench, but don't despair if you can't find a particular torque value to apply. Use common sense and your feel for the fastener's size.
Happy Boxstering,
Pedro
__________________
Racecar spelled backwards is: Racecar!
|
|
|
|
 Posting Rules
|
You may not post new threads
You may not post replies
You may not post attachments
You may not edit your posts
HTML code is On
|
|
|
All times are GMT -8. The time now is 04:15 PM.
| |


 Hybrid Mode


