 02-05-2015, 04:58 AM
|
#1
|
|
Registered User
Join Date: Oct 2012
Location: New Jersey
Posts: 52
|
Your info make it possible !
Thanks ,without your direction, taking on this project would be scary.
|

|

|
|
02-06-2015, 04:02 AM
|
#2
|
|
Registered User
Join Date: Dec 2014
Location: SF Bay Area
Posts: 246
|
Hey, what are you doing about the EVAP canister and oil separator. Are you keeping or deleting?
|
|
|
|
|
02-06-2015, 06:22 AM
|
#3
|
|
Registered User
Join Date: Oct 2012
Location: New Jersey
Posts: 52
|
AC compressor which one?
Do you use the boxster ac compressor or LS3 ?
|
|
|
|
|
02-09-2015, 06:12 AM
|
#4
|
|
Registered User
Join Date: Oct 2014
Location: Georgia
Posts: 391
|
Quote:
Originally Posted by Lcrivers816

Thanks brother! You're the best. I'll keep you posted on my build!
|
You are welcome - definitely keep us posted!
Quote:
Originally Posted by shockandawe
Thanks ,without your direction, taking on this project would be scary.
|
Glad I could help!!
Quote:
Originally Posted by martsink
Hey, what are you doing about the EVAP canister and oil separator. Are you keeping or deleting?
|
Haven't made it that far into the thought process yet but my initial thoughts are that if the Chevy motor dosen't need it then it goes bye bye. I know the oil seperator is integrated into the Porsche motor so that garbage isn't coming back for sure, perhaps a catch can of some sort will be in order, but most definitely not the Porsche unit... 
Quote:
Originally Posted by shockandawe
Do you use the boxster ac compressor or LS3 ?
|
The renegade mounts utilize the Porsche A/C compressor, although I'm sure you could make a chevy compressor work with some effort.
So I had a bunch to do this weekend but still managed to spend several hours trying to figure out the mounting situation for the gas pedal. I think I have a good setup figured out and made a prototype which is probably a bit sturdier then is necessary, but it shouldn't go anywhere! I'll post some pictures this week but essentially I just bent a piece of steel to make a "U" shape, or an "n" shape to be more specific, then made provisions on the legs of the "n" and bolted angle iron to them with some adjustability. With some more work it could be made better but will definitely get the job done.
Also regarding the wiring for the gas pedal, luckily I have some friends who work at a stereo shop and I was able to get a bunch of wire to extend it pretty cheap!! The one thing they didn't have which has slowed me down was EMI/RFI wire shielding! I figured since chevy thought enough of it to have it in place I should probably do the same thing to my wire extensions~ Couldn't find a local source so I ordered some online which should be here this week. Not sure exactly how much extension is necessary yet but i'm going to make it a bit longer then necessary so i have plenty of room to route it safely - but you should figure a minimum of 4-5 feet. I'm going to run my wire along the top edge of the engine compartment so i'll probably give it a good 6 feet to be safe but i'll give you an exact figure once it is in place.
|
|
|
|
|
02-09-2015, 06:24 AM
|
#5
|
|
Registered User
Join Date: Oct 2014
Location: Georgia
Posts: 53
|
Hey John why can't you use the Boxster accelerator pedal assembly - it is drive by wire isn't it? Seem like the wires would be the same or at least similar enough. What am I missing?
|
|
|
|
|
02-09-2015, 08:00 AM
|
#6
|
|
Registered User
Join Date: Oct 2014
Location: Georgia
Posts: 391
|
Quote:
Originally Posted by JRL
Hey John why can't you use the Boxster accelerator pedal assembly - it is drive by wire isn't it? Seem like the wires would be the same or at least similar enough. What am I missing?
|
Hey Randy,
Yes the porsche pedal is drive by wire, well the pedal itself is actually mechanical but it connects to an electric motor mounted in the dash. It is also a 6 wire setup like the GM unit, but i believe that the problem is in the voltages that GM uses vs. what Porsche uses, they no sprecken well~ Probably need a series of resistors or something - i'm sure you could make it work but when it comes to the throttle i'd like to keep it as simple as possible to avoid any potential issues.
J
|
|
|
|
|
03-08-2015, 05:15 AM
|
#7
|
|
Registered User
Join Date: Oct 2014
Location: Georgia
Posts: 391
|
Intake almost done
Greetings everyone,
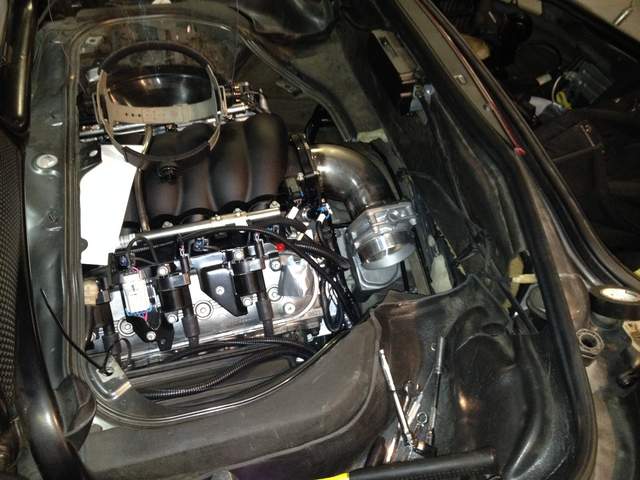
Got a bit more done and will hopefully get back over to the shop today~ Intake is almost fabricated, I think I am going to forget about the factory box due to potential restrictions and just go with a cone filter and create a cold air box.
One thing which I didn't really think about was the fact that the GM MAF sensor bung is aluminum, not steel so you will need to have some aluminum tiggin' skillz and straight aluminum pipe plumb it into. Unfortunately I already got the 4" steel pipe so I decided to make it work, plus my aluminum tigging skills are shall we say not that great  so... JB WELD TO THE RESCUE!!!!
I sometimes forget how awesome JB Weld is - scuff it up a bit, lay it on, then a nice final finishing finger weld and BAM!! Like it cam out of the factory that way!
So otherwise I also got started on the cooling system a bit... In case you don't remember the original motor cracked a cylinder head or something and the oil/coolant started to mix badly in the end. At minimum the entire cooling system needs to come apart for cleaning which is what I am starting on.
I decided in stead of spending money to have the 3 radiators, coolant reservoir and the heater core properly cleaned I would rather put it towards new parts as the stuff on the car is already 15 years old so I think it is the right way to go.
I have talked to quite a few people who have had trouble cooling these motors in other applications and really don't want to run into that issue so I am upgrading the radiators to CSF full aluminum, and getting a new heater core and coolant reservoir.
After pulling out the heater core yesterday I think I made the right call - the stuff coming out of it is nasty sticky goo, I'm sure the radiators are about the same.
Here are a few pics of the intake setup thus far~
Thanks for following~
J


|
|
|
|
|
03-08-2015, 06:51 PM
|
#8
|
|
Registered User
Join Date: Oct 2007
Location: Midwest
Posts: 1,746
|
JJ, Your build reminds me of a day when I had much more ambition and energy, except you've MUCH MORE TALENT lol............Great thread.................. 
|
|
|
|
|
02-09-2015, 08:09 AM
|
#9
|
|
Registered User
Join Date: Oct 2014
Location: Georgia
Posts: 53
|
Gottcha. Just seem simpler to use as much as possible but if no work then it no work.
I want to drop in and see the beast - when is a good time this week?
|
|
|
|
|
02-10-2015, 04:47 AM
|
#10
|
|
Registered User
Join Date: Oct 2014
Location: Georgia
Posts: 391
|
Quote:
Originally Posted by JRL
Gottcha. Just seem simpler to use as much as possible but if no work then it no work.
I want to drop in and see the beast - when is a good time this week?
|
Any day either mid morning 10ish~ or after 3pm would be best.
Thanks!
J
|
|
|
|
|
02-12-2015, 06:38 AM
|
#11
|
|
Registered User
Join Date: Jan 2015
Location: Illinois
Posts: 104
|
To whom it may concern,
The first Boxsters had full cable throttle bodies, I decided to go with a cable actuated throttle body for more throttle body options. I picked up an early Boxster floor pedal off of eBay for less than 100 bucks.
|
|
|
|
|
02-13-2015, 08:45 AM
|
#12
|
|
Registered User
Join Date: Feb 2015
Location: Atlanta GA
Posts: 20
|
JJ - I sent you a PM
|
|
|
|
|
02-21-2015, 03:01 PM
|
#13
|
|
Registered User
Join Date: Oct 2014
Location: Georgia
Posts: 391
|
Quote:
Originally Posted by JEhunter
JJ - I sent you a PM
|
Got your PM - Sorry been a hectic week but will call you next week~
Uploading a new video now which will be available here in a few hours - http://youtu.be/8iZO-lNw5Hc
I was hoping to have the parts for my intake in by now but unfortunately took longer then expected due to the custom size - guess 3.5" 120* mandrel bends in stainless steel aren't that common :/ Anyway that along with my 4" intake piping and couplers should all be here Monday.
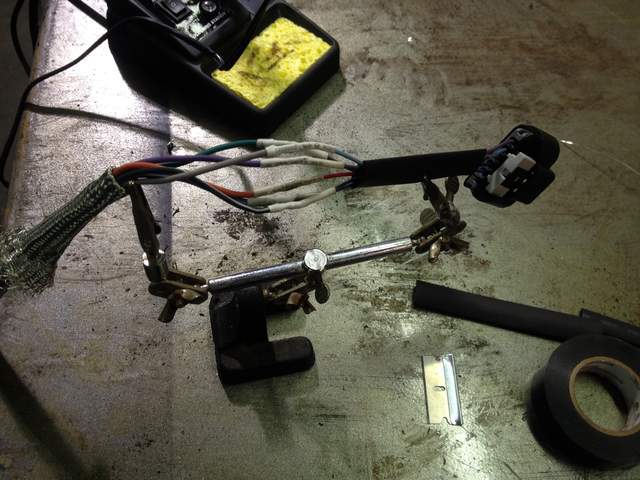
Been keeping on moving with little things and continued on with more wiring. Got the cable for the throttle pedal extended as well as the gas pedal mounted! The wiring is somewhat non standard as the pedal cable is not only wrapped like the rest of the harness but also has an additional layer of EMI/RFI tin/copper sleeving over it so which I found at a place called wirecare.com. Ordered 10 feet of it which cost about $27 with shipping which is a lot cheaper then some places were offering it.
The throttle pedal itself could probably be done a thousand ways, but in lieu of spending waaay to much time creating a masterpiece that no one will ever see except you all I tried the KISS method. I made the mount with a flat piece of steel which I rolled the edges to a 90* bend on and a piece of angle steel bolted to the sides and viola! I also opened the holes in the sides of the main mount to give some adjustability to it. On the floorboard there are two small raided channels which I welded the side plates to on the left, then on the right side it was close enough to the center tunnel that I just put one longer weld on it. Bada-bing - we got gas!
Always open to ideas and suggestions so feel free to chime in... Here are a few pictures until the vides finishes~
Thanks!
J


|
|
|
|
|
02-26-2015, 06:22 PM
|
#14
|
|
Registered User
Join Date: Oct 2014
Location: Georgia
Posts: 391
|
Another quick update and video~ Spent some time working on relocating the throttle body and intake system... I think it's gonna work but i'll know for sure this weekend~
Video available here when it is done uploading - http://youtu.be/iyI4i_ilrIs
Goodnight folks~
J
|
|
|
|
|
03-02-2015, 12:38 PM
|
#15
|
|
Registered User
Join Date: Dec 2014
Location: SF Bay Area
Posts: 246
|
Quote:
Originally Posted by BoxsterLS376
Another quick update and video~ Spent some time working on relocating the throttle body and intake system... I think it's gonna work but i'll know for sure this weekend~
Video available here when it is done uploading - http://youtu.be/iyI4i_ilrIs
Goodnight folks~
J |
Excellent video as usual. Where can I access these intake requirements from GM?
Also, have you considered mounting the TB on the intake manifold and using something like this tight elbow http://www.intakehoses.com/mm5/merchant.mvc?Store_Code=I&Screen=PROD&Category_Cod e=CHEW&Product_Code=90CB40 Do you think it would clear?
Last edited by martsink; 03-02-2015 at 08:06 PM.
|
|
|
|
|
03-04-2015, 06:26 AM
|
#16
|
|
Registered User
Join Date: Oct 2014
Location: Georgia
Posts: 391
|
Quote:
Originally Posted by martsink
|
Those Cobra head elbows are pretty cool and **I thought at first it would work - but it won't**.
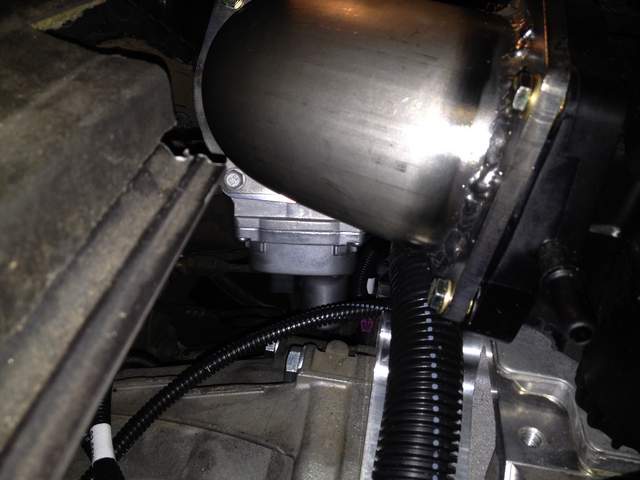
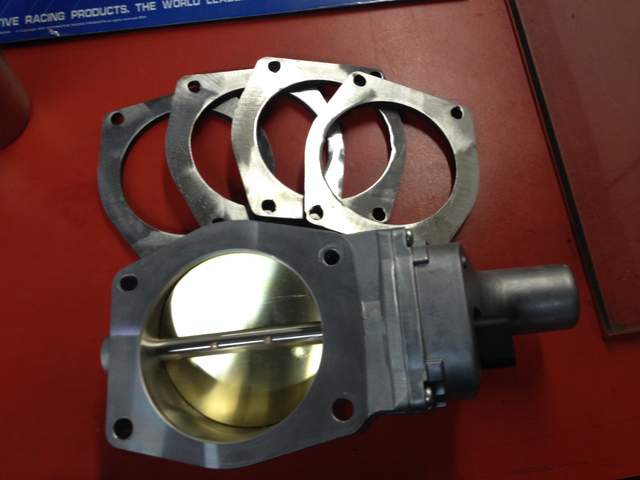
A few problems - Fitment and how/what you are attaching - these are rubber hoses which means you are intending to just mount the throttle body in the factory position. On my current mounting setup with the Renegade kit, I have right at 7" inches from the intake manifold to the absolute back of the car. Once you add the throttle body onto the manifold you lose an additional 2" inches of clearance leaving 5" inches between the furthest point a hose will fit onto the throttle body and the rear firewall... Looking at their measurements figure "C" is the most critical and as you can see it is 6.44" inches long which just won't work.
Ok so I thought just make some flanges to attach to the intake and remote hang the throttle body like I did (although it would be hanging by rubber and not a metal pipe so you would need to make a support bracket). So you would still need to make flanges and weld them to at least a short section of pipe in order to attach it to the intake plenum and the throttle body with hose clamps. I think that may work... but again now you have a different problem - the intake to throttle body pipe is 3.5" inches and it does not look like they make a 3.5" cobra elbow  Perhaps a different option?
Plus I'm not sure how much those cost, but in all reality the way I did it is fairly inexpensive... I bough extra of some things as it work out cheaper in the long run - but here is a quick breakdown of my costs off the top of my head:
$30 - Custom flanges cut by local fabricator (had 4 made for $60 - have 2 extra ;D )
$49 - 3.5" 120 degree mandrel bent stainless steel pipe
$52 - 4" silicon coupler kit with clamps (5 couplers and 10 clamps, should only need 3)
$22 - 1 foot of 4" straight stainless steel pipe
$44 - 4" Aluminum 90 degree mandrel bent pipe
So I've got about $197 plus time, cutting and welding materials/tools~
Hope this info helps and good luck with your project!!!!
J
|
|
|
|
|
03-04-2015, 11:33 AM
|
#17
|
|
Registered User
Join Date: Oct 2014
Location: Georgia
Posts: 391
|
I STAND CORRECTED!! Good option for intake!
Quote:
Originally Posted by BoxsterLS376
Those Cobra head elbows are pretty cool and **I thought at first it would work - but it won't**.
A few problems - Fitment and how/what you are attaching - these are rubber hoses which means you are intending to just mount the throttle body in the factory position. On my current mounting setup with the Renegade kit, I have right at 7" inches from the intake manifold to the absolute back of the car. Once you add the throttle body onto the manifold you lose an additional 2" inches of clearance leaving 5" inches between the furthest point a hose will fit onto the throttle body and the rear firewall... Looking at their measurements figure "C" is the most critical and as you can see it is 6.44" inches long which just won't work.
Ok so I thought just make some flanges to attach to the intake and remote hang the throttle body like I did (although it would be hanging by rubber and not a metal pipe so you would need to make a support bracket). So you would still need to make flanges and weld them to at least a short section of pipe in order to attach it to the intake plenum and the throttle body with hose clamps. I think that may work... but again now you have a different problem - the intake to throttle body pipe is 3.5" inches and it does not look like they make a 3.5" cobra elbow Perhaps a different option?
Plus I'm not sure how much those cost, but in all reality the way I did it is fairly inexpensive... I bough extra of some things as it work out cheaper in the long run - but here is a quick breakdown of my costs off the top of my head:
$30 - Custom flanges cut by local fabricator (had 4 made for $60 - have 2 extra ;D )
$49 - 3.5" 120 degree mandrel bent stainless steel pipe
$52 - 4" silicon coupler kit with clamps (5 couplers and 10 clamps, should only need 3)
$22 - 1 foot of 4" straight stainless steel pipe
$44 - 4" Aluminum 90 degree mandrel bent pipe
So I've got about $197 plus time, cutting and welding materials/tools~
Hope this info helps and good luck with your project!!!!
J |
Hey everyone,
So apparently my head was up my butt this morning when I looked at these Cobra intake hoses but this could very well be a viable option for this swap!! Vlad was kind enough to correct me without making me feel too bad But this is good info so wanted to make sure I wasn't spreading bad info out there.
I stand corrected and here is some good info
Thanks Vlad!
John
Quote:
|
Originally Posted by martsink
Hey,
Thanks so much for getting back regarding my intake comment. I did't want to highjack your thread, so I figured its more appropriate to PM you. On the cobra inake hose, you mentioned the "C" measurement, but what if you mount it the other way and look at "G"? The total width is 4.94 inches, which would be a pretty tight fit, but it should work. I drew a little diagram here. Let me know if I am missing something in this logic.
Heres a link to the cobra hose
Thanks,
Vlad |
Hey Vlad,
Wow I dunno what I was looking at this morning - my only excuse is that I'm at work and too much multitasking got my eyes confused
You are totally correct - for some reason I was thinking the "C" measurement was the "G" measurement. DOH!!
Ok so taking that into consideration it may work but will be VERY tight. In looking at mine I think it will clear the fuel line which mounts on that back wall but you could always relocate that if needed. Also you may want to check on the measurement for the throttle body you are going to be using. You may also be able to shorten the "B" spout to get a bit more clearance.
I just noticed the price on the site too... for that price I don't think you can afford to not try it!
I'm going to repost this into my thread anyway as it could be useful to someone else!!
Thanks!
J
|
|
|
|
|
03-04-2015, 06:39 AM
|
#18
|
|
Registered User
Join Date: Oct 2014
Location: Georgia
Posts: 391
|
[QUOTE=martsink;438566]Excellent video as usual. Where can I access these intake requirements from GM?
QUOTE]
Got so involved with the cobra head thing I forgot to address this! THANKS! I realize I'm no Jeremy Clarkson but if they can help you out then they have served their purpose
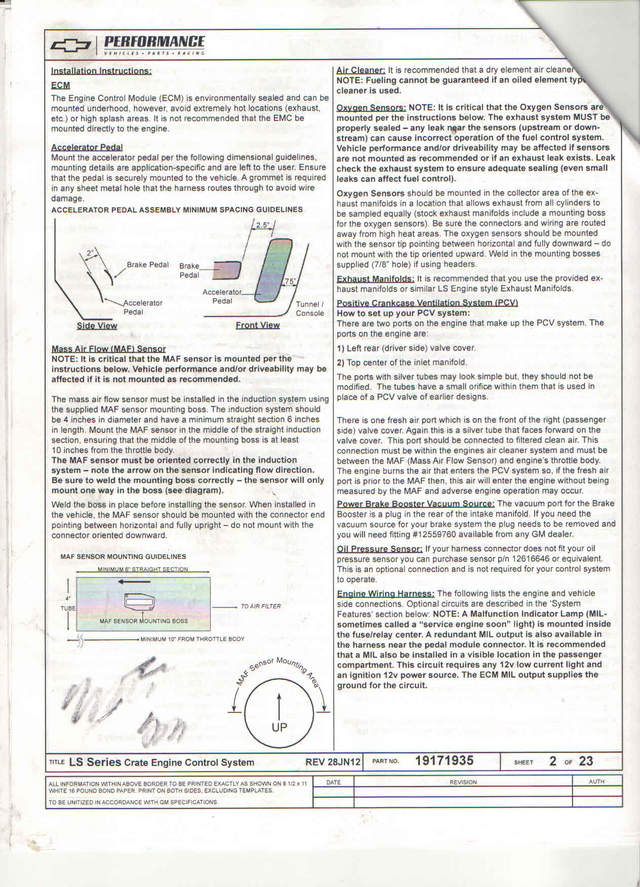
The requirements came with the GM crate motor stuff but could probably be found online if you look hard enough... but this picture may help - bottom left~
Take care~
J
|
|
|
|
|
03-04-2015, 08:56 AM
|
#19
|
|
Registered User
Join Date: Dec 2014
Location: SF Bay Area
Posts: 246
|
[QUOTE=BoxsterLS376;438842][QUOTE=martsink;438566]Excellent video as usual. Where can I access these intake requirements from GM?
QUOTE]
Got so involved with the cobra head thing I forgot to address this! THANKS! I realize I'm no Jeremy Clarkson but if they can help you out then they have served their purpose
The requirements came with the GM crate motor stuff but could probably be found online if you look hard enough... but this picture may help - bottom left~
Take care~
J
Thanks so much!
|
|
|
|
|
03-04-2015, 02:29 PM
|
#20
|
|
Registered User
Join Date: Dec 2014
Location: SF Bay Area
Posts: 246
|
Cheers!!!
|
|
|
|
 Posting Rules
|
You may not post new threads
You may not post replies
You may not post attachments
You may not edit your posts
HTML code is Off
|
|
|
All times are GMT -8. The time now is 09:20 AM.
| |


 Hybrid Mode


